WPD 200 Basic
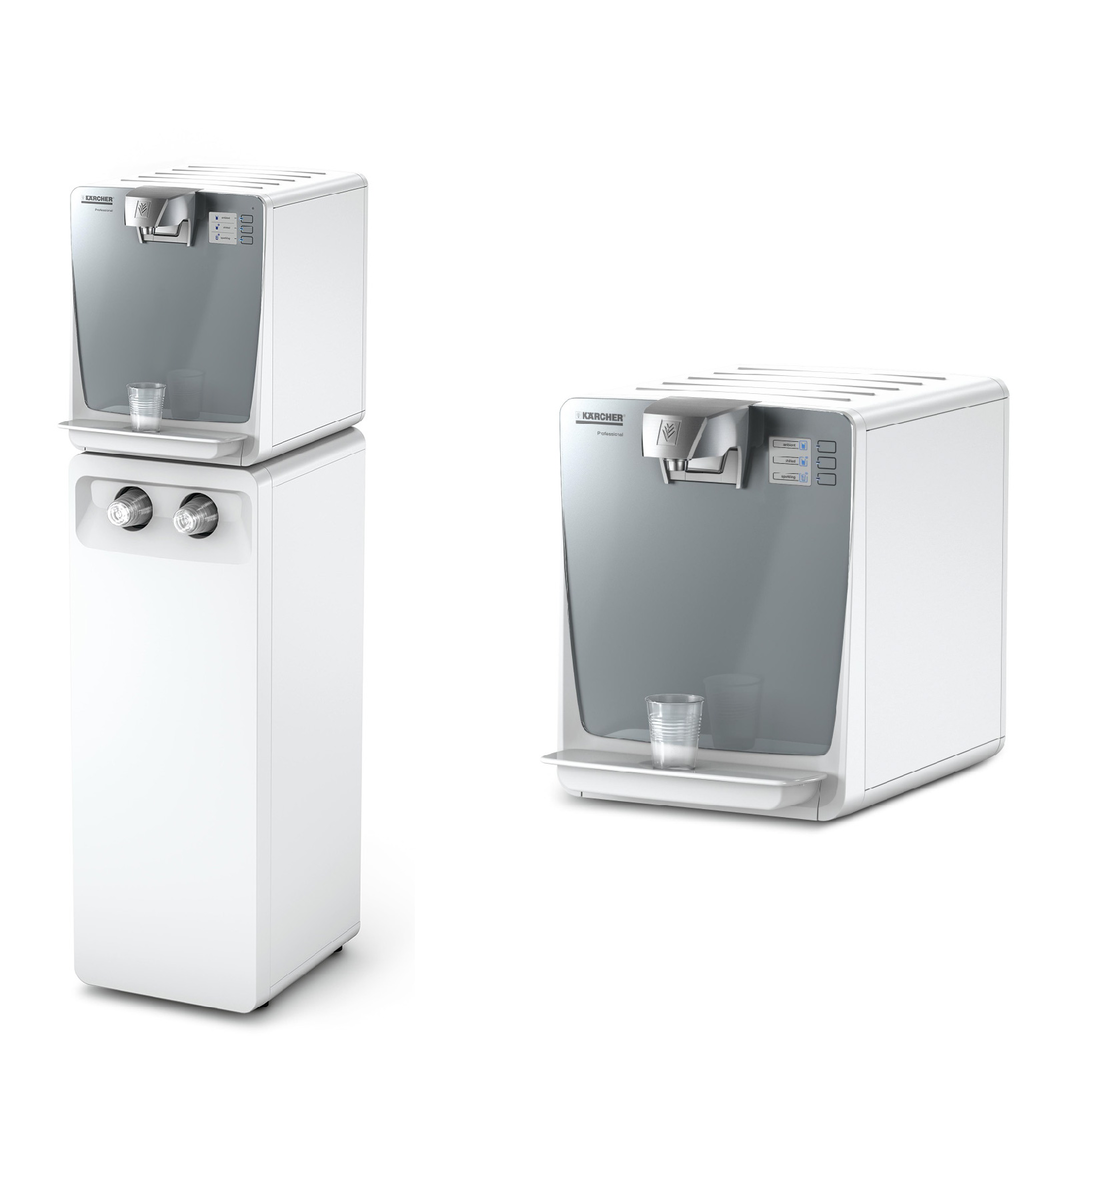
59651950 (12/24)

59651950 (12/24)
 Read the original instructions before using the unit for the first time and act in accordance with it. Keep the original instructions for future reference or for future owners.
Only drinking water from a public water supply can be used to guarantee the water quality of the emerging water. The quality must at least correspond to the guidelines of the World Health Organization (WHO).
If intervention in the drinking water network is necessary in order to install the unit, this must be done by a trained specialist who is authorised to do this according to the laws and regulations valid for the location. When installing the device, the applicable national regulations for interventions in the drinking water network must be observed. The work must be commissioned by the customer if required.
For protection against water damage caused by a burst water hose, we recommend installing a shut-off device and an aqua stop (optionally available) in the water supply line.
Maintenance work in the interior of the unit may only be carried out by the operator of the unit who has read these operating instructions.
When using a CO2 bottle, the locally applicable rules for marking the installation room must be observed.
Do not clean the unit with a water jet.
Plastic surfaces must not be cleaned with alcohol-based, aggressive or abrasive detergents. The surface cleaner CA 30 R (6.295-686.0) is recommended.
After initial start-up, filter changes and long downtime periods, dispensed unchilled water may temporarily be milky in appearance. This is due to small air bubbles in the water and does not affect water quality.
Indication of an imminent threat of danger that will lead to severe injuries or even death.
Indication of a potentially dangerous situation that may lead to severe injuries or even death.
Indication of a potentially dangerous situation that may lead to minor injuries.
Indication of a potentially dangerous situation that may lead to damage to property.
Risk of electric shock. Always pull out the mains plug before working on the device. The socket must be protected with a 30 mA fault current protection switch.
Danger of death from bursting CO2 cylinder. Place the CO2 cylinder upright and secure it. Always connect the CO2 cylinder with a pressure reducer with safety valve approved for the unit type. Protect the CO2 cylinder from excessive heat and never expose it to direct sunlight.
Danger of explosion. Never connect a CO2bottle with a riser. For example, riser bottles are marked with a red warning sticker.
Danger of suffocation due to escaping carbon dioxide. Ensure that the installation room is adequately ventilated or install a gas warning system. Observe the country-specific legal requirements regarding the prescribed minimum room size, warning systems and ventilation during the emptying of compressed gas tank.
Risk of explosion. Do not store any potentially explosive objects such as spray cans with flammable propellants in the unit or the stand.
When positioning the appliance, ensure the supply cord is not trapped or damaged.
Do not locate multiple portable socket-outlets or portable power supplies at the rear of the appliance.
Risk of injury from bursting bottles. Carbonated water may only be filled into pressure-stable bottles (10 bar).
Keep ventilation openings, in the appliance enclosure or in the built-in structure, clear of obstruction.
Chemical cleaning must be carried out at least every 6 months (see "Care and service").
Health risk due to increased germ concentration. After a warning from the drinking water supplier regarding microbiological contamination, chemical cleaning must be carried out at least once. Cleaning may need to be repeated. If in any doubt, contact the KÄRCHER Service.
Possible health risk due to increased concentration of germs in the water after prolonged standstill. Therefore, carry out chemical cleaning after a longer period of inactivity.
Health risk due to improperly repaired device. The device may only be repaired by trained specialist personnel.
Damage to the device cooling unit. If the device has been stored or transported lying down, you must place the device in its normal position and then wait at least 24 hours before operating it.
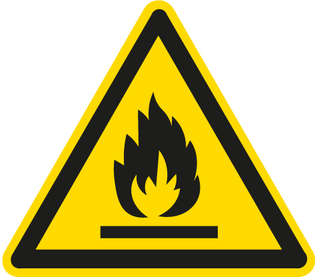
Risk of fire due to refrigerant
Flammable refrigerant is used in this unit.
If refrigerant escapes (damage to or defect in the cooling circuit), keep ignition sources away from the unit, ventilate the installation room and contact the service centre.This unit is not intended for use by persons (including children) with reduced physical, sensory or mental capabilities, unless they are supervised by a person who is responsible for their safety or have received instructions on how to use the unit from them and understand risks associated with using the unit. Cleaning and user maintenance may not be carried out by unsupervised children.
Children must be supervised to prevent them from playing with the appliance.
The unit is used to dispense both tempered and untempered water, with or without the addition of food-grade carbonic acid (CO2), in self-service mode.
Depending on the unit variant, the unit is equipped with different filters (Active-Pure filter or Hy-Protect filter).
This unit is intended for use in domestic and similar applications, such as in staff kitchen areas in shops, offices and other work areas, in agriculture and by guests in hotels, motels and other accommodation, in catering and similar wholesale use.
Do not set up or operate the unit in commercial kitchens.
The unit must be set up in a frost-free room.
Do not use or place the unit outdoors.
Do not place, store or transport the unit horizontally.
Any type of improper use is prohibited.
The operating personnel are liable for damage resulting from incorrect use.
From the water inlet, the water flows first through the filter (for a description of the filters, see Consumables). Depending on the button pressed, the water then flows through the cooling module, the CO2-mixer (optional) or directly onward to the water dispenser.
If carbonated water is required (optional), carbon dioxide is also added to the water.
To ensure perfect hygiene, the entire water system must be chemically cleaned at regular intervals.
When replacing CO2 bottles, the safety instructions of the gas supplier and any legal requirements must be observed.
The CO2 bottle must be equipped with the pressure reducer approved by KÄRCHER so that the carbonic acid content of the water can be adjusted.
The carbon dioxide E 290 must comply with the purity requirements of Directive 96/77/EC (food quality) and be labelled in accordance with Article 7 of Directive 89/107/EEC.
Before using a gas bottle, make sure that the correct type of gas has been provided. Reliable information about the type of gas is provided solely by the hazardous goods label that must be present on every gas bottle. The colour of the gas bottle does not always give clear information about the type of gas. A gas bottle of which there is any doubt about the contents or which is conspicuous in any other way (damage, exposure to fire, traces of mechanical processing) must not be used.
The country-specific regulations must be observed.
Risk of explosion
Never connect a CO2bottle with a riser. For example, riser bottles are marked with a red warning sticker.Danger of death from a possibly bursting CO2gas container
Place the pressure tank vertically and fasten it. Never open the compressed gas tank without a pressure reducer and without a safety valve. The pressure reducer with safety valve must be approved for the type of device.Danger of suffocation due to escaping carbon dioxide
Ensure sufficient ventilation of the installation room or install a gas warning system.Do not expose the CO2 bottle to direct sunlight.Protect the CO2 bottle from excessive heat.Apply a visible marking indicating the possible presence of gaseous carbon dioxide.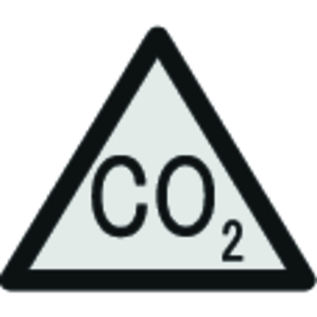
 The packing materials can be recycled. Please dispose of packaging in accordance with the environmental regulations.
 Electrical and electronic devices contain valuable, recyclable materials and often components such as batteries, rechargeable batteries or oil, which - if handled or disposed of incorrectly - can pose a potential danger to human health and the environment. However, these components are required for the correct operation of the device. Devices marked by this symbol are not allowed to be disposed of together with the household rubbish.
R-290 Contains greenhouse gas R290 - hermetically sealed device
Notes on the content materials (REACH)Current information on content materials can be found at: www.kaercher.de/REACH
Check the carton contents for completeness when unpacking the unit.
Also check that the supplied attachment kits are complete. If any accessories are missing or in the event of any shipping damage, please notify your dealer.
Only use original accessories and original spare parts. They ensure that the appliance will run fault-free and safely.
Information on accessories and spare parts can be found at www.kaercher.com.
Description | Order no. |
|---|---|
Active Pure filter Removes negative flavours or odours (e.g. chlorine), retains heavy metals, microplastics and impurities from the supply system. | 2.643-773.0 |
Hy-Protect filter Retains viruses, bacteria and microplastics. | 2.643-306.0 |
O-ring 11.91 x 2.62 KTW Seal of the pressure reducer 4.640-588.0 on the cylinder screw connection. | 6.640-731.0 |
Description | Order no. |
|---|---|
Bevi Tabs alkaline Chemical detergent for the interior cleaning of the WPD every six months. Contents: 10 tablets. | 5.295-891.0 |
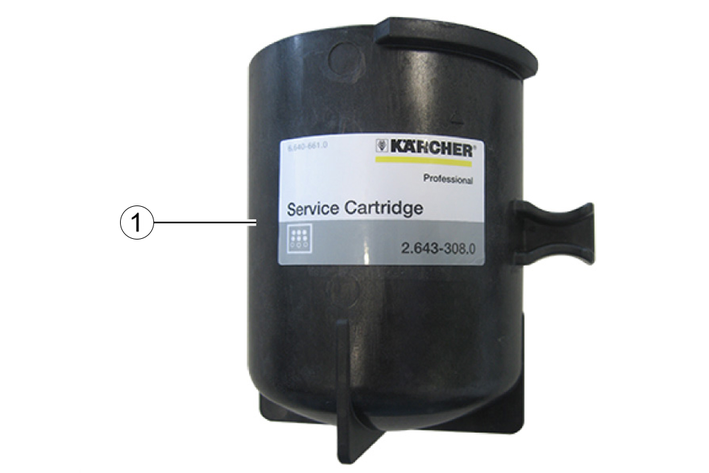
Service Cartridge Special auxiliary tool for carrying out chemical cleaning of the WPD. | 2.643-308.0 |
Description | Order no. |
|---|---|
CA 30 R Ready-to-use surface cleaner, 0.5 l bottle | 6.295-686.0 |
Spray head for surface cleaner When ordering CA 30 R for the first time, this reusable spray head for the spray bottle is required. | 6.295-723.0 |
Disinfectant RM 735 (20 ml concentrate) | 6.295-476.0 6.296-143.0 |
Empty bottle with spray head for preparing RM 735 | 6.296-148.0 |
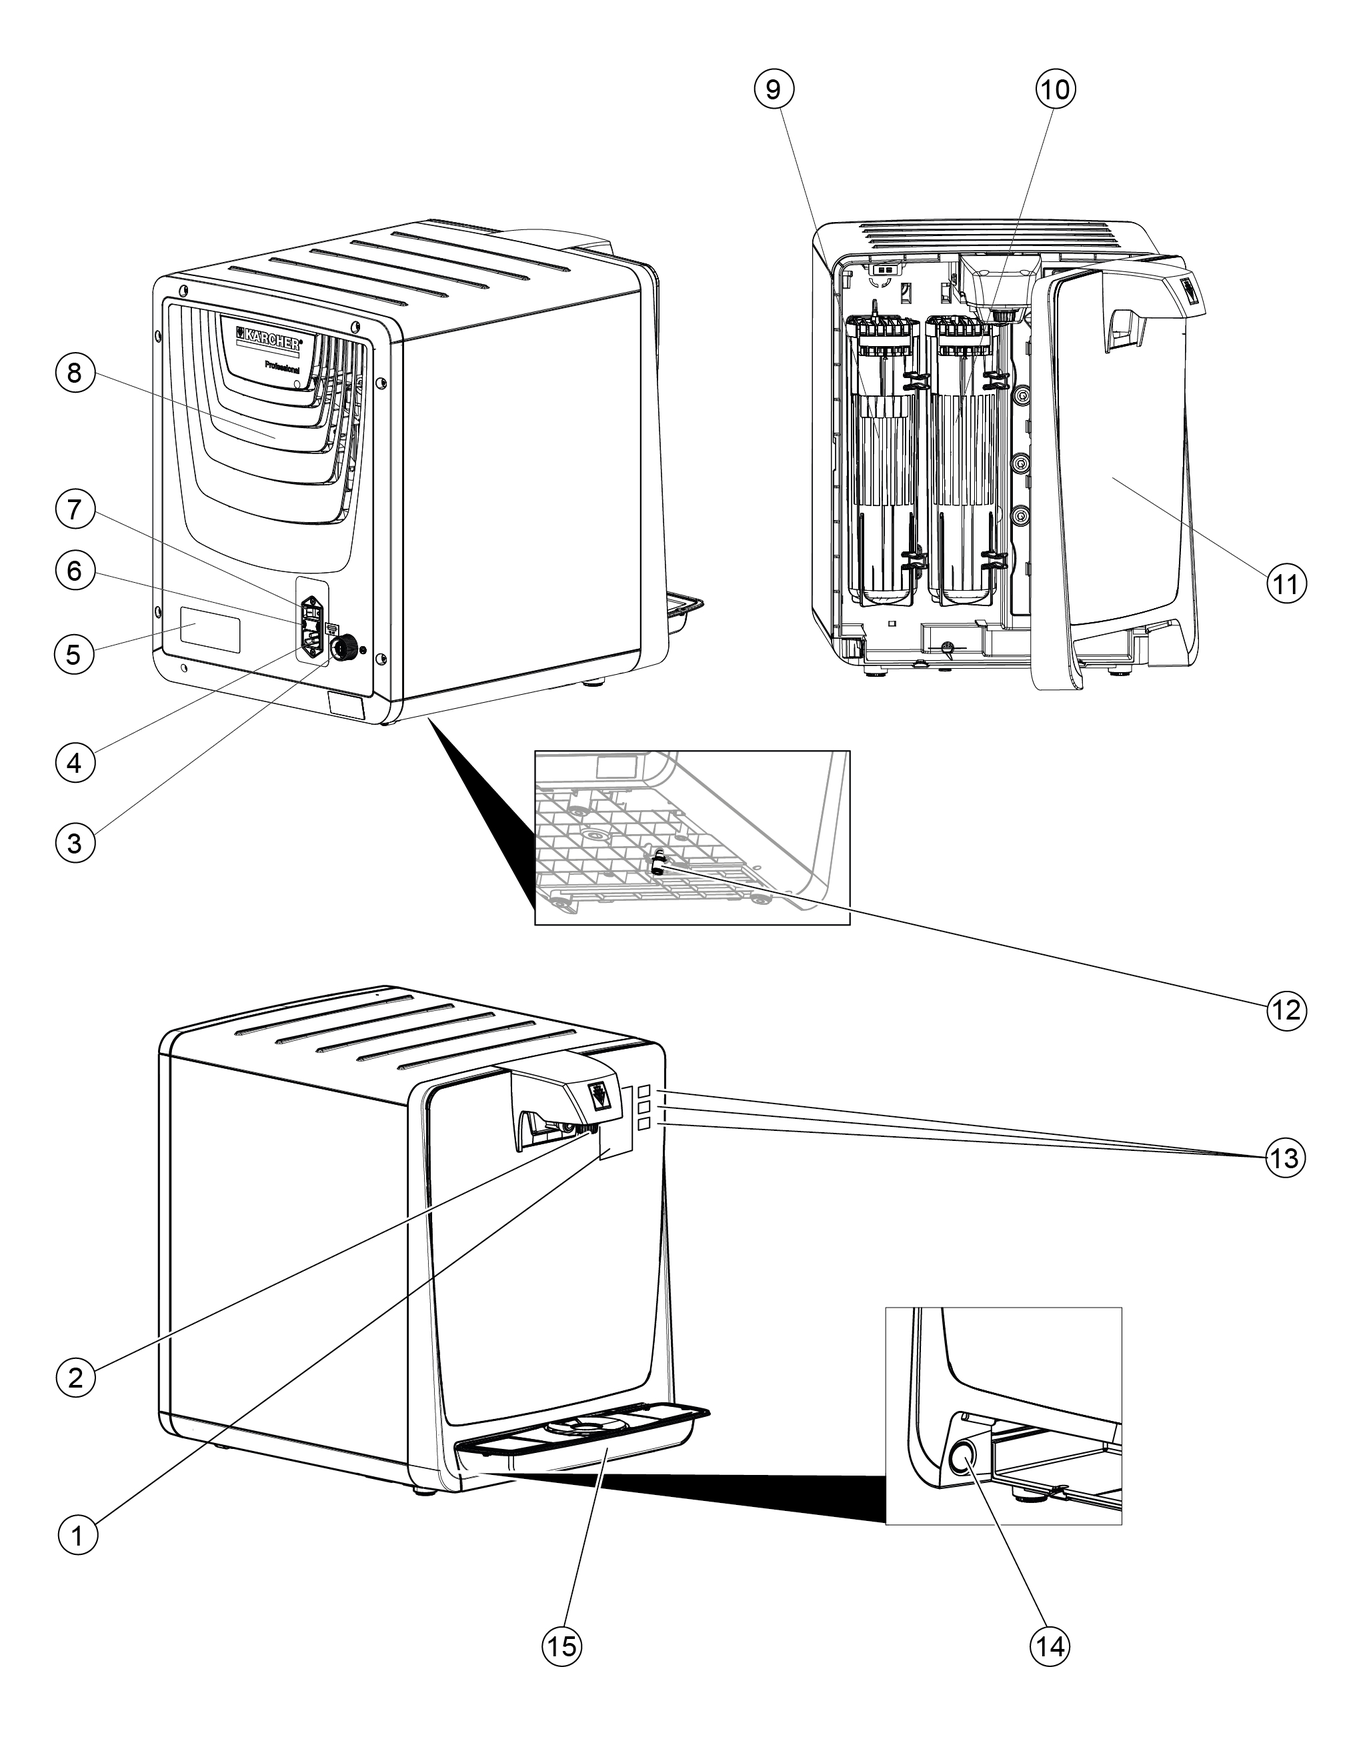
The following utilities are required to operate the device:
Mains socket for connection to the mains.
Water tap with 3/8" or 3/4" external thread for connection to the water supply.
Attach the attachment kits ordered for the device to the device.
The installation for each attachment kit is described in separate installation instructions enclosed with the attachment kit
Danger from electric shock.
Do not remove the side parts, the cover or the circuit board cover of the device. These components may only be removed by a qualified electrician.During initial installation and any repairs that involve the replacement of accessory parts, make sure only parts approved by KÄRCHER (filter, mains cable, connection kit, CO2-pressure regulator (Depending on the equipment)) are used. These components have been tested and certified to ensure compliance with KÄRCHER Quality Standards. No other components may be used.
The power connection and water input pressure must correspond to the values in the technical data (see chapter “Technical data”).
Depending on local regulations, an approved backflow preventer must be installed.
For devices with drip tray drainage into the building's waste water pipe, a siphon must be provided to protect against odours from the waste water pipe.
The siphon must be positioned lower than the drip tray.
The drip tray drain only functions reliably when the waste water hose slopes continuously downward.
Set up the device on a level surface.
Mains plug and socket must always be freely accessible.
The power switch, the fuse and the water connection (rear of the device) must be freely accessible. The minimum distance to the wall is 100 mm.
In the interest of reducing power consumption, the power supply can be switched off when the device is not in use (e.g. using a timer clock).
Do not use used hose lines.
Using the device with a stand:
To ensure a high level of stability of the device in accordance with the guidelines of the device standard, a device with a base must be fixed to the floor or wall (floor attachment kit WPD).
Alternatively, the WPD additional weight stand attachment kit can be used to lower the centre of gravity of the device accordingly.
Connection diagram:
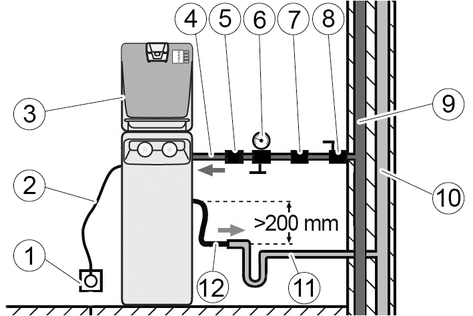
Connections:
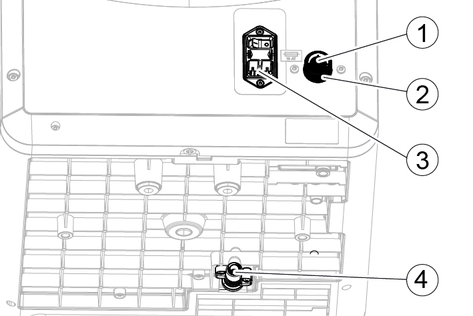
Attach the table-top device attachment kit according to the enclosed installation instructions.
If the drip tray is to be fitted with a drain, fit the drip tray drain attachment kit and carry out the following installation steps:
Lay a hose from the drip tray drain to the siphon.
If no waste water drain is possible, use the WPD can attachment kit.
If a drip tray drain is to be fitted, the drip tray drain adapter attachment kit must also be fitted.
Use the stand attachment kit, possibly also the cup dispenser attachment kit and the additional cooler attachment kit. Attach the attachment kits according to the enclosed installation instructions.
If the drip tray is to be fitted with a drain, fit the drip tray drain attachment kit and carry out the following installation steps:
Attach an angle piece to the drip tray drain.
Lay a hose through the stand from the angle piece to the siphon.
If no waste water drain is possible, use the WPD can attachment kit.
If a drip tray drain is to be fitted, the drip tray drain adapter attachment kit must also be fitted.
Connect the water supply hose to the rear of unit.
Connect the water supply hose to the tap of the building installation (if necessary, connect additional components).
Connect the mains cable to the power supply on the rear of the unit.
Connect the CO2 connection hose (optional) to the CO2 connection.
Pull out the drip tray.
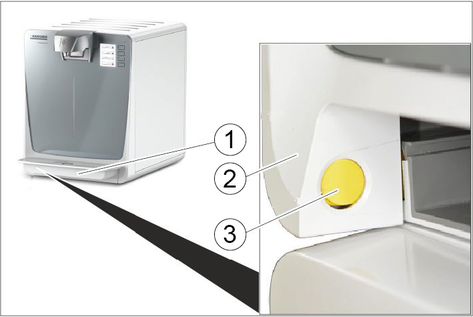
Press the unlocking button and open the device door.
Pull out the drip tray.
Open the device door.
Health risk
Germs introduced into the device can contaminate the water.
Pay special attention to hygiene and cleanliness when replacing the filter cartridges.Do not touch the connections and holders of the filters.Wear sterile disposable gloves when changing filters.Do not mix up the filters, observe the colour markings.Do not touch the marked areas.
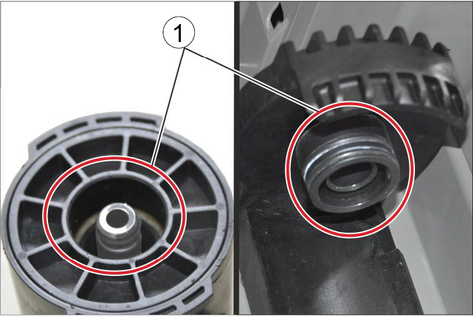
Turn the cap to the left and pull it off downwards.
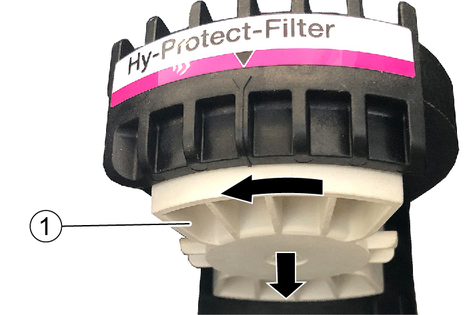
Turn the filter so that the handle is on the left side and insert it from below into the corresponding holder.
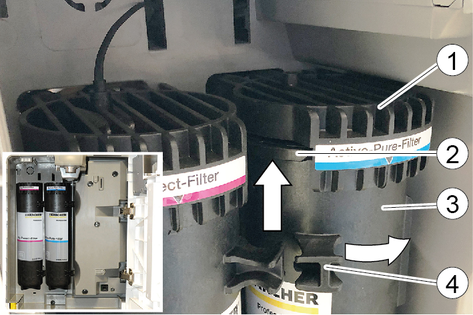
Turn the filter to the right as far as it will go.
Check the installation position: The markings on the label of the holder and on the filter must be aligned.
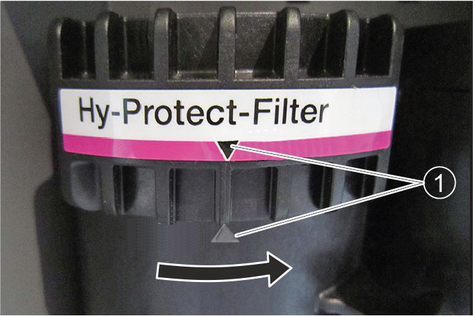
Close the device door.
Insert the drip tray.
Connect the CO2 cylinder before the initial start-up.
Without a CO2 cylinder connected, the dispensing of sparkling water is blocked and rinsing is not possible
See chapter "Connecting a new CO2 cylinder".
Plug the mains plug into the socket.
Set the power switch to "I".
Opening the water inlet
In the first minute after switch-on, the CO2 mixer is automatically filled with water.
Rinsing the filter
Press the button for unchilled water (rinsing time 10 minutes / approx. 20 litres).
Press the button for chilled water (rinsing time 4 minutes / approx. 8 litres).
For devices with CO2 function, press the button for carbonated water (rinsing time 4 minutes / approx. 8 litres).
The maximum output duration of the individual functions is limited in time. The button must therefore be pressed several times to maintain the required rinsing time.
The device is operable after rinsing.
It is then recommended to carry out a chemical cleaning (see "Care and service").
Please also note the general information on handling CO2bottles, see chapter General instructions for handling CO2 bottles.
When connecting a new, or removing an old CO2bottle, follow the steps below.
The door of the stand is lockable.
Unlock the door lock.
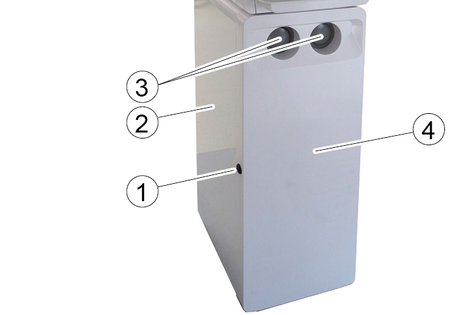
Open the door of the stand.
If the button for carbonated water is inactive and the LED for carbonated water flashes, either no CO2 cylinder is connected or the CO2 cylinder is empty and needs to be replaced.
Open the door of the stand.
Connect the gas cylinder to the main valve.
Turn the pressure regulator to "0".
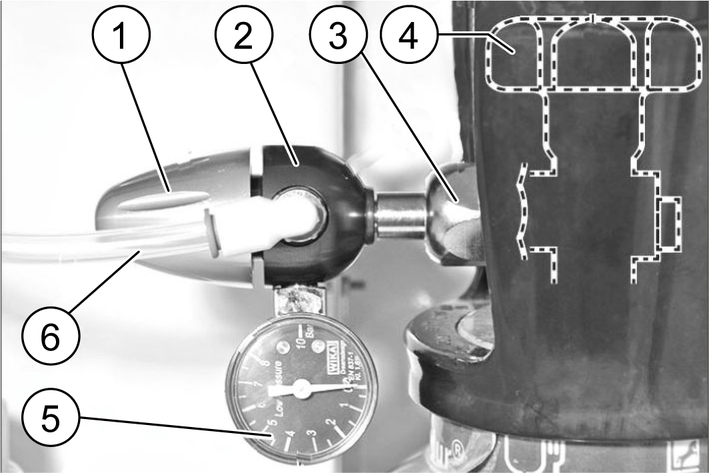
If the pressure reducer is separated from the CO2bottle when sufficient pressure is still present, the O-ring between the bottle and the pressure reducer will be deformed and must be replaced.
Unscrew the pressure reducer from the empty gas cylinder.
Screw the protective cover onto the empty gas cylinder.
Release the tensioning strap to secure the empty gas cylinder.
Remove the empty gas cylinder.
Insert the new gas cylinder into the stand.
Secure the gas cylinder with the lashing strap.
Unscrew the protective cover of the new gas cylinder.
Briefly open the main valve on the gas cylinder to allow any liquid CO2 to escape.

Screw the pressure reducer onto the new gas cylinder.
Note: Ensure that the sealing ring is installed properly.
Slowly open the main valve.
Set 3 bar using the rotary control on the pressure reducer.
Close the main valve.
Read off the displayed value on the control pressure gauge.
The displayed value must remain constant for at least 5 minutes. In case of recognisable pressure drop:
Check whether the O-ring between the gas cylinder and pressure reducer is present and undamaged.
Replace a defective O-ring.
Check that the pressure reducer is seated correctly.
Tighten the union nut firmly.
Check the hose coupling on the CO2 hose and on the pressure reducer for visible damage. If in doubt, call customer service.
If the pressure drop cannot be stopped by the above measures, the pressure reducer is defective and must be replaced.
Open the main valve.
Adjust the operating pressure on the pressure reducer using the rotary control.
First set the pressure regulator to approx. 3 bar (static).
Place a container under the water dispensing opening.
Dispense 1 litre of carbonated water to refill the CO2 mixer
Observe whether the pressure remains at 3...3.5 bar during dispensing.
Readjust the pressure if necessary.
If the water stream contains too little carbonic acid or starts to splash prematurely, check the setting of the compensation regulator (see Adjusting the compensation regulator)
Close the door of the stand.
The compensation regulator is used to finely regulate the delivery of carbonated water.
Place a measuring cup with a volume of more than 1 litre under the water dispenser.
Dispense 1 litre of carbonated water and observe the behaviour of the water stream.
If the water delivery is reduced towards the end of extraction and the water stream is interrupted by gas leakage, the compensation regulator must be reset.
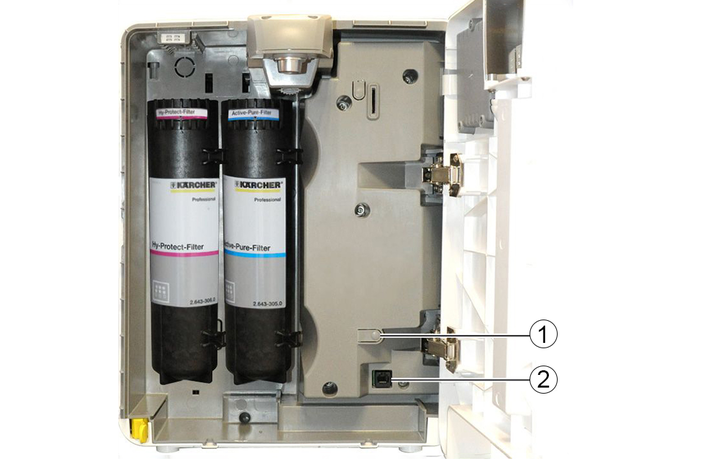
Open the device door.
The adjusting wheel of the compensation regulator is located behind the water outlet.
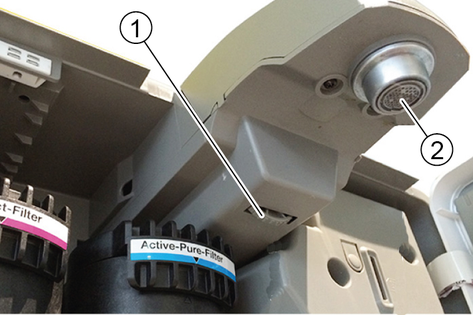
The adjustment is very fine. Move the adjusting wheel to the home position and then adjust in small steps.
Home position approx. 2.5 turns.
The total adjustment range is 4 revolutions.
Turn the compensation regulator clockwise.
Take another 1 litre of carbonated water and observe the water stream.
Repeat the process until the water stream has a perfect stream pattern.
Remove 300 ml of carbonated water.
Wait 10 seconds.
Remove 300 ml of carbonated water again.
Repeat the procedure 5 times.
If the carbon dioxide content remains constant, the regulator is set correctly.
If the carbon dioxide content decreases with each dispensing, turn the adjusting wheel anti-clockwise and repeat the process until the dispensing is always the same.
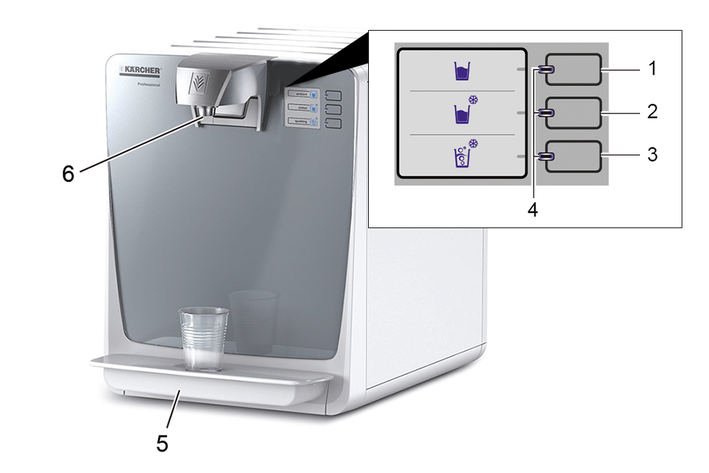
The sensor buttons are activated by a light touch.

Place a container in the centre of the drip tray.
Press and hold the button for the desired water type until the container is full.
If the device is not used for more than 4 days:
Close the water inlet.
Set the power switch to "0".
Close the main valve of the CO2 gas cylinder.
Health risk
During decommissioning, the concentration of germs in the water in the device may increase.
If the device has not been used for a longer period of time (more than 7 days), the following activities must be carried out before you use the device again.Opening the water inlet
Switch on the device.
Depending on the duration of shutdown, carry out the following steps:
After a shutdown of more than 7 days:
Take at least 1 litre of each type of water and discard.
After shutdown of 8 to 28 days:
Take at least 5 litre of each type of water and discard.
Extraordinary chemical cleaning is recommended. (see chapter "Care and service")
After shutdown of longer than 28 days:
Remove the filter and insert the service cartridges.
Take at least 5 litre of each type of water and discard.
Perform a chemical cleaning (see chapter “Care and service”).
Carry out an extraordinary filter change.
Failure to observe the weight
Risk of injury and damage
Be aware of the weight of the device during transportation.Do not transport the device in a horizontal position.
When transporting the device in vehicles, secure it to prevent it from slipping or overturning in accordance with the respective valid guidelines.
The device must not be transported in a horizontal position.
Select a suitable packaging for transport and mark it on the outside with a conspicuous marking for vertical transport.
If possible, place a small wooden pallet under the shipping box.
Alternatively, take the device directly to a Kärcher service centre.
Risk of injury or damage due to non-observance of the weight
Be aware of the weight of the device during storage.Store the device in a frost-free place.
Remove any filters remaining in the device after storage and replace with new filters.
Perform a chemical cleaning.
Health risk due to improperly repaired device
Have the device repaired only by trained specialist personnel.Only use original spare parts from the manufacturer, such as
Spare parts and wearing parts
Accessories
Operating materials
Detergent
Before performing any work on the device:
Set the trigger to “0”.
Pull out the mains plug.
Close the water inlet.
We recommend that you choose a service contract to ensure reliable operation of the device. Please contact your KÄRCHER customer service department responsible.
To ensure hygiene, remove 0.5 litres of water from each type of water after the device has been switched off overnight and pour it away.
Clean the drip tray and water dispenser with disinfectant detergent (RM735, see consumables).
Check the drip tray drain (optional) for blockages.
Do not use cleaning agents containing alcohol, acid components or abrasives to clean plastic surfaces.
Clean the exterior of the device with disinfectant detergent. Dirt can be removed very well with a melamine resin sponge (magic sponge, dirt eraser).
Clean the drip tray with hot water or in the dishwasher.
Empty the can.
Check the can for cleanliness and clean or replace if necessary.
Check and clean the inlet screen in the water connection (see "Care and Service/Clean the inlet screen"). If heavily soiled, clean the inlet screen monthly.
Perform chemical cleaning and documentation (see "Care and service / chemical cleaning").
Have the annual customer service carried out.
Change the Active-Pure and Hy-Protect filter.
Even earlier if the inlet water quality is unfavourable.
The filter change intervals apply to defined test conditions and may deviate from the specified periods.
Replace the CO2 pressure reducer
Health risk through the entry of germs
When installing the filter cartridge, take special care to ensure hygiene and cleanliness.Always wear sterile disposable gloves when installing the filter.Close the water inlet.
Press the button for “unchilled water” until no more water is dispensed.
Remove the drip tray and open the device door.
Remove the filter that is to be replaced.
Turn the filter to the left until the tab is visible.
Pull the filter downwards and remove it.
The used filter can be disposed of as household rubbish after the residual water it contains has been emptied.
Unpack the new filter.
Insert the new filter.
Turn the filter so that the handle is on the left-hand side.
Insert the filter from below into the support.
Turn the filter to the right as far as it will go.
Check installation position:
The markings on the filter label and the filter holder must be aligned with each other.
Correct position if necessary.
If both filters are to be replaced, install and remove the other filter in the same way.
If only the Active-Pure filter is being changed, it must first be filled manually (at the tap) before being inserted into the device.
Always install the filter in the same position! Filters must not be interchanged, otherwise the filter system will not work. Be sure to observe the markings and labelling!
The subsequent rinsing process then only needs to be carried out once for both filters at the same time.
Close the device door and attach the drip tray.
Plug the mains plug into the socket.
Place a container under the water dispensing opening.
Open the water inlet.
Press the “unchilled water” button repeatedly until the rinsing time of 5 minutes is reached (approx. 10 – 15 litres).
The device automatically stops dispensing after 60 seconds of continuous water dispensing.
Perform the chemical cleaning.
Health risk due to discharged rinsing water!
The rinse water is not drinking water!
Always dispose of rinse water immediatelyChemical cleaning must be carried out after initial Start-Up and at least every 6 months. The same applies after a shutdown for more than 7 days or an extraordinary filter change. A service cartridge is required for chemical cleaning.
Chemical cleaning takes approx. 60 minutes.
Empty the can before starting the chemical cleaning process (optional).
Risk of damage to the filter group
An incorrectly inserted service cartridge will damage the filter group.
Always use the service cartridge instead of the Hy-Protect filter! Never use in place of the Active-Pure filter.Risk of injury from contact with detergent
The detergents used can cause skin irritation and other injuries.
Wear suitable gloves and safety goggles during chemical disinfection. Observe the instructions on the detergent!For devices with drip tray drain, empty the can.
Place a container with a capacity of at least 1 litre under the water outlet.
Start chemical cleaning:
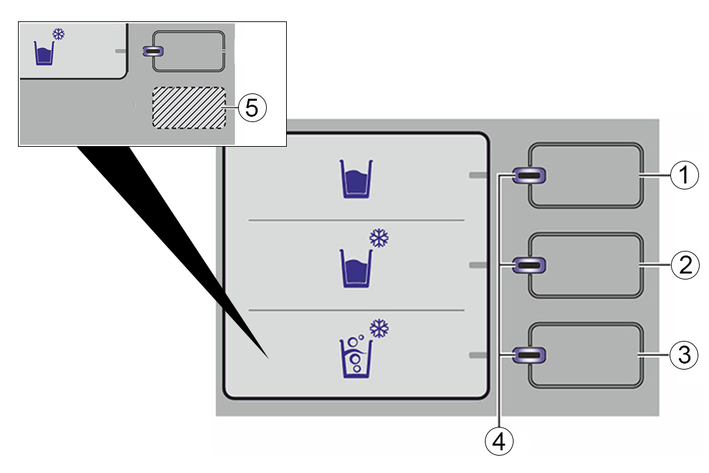
Press the button for unchilled water and the button for carbonated water or the dummy button at the same time.
Pressing the buttons simultaneously starts the cleaning programme. The drinking water dispenser is blocked during the cleaning programme. The cleaning programme takes approx. one hour with subsequent rinsing and cannot be interrupted once it has started.
When a signal tone sounds, press and hold the buttons for 5 seconds until another signal tone sounds.
All LEDs flash blue.
Press any button.
The pressure in the system is released, the process takes approx. 30 seconds.
All LEDs flash red.
Remove the drip tray and open the device door.
Beeps sound as long as the door is open and the drip tray is removed.
Remove the Hy-Protect filter.
Place the detergent (4 tablets) into the service cartridge and insert into the filter holder.
Observe dosage!
Health risk due to increased germs
If chemical cleaning is not carried out carefully, there is a danger of contamination of the water system.
The following steps must be carried out carefully as otherwise the effect of chemical cleaning cannot be guaranteed.In the event of a malfunction during chemical cleaning (power failure, can is full, switching off the device), the rinsing process is started. This must be carried out completely before dry cleaning can be restarted.
Close the device door and insert the drip tray.
The LED on the button for unchilled water flashes blue.
Place a measuring cup under the water dispensing opening.
Press the button for unchilled water and dispense 500 ml of water to fill the service cartridge.
5 seconds after the button is released, the dissolving time of the cleaning tablets starts and all LEDs flash red. Duration is approx. 2.5 minutes.
As soon as the LED on the button for unchilled water flashes blue, press the button and dispense another 500 ml of water.
The pipes for unchilled water are flushed with detergent.
The contact time starts 5 seconds after the button is released. Duration is approx. 2.5 minutes.
Empty the container during the contact time and place it back under the water dispenser.
As soon as the LED on the button for chilled water flashes blue, press the button and dispense another 500 ml of water.
The pipes for chilled water are flushed with detergent.
The contact time starts 5 seconds after the button is released. Duration is approx. 2.5 minutes.
As soon as the LED on the button for carbonated water flashes blue, press the button and dispense another 500 ml of water.
The pipes for carbonated water are flushed with detergent.
During the following 15-minute contact time, all LEDs flash red and the buttons are locked.
Empty the container during the contact time and place it back under the water dispenser.
At the end of the contact time, all LEDs light up red.
Press the button for unchilled water and the button for carbonated water or the dummy button at the same time.
When a signal tone sounds, press and hold the buttons for 5 seconds until another signal tone sounds.
The pressure in the system is released, the process takes approx. 30 seconds.
Remove the drip tray and open the device door.
Remove the service cartridge and reinsert the Hy-Protect filter.
Close the device door and insert the drip tray.
Put a container under the water dispensing opening.
The button for unchilled water flashes blue.
Start the rinsing process (see chapter "Rinsing after chemical cleaning").
A suitable 6.640-341.0 rinsing cup is required for rinsing. See chapter "Accessories".
You can interrupt the rinsing process briefly at any time, e.g.to empty the rinsing cup. To interrupt, release the corresponding button.
The required rinsing time has been reached when the water dispensing stops automatically and the next button flashes blue.
Place a rinsing cup under the water dispensing opening.
Press the button for unchilled water until the water output automatically stops.
Press the button for chilled water until the water output automatically stops.
If available, press the button for carbonated water until the water output automatically stops.
After the rinsing process is complete, all LEDs light up red.
To complete the chemical cleaning process and return to normal operation, carry out the following steps:
Press the button for unchilled water and the button for carbonated water or the dummy button at the same time.
When the signal tone sounds, press and hold the buttons for 5 seconds until another signal tone sounds.
The rinsing process is now complete and the device is re-initialised.
All LEDs light up blue.
After rinsing, dispense 1 litre of carbonated water to refill the CO2 mixer.
To be able to test the effectiveness of the chemical cleaning, samples should be collected immediately after completion of chemical cleaning under observance of the rules for microbiological water analysis and these should be evaluated by an accredited laboratory.
As soon as the drip tray has reached its maximum fill level, the LED on the button for unchilled water starts to flash blue.
Carefully remove the full drip tray and empty it.
Check the drip tray for soiling and clean if necessary.
Reinsert the drip tray.
The device is ready for operation again.
As soon as the can has reached its maximum fill level, the LED on the button for chilled water starts to flash blue.
Open the door for the stand.
Remove the lid of the can. Do not damage the lines and cables of the level sensor.
Remove the can and empty it.
Replace the can.
Replace the sealing cap and tighten it.
Close the door for the stand.
The device is ready for operation again.
Close the water inlet to the device.
Press the "Unchilled water" button briefly to release the water pressure in the device.
Unscrew the water supply hose on the device.
Pull the inlet screen out of the water connection on the device side using needle-nosed pliers
Clean the inlet screen.
Insert the inlet screen into the device.
Connect the water supply hose to the water connection at the rear of the device.
Open the water inlet.
Many faults can be rectified using the fault table.
Contact the service personnel if a malfunction cannot be corrected using this table.
Health and damage hazards due to improperly repaired device!
If repairs are carried out incorrectly, there is a risk of contamination of the water system, electric shock or flooding of the installation site.
The device may only be operated by specifically trained specialist personnel.Malfunction / display | Possible cause | Rectification |
|---|---|---|
LED on the button for unchilled water flashes blue. | Drip tray is full | Empty drip tray |
LED on the button for chilled water flashes blue | Can is full | Empty the can |
No CO2 in the water | CO2 pressure set too low | Set the CO2 pressure correctly and readjust the compensation valve. |
LED button for carbonated water flashes red and the button is deactivated. | CO2 cylinder is empty. | Replace the CO2 cylinder. |
LED button for carbonated water lights up red and the button is deactivated. | Level sensor of carbonator is defective. | Set the power switch to "0", wait 5 minutes and switch the power switch back on. If the fault persists, contact Service. |
No CO2 in the water after chemical cleaning. | No fault | After chemical cleaning, dispense one litre of carbonated water and the carbon dioxide content will return to normal. |
Device does not dispense water, but displays "Operable", all LEDs light up. | Water supply is cut off. | Establish water supply, check all shut-off devices. If the fault persists, contact Service. |
Device does not work / none of the LEDs flash or light up | Voltage supply has been interrupted. | Check the voltage supply. |
The device turned off. | Set the trigger to the "I" position. | |
Device fuse has blown. | Switch off the device, pull out the fuse holder next to the power switch, check the fuse and replace it with a new fuse of the same value if necessary. Switch on the device. If the fuse blows again, contact Service. | |
The LED on the button for unchilled water lights up red and blue continuously. | Defect in cooling module 1. | Switch off the device and contact Service. |
The LED on the chilled water button flashes red and blue simultaneously. | Temperature of cooling module 1 too low. | |
The flashing LED on the chilled water button alternates between red and blue. | Temperature of cooling module 2 is too low. | |
All LEDs light up red and blue | Electronics fault | |
| Keypad does not work. | Possible ingress of moisture, e.g. due to an overturned container on the top. | Switch off the device and leave to dry (at least 12 hours). If the fault persists, contact Service. |
Poor water drainage from the drip tray into the can. | Drip tray drain or drain hose dirty. | Check drip tray, drain and hose, clean if necessary. |
Poor water drainage from the drip tray into the waste water line. | Missing siphon or height difference between drip tray and waste water line too small. | Install siphon and ensure sufficient slope. |
Malfunction during chemical cleaning. All LEDs light up red and the interval tone sounds. Chemical cleaning was interrupted and the "Rinse" programme was started. | Failure of the voltage supply (power failure, power switch set to "0") | Rinse completely and restart chemical cleaning. |
The can level sensor has responded. | Empty the can, rinse completely and restart chemical cleaning. |
The warranty conditions issued by our relevant sales company apply in all countries. We shall remedy possible malfunctions on your appliance within the warranty period free of cost, provided that a material or manufacturing flaw is the cause. In a warranty case, please contact your dealer (with the purchase receipt) or the next authorised customer service site.
Further information can be found at: www.kaercher.com/dealersearch
Further warranty information (if available) can be found in the service area of your local Kärcher website under "Downloads".
Device performance data | |
Working voltage of the battery | 220-240 V |
Power frequency | 50 Hz |
Power protection (slow-blowing) | 10 A |
Max. power input | 300 W |
Water supply pressure | 0,15 -0,6 (1,5-6) MPa (bar) |
Water supply temperature | 4-35 °C |
Pressure adjustment range for CO2 | 0,30...0,35 (3,0...3,5) MPa (bar) |
Ambient temperature | 5 - 32 °C |
Water dispenser, max. | 120 l/h |
Min. temperature of chilled water | 6 °C |
Cooling capacity of chilled water | 40 l/h |
Dimensions and weights | |
Width | 390 mm |
Depth | 520 mm |
Height | 450 mm |
Height with stand | 1450 mm |
Weight | 35 kg |
Weight with stand | 50 kg |
Sound pressure level LpA | <43 dB(A) |
Cup for cup dispenser in stand (option) | |
Cup collar diameter | 70...71 mm |
Hy Protect filter | |
max. permissible medium temperature | +80 °C |
max. permissible medium pressure | 0,6(6) MPa (bar) |
max. flow performance | 120 l/h |
Typical filter capacity | 20000 l |
Filter life | 1 Years |
Active Pure filter | |
max. permissible medium temperature | +35 °C |
max. permissible medium pressure | 0,6(6) MPa (bar) |
max. flow performance | 120 l/h |
max. capacity | 10000 l |
Filter life | 1 Years |
All parts/components containing water are suited and approved for the use in direct contact with drinking water in accordance with current industry standards.
The device has been certified for food suitability by the Fresenius Institute and meets the requirements of the Mineral and Table Water Ordinance.
Device: | Place of installation: | |||||||
Device type: | Date of installation | |||||||
The operator has been advised that the water quality must be checked regularly in accordance with national and local regulations. The operator has been informed that they are responsible for carrying out regular maintenance work in accordance with the "Maintenance schedule" section. | ||||||||
Signature of service technician | Location, date | Signature of customer | ||||||
Serial number: | Installation by: | |||||||
Date | Technician | Operating hours | Filter change | Other parts | Hygienisation / Chemical Cleaning | Remarks | Signature Technician | |
Hy-Protect* | Active-Pure* | |||||||
