BD 160 R Classic
97635330 (06/19)
97635330 (06/19)
 Read these original operating instructions and the enclosed safety instructions before using the device for the first time. Proceed accordingly.
Keep both books for future reference or for future owners.
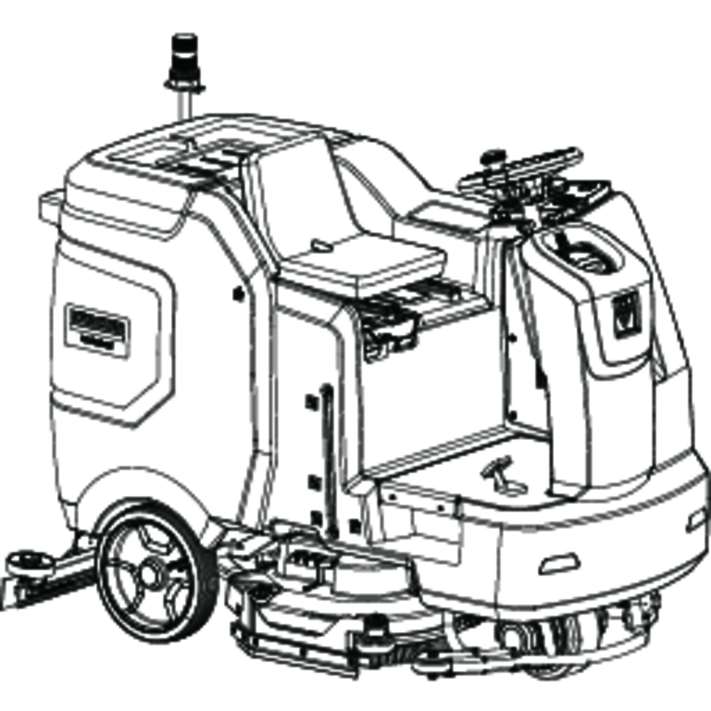
This scrubber vacuum is used for the wet cleaning or polishing of level floors.
The appliance can be adjusted to suit the respective cleaning task by setting the water volume, contact pressure of the brusches and driving speed.
Use this appliance only as directed in the following operating instructions.
The appliance may only be used for the cleaning of hard surfaces that are not sensitive to moisture and polishing operations.
The appliance is intended for inside use.
The working temperature of the appliance ranges from +5°C to +40°C.
The appliance is not suited for the cleaning of frozen ground (e.g. in cold stores).
The appliance is suitable for a max. water depth of 1 cm. Do not drive into an area where there is a risk of this max. water height being exceeded.
The appliance may only be equipped with original accessories and spare parts.
The appliance is not intended for the cleaning of public traffic routes.
The appliance should not be used on surfaces that are sensitive to pressure.
Please consider the allowed load per surface unit of the floor. Details of the load per surface unit can be found in the technical data.
The appliance is not suited for the use in potentially explosive environments.
The appliance should not be used to suck in flammable gases, undiluted acids or solvents.
This includes petrol, thinning agents or hot oil that can form an explosive mixture when it comes in contact with sucked air. Do not use acetone, undiluted acids and solvents as they are aggressive towards the materials of which the appliance is made.
 The packing materials can be recycled. Please dispose of packaging in accordance with the environmental regulations.
 Electrical and electronic devices contain valuable, recyclable materials and often components such as batteries, rechargeable batteries or oil, which - if handled or disposed of incorrectly - can pose a potential danger to human health and the environment. However, these components are required for the correct operation of the device. Devices marked by this symbol are not allowed to be disposed of together with the household rubbish.
Current information on content materials can be found at: www.kaercher.de/REACH
Only use original accessories and original spare parts. They ensure that the appliance will run fault-free and safely.
Information on accessories and spare parts can be found at www.kaercher.com.
The scope of delivery for the appliance is shown on the packaging. Check the contents for completeness when unpacking. If any accessories are missing or in the event of any shipping damage, please notify your dealer.
Please read the operating instructions for the device before using it, and pay particular attention to the following safety instructions.
Warning and information plates on the machine provide important directions for safe operation.
Apart from the notes contained herein the general safety provisions and rules for the prevention of accidents of the legislator must be observed.
Device tipping over
Danger of injury!
The device is approved for operation on surfaces with a specified limited slope (see Chapter Technical data).
The device may only be operated when the hood and all covers are closed.
Indication of an imminent threat of danger that will lead to severe injuries or even death.
Indication of a potentially dangerous situation that may lead to severe injuries or even death.
Indication of a potentially dangerous situation that may lead to minor injuries.
Indication of a potentially dangerous situation that may lead to damage to property.
The voltage indicated on the type plate must correspond to the voltage of the electrical source.
Safety class I - Appliances may only be connected to sockets with proper earthing.
While working with fluids (such as detergents), we recommend the use of a safe socket with overcurrent protection switch (max. 30 mA).
Please use the mains cable prescribed by the manufacturer; the same is also applicable when you replace the cables. See Operating Instructions Manual for Order Number and Type.
Check the power cord with mains plug for damage before every use. If the power cord is damaged, please arrange immediately for the exchange by an authorized customer service or a skilled electrician.
The appliance may only be connected to an electrical supply which has been installed by an electrician in accordance with IEC 60364.
Never touch the mains plug with wet hands.
Make sure that the power cord or extension cables are not damaged by running over, pinching, ragging or similar. Protect the cable from heat, oil, and sharp edges.
The power cord must be checked regularly for damages, such as cracks or aging. If damage is found, the cable must be replaced before further use.
If couplings of the power cord or extension cable are replace the splash protection and the mechanical tightness must be ensured.
Do not clean the appliance with a water hose or high-pressure water jet (danger of short circuits or other damage).
Operating procedures create short term power sinkings.
During unfavorable net conditions other devices might be disturbed.
With a net impedance lower then 0.15 Ohm no disturbances are to be expected.
Appliances with working equipment, specifically the power cord and the extension cable, must be checked to ensure that it is in proper working order and is operating safely prior to use. Otherwise, immediately pull out the power plug. The appliance must not be used.
The water level limiter must be cleaned regularly and checked for signs of damage.
Never spray and vacuum up explosive liquids, combustible gases, explosive dusts as well as undiluted acids and solvents! This includes petrol, paint thinner or heating oil which can generate explosive fumes or mixtures upon contact with the suction air. Acetone, undiluted acids and solvents must also be avoided as they can harm the materials on the machine.
Do not vacuum up any burning or glowing objects.
Humans and animals must not be vacuumed with this appliance.
Appliances may not be used in outside areas in low temperatures.
If the appliance is used in hazardous areas (e.g. filling stations) the corresponding safety provisions must be observed. It is not allowed to use the appliance in hazardous locations.
Only use cleaners recommended by the manufacturer and comply with their application, disposal and warning guidelines.
Do not use the recommended detergents in an undiluted state. The products are safe for operations as they do not contain any acids, alkalis or environment hazardous substances. We recommend to keep the detergents out of reach of children. If the detergent comes in contact with the eyes, please rinse the eyes thoroughly with water and consult a doctor immediately if the detergent has been swallowed.
The appliance is not suitable for vacuuming dust which endangers health.
Please follow the statutory regulations for disposing off dirt water and alkalis.
The socket on the device may only be used to connect the attachments and accessories mentioned in the operating instructions.
The appliance is not a vacuum cleaner! Never suck in more fluid than what has been sprayed. Do not use to suck in drydust!
Appliance suited for moist to wet floors with a max. water level of approx. 1 cm. Do not drive into an area where there is a risk of this max. water level being exceeded.
The machine is only suitable for use on the types of surfaces specified in the operating instructions.
Protect the appliance against frost.
The operator must use the appliance properly. The person must consider the local conditions and must pay attention to third parties, in particular children, when working with the appliance.
Never leave the machine unattended so long as the engine is running. The operator must not leave the device before the engine has been shut down, the device has been protected against accidental movement, the parking brake has been applied and the ignition key / intelligent key has been removed.
Always use appropriate gloves while working on the device.
In order to prevent unauthorised use of devices that are provided with an ignition key / intelligent key, the ignition key / intelligent key must be removed.
This machine is not intended for use by persons (including children) with reduced physical, sensory or mental capabilities, or lack of experience and knowledge.
Children should be supervised to prevent them from playing with the appliance.
Turn off the appliance immediately in case of leaks.
Caution! Switch the appliance off immediately in case foam or liquid escape!
Do not open the hood when the motor is running.
On tilted surfaces, the tilt angle and the driving direction should not exceed the values given in the Operating Instructions.
The engine is to be brought to a standstill and the appliance is to be fastened properly during transportation.
Switch off the appliance prior to performing any cleaning or maintenance tasks on the appliance, replacing parts or switching over to another function. In the case of mains operated appliances, remove the mains plug; in the case of battery-operated appliances, pull out the battery plug or clamp off the battery.
Maintenance work may only be carried out by approved customer service outlets or experts in this field who are familiar with the respective safety regulations.
Please observe the local safety regulations regarding portable commercially used appliances.
Only use accessories and spare parts which have been approved by the manufacturer. The exclusive use of original accessories and original spare parts ensures that the appliance can be operated safely and trouble free.
Use only brushes/ disks that are provided with the appliance or specified in the Operations Manual. The use of other brushes / disks can affect the safety of the appliance.
Please keep in mind that the power cord or extension cable can be damaged when run over while operating the cleaning head with rotating brushes / disks.
The attachments are not approved for public transport. Please ask your dealer for the equipment set for approval for road traffic.
It is strictly prohibited to take co-passengers.
Ride-on appliances may only be started after the operator has occupied the driver's seat.
Please follow the special safety instructions in the Operating Instructions Manual for petrol engine devices.
Do not use the appliance without a falling objects protective structure (FOPS) in areas, where there is a chance that the operator may be struck by falling objects.
Always follow the instructions of the battery manufacturer and the charger manufacturer. Please follow the statutory requirements for handling and disposing batteries.
Do not place tools or similar items on the battery. Risk of short-circuit and explosion.
Do not work with open flames, generate sparks or smoke in the vicinity of a battery or a battery charging room. Danger of explosion.
Be careful while handling battery acid. Follow the respective safety instructions!
Used batteries are to be disposed according to the EC guideline 91 / 157 EWG or the corresponding national regulations in an environment-friendly manner.
Never leave the batteries in a discharged state; recharge them as soon as possible.
Always keep the batteries clean and dry to avoid creep currents. Protect the batteries and avoid contact with impurities such as metal dust.
To take all functions out of operation immediately: Turn the safety switch to the "0" position.
When switching off the safety switch, the appliance brakes hard.
The emergency stop has a direct effect on all machine functions.
This switches off the drive motor after a short delay if the operator leaves the operator seat during operation or while the appliance is moving.
 | CAUTIONRisk of injury through crushing. Keep hands away from this area while lowering the waste water tank. |
Observe the following warnings when handling the batteries:
 | Observe notes in the instructions for the battery, on the battery and in these operating instructions. |
 | Wear eye protection. |
 | Keep acids and batteries away from children. |
 | Risk of explosion |
 | Fire, sparks, open flames and smoking are prohibited. |
 | Risk of acid burns |
 | First aid. |
 | Warning |
| Disposal |
| Do not throw batteries in the bin. |

* not included in delivery
** optional
 | Fresh water tank filling level (25%) |
 | Fresh water tank filling level (50%) |
 | Fresh water tank filling level (75%) |
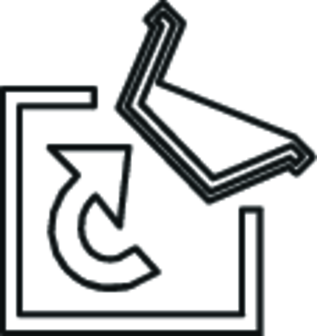 | Handle for swivelling up the waste water tank |
 | Brush replacement pedal |
 | Drain outlet for fresh water tank |
 | Drain out for waste water tank |
 | Open the cover of the waste water tank to dispel the odor |
 | Water connection filling system** |
 | Mop holder** |
** option
To take all functions out of operation immediately, set the safety switch to the "0" position.
Remove the carton.
Remove the straps.
Remove four floorboards fastened to the pallet by screws.
Place the boards on the edge of the pallet. Place the boards in such a way that they lie in front of the four wheels of the machine.
Fasten the boards with screws.
Slide the four support beams included in the packaging under the ramp.
Remove the wooden bars in front of the wheels.
Pull the brake lever.
Remove the appliance from the pallet.
Pull the appliance backwards off the pallet.
Drive the appliance off the pallet.
Plug in the Intelligent Key.
Set the safety switch to the "1" position.
Set the programme selector switch to transport run.
Set the travel direction switch to "forward".
Actuate the accelerator pedal.
Drive the appliance off the pallet.
Set the safety switch to the "0" position.
Push the brake lever.
The cleaning head is already installed on some models.
For more information about replacing the cleaning head, see the Care and maintenance chapter.
For more information, see the Care and maintenancechapter.
Insert the vacuum bar into the vacuum bar suspension.
The profiled sheet is positioned above the suspension.

Tighten the wing nuts.
Fit the suction hose.
Refilling discharged batteries with water
Danger of acid burns from escaping acid, destruction of clothing
Wear safety goggles when handling the batteries.
Observe the applicable regulations.
Immediately rinse off any splashed acid from the skin or clothing using copious amounts of water.
Using water with additives
Defective batteries, loss of warranty eligibility
Top up the batteries using only distilled or desalinated water (EN 50272-T3).
Do not use any foreign additives, so-called enhancing agents, because this will invalidate the warranty.
Add distilled water one hour before the charging process comes to an end. Observe the correct acid level according to the battery label.
All cells must produce gas at the end of the charging process.
Turn the safety switch to the "0" position.
Rotate the waste water tank upwards.
Disconnect the cable from the minus terminal at the batteries..
Disconnect the remaining cables from the batteries.
Remove the batteries.
Dispose of the used batteries in accordance with statutory provisions.
Risk of electric shock.
Risk of explosion.
Adhere to the mains voltage and fuse values specified on the device type plate.
Only use the charger in dry rooms with sufficient ventilation.
The room where the appliance is kept to charge the battery must feature a minimum volume and an air exchange with a minimum flow rate, depending on the type of battery.
The charging of wet batteries is only permitted if the waste water reservoir is tilted up.
Drive the device directly to the charger and do not drive on slopes.
Empty the waste water tank.
Turn the safety switch to the "0" position.
Rotate the waste water tank upwards.
Disconnect the charger cable from the battery plug.
Plug the mains plug of the charger into the socket.
Carry out the charging process in accordance with the operation instructions for the charger.
Length | 620 mm |
Width | 620 mm |
Height | 420 mm |
Risk of injuries. Never use the appliance without a protective roof in areas where the operators can be hit by falling objects.
To immediately terminate the operation of all functions, turn the safety switch to the "0" position.
Operate the lever for the seat adjustment and move the seat to the desired position.
Loosen the seat adjustment lever and lock the seat in place.
Never adjust the steering wheel while the device is moving.
Loosen the wing screws.
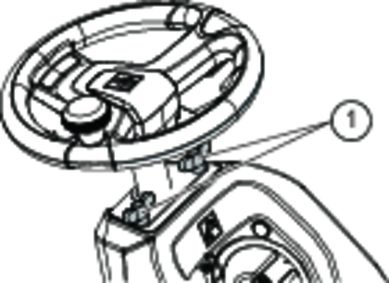
Move the steering wheel to the desired position.
Tightly screw in the wing screws.
Attempt to push/pull the steering wheel to make sure it's locked before driving.
Sit in the driver's seat.
Plug in the Intelligent Key.
Turn the safety switch to the "1" position.
Turn the programme switch to the desired function.
If the relevant indication appears on the display, perform the maintenance task.
Display | Activity |
|---|---|
Maintenance vacuum bar | Clean the vacuum bar. |
Maintenance freshwater filter | Clean the fresh water filter. |
Maintenance suction lip | Check suction lips of the vacuum for wear and tear. |
Maintenance turbine strainer | Clean the protective turbine strainer. |
Maintenance brush head | Check the brush for wear and tear, and clean it. |
Press the Info button.
Reset the counter for the corresponding maintenance (see "Care and maintenance/resetting counter").
If the counter is not reset, the maintenance indicator appears again with every start-up of the appliance.
Risk of accident. Prior to every operation, check the parking brake for proper function on level ground.
Turn on the appliance.
Turn the travel direction switch to "forward".
Turn the programme selector switch to transport run.
Gently press the drive pedal down.
The brake must audibly unlock. The appliance must roll easily on a plane surface.
When the pedal is released, the brake audibly locks. Switch off the appliance, and contact the customer service if the above-mentioned events do not occur.
Danger of accident. If the machine does not brake, then proceed as follows:
If the appliance does not stop when the accelerator is released on a ramp with more than a 2% inclination, the safety switch must be turnend to the "0" position. However, this may only be done if, for safety reasons, the proper mechanical function of the parking brake has been checked prior to every operation of the appliance.
Switch off the appliance only after it comes to a complete halt (on an even surface) and call customer service!
In addition to this, follow all warning instructions for braking.
Danger of tipping if gradient is too high.
The gradient in the direction of travel should not exceed 10% (Adv 15%).
Drive only lengthwise on uphill and downhill gradients. Do not turn.
Danger of tipping when driving around bends at high speed.
Danger of slipping on wet floors.
Drive slowly when turning corners.
Danger of tipping on unstable ground.
Only use the appliance on stable surfaces.
Danger of tipping with excessive sideways tilt.
Assume the seated position.
Plug in the Intelligent Key.
Turn the safety switch to the "1" position.
Turn the programme selector switch to transport run.
Set the drive direction using the drive direction button on the operator console.
Set the driving speed by pressing the drive pedal.
Stop the appliance by releasing the drive pedal.
The direction of travel can also be changed while driving. This way, even very unsmooth spots can be polished by driving back and forth several times.
In case of overloading, the drive motor automatically switches off after a certain period. A fault message is displayed on the console. Switch off the concerned unit if the controls get overheated.
Allow machine to cool down for at least 15 minutes.
Turn the programme switch to "OFF", wait for a short period of time and turn it back to the desired programme.
If detergent is added to the fresh water tank first before the water, this can result in the formation of a lot of foam.
Fill up the fresh water tank completely before starting up the machine in order to ventilate the water supply system.
Open the cover of the fresh water tank.
Fill fresh water (max. 60 °C) until 15 mm below the upper edge of the tank.
Fill the detergent into the fresh water tank.
Close the cover of the fresh water tank.
Risk of damage. Only use the recommended detergents. With respect to different detergents, the operator bears the increased risk related to operational safety and potential accidents.
Only use detergents that are free from solvents, hydrochloric acid, and hydrofluoric acid.
Follow the safety instructions for using detergents.
Do not use highly foaming detergents.
Application | Detergent |
|---|---|
Routine cleaning of all water resistant floors | RM 746RM 780 |
Routine cleaning of glossy surfaces (e.g. granite) | RM 755 es |
Routine cleaning and basic cleaning of industrial floors | RM 69 ASF |
Routine cleaning and basic cleaning of fine stoneware tiles | RM 753 |
Routine cleaning of tiles in sanitary areas | RM 751 |
Cleaning and disinfection in sanitary areas | RM 732 |
Removal of coating from all alkali-resistant floors (e.g. PVC) | RM 752 |
Removal of coating from linoleum floors | RM 754 |
To improve the vacuuming result on tiled floors, the vacuum bar can be turned to an oblique position of up to 5°.
Loosen the wing nuts.
Adjust the oblique position of the vacuum bar.
Tighten the wing nuts.
If the suction result is unsatisfactory, the inclination of the straight vacuum bar can be adjusted.
Lift the tension lever.
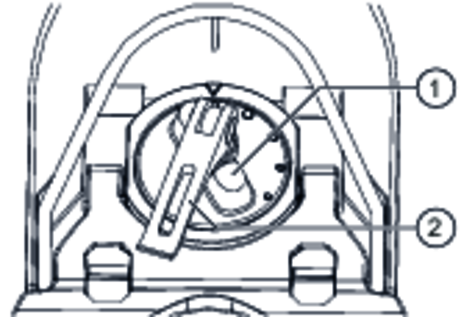
Adjust the rotary handle to incline the vacuum bar.
Press the tension lever downwards.
Adjust the wiper flaps by turning the adjustment wheel so that the flaps touch the floor.
Turn the adjustment wheel an additional turn toward the bottom.
Parameters for the different cleaning programmes are preset in the appliance.
Depending on the authorisation of the yellow Intelligent Key, individual parameters can be changed.
The modification of the parameters is only valid until another cleaning programme is selected via the programme selection switch.
If you wish to permanently change the parameters, you must use the grey Intelligent Key. This adjustment procedure is described in the section "Grey Intelligent Key".
Almost all displayed text regarding parameter adjustment is self-explanatory. The only exception is the parameter FACT:
Fine Clean: Lower brush speed for removing the grey film on fine stone floors.
Whisper Clean: Medium brush speed for regular cleaning at a reduced noise level.
Power Clean: High brush speed for polishing, crystallising and sweeping.
Turn the programme selection switch to the desired cleaning programme.
Turn the Info button until the desired parameter is displayed.
Press Info button. The set value blinks.
Set the desired value by turning the Info button.
Confirm the changed setting by pressing the Info button or wait till the set value is automatically accepted after 10 seconds.
Overflow of waste water tank. When the waste water tank is full, the suction turbine switches off and "Waste water tank full" is shown on the display.
Please observe the local provisions regarding waste water treatment.
Take the waste water discharge hose from the support and lower above a suited collection device.
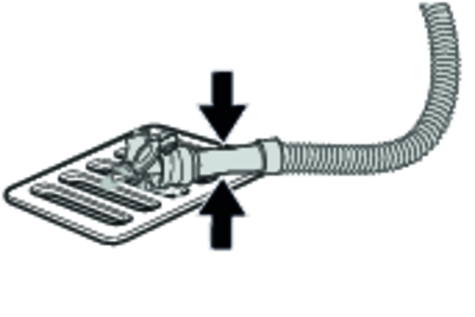
The waste water flow can be controlled by squeezing the dosing unit.
Release the water by opening the dosage device at the discharge hose.
The rinse the waste water reservoir with clear water.
Open the lock of the fresh water reservoir.
Drain the fresh water.
Attach the closure of the fresh water tank.
Remove the Intelligent Key.
Secure the machine with wheel chocks to prevent it from rolling away.
Charge the batteries if necessary.
Plug in the Intelligent Key.
Select the desired function by turning the Info button.
The different functions are described below.
Turn the programme selector switch to "transport run".
Press the Info button.
In the transport run menu, the following settings can be made:
In this menu item, the authorisations for yellow Intelligent Keys as well as the language of the display texts are selected.
Turn the Info button until "key managem." is shown on the display.
Press the Info button.
Remove the grey Intelligent Key and insert the yellow Intelligent Key to be programmed.
Select the desired menu item to be modified by turning the Info button.
Press the Info button.
Adjust the menu item by turning the Info button.
Confirm the setting by pressing the menu item.
Select the next menu item to be modified by turning the Info button.
In order to save the authorisations, call the "Save?" menu by turning the Info button and then press it.
"Continue key menu":
Yes: Programme further Intelligent Key.
No: Exit the key menu.
Press the Info button.
This function is required when changing the cleaning head.
Turn the Info button until "brush head" is shown on the display.
Press the Info button.
Turn the Info button until the desired brush shape is highlighted.
Press the Info button.
Move the hoist drive for replacement of the cleaning head by turning the Info button:
Up: Raise
Down: Lower
OFF: Stop
Exit menu: Select "OFF" by turning the Info button and press it.
When exiting the menu, the controllor performs a restart.
Turn the Info button until "stopping times" is shown on the display.
Press the Info button.
Turn the Info button until the desired assembly is highlighted.
Press the Info button.
Turn the Info button until the desired stopping time is reached.
Press the Info button.
Turn the Info button until "Battery menu" is displayed.
Press the Info button.
Turn the Info button until the desired battery type is highlighted.
Press the Info button.
Changes made to the parameters of the individual cleaning programmes during operation are reset to the basic setting after switching off the appliance.
Turn the Info button until "Basic setting" is displayed.
Press the Info button.
Turn the Info button until the desired cleaning programme is displayed.
Press the Info button.
Turn the Info button until the desired parameter is displayed.
Press the Info button - the set value blinks.
Set the desired value by turning the Info button.
Press the Info button.
Turn the Info button until "Language" is displayed.
Press the Info button.
Turn the Info button until the desired language is highlighted.
Press the Info button.
The factory settings of all parameters are restored.
Parameters that are adjusted with the grey Intelligent Key are kept until another setting is selected.
Turn the programme selection switch to the desired cleaning programme.
Press the Info button. The first adjustable parameter is displayed.
Press Info button. The set value blinks.
Set the desired value by turning the Info button.
Confirm the changed setting by pressing the Info button or wait till the set value is automatically accepted after 10 seconds.
Select the next parameter by turning the Info button.
After all desired parameters have been modified, turn the Info button until "Exit menu" is displayed.
Press the Info button to exit the menu.
Risk of injury! When loading or unloading the appliance, operate only on gradients of max. 10%. Drive slowly.
Risk of injury and damage! Take the weight of the appliance into account when transporting it.
When transporting in vehicles, secure the appliance according to the guidelines to prevent slipping and tipping over.
Remove brushes from the brush head.
Failure to observe the weight
Risk of injury and damage
Be aware of the weight of the device during storage.
Frost
Destruction of the device through freezing water
Drain all water from the device.
Store the device in a frost-free location.
This device may only be stored indoors.
Risk of injury! Before working on the appliance, remove the Intelligent Key and the mains plug of the charger.
Pull out the battery plug.
Drain and dispose of the waste water and the residual fresh water.
Risk of injury due to overrun of the suction turbine.
Suction turbine will continue to run for a while after switch-off. Carry out maintenance tasks only after the suction turbine has come to a halt.
Risk of damage. Do not spray the appliance with water and do not use aggressive detergents.
Drain waste water.
Clean the protective turbine strainer.
Clean the outside of the appliance with a damp cloth which has been soaked in mild detergent.
Clean the suction lips of the vacuum and the wiping lips. Check for wear and replace if required.
Check the brushes for wear. Replace if required.
Charge the battery.
During long operating pauses, carry out recharging of the battery.
Check battery poles for oxidation. Brush off if necessary. Ensure the connection cable is securely connected.
Clean the seals between waste water tank and cover, and check for tightness, replace if required.
Check the acid density of the cells if the batteries are not maintenance-free batteries.
Have the prescribed inspection carried out by the customer service.
When a maintenance task indicated in the display has been performed, the relevant maintenance counter must be reset afterwards.
Plug in the Intelligent Key.
Turn the safety switch to the "1" position.
Set programme selector switch to transport run.
Press the Info button.
Turn the Info button until "Maintenance counter" is displayed.
Press the Info button.
The counter readings are displayed.
Press the Info button.
"Delete counter" is indicated.
Turn the Info button until the counter to be deleted is highlighted.
Press the Info button.
Select "YES" by turning the Info button.
Press the Info button.
The counter is deleted.
The service counter can only be reset by customer service.
The service counter indicates the deadline for the next service by customer service.
To ensure a reliable operation of the appliance, the maintenance contracts must be concluded with the relevant Kärcher sales office.
Open the cover of the waste water tank.
Unscrew the screws.
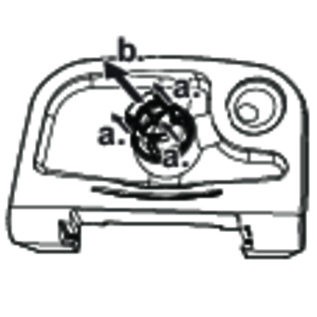
Pull off the float.
Turn the protective turbine strainer in a counterclockwise direction.
Remove the protective turbine strainer.
Rinse dirt off the protective turbine strainer with water.
Reattach the protective turbine strainer.
Attach the float.
Remove the vacuum bar.
Unscrew the star grips.

Remove the plastic parts.
Remove the suction lips of the vacuum.
Insert new suction lips.
Insert the plastic parts.
Screw in and tighten the star grips.
Lift the holder of the cleaning head (see Chapter "Operation/Selecting the brush shape".
Slide the cleaning head under the appliance so that the hose points toward the rear.
Only slide the cleaning head halfway under the appliance.
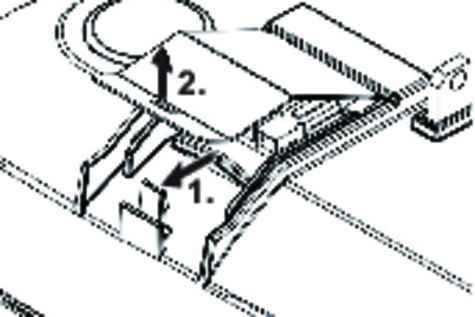
Remove the lid of the cleaning head.
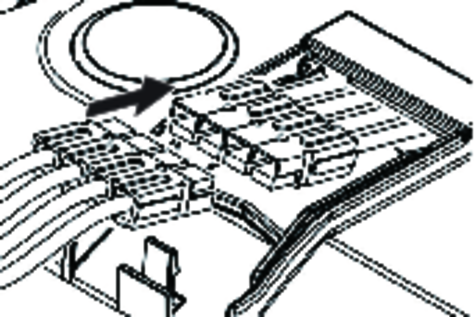
Connect the power cord of the cleaning head to the appliance (same colours must meet).
Replace the lid and lock it.
Slide the cleaning head halfway under the appliance.
Insert the tab into the middle of the cleaning head, between the fork of the lever.
Align the holder of the cleaning head so that the drilled holes in the lever and the cleaning head match.
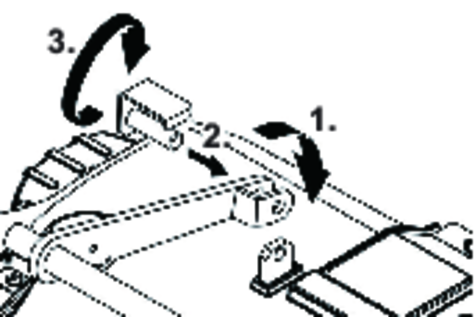
Insert the stop pin through the bushings and swivel the locking plate downward.
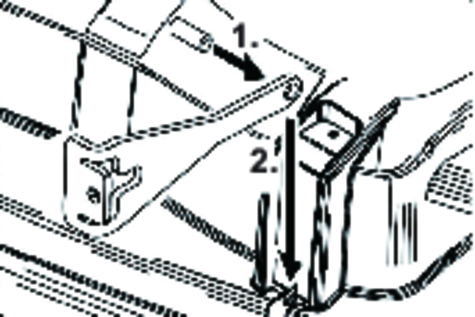
Insert the cylinder pin into the boring of the drawbar.
Slide the drawbar with the pin into the guide channel on the cleaning head all the way to the bottom.
Insert the locking plate into the guide channel and lock it in.
Repeat process on the drawbar on the opposite side.
Insert the grey Intelligent Key.
Set brush type "Disc".
Press in the locking plate and swivel the drawbar upward.
Subsequent removal occurs in the opposite order of the installation.
Lift the cleaning head.

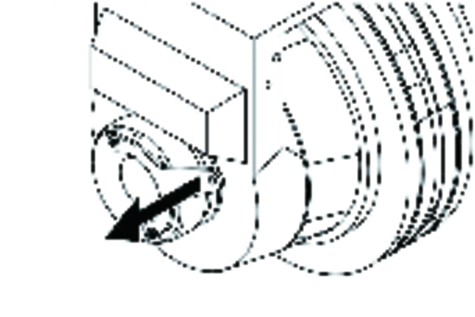
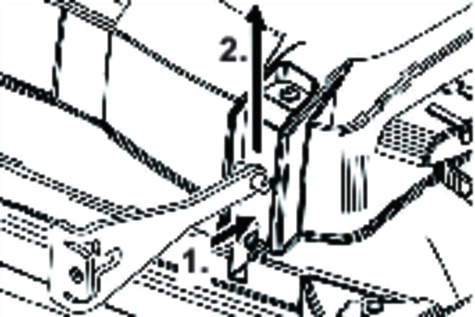
Press the pedal for changing the brushes downward beyond its resistance.
Pull the disc brush out of the side below the cleaning head.
Hold the new disc brush under the cleaning head, push upward and lock.
In case of danger of frost:
Empty the fresh and waste water reservoirs.
Store the appliance in a frost-protected room.
Risk of injury! Before working on the appliance, remove the Intelligent Key and the mains plug of the charger.
Pull out the battery plug.
Drain and dispose of the dirty water and the residual fresh water.
Risk of injury due to overrun of the suction turbine.
Suction turbine will continue to run for a while after switch-off. Carry out maintenance tasks only after the suction turbine has come to a halt.
In case of faults that cannot be remedied using the table below, please contact customer service.
Fault messages that are not listed in the table indicate faults that cannot be rectified by the operator. Please contact customer service.
If errors appear on the display, then proceed as follows:
Remedy:
Execute instructions on the display.
Acknowledge the fault by pressing the Info button.
Remedy:
Turn the programme selection switch to "OFF".
Wait till the text on the display has disappeared.
Turn the programme switch Into the previous position.
Only carry out the troubleshooting measures in the indicated order if the error occurs again. The key switch must be in the "0" position and the emergency stop button pressed.
If the fault cannot be repaired, contact customer service and mention the error message.
Cause:
Seat contact switch has not been activated.
Remedy:
Release the drive pedal. Sit on the seat.
Cause:
The gas pedal is pressed down when the main switch is on.
Remedy:
Release drive pedal and reactivate.
Cause:
Travel direction switch or cable connection defective.
Remedy:
Contact customer service.
Cause:
Battery voltage is too low.
Remedy:
Charge the battery.
Cause:
Battery voltage is above or below the permissible range.
Remedy:
Contact customer service.
Cause:
The fresh water tank is empty.
Remedy:
Fill up fresh water reservoir.
Cause:
Timeout brush contact pressure control.
Remedy:
Check brush wear. Replace brush if required.
Check the function of the brush heads: lowering and raising.
Cause:
The waste water tank is full.
Remedy:
Empty the waste water tank.
Cause:
The waste water tank is full.
Remedy:
Contact customer service.
Cause:
The brake is defective.
Remedy:
Do not drive the appliance.
Contact customer service.
Cause:
Motor protection is triggered.
Remedy:
Turn the safety switch to the "0" position.
Allow the appliance to cool down for at least 15 minutes.
Contact customer service in case of recurrence.
Cause:
The horn is defective.
Remedy:
Contact customer service.
Cause:
Performance electronics of lift module (A4) is too hot.
Remedy:
Turn the safety switch to the "0" position.
Allow control to cool down at least 5 minutes.
Reduce the brush pressure with the rough ground.
Contact customer service in case of recurrence.
Cause:
Load of the brush heads is asymmetric.
Remedy:
Adjust the brush level.
Remedy:
Seat switch not operated, Sit down on the seat.
The appliance operates only if the operator is seated on the seat.
Remedy:
Turn the safety switch to the "1" position.
Remedy:
Set the programme switch to "OFF". Wait for 10 seconds. Set the programme selector switch to the previous function. If possible, drive the appliance on level ground only. Check the parking brake and the foot brake if necessary.
Remedy:
Take the foot off the accelerator pedal prior to switch on the safety switch.
If the fault recurs, contact customer service.
Remedy:
Check the battery.
Charge the battery if needed.
Remedy:
Check the fresh water level. Refill the fresh water tank if necessary.
Check the hoses for blockages. Clean them if required.
Clean the fresh water filter.
Remedy:
Clean the seals between the waste water tank and the cover, and check for tightness. Replace the seals if required.
Check the protective turbine strainer for soiling. Clean it if necessary.
Clean the vacuum lips on the vacuum bar. Turn or replace it if required.
Check if the cover on the waste water discharge hose is closed.
Check the suction hose for blockages. Clean it if required.
Check the suction hose for tightness. Replace it if required.
Check the setting of the vacuum bar.
Attach the additional weight (accessory) to the vacuum bar.
Remedy:
Reduce the contact pressure.
Check if the foreign matters block the brushes. Remove the foreign matter if required.
Motor is overloaded. Allow to cool down.
Set the programme switch to "OFF".
Wait for 10 seconds.
Set the programme selector switch to the previous function.
Remedy:
Open the dosing equipment at the drain hose.
Pull out the suction hose from the suction beam, and close the suction hose by hand.
Set the program selection switch to suction or vacuuming.
The blockage will be sucked out from the drain hose into the waste water tank.
Remedy:
Set and adjust the contact pressure.
Adjust the wiper lips.
Check the brushes for wear. Replace the brushes if required.
Remedy:
Execute instructions on the display.
Acknowledge the fault by pressing the Info button.
Remedy:
Turn the programme selection switch to "OFF".
Wait till the text on the display has disappeared.
Turn the programme switch Into the previous position.
Only carry out the troubleshooting measures in the indicated order if the error occurs again. The key switch must be in the "0" position and the emergency stop button pressed.
If the fault cannot be repaired, contact customer service and mention the error message.
Cause:
Seat contact switch has not been activated.
Remedy:
Release the drive pedal. Sit on the seat.
Cause:
The gas pedal is pressed down when the main switch is on.
Remedy:
Release drive pedal and reactivate.
Cause:
Travel direction switch or cable connection defective.
Remedy:
Contact customer service.
Cause:
Battery voltage is too low.
Remedy:
Charge the battery.
Cause:
Battery voltage is above or below the permissible range.
Remedy:
Contact customer service.
Cause:
The fresh water tank is empty.
Remedy:
Fill up fresh water reservoir.
Cause:
Timeout brush contact pressure control.
Remedy:
Check brush wear. Replace brush if required.
Check the function of the brush heads: lowering and raising.
Cause:
The waste water tank is full.
Remedy:
Empty the waste water tank.
Cause:
The waste water tank is full.
Remedy:
Contact customer service.
Cause:
The brake is defective.
Remedy:
Do not drive the appliance.
Contact customer service.
Cause:
Motor protection is triggered.
Remedy:
Turn the safety switch to the "0" position.
Allow the appliance to cool down for at least 15 minutes.
Contact customer service in case of recurrence.
Cause:
The horn is defective.
Remedy:
Contact customer service.
Cause:
Performance electronics of lift module (A4) is too hot.
Remedy:
Turn the safety switch to the "0" position.
Allow control to cool down at least 5 minutes.
Reduce the brush pressure with the rough ground.
Contact customer service in case of recurrence.
Cause:
Load of the brush heads is asymmetric.
Remedy:
Adjust the brush level.
Remedy:
Seat switch not operated, Sit down on the seat.
The appliance operates only if the operator is seated on the seat.
Remedy:
Turn the safety switch to the "1" position.
Remedy:
Set the programme switch to "OFF". Wait for 10 seconds. Set the programme selector switch to the previous function. If possible, drive the appliance on level ground only. Check the parking brake and the foot brake if necessary.
Remedy:
Take the foot off the accelerator pedal prior to switch on the safety switch.
If the fault recurs, contact customer service.
Remedy:
Check the battery.
Charge the battery if needed.
Remedy:
Check the fresh water level. Refill the fresh water tank if necessary.
Check the hoses for blockages. Clean them if required.
Clean the fresh water filter.
Remedy:
Clean the seals between the waste water tank and the cover, and check for tightness. Replace the seals if required.
Check the protective turbine strainer for soiling. Clean it if necessary.
Clean the vacuum lips on the vacuum bar. Turn or replace it if required.
Check if the cover on the waste water discharge hose is closed.
Check the suction hose for blockages. Clean it if required.
Check the suction hose for tightness. Replace it if required.
Check the setting of the vacuum bar.
Attach the additional weight (accessory) to the vacuum bar.
Remedy:
Reduce the contact pressure.
Check if the foreign matters block the brushes. Remove the foreign matter if required.
Motor is overloaded. Allow to cool down.
Set the programme switch to "OFF".
Wait for 10 seconds.
Set the programme selector switch to the previous function.
Remedy:
Open the dosing equipment at the drain hose.
Pull out the suction hose from the suction beam, and close the suction hose by hand.
Set the program selection switch to suction or vacuuming.
The blockage will be sucked out from the drain hose into the waste water tank.
Remedy:
Set and adjust the contact pressure.
Adjust the wiper lips.
Check the brushes for wear. Replace the brushes if required.
The warranty conditions issued by our sales company responsible apply in all countries. We shall remedy possible malfunctions on your device within the warranty period free of cost, provided that a material or manufacturing defect is the cause. In a warranty case, please contact your dealer (with the purchase receipt) or the next authorised customer service site.
You can find more detailed information at: www.kaercher.com/dealersearch
Leistungsdaten Gerät | |
Nennspannung | 36 V |
Batteriekapazität | 240 / 300 Ah (5 h) |
Mittlere Leistungsaufnahme | 2500 W |
Leistung Fahrmotor | 600 W |
Leistung Saugturbine | 750 W |
Leistung Bürstenantrieb | 2 * 600 W |
Theoretische Flächenleistung | 5400 m2/h |
Volumen Frischwassertank | 160 l |
Höchstgeschwindigkeit | 6 km/h |
Steigung Arbeitsbereich max. | 10 % |
Saugen | |
Saugleistung, Luftmenge | 26 l/s |
Saugleistung, Unterdruck | 18.0 kPa |
Reinigungsbürsten | |
Arbeitsbreite | 900 mm |
Bürstendurchmesser | 450 mm |
Bürstendrehzahl | 140 1/min |
Maße und Gewichte | |
Länge | 1700 mm |
Breite (ohne Saugbalken) | 900 mm |
Höhe | 1400 mm |
Zulässiges Gesamtgewicht | 1130 kg |
Leergewicht (Transportgewicht) | 775 kg |
Flächenbelastung (mit Fahrer und vollem Frischwassertank) | |
Flächenbelastung, Vorderrad | 100 N/cm2 |
Flächenbelastung, Hinterrad | 82 N/cm2 |
Ermittelte Werte gemäß EN 60335-2-72 | |
Hand-Arm-Vibrationswert | < 2.5 m/s2 |
Unsicherheit K | 0.1 m/s2 |
Sitz-Vibrationswert | < 2.5 m/s2 |
Unsicherheit KpA | 2 dB(A) |
Schalldruckpegel LpA | 67 dB(A) |
Schallleistungspegel LWA + Unsicherheit KWA | 85 dB(A) |