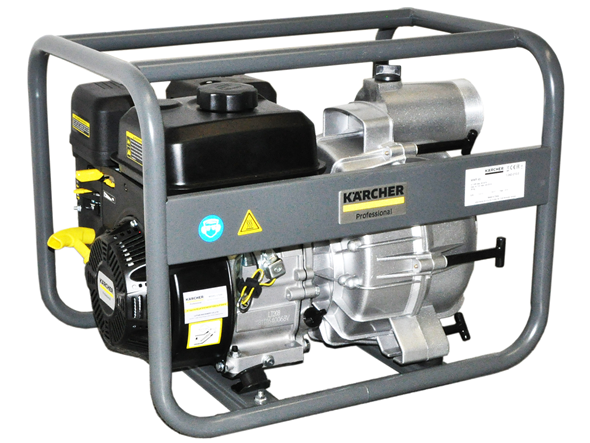
WWP 45
59686320 (02/24)
59686320 (02/24)
 Read these original operating instructions and the enclosed safety instructions before using the device for the first time. Proceed accordingly.
Keep both books for future reference or for future owners.
This waste water pump must not be operated in enclosed spaces and is only approved for outdoor operation.
This waste water pump is not approved for use in the food industry.
Only fresh water may be delivered using the pump.
Using the pump for inflammable substances such as petrol, diesel or heating oil is prohibited due to the danger of fire and explosion.
Delivering salt water, acidic chemicals and other corrosive substances can damage the pump.
As delivered, this waste water pump is intended for use at heights of up to 1500 m above sea level. It can be adjusted by an authorised Customer Service department for use at higher elevations.
If a device that has been adjusted for use at higher elevations is used below this height then this can result in destruction of the motor through overheating.
 The packing materials can be recycled. Please dispose of packaging in accordance with the environmental regulations.
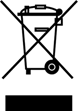 Electrical and electronic devices contain valuable, recyclable materials and often components such as batteries, rechargeable batteries or oil, which - if handled or disposed of incorrectly - can pose a potential danger to human health and the environment. However, these components are required for the correct operation of the device. Devices marked by this symbol are not allowed to be disposed of together with the household rubbish.
Current information on content materials can be found at: www.kaercher.de/REACH
Only use original accessories and original spare parts. They ensure that the appliance will run fault-free and safely.
Information on accessories and spare parts can be found at www.kaercher.com.
Check the contents for completeness when unpacking. If any accessories are missing or in the event of any shipping damage, please notify your dealer.
Indication of an imminent threat of danger that will lead to severe injuries or even death.
Indication of a potentially dangerous situation that may lead to severe injuries or even death.
Indication of a potentially dangerous situation that may lead to minor injuries.
Indication of a potentially dangerous situation that may lead to damage to property.
Danger of injury.
The device is not intended for use by persons with restricted physical, sensory or mental abilities or those lacking in experience and / or lacking in knowledge.
Children must be supervised to prevent them from playing with the device.
Children and minors must not use the device.
Danger of explosion.
Never operate the device in potentially explosive environments.
Observe the corresponding safety instructions when operating the device in hazard zones (e.g. a petrol station).
Only fill the fuel specified in the operating instructions.
Only refuel with the engine switched off.
Do not refuel in confined spaces.
Smoking and open flames are prohibited.
Ensure that no fuel gets on hot surfaces during refuelling.
Close the fuel tank cap after refuelling.
Do not operate the device if fuel has been spilt. Move the device to another location and avoid generating sparks.
Store fuel only in approved containers.
Do not store fuel in the vicinity of open flames or devices having an ignition flame or that generate sparks (e.g. oven, heating boiler or water heater).
Do not spray start spray into the air filter.
Danger of fire.
Maintain a minimum distance of 2 m between inflammable objects and the muffler.
Do not operate the device in forests, bushy or grassy areas unless the exhaust pipe has been equipped with a spark catcher.
Keep grass and other soiling substances away from the cooling fins.
Do not operate the device if the fuel system is damaged or leaking. Check the fuel system regularly.
Allow the device to cool down before storing in closed rooms.
Danger of electric shock
Do not touch the spark plug or ignition lead when the device is in operation.
Health risk
Exhaust gases are toxic. Never breathe in the exhaust gases. Never operate the device in confined spaces. Ensure sufficient ventilation and extraction of the exhaust gases.
Make sure that no exhaust gases are emitted close to air vents.
Avoid repeated or prolonged contact with fuel or engine oil and do not inhale the fuel vapours.
Danger of burns
Do not touch any hot parts such as the muffler, cylinder or cooling fins.
Danger of hearing damage
Do not operate the device without a muffler. Check the muffler regularly and have a damaged muffler replaced.
Risk of damage
Use only spare parts from the original manufacturer.
Old fuel can lead to deposits in the carburettor and impair the engine performance. Use only new fuel.
Do not adjust any control springs or linkages that might increase the speed of the engine.
Do not operate the device with the air filter removed.
Do not pull the starter cord while the device is running.
Ensure adequate ventilation so that the device does not overheat.
Drain all water from the pump if there is a danger of frost.
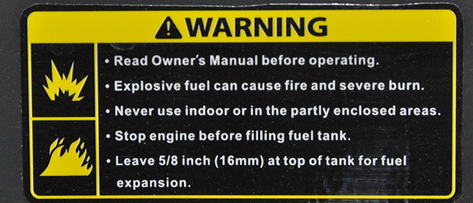
Danger of explosion, risk of fire.
Petrol can cause fires or explosions if handled incorrectly.
Read these operating instructions before using the device.
Do not operate the device in confined spaces or partially enclosed areas.
Shut the motor down prior to refuelling.
Fill the tank only up to 16 mm below the upper edge of the tank to allow room for expansion of the fuel.
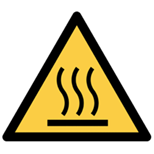
Hot surface
The exhaust pipe of the device becomes very hot during operation and can cause burns.
Avoid touching the exhaust pipe.

Risk of eye injuries and hearing damage.
Wear safety goggles and hearing protection when operating the device.
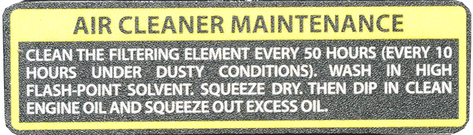
Clean the air filter every 50 operating hours or every 10 operating hours in the case of dusty environments(see "Care and maintenance/Cleaning the air filter").
Note on checking the oil level.

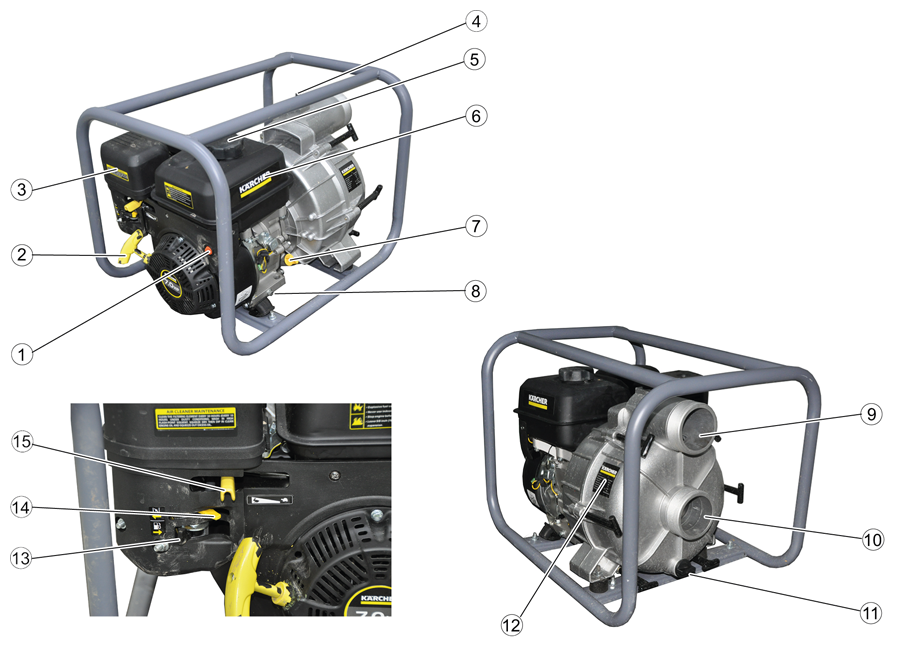
Choke lever

Accelerator lever
Position the device on a level surface.
Unscrew the oil dipstick.
Fill with engine oil.
Note: The engine oil is not included in the scope of delivery. The filling quantity and oil type are specified in the section "Technical data".
Wipe off the oil dipstick.
Insert the oil dipstick as far as it will go, but do not screw in.
Pull out the oil dipstick. The oil level must lie in the marked section of the oil dipstick.
Top up the engine oil if the level is too low.
Screw in and tighten the oil dipstick.
Position the device on a level surface.
Unscrew the oil dipstick.
Wipe off the oil dipstick.
Insert the oil dipstick as far as it will go, but do not screw in.
Pull out the oil dipstick. The oil level must lie in the marked section of the oil dipstick.
Top up the engine oil if the level is too low.
Screw in and tighten the oil dipstick.
Unscrew the fuel tank cap.
Fill fuel up a maximum of the lower edge of the filling nozzle.
Fit the fuel tank cap and screw tight.
The delivery performance of the pump is heavily dependent on the operating conditions. Adhering to the following rules will ensure optimum performance.
Keep the height difference between the water surface and the pump as small as possible.
Position the pump so that the suction hose is a short as possible.
A long pressure hose is better than a long suction hose.
Do not unnecessarily long hoses.
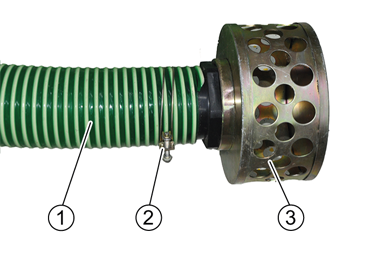
Push the hose clip onto the suction hose.
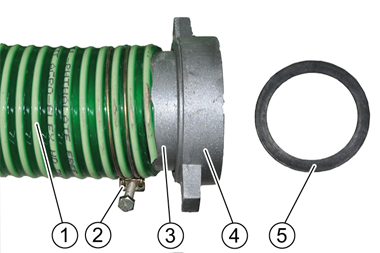
Slide the union nut onto the hose nipple.
Push the suction hose onto the hose nipple.
Position and tighten the hose clip.
Fit a flat seal between the suction nozzle and hose nipple.
Note: A reinforced hose suitable for vacuum applications must be used for the suction hose.
Connect the suction hose to the suction nozzle and tighten the union nut.
Fit the suction filter to the other end of the suction hose.
Fit a hose nipple, union nut and hose clip to the pressure hose (not included in the scope of delivery).
Fit a flat seal between the hose nipple and outlet.
Connect the pressure hose to the outlet and tighten the union nut.
Risk of damage
The seals will be damaged if the pump runs dry.
Vent the pump before starting. If the pump is accidentally run dry then stop the engine immediately and allow the pump to cool down before starting the venting procedure.
Unscrew the cap from the filler opening.
Fill the pump completely with water.
Screw the cap back into the filler opening and tighten.
Vent air from the pump.
Open the fuel cock.
Push the choke lever to the left.
Push the accelerator lever to approximately 1/3 of the total range.
Set the power switch to "I".
Pull the starter cord slowly until a strong resistance is discernible then pull strongly.
Slowly return the starter cord.
Risk of damage
A rapidly returning starter cord damages the device.
Slowly return the starter cord.
Push the choke lever to the right once the engine has started.
Push the accelerator lever to the left until reaching the desired speed. The flow rate of the pump depends on the engine speed.
Check the function of the pump. Dry running damages the pump. Switch off the engine and repeat venting of the pump if the pump does not deliver water.
Set the power switch to "0".
Push the accelerator lever all the way to the right.
Set the power switch to "0".
Close the fuel cock.
Unscrew the water drain screw.
Allow the water to drain from the pump.
Unscrew the cap from the filler opening.
Flush the pump with fresh water.
Allow the fresh water to drain away.
Screw the cap into the filler opening and tighten.
Screw in and tighten the water drain screw.
Set the power switch to "0" before transport.
Allow the engine to cool down for at least 15 minutes before loading.
Keep the device horizontal during transport to prevent fuel from spilling out.
When transporting in vehicles, secure the device against rolling away, slipping and tipping according to the respectively applicable guidelines.
Be aware of the weight of the device during transport.
Failure to observe the weight
Risk of injury and damage
Be aware of the weight of the device during storage.
Risk of damage
Do not place any heavy objects on the device.
Store the device in a dry and dust-free place.
The device must be cleaned before storage.
Allow the device to cool down for a half-hour if it was recently in operation.
Flush the pump with clear water.
Manually wash the exterior of the device with a small amount of water.
Rub all accessible surfaces dry.
Unscrew the water drain screw and allow the water to drain out.
Screw in and tighten the water drain screw.
Lightly oil rust-prone surfaces.
Spray the control elements with silicone spray.
Add petrol stabiliser to the fuel tank.
Top up the fuel tank.
Additionally:
Close the fuel cock.
Place a container under the carburettor.
Unscrew the drain screw.
Collect the fuel in the container.
Screw in and tighten the drain screw.
Empty the settling cup (see "Care and Maintenance/Cleaning the settling cup").
Additionally:
Unscrew the spark plug.
5...10 cm3 Add engine oil to the cylinder.
Slowly pull the starter cord several times to distribute the oil in the engine.
Screw in the spark plug.
Change the oil (see "Care and Maintenance/Changing the oil").
Pull the starter cord slowly until a strong resistance is discernible.
Danger of injury from electric shock.
The device can start unintentionally. You can be injured by moving parts.
Remove the spark plug connector before performing any maintenance work.
Danger of burns.
Hot device components cause burns if touched.
Allow the device to cool down before working on it.
* See "Startup" for a description.
** See "Maintenance work" for a description.
Check the device for correct condition and operational safety. Do not start up a damaged device.
Check the oil level. *
Check the air filter. **
Change the oil. **
Clean the air filter. **
Perform cleaning more frequently in a dusty application environment.
Change the oil. **
Clean the settling cup. **
Check and clean the spark plug. **
Clean the spark catcher (not included in the scope of delivery). **
Check and adjust the valve play.
Clean the fuel tank and fuel filter.
Replace the air filter insert.
Replace the spark plug.
Check/adjust the idling mixture speed.
Check/adjust the valve play.
Check the pump impeller.
Check the gap between the casing and impeller.
Check the pump inlet valve.
Check the fuel line and replace if necessary.
Clean the engine combustion chamber.
Lift the strap and remove the cover.

Check the air filter insert for soiling. Clean the air filter if necessary or replace if damaged (see "Cleaning the air filter").
Fit the cover and latch into place.
Risk of damage
Penetrating dust can destroy the engine if the air filter insert is absent.
Do not operate the device without an air filter insert.
Open the air filter (see "Checking the air filter").
Remove the air filter insert.
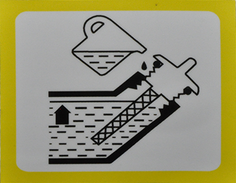
Wash the air filter insert in warm water and household cleaner then rinse with clear water.
Note: Dispose of the oil contaminated washing solution in an environmentally friendly manner.
Allow the air filter insert to dry.
Saturate the air filter insert in clean engine oil and press out the excess oil.
Fit the air filter insert back into place.
Fit the cover.
Close the latches.
Perform the oil change on a warm engine.
Unscrew the oil dipstick.
Unscrew the oil drain screw with seal and catch the escaping oil.
Screw in and tighten the oil drain screw with seal.
Position the device on a level surface.
Measure the correct quantity of engine oil (for oil type see "Technical data") and fill through the oil dipstick hole.
Check the oil level (see "Starting up").
Screw in and tighten the oil dipstick.
Dispose of the old oil in accordance with the environmental regulations.
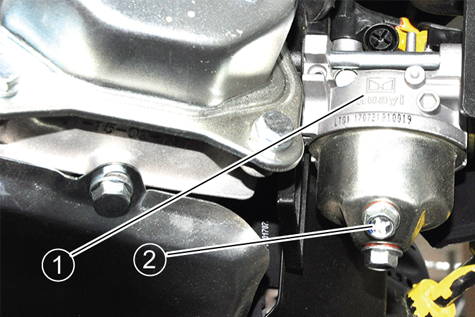
The settling cup separates water from the petrol.
Close the fuel cock.
Unscrew the settling cup.
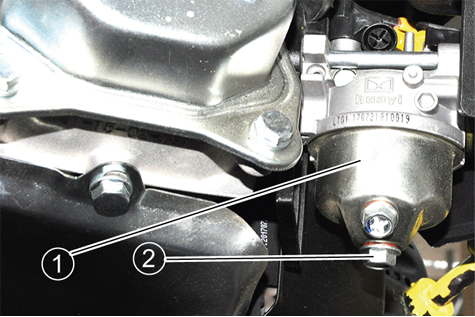
Remove the settling cup with O-ring.
Clean the settling cup and O-ring using a non-inflammable solvent and allow to dry.
Fit the settling cup and O-ring and screw tight.
Open the fuel cock.
Check the seal between the settling cup and carburettor.
Close the fuel cock.
Pull off the spark plug connector.

Clean the region around the spark plug to prevent dirt from entering the engine when the spark plug is removed.
Unscrew the spark plug.
Replace a spark plug that has worn electrodes or a broken insulator.
Check the electrode gap of the spark plug. Target value 0.7...0.8 mm.
Check the spark plug seal for damage.
Risk of damage
A loose spark plug can overheat and damage the engine. An overtightened spark plug can damage the thread in the engine.
Observe the following instructions for tightening the spark plug.
Carefully screw the spark plug in by hand. Do not cross the thread.
Screw the spark plug all the way in using the plug spanner and the tighten as follows.
Tighten a used spark plug by an additional 1/8...1/4 turn.
Tighten a new spark plug by an additional 1/2 turn.
Plug on the spark plug connector.
Have all checks and work on electrical parts performed by an expert.
In case of any malfunctions not mentioned in this chapter, contact the authorised Customer Service.
The engine does not start.
Remedy:
Open the fuel cock.
Push the choke lever to the left.
Set the power switch to "I".
Fill the tank with fuel.
Check the oil level and top up if necessary.
Clean the fuel tank and carburettor. Refuel with fresh fuel.
Check the spark plug (see"Care and maintenance/Checking and cleaning the spark plug").
Allow a wet spark plug to dry. Then start the engine with the accelerator lever at the full speed position.
Clean the settling cup (see "Care and Maintenance/Cleaning the settling cup").
Low engine performance
Remedy:
Check the air filter.
Clean the fuel tank and carburettor. Refuel with fresh fuel.
Pump does not deliver any water
Remedy:
Vent air from the pump.
Check the suction hose for leaks and holes.
Check the flat seal between the device and the suction hose.
Use a more sturdy suction hose.
Completely immerse the suction filter.
Clean the suction filter.
Position the pump closer to the water source. Reduce the height difference between the pump and water surface.
Use shorter hoses.
Low delivery rate
Remedy:
Check the suction hose for leaks and holes.
Check the flat seal between the device and the suction hose.
Use a more sturdy suction hose.
Completely immerse the suction filter.
Clean the suction filter.
Position the pump closer to the water source. Reduce the height difference between the pump and water surface.
Use shorter hoses.
The warranty conditions issued by our sales company responsible apply in all countries. We shall remedy possible malfunctions on your device within the warranty period free of cost, provided that a material or manufacturing defect is the cause. In a warranty case, please contact your dealer (with the purchase receipt) or the next authorised customer service site.
You can find more detailed information at: www.kaercher.com/dealersearch
We hereby declare that the machine described below complies with the relevant basic safety and health requirements in the EU Directives, both in its basic design and construction as well as in the version placed in circulation by us. This declaration is invalidated by any changes made to the machine that are not approved by us.
Product: Waste water pump
Type: 1.042-xxx
Currently applicable EU Directives2006/42/EC (+2009/127/EC)
2011/65/EU
2014/30/EU
2000/14/EC
Harmonised standards usedEN 809: 1998: A1: 2009 + AC: 2010
EN IEC 63000: 2018
EN ISO 14982:2009
National standards used-
Conformity evaluation procedure used2000/14/EG: Anhang V
Sound power level dB(A)
Measured: 101
Guaranteed: 104
The signatories act on behalf of and with the authority of the company management.

Documentation supervisor:
S. Reiser
Alfred Kärcher SE & Co. KG
Alfred-Kärcher-Str. 28 - 40
71364 Winnenden (Germany)
Ph.: +49 7195 14-0
Fax: +49 7195 14-2212
Winnenden, /01/02
Pump | |
Nominal width“ | 3 |
Maximum flow rate | 45000 l/h |
Suction height (max.) | 7 m |
Delivery height (max.) | 25 m |
Internal combustion engine | |
Engine type | Single-cylinder |
Type | 4-stroke |
Cooling type | Air-cooled |
Engine capacity | 196 cm3 |
Engine performance | 5,1/6,9 kW/PS |
Fuel type | Petrol, min. 88 octane |
Fuel tank capacity | 3,6 l |
Working time with a fully filled fuel tank | 2,1 h |
Engine oil volume | 0,5 l |
Oil type | 10 W-30
15 W-40 |
Spark plug type | F5T, F6TJC, F7TJC |
Dimensions and weights | |
Length | 580 mm |
Width | 440 mm |
Height | 450 mm |
Weight without fuel | 36 kg |
CO2Emissions according to the measurement procedure of EU regulation 2016/1628 Euro V | |
Motor | 790 g/kWh |