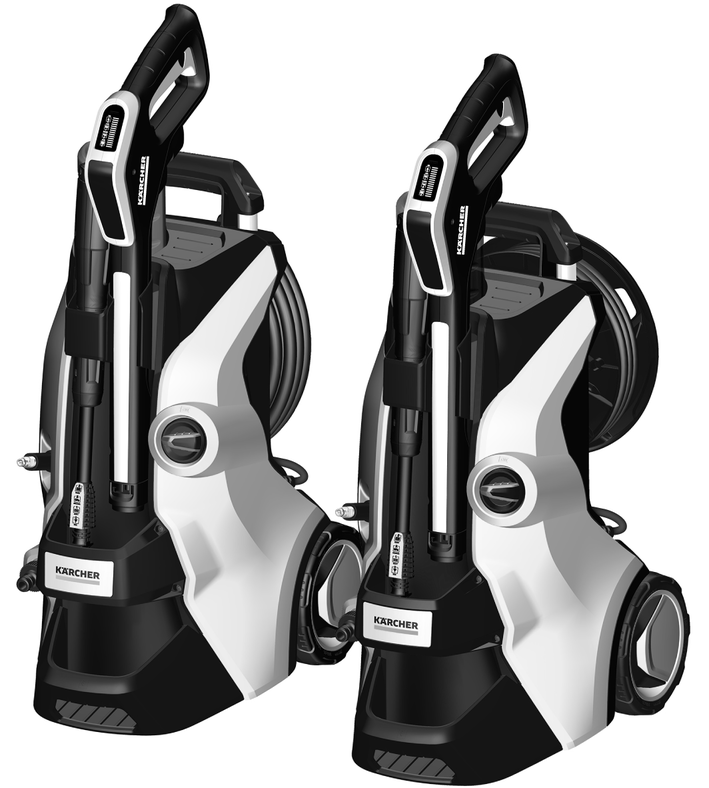
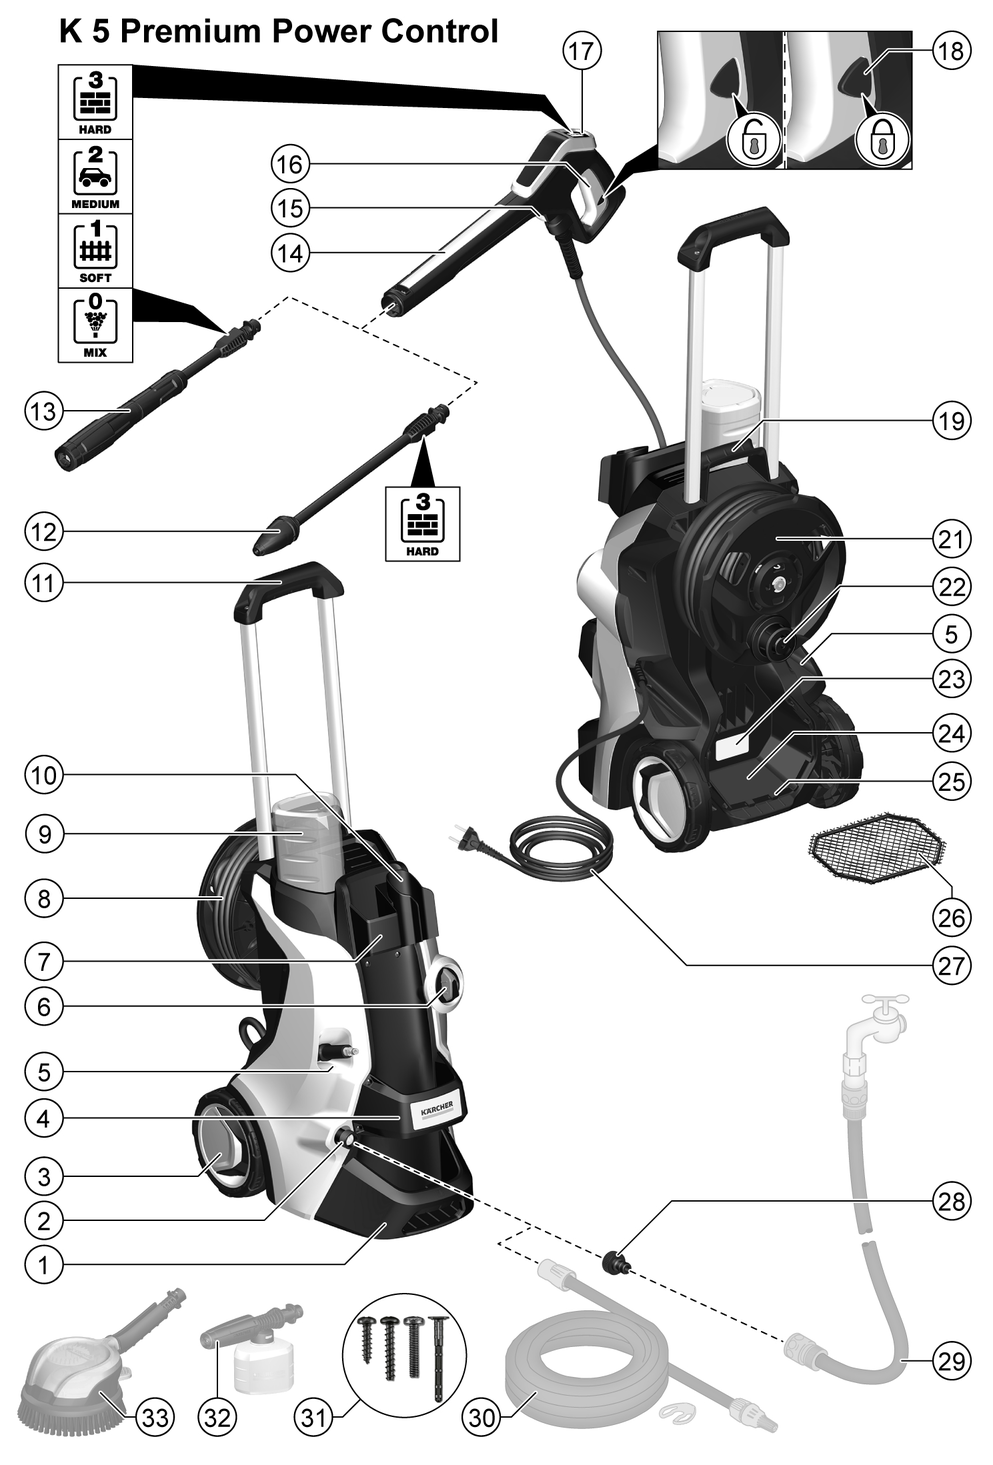
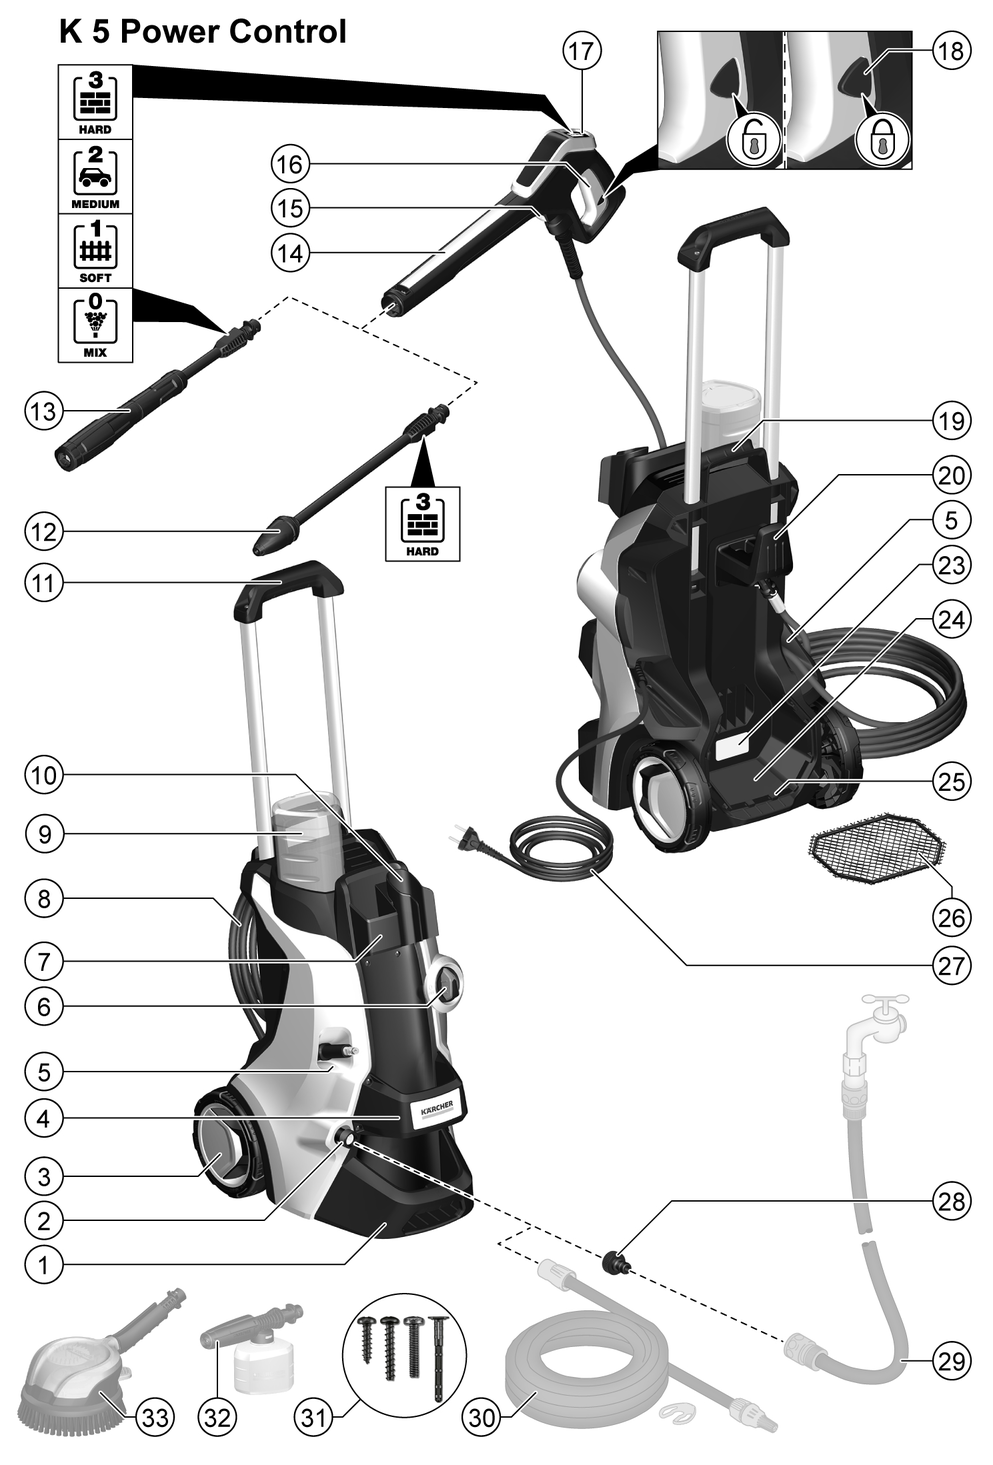
K 5 (Premium) Power ControlK 5 Power Control
59688390 (12/20)
59688390 (12/20)
 Read these original operating instructions and the enclosed safety instructions before using the device for the first time. Proceed accordingly.
Keep both books for future reference or for future owners.
The KÄRCHER Home & Garden app contains:
Installation and initial startup information
Information about the areas of application
Tips & Tricks
FAQ with detailed troubleshooting
Connection to the KÄRCHER Service Centre
The app can be downloaded here:

Trademarks
™ and ™ are trademarks or registered trademarks of Google Inc.
® and ® are trademarks or registered trademarks of Apple Inc.
 The packing materials can be recycled. Please dispose of packaging in accordance with the environmental regulations.
 Electrical and electronic appliances contain valuable, recyclable materials and often components such as batteries, rechargeable batteries or oil, which - if handled or disposed of incorrectly - can pose a potential danger to human health and the environment. However, these components are required for the correct operation of the appliance. Appliances marked by this symbol are not allowed to be disposed of together with the household rubbish.
 Cleaning work producing in oily waste water, e.g. washing engines, washing undercarriages etc., may only be performed at washing stations with an oil separator.
Working with detergents may only be performed on watertight surfaces with connection to the waste water sewage system. Do not allow detergent to enter waterways or the soil.
Extraction of water from public waterways is not permitted in some countries.
Current information on content materials can be found at: www.kaercher.de/REACH
Use the high-pressure cleaner in private households only.
The high-pressure cleaner is intended for cleaning machines, vehicles, buildings, tools, façades, terraces, garden machines etc. using a high-pressure water jet.
Only use original accessories and original spare parts. They ensure that the appliance will run fault-free and safely.
Information on accessories and spare parts can be found at www.kaercher.com.
The scope of delivery for the appliance is shown on the packaging. Check the contents for completeness when unpacking. If any accessories are missing or in the event of any shipping damage, please notify your dealer.
The maximum amount of equipment is described in these operating instructions. Depending on the model used, there are differences in the scope of delivery (see packaging).
* optional, ** zusätzlich erforderlich
Missing or modified safety devices
Safety devices are provided for your own protection.
Never modify or bypass safety devices.
The power switch prevents unintentional operation of the device.
The lock locks the lever of the high-pressure gun and prevents the device from starting unintentionally.
If the lever of the high-pressure gun is released, the pressure switch turns off the pump and the high-pressure jet stops. The pump switches on again when the lever is pressed.
The motor circuit breaker shuts off the device if power consumption it too high.
 | Do not aim the high-pressure jet may at persons, animals, live electrical equipment or the device itself. Protect the device against frost. |
 | The device may not be connected to the public drinking water network. |
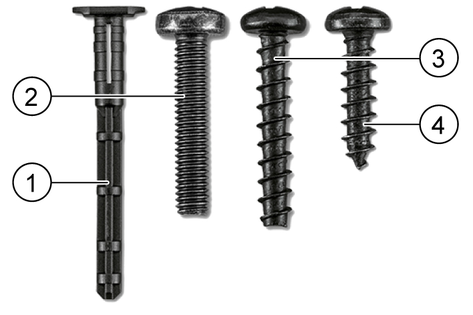
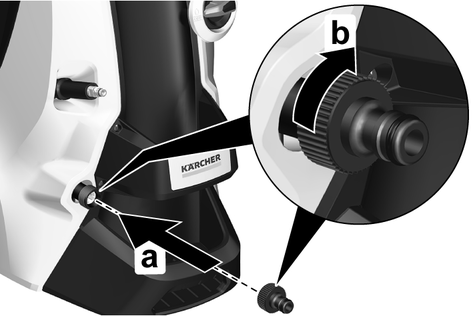
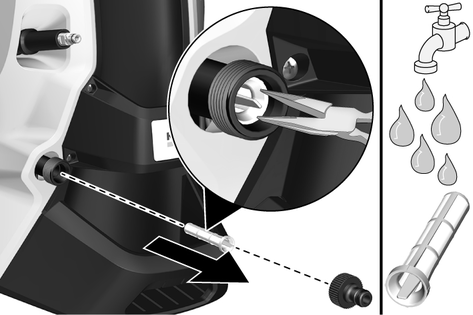
Place the screws provided and matching screwdriver at the ready.
Fit the supplied loose parts onto the device before starting up the device.
Insert the wheels.
Pay attention to the alignment of the hole.
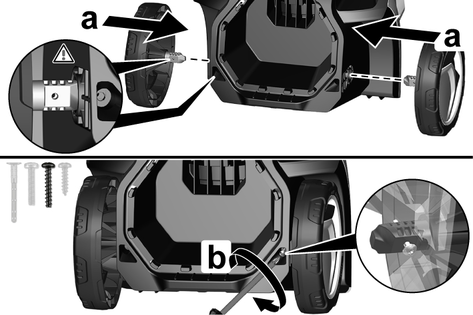
Secure the wheels with 1 screw each.
Insert the stand.
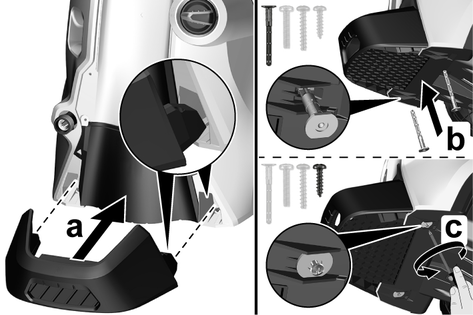
Insert the 2 dowels into the holes as far as they will go.
Secure the base with 2 screws.
Hang the spray lance storage in position.
Secure the storage with 2 screws.
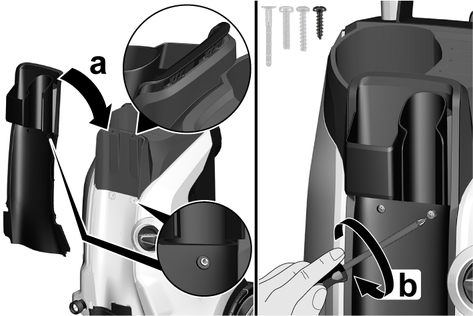
Secure the cover with 4 screws.
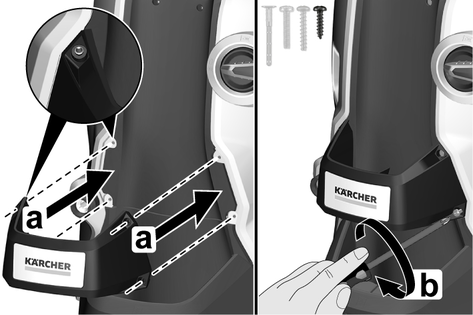
Attach the transport handle.

Secure the transport handle with 2 screws.
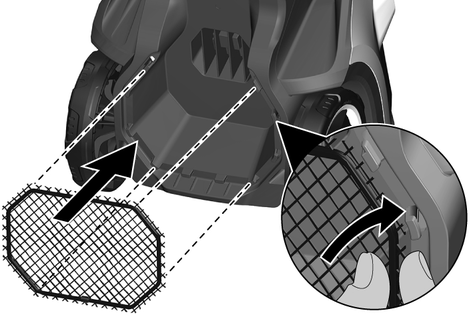
Hang the accessory net on the hooks.
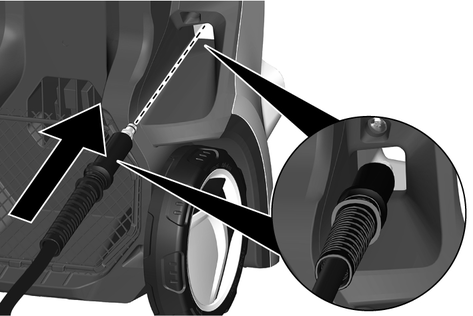
Insert the high-pressure hose through the hose guide from the rear.
Screw the water connection coupling onto the water connection on the device.
Place the device on a flat and level surface.
For devices with a hose reel: Completely unwind the high-pressure hose from the hose reel.
For devices without a hose reel: Unwind the high-pressure hose completely and eliminate any loops and twists.
Pull the high-pressure hose all the way forwards through the hose guide.
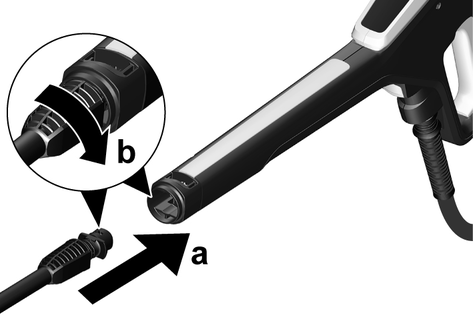
Insert the high-pressure hose into the high-pressure gun until it audibly latches into place.
Take care to ensure the correct alignment of the nipple.
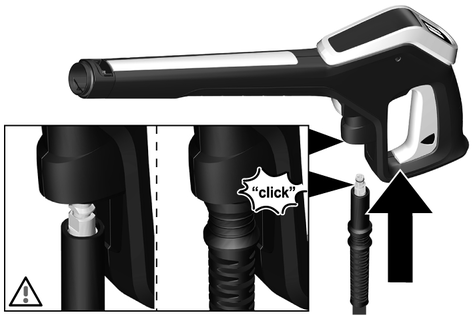
Check for a secure connection by pulling on the high-pressure hose.
Plug the mains plug into a mains socket.
For the connection values, see the type plate or chapter Technical data.
Observe the water distribution company regulations.
Damage through contaminated water
Contamination in the water can damage the pump and the accessories.
KÄRCHER recommends using the KÄRCHER water filter for protection(special accessory, order number 4.730-059).
Hose coupling with Aquastop on the water connection of the device
Damage to the pump
Never use a hose coupling with Aquastop on the water connection of the device.
You can use an Aquastop coupling on the tap.
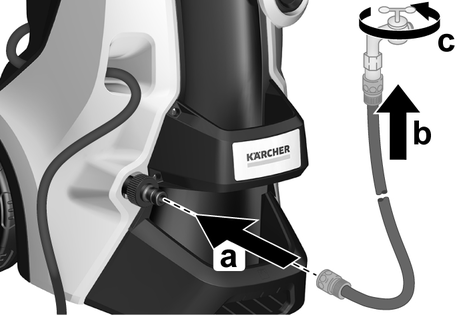
Plug the garden hose onto the water connection coupling.
Connect the garden hose to the water line.
Open the water tap fully.
When used with the KÄRCHER suction hose with check valve (special accessory, order number 2.643-100) this high-pressure cleaner is suitable for sucking up surface water, e.g. from rain barrels or ponds (for the maximum suction height see chapter Technical data).
The water connection coupling is not required for vacuuming operation.
Fill the suction hose with water.
Screw the suction hose onto the device water connection and hang it in a water source (e.g. water butt).
Switch the device on "I/ON".
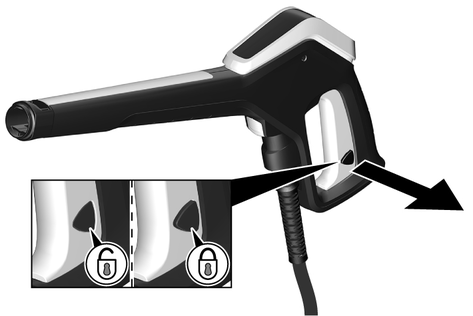
Unlock the lever of the high-pressure gun.
Press the lever of the high-pressure gun.
The device switches on.
Allow the device for run a maximum of 2 minutes until the water escaping from the high-pressure gun is free of air bubbles.
Release the lever of the high-pressure gun.
Lock the lever of the high-pressure gun.
Pump running dry
Damage to the device
If pressure does not build up in the device after 2 minutes then switch the device off and proceed according to the instructions in chapter Troubleshooting guide.
The pressure indicator on the high-pressure gun shows the currently set pressure level when operating with a Power Control spray lance.
The sensitivity of materials can vary greatly depending on age and condition. The recommendations are therefore not binding.
When operating with surface cleaner and other accessories, the pressure indicator is not accurate.
Display | Pressure level | Recommended for e.g. |
|---|---|---|
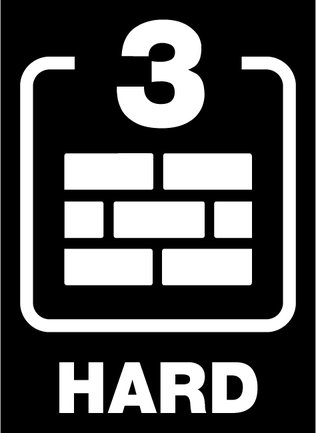 | HARD | Stone terraces made of paving stones or washed concrete, asphalt, metal surfaces, garden utensils (wheelbarrow, spade, etc.) |
 | MEDIUM | Cars / motorcycles, brick surfaces, plastered walls, plastic furniture |
 | SOFT | Wooden surfaces, bicycle, sandstone surfaces, rattan furniture |
 | MIX | Operation with detergent |
Damage to painted or sensitive surfaces
Surfaces can be damaged when the jet is too close to the surface or an unsuitable spray lance is used.
Maintain a minimum spray distance of 30 cm when cleaning painted surfaces.
Do not clean car tyres, paint or sensitive surfaces such as wood with the dirt grinder.
Insert a spray lance into the high-pressure gun and lock it by turning it 90°.
Switch the device on ("I/ON").
Unlock the lever of the high-pressure gun.
Press the lever of the high-pressure gun.
The device switches on.
Turn the Vario Power Power Control spray lance until the required pressure level is shown on the pressure indicator.
Paint damage
Damage to surfaces through a dirty brush
Ensure that the washing brush is free from dirt or other particles before using it.
The device operates at low pressure when using washing brushes. This means that detergent can be mixed with the water.
Insert the washing brush into the high-pressure gun and turn by 90° to fasten it.
Failure to adhere to the safety data sheet
Incorrect handling of the detergent can seriously damage your health
Observe the safety data sheet of the detergent manufacturer, in particular the instructions on personal protective equipment.
Detergent can only be mixed into the jet at low pressure.
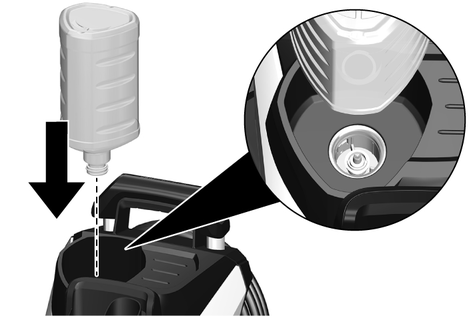
A Plug ‘n’ Clean detergent bottle is required for operating with detergent. KÄRCHER detergent can be purchased ready to use in a Plug ‘n’ Clean detergent bottle.
Remove the cover from the Plug ‘n’ Clean detergent bottle.
Plug the detergent bottle into the Plug ‘n’ Clean detergent connection with the opening facing down.
Use the Vario Power spray lance.
Turn the spray lance towards "MIX" until "MIX" is displayed on the high-pressure gun.
The detergent solution is mixed with the water jet during operation.
You can optionally use the foam nozzle.
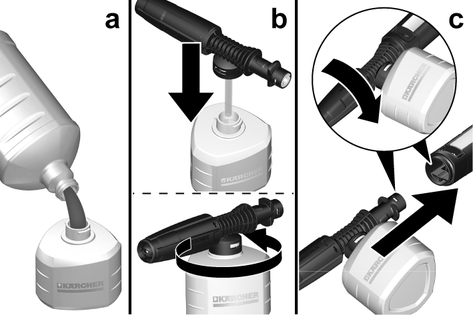
Fill the detergent solution into the detergent tank. Adhere to the dosage specifications on the detergent container.
Connect the foam nozzle to the detergent container.
Insert the foam nozzle into the high-pressure gun and turn by 90° to fasten it.
Spray the detergent sparingly on the dry surface and let it work for a while (do not let it dry).
Rinse off the loosened dirt with the high-pressure jet.
Pull the Plug ‘n’ Clean detergent bottle out of the mount and close it with the cap before transporting the device lying down.
Store the detergent bottle in the holder with the lid facing up.
Flush the device with clear water for approx. 30 seconds.
Release the lever of the high-pressure gun.
The device switches off when the lever is released. The high pressure in the system is retained.
Lock the lever of the high-pressure gun.
Place the high-pressure gun with the spray lance in the parking position.
Switch the device off "0/OFF" during work breaks longer than 5 minutes.
Pressure in the system
Injuries from high-pressure water escaping uncontrollably
Only disconnect the high-pressure hose from the high-pressure gun or the device when the system is fully depressurised.
Release the lever of the high-pressure gun.
Close the water tap.
Press the lever of the high-pressure gun for 30 seconds.
The pressure remaining in the system is discharged.
Release the lever of the high-pressure gun.
Lock the lever of the high-pressure gun.
Disconnect the device from the water supply.
Switch off the device "0/OFF".
Pull the mains plug out of the socket.
Failure to observe the weight
Risk of injury and damage
Be aware of the weight of the device during transportation.
Lift and carry the device by the carrying handles.
Pull the transport handle out until it audibly latches into place.
Pull the device via the transport handle.
Before transporting lying down, pull the Plug ‘n’ Clean detergent bottle out of the mount and close it with the cap.
Secure the device against slipping and tipping over.
Failure to observe the weight
Risk of injury and damage
Be aware of the weight of the device during storage.
Place the device on a level surface.
Disconnect the spray lance from the high-pressure gun.
Press the separation button on the high-pressure gun and disconnect the high-pressure hose from the high-pressure gun.
Damage to the high-pressure hose
Damage to the high-pressure hose through incorrect direction of rotation
Observe the correct direction of rotation of the hose reel when winding on the hose.
For devices with a hose reel: Use the crank handle to turn the hose reel anticlockwise and coil up the high-pressure hose.
For devices without a hose reel: Store the high-pressure hose on the device.
Store the mains connection cable and accessories on the device.
Observe the additional instructions before storing the device for a longer period of time, see chapter Care and service.
Danger of frost
Incompletely emptied devices can be destroyed by frost.
Completely empty the device and accessories.
Protect the device from frost.
The following requirements must be satisfied:
The device is disconnected from the water supply.
The high-pressure gun is disconnected from the high-pressure hose.
Switch the device on "I/ON".
Wait for a maximum of 1 minute until no more water escapes from the high-pressure hose.
Switch off the device.
Store the device in a frost-protected room, together with all accessories.
Danger of electric shock
Injuries due to touching live parts
Switch off the device.
Remove the mains plug.
The device is maintenance-free, i.e. you do not need to perform any maintenance work.
Damaged sieve in the water connection
Damage to the device through contaminated water
Check the sieve for damage before inserting it in the water connection.
If necessary, clean the sieve in the water connection.
Remove the water connection coupling.
Pull the sieve out using flat pliers.
Clean the sieve under running water.
Insert the sieve into the water connection.
Malfunctions often have simple causes that you can remedy yourself using the following overview. When in doubt, or in the case of malfunctions not mentioned here, please contact your authorised Customer Service.
Danger of electric shock
Injuries due to touching live parts
Switch off the device.
Remove the mains plug.
Device not running
Remedy:
Press the lever of the high-pressure gun.
The device switches on.
Check that the voltage specified on the type plate corresponds to the voltage of the power source.
Check the mains connection cable for damage.
If the motor is overloaded and the motor circuit breaker has triggered:
Switch off the device "0/OFF".
Allow the device to cool down for 1 hour.
Switch the device on "I/ON" and resume operation.
Have the device checked by Customer Service if this fault occurs repeatedly.
The device does not start up, the motor buzzes
Cause:
Voltage drop due to a weak mains grid or when using an extension cable
Remedy:
When switching on, first press the lever on the high-pressure gun and then switch on the device "I/ON".
Device does not reach required pressure
Cause:
The water supply is too low
Remedy:
Open the water tap fully.
Check the water inlet for an adequate flow rate.
Cause:
The sieve in the water connection is dirty.
Remedy:
Pull the sieve in the water connection out using flat pliers.
Clean the sieve under running water.
Cause:
Air is in the device.
Remedy:
Vent the device:
Switch on the device without a connected spray lance for a maximum of 2 minutes.
Press the high-pressure gun and wait until the water escaping from the high-pressure gun is free of air bubbles.
Connect the spray lance.
Observe the maximum suction height during suction operation (see chapter Technical data).
Remedy:
Clean the high-pressure nozzle:
Use a needle to remove dirt from the nozzle drill.
Rinse the high-pressure nozzle from the front with water.
Check the water supply volume.
Device leaking
Remedy:
The device leaks a small amount for technical reasons. If the leak is severe, request authorised Customer Service.
Remedy:
Use the Vario Power spray lance and turn it to "MIX".
Check that the Plug ‘n’ Clean detergent bottle is sitting correctly with the opening facing down in the detergent connection.
The warranty conditions issued by our relevant sales company apply in all countries. We shall remedy possible malfunctions on your appliance within the warranty period free of cost, provided that a material or manufacturing defect is the cause. In a warranty case, please contact your dealer (with the purchase receipt) or the next authorised customer service site.
(See overleaf for the address)
Electrical connection | |
Voltage | 230 V |
Phase | 1 ~ |
Frequency | 50 Hz |
Power rating | 2,1 kW |
Degree of protection | IPX5 |
Protection class | I |
Power protection (slow-blowing) | 10 A |
Water connection | |
Feed pressure (max.) | 1,2 MPa |
Input temperature (max.) | 40 °C |
Input amount (min.) | 10 l/min |
Suction height (max.) | 0,5 m |
Device performance data | |
Operating pressure | 12,5 MPa |
Max. permissible pressure | 14,5 MPa |
Water flow rate | 7,5 l/min |
Maximum flow rate | 8,3 l/min |
Detergent flow rate | 0,3 l/min |
High-pressure gun recoil force | 20 N |
Dimensions and weights | |
Typical operating weight | 15,8 kg |
Length | 414 mm |
Width | 306 mm |
Height | 588 mm |
Determined values in acc. with EN 60335-2-79 | |
Hand-arm vibration value | <2,5 m/s2 |
Uncertainty K | 0,6 m/s2 |
Sound pressure level LpA | 76 dB(A) |
Uncertainty KpA | 3 dB(A) |
Sound power level LWA + K uncertaintyWA | 92 dB(A) |
Electrical connection | |
Voltage | 230 V |
Phase | 1 ~ |
Frequency | 50 Hz |
Power rating | 2,1 kW |
Degree of protection | IPX5 |
Protection class | I |
Power protection (slow-blowing) | 10 A |
Water connection | |
Feed pressure (max.) | 1,2 MPa |
Input temperature (max.) | 40 °C |
Input amount (min.) | 10 l/min |
Suction height (max.) | 0,5 m |
Device performance data | |
Operating pressure | 12,5 MPa |
Max. permissible pressure | 14,5 MPa |
Water flow rate | 7,5 l/min |
Maximum flow rate | 8,3 l/min |
Detergent flow rate | 0,3 l/min |
High-pressure gun recoil force | 20 N |
Dimensions and weights | |
Typical operating weight | 14,8 kg |
Length | 402 mm |
Width | 306 mm |
Height | 588 mm |
Determined values in acc. with EN 60335-2-79 | |
Hand-arm vibration value | <2,5 m/s2 |
Uncertainty K | 0,6 m/s2 |
Sound pressure level LpA | 76 dB(A) |
Uncertainty KpA | 3 dB(A) |
Sound power level LWA + K uncertaintyWA | 92 dB(A) |
We hereby declare that the machine described below complies with the relevant basic safety and health requirements in the EU Directives, both in its basic design and construction as well as in the version placed in circulation by us. This declaration is invalidated by any changes made to the machine that are not approved by us.
Product: High-pressure cleaner
Type: 1.324-xxx
Currently applicable EU Directives2000/14/EC
2014/30/EU
2006/42/EC (+2009/127/EC)
2011/65/EU
Harmonised standards usedEN 50581
EN 55014-1: 2017
EN 55014-2: 2015
EN 60335-1
EN 60335-2-79
EN 61000-3-2: 2014
EN 61000-3-3: 2013
EN 62233: 2008
Conformity evaluation procedure used2000/14/EC: Annex V
Sound power level dB(A)Measured: 89
Guaranteed: 92
The undersigned act on behalf and under the power of attorney of the company management.

Documentation supervisor:
S. Reiser
Alfred Kärcher SE & Co. KG
Alfred-Kärcher-Str. 28 - 40
71364 Winnenden (Germany)
Ph.: +49 7195 14-0
Fax: +49 7195 14-2212
Winnenden, 2020/08/01