Puzzi 9/1 BpPuzzi 9/1 Bp Adv
59690590 (01/24)
59690590 (01/24)
 Before using for the first time, read the enclosed original instructions of this device, the battery pack and the charger as well as the safety instructions. Act in accordance with them.
Keep these documents for future reference or for future owners.
If the operating instructions and safety instructions are not observed, the device can be damaged and dangers could arise for users and other persons.
Notify the dealer immediately in the case of shipping damage.
Check the package contents when unpacking for missing accessories or for damage.
 The packing materials can be recycled. Please dispose of packaging in accordance with the environmental regulations.
 Electrical and electronic devices contain valuable, recyclable materials and often components such as batteries, rechargeable batteries or oil, which - if handled or disposed of incorrectly - can pose a potential danger to human health and the environment. However, these components are required for the correct operation of the device. Devices marked by this symbol are not allowed to be disposed of together with the household rubbish.
Current information on content materials can be found at: www.kaercher.de/REACH
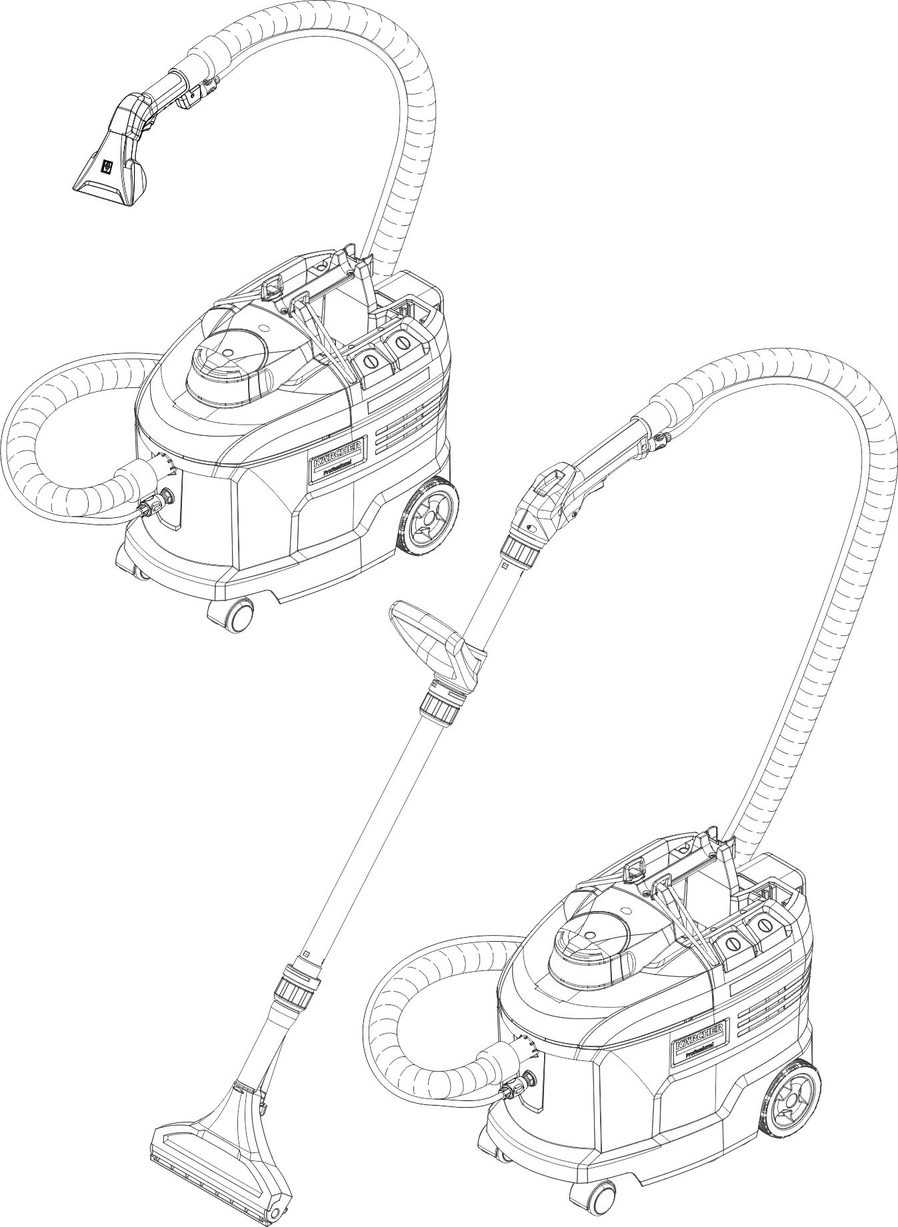
This spray extraction device is intended for wet cleaning of upholstery, upholstered furniture and small carpeted areas.
This device is suitable for commercial use.

Colour | Part number | Flow volume | Application | Approved for device |
|---|---|---|---|---|
Yellow | 6.415-165.0 | 2.0 l/min | Floor nozzle | Puzzi 10/2 |
Green | 6.415-105.0 | 0.7 l/min | Floor nozzle | Puzzi 9/1 Bp |
Brown | 6.415-166.0 | 1.0 l/min | Floor nozzle | Puzzi 8/1, Puzzi 10/1 |
Blue | 6.415-928.0 | 1.0 l/min | Upholstery nozzle | Puzzi 8/1, Puzzi 10/1, Puzzi 10/2, Puzzi 30/4 |
Red | 2.884-362.0 | 0.55 l/min | Upholstery nozzle, short | Puzzi 8/1, Puzzi 9/1 Bp |
Check hoses for damage before each startup.
Adv only: Fit the suction pipe onto the floor nozzle and hand-tighten the union nut on the floor nozzle.
Adv only: If necessary, slide the D-handle onto the suction pipe and hand-tighten in the desired position. The D-handle is easier to slide on with the help of dishwashing detergent or other lubricant.
Adv only: Fit the handle onto the suction pipe and hand-tighten the union nut on the handle.
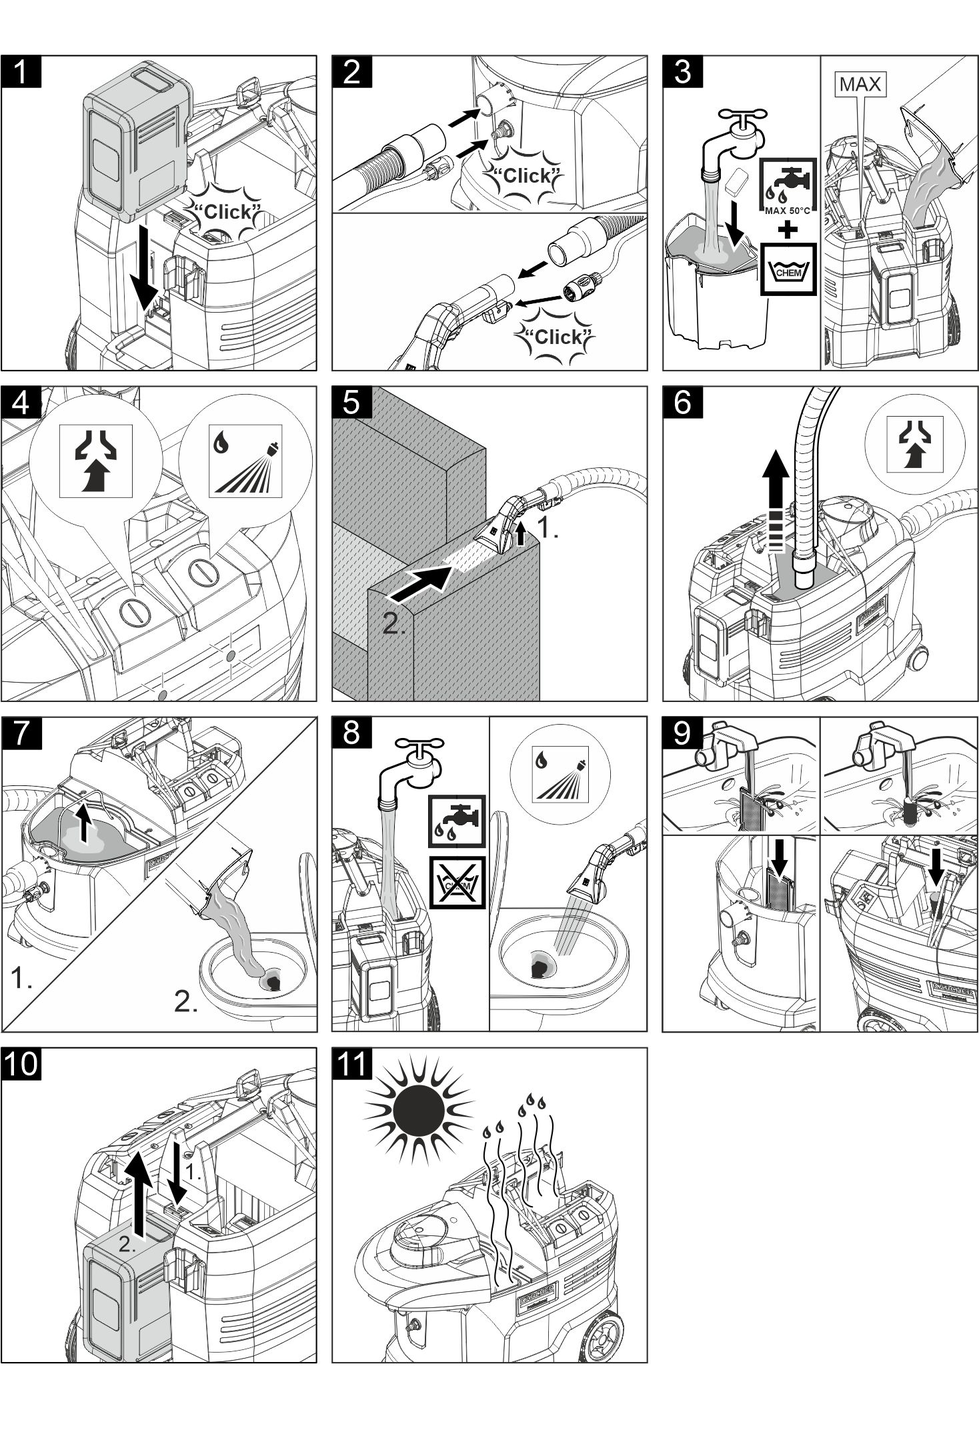
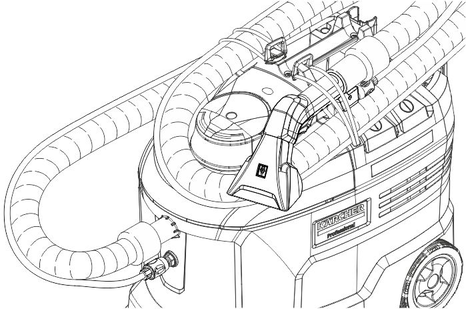
Connect the suction hose to the suction hose connection on the device. Insert the spray hose coupling into the spray hose connection on the device and latch into place.
Connect the suction hose to the upholstery nozzle or the handle. Connect the spray hose coupling to the upholstery nozzle or handle and latch into place.
Danger from detergents
Risk of injury and damage
Observe all instructions that are included with the detergents used.
Warm water (maximum 50 °C) increases the cleaning effect. Check the temperature resistance of the surface to be cleaned.
Use detergents sparingly to conserve the environment.
Mix fresh water and detergent in a clean container (concentration as specified for the detergent). Dissolve the detergent in the water.
Pour the cleaning solution into the fresh water tank. The filling level must not exceed the "MAX" mark.
Foam is generated in the wastewater container when cleaning previously shampooed carpets. Foaming can be prevented by adding defoaming agents.
Add defoaming agent (special accessory) to the wastewater container.
Slide the battery pack into the battery holder and lock it in place.
Read the operating instructions of the charger, especially the safety instructions!
Read the operating instructions of the battery pack, especially the safety instructions!
The battery pack is partially charged on delivery. Charge before use and when necessary.
The battery pack can only be charged when it is removed.
Press the unlocking button and remove the battery pack.
Charge the battery pack according to the operating instructions of the charger and battery pack.
Press the spray switch to switch on the spray pump. The spray LED lights up.
Press the suction switch to switch on the suction turbine. The suction LED lights up.
Danger from cleaning solution
Risk of damage
Before using the device, check the object to be cleaned for colour fastness and water resistance in an inconspicuous place.
Remove loose dirt from the object to be cleaned.
Press the lever on the upholstery nozzle or handle to spray the cleaning solution.
Run over the surface to be cleaned in overlapping paths. Pull the nozzle backwards (do not push).
Adv only: When interrupting work, the suction pipe (with floor nozzle) can be placed on the carrying handle of the device.
When changing the nozzle, the upholstery nozzle can be inserted into the holder for accessories.
Switch off the spray switch and the suction switch. The LEDs extinguish.
Switch off the suction switch and the spray switch when the wastewater container is full.
Remove the cover.
Remove the wastewater container from the device and empty it.
Switch off the device.
Briefly operate the lever on the upholstery nozzle or handle to relieve pressure.
Disconnect the upholstery nozzle or handle from the spray/suction hose.
Hang the suction hose in the fresh water tank.
Press the suction switch to switch on the suction turbine.
Suck the fresh water tank empty and switch off the device.
Remove the cover.
Remove the wastewater container from the device and empty it.
Connect the upholstery nozzle or handle (with suction pipe and floor nozzle) to the suction hose.
Connect the spray hose coupling to the upholstery nozzle or handle and latch into place.
Pour approximately 2 litres of tap water into the fresh water tank. Do not add detergents.
Press the spray switch to switch on the spray pump.
Hold the upholstery or floor nozzle over a drain.
Operate the lever on the upholstery nozzle or handle and flush the device for 1 to 2 minutes.
Switch off the device.
Flush the device.
Drain the wastewater container and clean it under running water.
Empty the fresh water tank.
Clean the exterior of the device with a damp cloth.
To avoid unpleasant smells, remove all water from the device before long downtimes.
Let the device dry thoroughly: Remove the cover or move it to the side.
Clean the fluff filter and fresh water filter (see “Care and maintenance”).
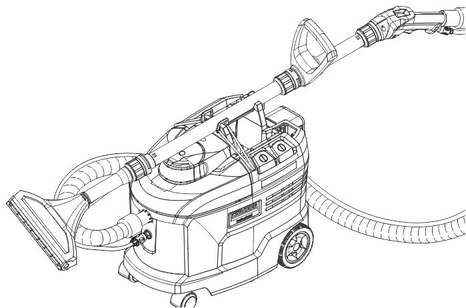
Store the spray/suction hose and upholstery nozzle as shown in the illustration.
Store the device in a dry room and secure it against unauthorised use.
Spray and vacuum up the cleaning solution in one step.
Repeated vacuuming without spraying shortens the drying time.
Apply cleaning solution with the suction turbine switched off and let it work for 10 to 15 minutes.
Clean the area as with normal soiling.
Adv only: Attach the upholstery nozzle instead of the floor nozzle (with suction pipe and handle).
Use less detergent for sensitive fabrics and spray the surface at a distance of approx. 200 mm. Then only vacuum.
Spray heavily soiled areas in advance and allow the cleaning solution to work for 5 to 10 minutes.
Always work from light to shadow (from window to door).
Always work from the cleaned to the uncleaned area.
The more sensitive the covering (oriental bridges, Berber, upholstery fabric) the lower the concentration of detergent.
Carpets with jute backs can shrink and bleed in colour if the work is too wet.
Brush wet pile carpets in the direction of the pile after cleaning when wet (e.g. with a fibre brush or scrubber).
Impregnating after wet cleaning prevents the textile from being quickly soiled again.
To avoid pressure points or rust stains, do not walk on or furnish the cleaned area until after it has fully dried.
To improve the cleaning result, rinse the object with clean water after using detergents.
Description | Name | Dosing | Order number |
|---|---|---|---|
CarpetPro cleaner (0.8 kg) | RM 760 powder | 1 % | 6.295-849.0 |
CarpetPro cleaner, iCapsol (16 piece) | RM 760 tabs | 2 tabs for 8 litres | 6.295-850.0 |
CarpetPro cleaner, quick-drying (10 litre) | RM 767 liquid | 1.2 % | 6.295-198.0 |
CarpetPro cleaner (10 litres) | RM 764 liquid | 1 % | 6.295-854.0 |
CarpetPro impregnation (5 litres) | RM 762 liquid | 20 % | 6.295-852.0 |
Defoaming (2.5 litres) | RM 761 liquid | 0.5 % | 6.291-389.0 |
For further information, please request the product information sheet and the EU safety data sheet for the relevant cleaning agent.
Failure to observe the weight
Risk of injury and damage
Be aware of the weight of the device during transportation.
Adv only: Place the suction pipe (with floor nozzle) on the carrying handle of the device.
When transporting the device in vehicles, secure it to prevent it from slipping or overturning in accordance with the respective valid guidelines.
Failure to observe the weight
Risk of injury and damage
Be aware of the weight of the device during storage.
The device may only be stored indoors.
Press the unlocking button and remove the battery pack to prevent discharge.
Danger of electric shock
Injuries due to touching live parts
Switch off the device.
Remove the battery pack.
Regularly check the device-side contacts in the battery holder for contamination and clean with a damp cloth if necessary. Do not use detergents.
Remove the cover.
Remove the wastewater container from the device.
Pull out the fluff filter.
Regularly clean the fluff filter under running water. If very dirty, open the frame and replace the fleece.
Unscrew the fresh water filter.
Clean the fresh water filter under running water.
Unscrew the union nut.
Clean the nozzle mouthpiece.
Danger of electric shock
Injuries due to touching live parts
Switch off the device.
Remove the battery pack.
Device not running
Remedy:
Charge the battery pack.
Insert the battery pack.
Check the battery pack for correct seating.
Switch on the device.
Allow the overheated board to cool down.
No water emitted from the nozzle
Remedy:
Fill up the fresh water tank.
Check the couplings on the spray hose for correct seating.
Clean or replace the nozzle mouthpiece.
Clean the fresh water filter.
Spray pump defective, contact customer service.
Single-sided spray jet
Remedy:
Clean the nozzle mouthpiece.
Poor suction performance
Remedy:
Check that the cover is seated correctly.
Clean the seal on the cover and the contact surface on the device.
Clean the fluff filter.
Check the suction hose for clogging; clean if necessary.
Spray pump is loud
Remedy:
Refill the fresh water tank.
Heavy foaming in the wastewater container
Remedy:
Add defoaming agent (special accessory) to the wastewater container.
If the malfunction cannot be corrected, the device must be checked by the Customer Service department.
Device not running
Remedy:
Charge the battery pack.
Insert the battery pack.
Check the battery pack for correct seating.
Switch on the device.
Allow the overheated board to cool down.
No water emitted from the nozzle
Remedy:
Fill up the fresh water tank.
Check the couplings on the spray hose for correct seating.
Clean or replace the nozzle mouthpiece.
Clean the fresh water filter.
Spray pump defective, contact customer service.
Single-sided spray jet
Remedy:
Clean the nozzle mouthpiece.
Poor suction performance
Remedy:
Check that the cover is seated correctly.
Clean the seal on the cover and the contact surface on the device.
Clean the fluff filter.
Check the suction hose for clogging; clean if necessary.
Spray pump is loud
Remedy:
Refill the fresh water tank.
Heavy foaming in the wastewater container
Remedy:
Add defoaming agent (special accessory) to the wastewater container.
The warranty conditions issued by our sales company responsible apply in all countries. We shall remedy possible malfunctions on your device within the warranty period free of cost, provided that a material or manufacturing defect is the cause. In a warranty case, please contact your dealer (with the purchase receipt) or the next authorised customer service site.
You can find more detailed information at: www.kaercher.com/dealersearch
Only use original accessories and original spare parts. They ensure that the appliance will run fault-free and safely.
Information on accessories and spare parts can be found at www.kaercher.com.
Only use KÄRCHER original battery packs, not non-rechargeable batteries.
Description | Order number, spare part | Item No., unpacked |
|---|---|---|
Battery pack Battery Power+ 36/75 | 2.445-043.0 | 6.445-059.0 |
Battery pack Battery Power+ 36/60 | 2.042-022.0 | 6.445-085.0 |
Battery pack Battery Power 36/50 | 2.445-031.0 | 6.445-039.0 |
Quick charger Battery Power+ 36/60 (EU) | 2.445-045.0 | 6.445-063.0 |
Quick charger Battery Power+ 36/60 (GB) | 2.445-047.0 | 6.445-065.0 |
Quick charger Battery Power+ 36/60 (AU) | 2.445-051.0 | 6.445-069.0 |
EU Declaration of Conformity |
We hereby declare that the machine described below complies with the relevant basic safety and health requirements in the EU Directives, both in its basic design and construction as well as in the version placed in circulation by us. This declaration is invalidated by any changes made to the machine that are not approved by us.
Product: Spray retraction device
Type: 1.101-xxx
Currently applicable EU Directives2006/42/EC (+2009/127/EC)
2011/65/EU
2014/30/EU
Harmonised standards usedEN IEC 63000: 2018
EN 55014-1: 2017 + A11: 2020
EN 55014-2: 2015
EN 60335-1
EN 60335-2-68
EN 62233: 2008
National standards used-
The signatories act on behalf of and with the authority of the company management.

Documentation supervisor:
S. Reiser
Alfred Kärcher SE & Co. KG
Alfred-Kärcher-Str. 28 - 40
71364 Winnenden (Germany)
Ph.: +49 7195 14-0
Fax: +49 7195 14-2212
Winnenden, 2020/10/01
Declaration of Conformity (UK) |
We hereby declare that the product described below complies with the relevant provisions of the following UK Regulations, both in its basic design and construction as well as in the version put into circulation by us. This declaration shall cease to be valid if the product is modified without our prior approval.
Product: Spray retraction device
Type: 1.101-xxx
Currently applicable UK RegulationsS.I. 2008/1597 (as amended)
S.I. 2012/3032 (as amended)
S.I. 2016/1091 (as amended)
Designated standards usedEN IEC 63000: 2018
EN 55014-1: 2017 + A11: 2020
EN 55014-2: 2015
EN 60335-1
EN 60335-2-68
EN 62233: 2008
National standards used-
The signatories act on behalf of and with the authority of the company management.
Documentation supervisor:
S. Reiser
Alfred Kärcher SE & Co. KG
Alfred-Kärcher-Str. 28 - 40
71364 Winnenden (Germany)
Ph.: +49 7195 14-0
Fax: +49 7195 14-2212
Winnenden, 2020/10/01
Electrical connection | |
Battery pack nominal voltage | 36 DC V |
Degree of protection | IPX4 |
Protection class | III  |
Nominal power | 500 W |
Maximum power | 575 W |
Maximum fan motor power | 570 W |
Blower motor nominal power | 550 W |
Spray pump power | 4 W |
Device performance data | |
Fresh water filling quantity | 9 l |
Wastewater filling quantity | 7 l |
Air quantity (max.) | 57 l/s |
Vacuum (max.) | 15,0 (150) kPa (mbar) |
Spray pressure | 0,16 MPa |
Spray pressure (max.) | 0,22 MPa |
Spray volume | 0,55 l/min |
Cleaning solution temperature (max.) | 50 °C |
Operating time at full battery charge - Battery Power 36/50 battery pack | 23 Minutes |
Operating time at full battery charge - Battery Power+ 36/60 battery pack | 27 Minutes |
Operating time at full battery charge - Battery Power+ 36/75 battery pack | 35 Minutes |
Dimensions and weights | |
Typical operating weight | 10,2 kg |
Length x width x height | 545 x 340 x 445 mm |
Ambient conditions | |
Ambient temperature (max.) | +40 °C |
Determined values in acc. with EN 60335-2-68 | |
Sound pressure level LpA | 70 dB(A) |
Uncertainty KpA | 1 dB(A) |
Hand-arm vibration value | <2,5 m/s2 |
Uncertainty K | 0,2 m/s2 |
Zubehör / Accessories / Accessoires
 |  |  |  | |
 | 4.130-013.0 | DN 32 | ||
 | 4.130-007.0 | DN 32 | 240 | |
 | 4.762-014.0 Hartflächenadapter, hard surface adapter, adaptateur pour surface rigide | 240 | ||
 | 4.130-010.0 | DN 32 | 0,25 | |
 | 5.070-010.0 Behälter für Reinigungsmittel, container for detergent, réservoir pour détergent | |||
 | 6.980-078.0 | DN 20-26 |
DN = Konus-Verbindung, cone connection, connexion de cône