B 110 R

59691690 (07/24)
59691690 (07/24)
Observe all basic precautions when using the device, including the following:
READ ALL INSTRUCTIONS BEFORE USING THIS MACHINE
Risk of electric shock, burns and injuries
Do not leave the device unattended when plugged in.
Switch off the device and pull out the mains plug before performing any care and service work.
Only use the device indoors.
The device is not a toy. Exercise special caution when using the device in the presence of children.
Only use the device as described in the manual.
Use only accessories recommended by the manufacturer.
Do not use the device with a damaged charging cable or plug. If the device does not work as it should, has been dropped or left outdoors, or has fallen into water, have the device checked by our customer service department before using it.
Do not pull on the charging cable of the charger or use it as a handle when transporting the device, do not close a door on the charging cable of the battery charger or pull it around sharp edges or corners. Do not run the device over the charging cable of the battery charger. Keep the charging cable away from hot surfaces.
Do not unplug the device by pulling on the charging cable of the charger. To disconnect the device from the mains, pull the plug.
Do not touch the charger or the device with wet hands.
Never insert objects into the device openings. Do not use the device if the device openings are blocked. Keep openings free of lint, hair, dust, and anything that obstructs airflow.
Switch off the device before pulling out the mains plug.
Keep hair, loose clothing, your fingers and all body parts away from openings and moving parts.
Exercise caution when using the device on stairs.
Do not use the device to pick up flammable or inflammable liquids, such as e.g. petrol and do not use in areas where these fluids may be present.
Only connect the device to a properly grounded socket (see chapter Grounding regulations).
This device complies with Part 15 of the FCC Regulations and the Industry Canada license, excluding the RSS standard.
Operation takes place under the following two conditions:
This device may not cause harmful interference, and
This device must receive any interference received, including interference that may cause undesired operation.
Changes or modifications to the device that have not been expressly approved by KÄRCHER will void the FCC approval for operating this device.
This device has been tested and found to comply with the limits for a class B digital device, pursuant to part 15 of the FCC rules.
These limit values are designed to provide adequate protection against harmful interference in residential areas.
This equipment generates, uses and can radiate radio frequency electricity. If it is not installed and used in accordance with the instructions, this can cause harmful interference to radio communications.
However, there is no guarantee that interference will not occur in a particular application.
If the device causes interference to radio or television reception, which can be determined by turning the device off and on, we recommend that you eliminate the interference by one or more of the following measures:
Change the orientation or location of the receiving antenna.
Increase the separation between the device and the receiver.
Connect the device to a power socket on a circuit different from that to which the receiver is connected.
Contact a dealer or an experienced radio / television technician.
RETAIN THESE INSTRUCTIONS
This device must be grounded. Should a malfunction or failure occur, the grounding provides a path of least resistance for the electric current so that the risk of electric shock is reduced.
This device is equipped with a power supply cable with earth conductor and a Schuko plug.
The plug must be plugged into a suitable outlet that is properly installed and grounded in accordance with all local codes and ordinances.
Improper connection of the device earth conductor may result in a risk of electric shock.
Contact a qualified electrician or customer service representative if there is any doubt as to whether the socket is properly earthed.
Do not modify the plug supplied with the device.
If the plug does not fit into the socket, have a suitable socket installed by a qualified electrician.
This device is approved for use on a 120 V mains power circuit and has a plug as shown in Figure A.
Make sure the device is plugged into an outlet that has the same configuration as the plug.
Do not use an adapter with this device.
ONLY CONNECT THE DEVICE TO A PROPERLY GROUNDED SOCKET

Only trained and authorized persons are allowed to operate the powered floor cleaner. Operators of powered floor cleaners must be qualified with the visual, acoustic, physical and mental abilities needed to operate the device safely.
Personnel who have not been trained in the operation of powered floor cleaners may only operate a floor cleaner for training purposes, under the direct supervision of the trainer. This training should be conducted in an area away from other trucks, obstacles and pedestrians.
The operator training program should include the user's guidelines for the location where the trainee will operate the floor cleaner, the operating conditions for that location, and the specific floor cleaner the trainee will operate. The training program must be presented to all new operators regardless of previous experience.
The training body must inform the trainee of the following:
The operator's primary responsibility is to use the powered floor cleaner safely as instructed in the training program.
Unsafe or improper operation of a powered floor cleaner can result in the following: Death or serious injury to the operator or other persons; damage to the powered floor cleaner or other objects.
The training program should highlight safe and proper operation to prevent injury to the operator and others, and to prevent property damage, and should cover the following areas:
The basics of the powered floor cleaners that the trainee will operate:
The properties of powered floor cleaners, including variations between powered floor cleaners in the workplace
The similarities and differences to automobiles
The meaning of the type plate data, warnings and instructions affixed to the powered floor cleaner
The instruction manual and warnings in the instruction manual of the powered floor cleaner and the instructions for inspection and maintenance by the operator
The type of driving force and its properties
The steering method
The braking method and characteristics
The view forwards and backwards
The stability characteristics with and without load, with and without attachments
The positions of the controls, the function, the type of operation, the identification of symbols
Charging of the battery
The isolating and non-isolating protective devices for the specific powered floor cleaner
Other properties for the specific powered floor cleaner
The operating environment and its effects on the operation of the powered floor cleaner including the following:
The soil conditions, including transient conditions
Ramps and gradients
The battery charging stations
Narrow aisles, doors, overhead lines, above-ground pipelines and other areas with limited space
The areas in which the powered floor cleaner is operated in the vicinity of other industrial trucks, other vehicles or pedestrians
The use and capacity of elevators
Operation near loading ramps or the edges of upgraded surfaces
Other special operating conditions and hazards that may arise
The operation of the powered floor cleaner including the following points:
Proper inspection prior to each startup and authorized decommissioning of a powered floor cleaner in need of repair
Driving, cornering
The parking and shutdown procedure
Other special operating conditions for the specific application
The rules and practices of operational safety including the following points:
The terms of this standard in chapter OPERATIONAL SAFETY RULES AND PRACTICES
Other employer rules, regulations, or practices in the location where the powered floor cleaner is used
Company training practice, including the following:
If possible, practical training in operating the powered floor cleaner should take place in an area that is separate from other activities or personnel in the workplace.
The practical training is to be carried out under the supervision of the trainer.
The practical training should include the actual operation or the simulated execution of all tasks in the company, such as manoeuvring, driving, stopping, starting and other activities under the conditions encountered when operating the powered floor cleaner.
During the training, the employer must provide both performance tests and oral and / or written tests to measure the operator's skills and knowledge in meeting the requirements of the standard. Employers can delegate such tests to others, but remain responsible for the tests. Corresponding records are to be kept.
Operators are to be retrained when new equipment is introduced, existing device is upgraded, operating conditions change, or an operator's performance is unsatisfactory.
The user is responsible for ensuring the safe use of the powered floor cleaner in accordance with the provisions of this standard.
Operator training information is available from sources such as powered floor cleaner manufacturers, government agencies dealing with employee safety, industrial trucking trade associations, public and private organizations, and safety advisers.
Safe operation is the responsibility of the operator.
The operator must develop safe work habits and be aware of dangerous conditions in order to protect himself, other personnel, the powered floor cleaner and other material.
The operator must familiarize himself with the operation and function of all control elements and instruments before agreeing to operate the device.
Before operating the device, operators must read and be familiar with the operating instructions for each device and observe the safety rules and practices in the following paragraphs.
Before operating a device, the operator must be familiar with unusual operating conditions that may require additional safety precautions or special operating instructions.
Before starting the powered floor cleaner:
Be in the operating position.
Set the direction controller to the neutral position.
Apply the brake.
Set the switch to the "ON" position.
Do not start the device or operate the device, its functions or attachments from a location other than the specified operator position.
Keep hands and feet within the designated area for the operator or in the device compartment.
Understand the limitations of the device and operate the device safely so as not to cause injury to personnel. Protect pedestrians at all times.
Do not drive a powered floor cleaner towards people standing in front of an object.
Before turning manoeuvres, ensure that personnel stay away from the rear turning range.
Particular caution is required at front aisles, doors and other places where pedestrians can step into the path of the powered floor cleaner.
Do not allow passengers to drive with powered floor cleaners unless the manufacturer has provided a safe place to drive.
A powered floor cleaner is supervised when the operator is in sight, less than 25 ft (7.6 m) from the device.
A powered floor cleaner will not be supervised if the operator is in sight more than 25 ft (7.6 m) from the device or whenever the operator leaves the device and it is not in sight.
Before leaving the driver's position:
Bring the device to a standstill.
Set the direction controller to the neutral position.
Apply the parking brake.
Stop the motor or switch off the controls.
If the device has to be parked on an incline, lock the wheels.
Maintain a safety distance from the edge of ramps, platforms and similar working areas.
When powered floor cleaners are being driven on or off long distance trucks or trailers, apply the brakes on the truck or trailers and use wheel chocks or other safe mechanical means to prevent unintentional movement of the truck or trailer.
Whenever powered floor cleaners are driven on and off semi-trailers that are not coupled to a tractor, supports may be required to prevent corners from tipping or diving.
Care must be taken that overhead installations such as lights, cables, pipes, sprinkler systems, etc. are not touched.
Report all accidents involving personnel, building structures and equipment to the supervisor or as instructed.
Do not make any additions or modifications to the device.
Do not block access to escape routes, stairs or fire extinguishers.
Observe all traffic regulations including the permitted speed limits. Drive on the right under normal traffic conditions. Maintain a safety distance based on the travel speed of the device in front and keep the device under control at all times.
Give the right of way to pedestrians and emergency vehicles such as ambulances and fire engines.
Do not overtake another truck at intersections, blind spots or other dangerous places.
At the intersections of aisles and other places where visibility is impaired, reduce the travel speed and sound the acoustic warning device.
If possible, cross the railroad tracks at an angle. Park no closer than 6 ft (1800 mm) to the nearest rail of a railway line.
Travel up and down gradients slowly and with caution. If possible, avoid turning and be extremely careful on gradients, ramps or slopes; normally travel straight up and down the gradient.
Maintain a clear view of the route and pay attention to other traffic, personnel and safety distances.
Operate the device in driving conditions at a speed sufficient to bring the device to a safe standstill.
Carry out starts, stops, rotations or turns in a gentle manner so as not to shift the load and / or overturn the powered floor cleaner.
Do not perform stunt rides or other mischief.
Reduce the travel speed on wet and slippery floors.
Before driving over a slatted frame or a bridge plate, make sure that it is properly secured. Drive carefully and slowly over the slatted frame or bridge plate and never exceed the load-bearing capacity.
Do not drive the powered floor cleaner into an elevator unless expressly authorized. Drive slowly towards the elevator and then enter immediately after the elevator car has been properly levelled. As soon as you are in the elevator, put the controls in neutral, switch off the power and apply the brakes. It is advisable that everyone else exits the elevator before the powered floor cleaner is allowed to enter or exit the elevator.
When cornering, reduce your speed to a safe level that is compatible with the operating environment. Take the curves gently. Except when manoeuvring at very low speed, turn the steering moderately and smoothly.
The operation of a powered floor cleaner requires special safety aspects such as the following:
A powered floor cleaner can tip over if an operator does not slow down to a safe speed before cornering. Signs that a truck is being driven at excessive speed during turning manoeuvres include:
Skidding of the tyres
Device sliding away
Lifting of the wheels and
The need to firmly grip the steering wheel so as not to slip out of the seat
The chance of a side tipping is increased under any of the following conditions or a combination thereof:
Driving on an uneven surface
Driving at excessive speed
Tipping forward can occur and its likelihood is increased under the following conditions or a combination thereof:
The operator should stay with the powered floor cleaner if it falls off a loading ramp or ramp. The operator should hold on tight and lean away from the point of impact.
If the environment presents a serious hazard or other abnormal operating conditions exist, the user may need to use different and / or additional safety precautions and special operating instructions as appropriate for the conditions.
At the start of each shift and before operating the powered floor cleaner, its condition must be checked, paying particular attention to the following:
Condition of tyres
Check the tire pressure for pneumatic tires
Warning and safety devices
Lights
Battery
Controller
Lifting and tipping systems
Chains and cables
Limits switches
Brakes
Steering mechanism
Additional items or special equipment as specified by the user and / or manufacturer
If it is determined that the device is in need of repair, is in any way unsafe or contributes to an unsafe condition, the matter must be reported immediately to the user-designated authority and the device must not be operated until it has been returned to a safe operating condition.
If the device becomes unsafe in any way during operation, the matter must be reported immediately to the authority designated by the user, and the device must not be put into service until it has been returned to a safe operating condition.
Do not make any repairs or adjustments unless expressly authorized.
Do not use an open flame when checking the electrolyte level in batteries.
Operation of the device can be dangerous if maintenance is neglected or repairs, modifications or adjustments are not carried out in accordance with the manufacturer's design criteria. Therefore, maintenance facilities (on-site or off-site), trained personnel, and detailed procedures should be provided.
Parts manuals and maintenance manuals are available from the manufacturer of the powered floor cleaner.
In unusual cases that are not dealt with in the above manuals, contact the manufacturer of the powered floor cleaner. Maintenance and inspection of the device must be performed in accordance with the following practices:
A scheduled maintenance, lubrication and inspection system must be observed. Consult the manufacturer's recommendations.
Only trained and authorized personnel may maintain, repair, adjust and inspect the device in accordance with the manufacturer's instructions.
When lifting a powered floor cleaner for repair or inspection, the device must be lifted safely and stably. Removing components such as counterweights or posts changes the centre of gravity and can lead to an unstable condition.
Before starting the inspection and repair of the powered floor cleaner:
Raise the drive wheels off the ground, disconnect the battery, and use wheel chocks or other secure truck positioning device.
Block the chassis before working on it.
Disconnect the battery before working on the electrical system.
The charging plug may only be connected to the battery connection and never to the device plug.
Operation of the powered floor cleaner to test the performance must be carried out in an approved area having a safe clearance.
Before starting the device:
Be in the operating position.
Apply the brake.
Set the direction controller to the neutral position.
Set the switch to the "ON" position.
Check the function of the lifting and tilting systems, steering, warning devices and brakes.
Before leaving the unit:
Stop the device.
Set the direction controller to the neutral position.
Apply the parking brake.
Stop the motor or switch off the controls.
Switch off the control circuit
If the device has to be parked on an incline, lock the wheels.
Avoid fire hazards and have fire protection equipment ready in the work area. Do not use an open flame to check the fluid level, especially of battery electrolytes. Do not use open pans of fuel or flammable cleaning fluids to clean parts.
Properly ventilate the work area, discharge exhaust gases and keep the workshop clean and dry.
The brakes, steering mechanisms, control mechanisms, warning devices, lighting, controls, protection and safety devices, stops for the articulated axles and the frame parts must be checked carefully and regularly and kept in a safe operating condition.
Devices that are not in a safe operating state must be taken out of service.
Repairs may not be made in Class I, Class II, and Class III locations.
Repairs to the electrical system of battery-operated floor cleaners may only be made after the battery has been disconnected.
Operating temperature. If it is determined that any part of a powered floor cleaner is above its normal operating temperature and poses a hazard, the vehicle should be taken out of service and not restarted until the cause of such overheating has been eliminated.
Fire protection. The device must be kept in a clean condition and reasonably free of lint, excess oil and grease. Non-flammable agents are preferred for cleaning the device. Flammable liquids [those with flash points at or above 100 °F (37.8 °C)] are not permitted. Precautions regarding toxicity, ventilation and fire hazard must be appropriate for the agent or solvent used.
Visibility of the type plate. The type designations of the device stated on the type plate and the type markings must not be painted over so that their identification information is covered.
Changing and charging batteries. This section applies to batteries used in electric trucks. The two types of batteries are generally lead and nickel-iron batteries. They contain corrosive chemical solutions, either acidic or alkaline, and therefore pose a chemical hazard. While charging, they emit hydrogen and oxygen, which are explosive in certain concentrations. Battery charging systems must be located in designated areas; these areas must be kept free of combustible foreign matter.
Facilities must be provided for:
Flushing off spilled electrolyte
Fire protection
Protecting chargers from damage by trucks, and
Adequate ventilation to disperse the fumes from gas batteries
If on-board chargers are used, charging must take place at the designated locations, taking into account the electrical requirements for the charger and the fire protection equipment.
Exception: Rinsing facilities are not required if charging is carried out without removing the battery from the vehicle.
When handling acid concentrates with more than 50 percent acid (over 1,400 specific gravity), an eye-wash device must be provided.
A conveyor belt, ceiling hoist, or equivalent material handling equipment should be provided for handling batteries. Chain hoists must be equipped with load chain containers. When using a hand winder, uncovered batteries must be covered with a sheet of plywood or other non-conductive material to prevent the hand chain from shorting out the cell connections or terminals. A properly insulated spreader bar must be used with every ceiling hoist.
Reinstalled or new batteries must meet or exceed the battery type specified on the device. Newly inserted batteries must be properly positioned and secured in the device.
When using acid supplied in balloons, a balloon tipper or siphon must be provided. When concentrated sulphuric acid is diluted into electrolyte, the acid must ALWAYS be added to the water - not the other way around. Battery maintenance personnel must wear protective clothing such as eye protection, long sleeves and gloves.
Exception: No protective clothing is required for removing and replacing batteries.
Electrical installations must comply with NFPA 70, national electrical codes, and all local codes.
Trained and authorized personnel must change or charge the batteries.
The powered floor cleaner must be correctly positioned and the brakes must be applied before attempting to change or recharge the batteries.
When charging batteries, the vent caps must remain in place to prevent the electrolyte from spraying. Make sure that the vent caps work. The battery (or compartment) cover (s) must be open to dissipate heat and gas.
Smoking is prohibited in the charging area.
Precautions should be taken to prevent open flames, sparks, or electrical arcs in battery charging areas.
Tools and other metallic objects must be kept away from the lids of uncovered batteries.
The device must not be used in classified areas.
Your device must be registered in order to help with any questions or issues that you have. You can register your device at www.karcher-register.com if located in the U.S.A., www.karcher.com/ca if located in Canada, or www.karcher.com/mx if located in Mexico.
In the case of a warranty claim, you can contact customer support. Please see the contact information listed below for either the USA, Canada, or Mexico. You MUST provide your proof of purchase in order to file a warranty claim either via email, phone, or fax.
You can contact our Customer Service department by phone at 1-800-537-4129 or via the website at www.karcher-help.com.
You can contact our Customer Service department by phone at 01-800-024-13-13 or via the website at www.karcher.com/mx.
You can contact our Customer Service department by phone at 1-800-465-4980 or via the website at www.karcher.com/ca/support.
The scope of delivery for the appliance is shown on the packaging. During unpacking, check the contents for completeness. If any accessories are missing or in the event of any shipping damage, please notify our Customer Service department as stated above either by phone or via the website.
Before using the device for the first time, read and observe these operating instructions and the accompanying brochure: Safety instructions for brush cleaning devices, No. 5.956-251.0.
The device is approved for operation on surfaces with a specified limited slope (see chapter "Technical Data").
The device can tip over
Risk of injury
Only operate the device on surfaces that do not exceed the permitted slope (see chapter "Technical Data").Risk of accident due to incorrect operation
People can be injured.
Operators must be properly trained on how to use this machine.The device may only be operated when the hood and all covers are closed.
Missing or modified safety devices!
Safety devices are provided for your own protection.
Do not bypass, remove or render ineffective any safety devices.For immediate shutdown of all functions: Set the safety switch to "0".
The device brakes hard when the safety switch is switched off.
The safety switch acts directly on all device functions
If the operator leaves the seat during work or while driving, the seat switch switches off the engine after a short delay.

Risk of damage
Water will damage the suction turbine.
Do not fill or splash water into this opening.
Danger of burns
Components marked with this notice become hot during operation.
Do not touch components marked in this way. Let these components cool down before working on the device.
Danger of accident
On slopes, there is an increased risk of tipping over at high speed.
Drive slowly downhill.Do not turn on a slope.When driving fast, avoid jerky steering with a large steering angle.Observe the following warnings when handling the batteries:
 | Observe notes in the instructions for the battery, on the battery and in these operating instructions. |
 | Wear eye protection. |
 | Keep acids and batteries away from children. |
 | Risk of explosion |
 | Fire, sparks, open flames and smoking are prohibited. |
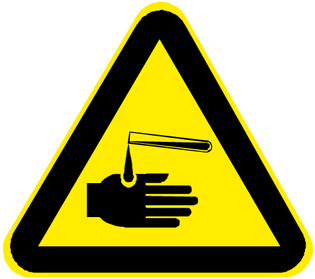 | Risk of acid burns |
 | First aid. |
 | Warning |
 | Disposal |
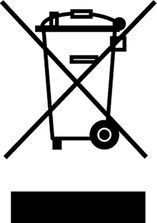 | Do not throw batteries in the bin. |
Indication of an imminent threat of danger that will lead to severe injuries or even death.
Indication of a potentially dangerous situation that may lead to severe injuries or even death.
Indication of a potentially dangerous situation that may lead to minor injuries.
Indication of a potentially dangerous situation that may lead to damage to property.
This scouring and vacuum machine is used for wet cleaning or polishing of level floors.
The device can be adjusted to suit the respective cleaning task by setting the water volume and detergent volume appropriately. The detergent dosage is adjusted by adding detergent to the tank or via a dosing device ("Dose" option).
Brush irrigation is either speed-dependent or constant.
The working width and the capacity of the fresh and waste water tanks (see chapter "Technical data") enable effective cleaning with a long working time.
The device has a drive motor.
The device can be equipped with various accessories to suit the respective cleaning task. Request a copy of our catalogue or visit our Internet website at www.kaercher.com.
This device is suitable for commercial and industrial use, e.g. in hotels, schools, hospitals, factories, shops, offices, and rental companies. Use the device only in accordance with the information in these operating instructions.
The device may only be used for cleaning smooth surfaces that are insensitive to water and polishing.
The device is designed for indoor use.
The operational temperature range is between +5 °C and +40 °C.
The device is not suitable for cleaning frozen floors (e.g. in cold stores).
The device is suitable for a maximum water height of 1 cm. Do not drive into an area if there is a danger of exceeding the maximum water height.
When using chargers or batteries, only the components approved in the operating instructions may be used. A different combination must be confirmed by the responsible charger and/or battery supplier.
The device is not intended for cleaning public traffic routes.
The device must not be used on pressure-sensitive floors. Take into account the permissible load per unit area of the floor. The load per unit area caused by the device is specified in the technical data.
The device is not suitable for use in potentially explosive environments.
The device is approved for operation on surfaces with a maximum slope (see chapter "Technical Data").
The packing materials can be recycled. Please dispose of packaging in accordance with the environmental regulations.
Electrical and electronic devices contain valuable, recyclable materials and often components such as batteries, rechargeable batteries or oil, which - if handled or disposed of incorrectly - can pose a potential danger to human health and the environment. However, these components are required for the correct operation of the device. Devices marked by this symbol are not allowed to be disposed of together with the household rubbish.
Current information on content materials can be found at: www.kaercher.de/REACH
Check the contents for completeness when unpacking. If any accessories are missing or in the event of any shipping damage, please notify your dealer.
* optional
Control elements for the cleaning process are yellow.
Control elements for maintenance and servicing are light grey.
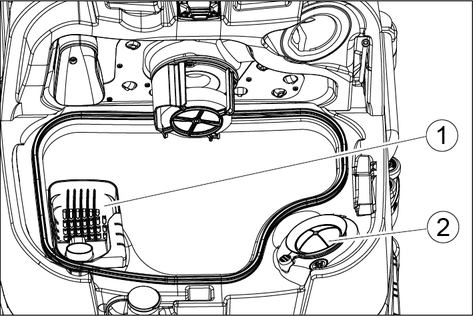
When driving through narrow spaces, the suction bar can be removed and hung in one of the openings on the lid of the waste water tank.
The suction bar can be hung in the recess on the waste water tank for storage.
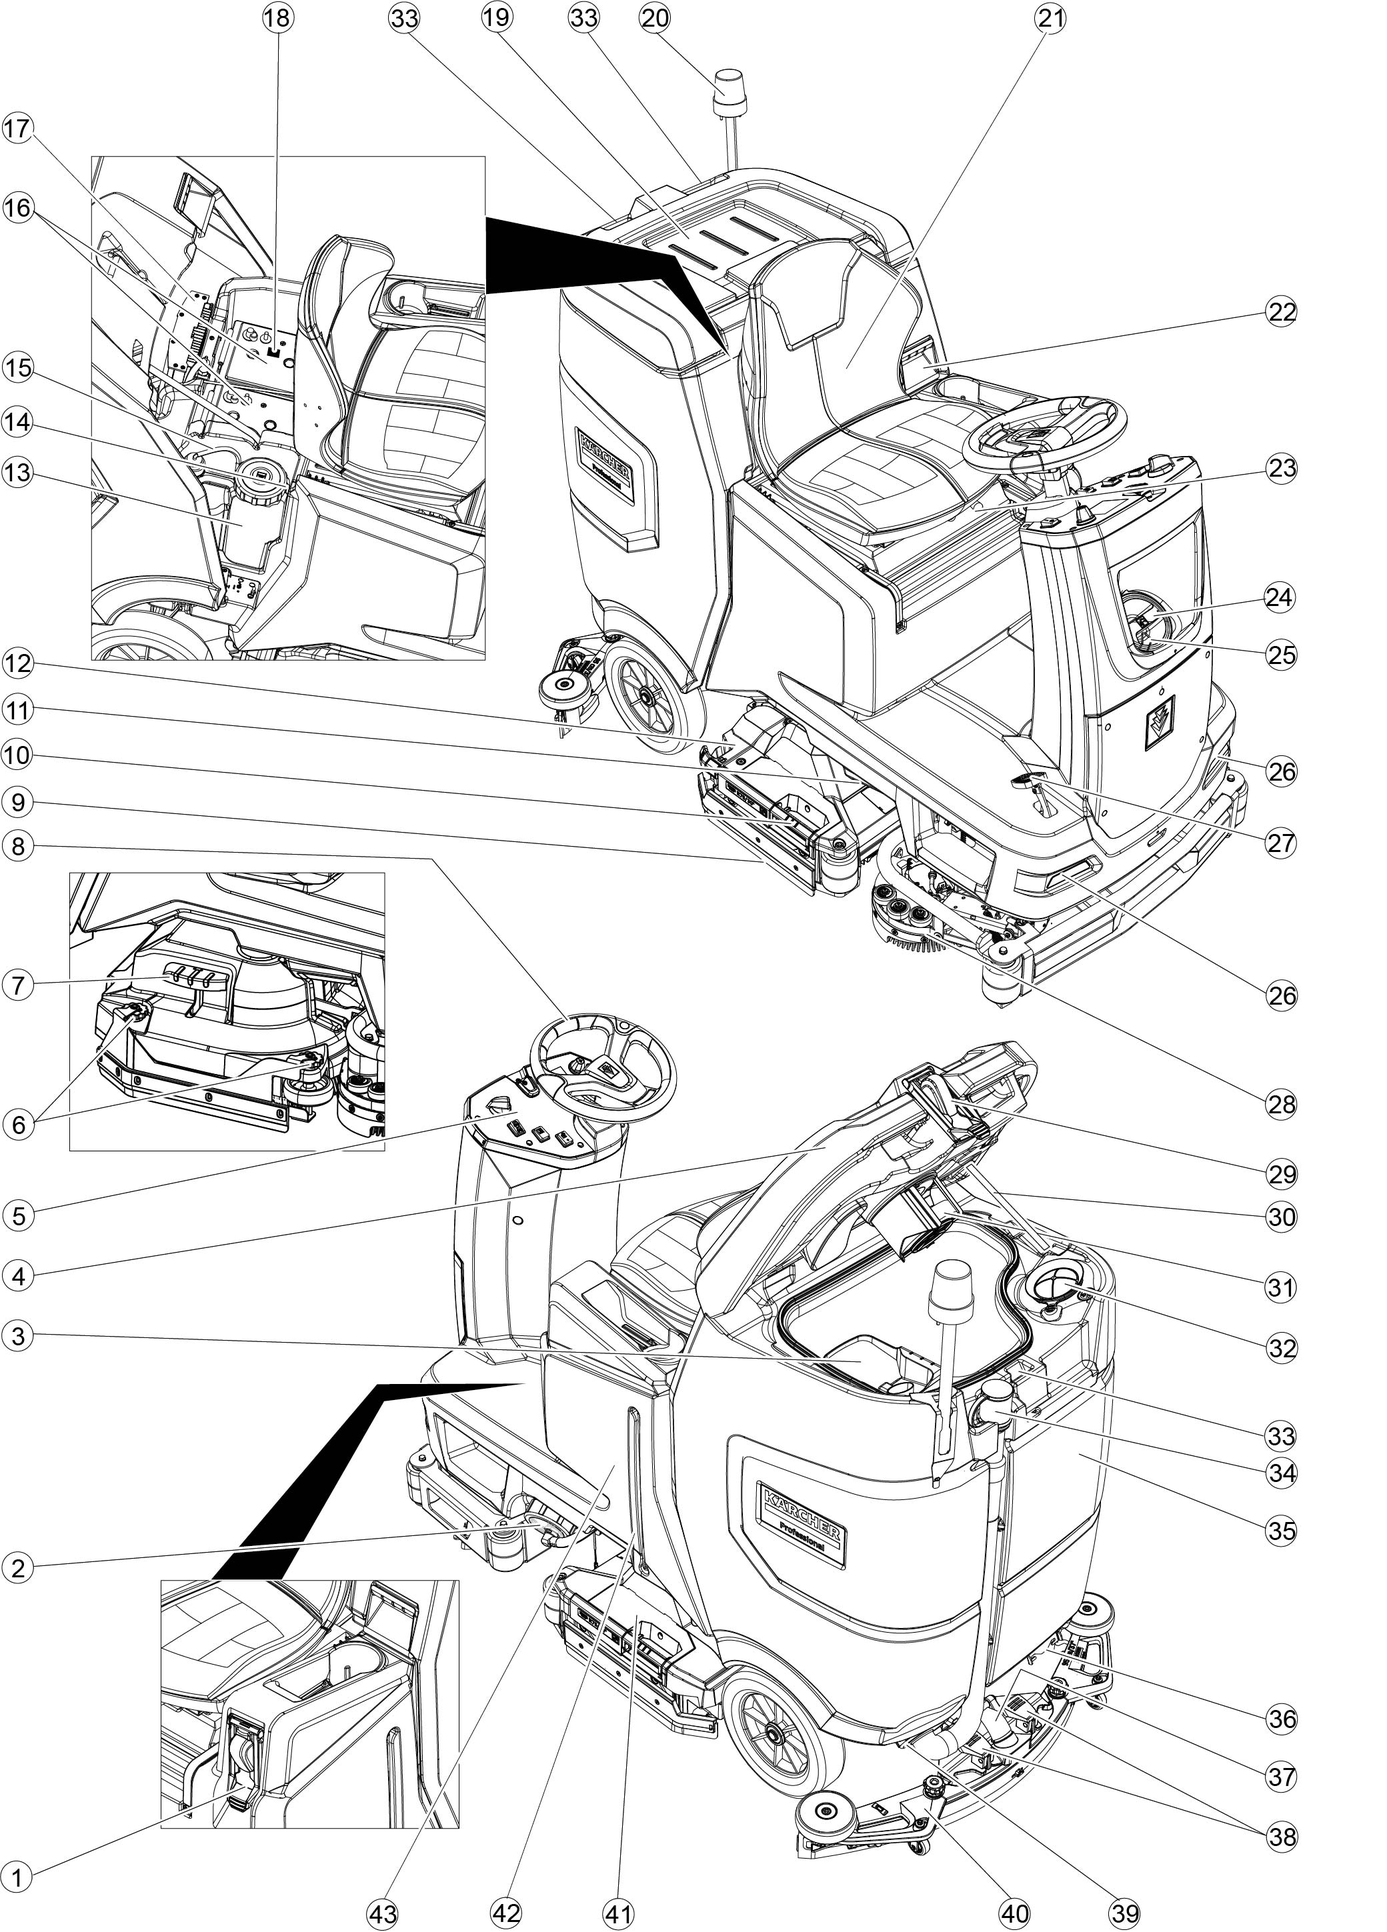
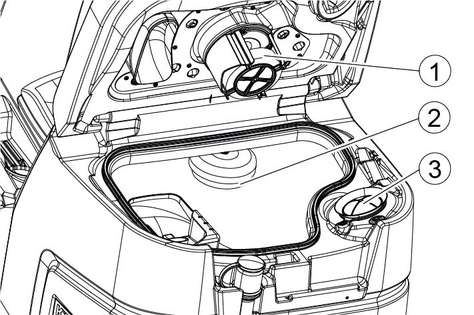
 | Fresh water tank drain opening |
 | Waste water tank drain opening |
 | Fresh water tank filling level (50%) |
 | Lashing point |
 | * Mop holder |
 | Filling system water connection |
 | Waste water tank flushing system water connection |
 | Brush replacement |
* optional
Remove the packaging film.
Remove the strap.
Unscrew the block, squared timber and boards. The components to be unscrewed are marked in grey in the figure.
Place a ramp in front of the pallet with the unscrewed boards and squared timber and fasten with chipboard screws.
Install the batteries if the device was delivered without batteries (see chapter "Before inital startup/ batteries").
Drive the device forward and off the pallet (see chapter "Operation / Driving").
The installation of the brushes is described in the chapter "Maintenance work".
Pivot both clamping levers upwards.
Insert the suction bar in the suction bar mount.
Pivot both clamping levers downwards.
Risk of damage
Batteries may only be replaced with batteries of the same technology.Lead batteries must not be replaced by Li-Ion batteriesLi-ion batteries must not be replaced by lead batteries.Lead batteries:
Description | Order no. | Volume (m3)* | Airflow (m3/h)** |
|---|---|---|---|
170 Ah - Maintenance-free, AGM | 4.039-352.7 | 2,4 | 1,0 |
180 Ah - Maintenance-free, gel | 4.039-354.7 | 3,8 | 1,6 |
285Ah - Maintenance-free, AGM | 4.039-353.7 | 12,6 | 5,1 |
* Minimum volume of battery charging room
** Minimum air flow between battery charging room and environment
The device requires 2 batteries.
Li-ion batteries:
Description | Order no. |
|---|---|
80 Ah, 25.6 V | 6.654-454.0 |
The device requires 2 batteries.
In the case of the device variant with Li-Ion battery, the battery is already installed and connected.
Removing and installing the batteries
Unstable machine position
Ensure that the machine is positioned stably when removing and installing the batteries.Incorrect connection polarity
Destruction of the control electronics
Take care to ensure the correct polarity when connecting the batteries.Deep discharge
Risk of damage
Charge the batteries before starting the device.Drain the waste water.
Unlock the waste water tank and pivot it to the rear.
Place the battery in the device.
170 Ah, 4.039-352.7
180 Ah, 4.039-354.7
285 Ah, 4.039-353.7
160 Ah Li-Ion, 6.654-454.0
Insert the spacers at the locations shown in the picture between the battery and the device.
Connect the battery terminals using the connecting cables.
Clamp the connecting cable on the (+) and (‑) battery terminals that are still free.
For the 170 Ah 4.039-352.7 battery set, attach the connection cable to the negative pole with the insulated pole screw.
Connect the device-side battery connector to the battery-side battery connector.
Pivot the waste water tank forwards and close it.
Removing and installing the batteries
Unstable machine position
Ensure that the machine is positioned stably when removing and installing the batteries.Risk of injury due to the device tipping over!
Device may tip over when removing and installing batteries.
Ensure that the device is positioned stably when removing and installing the batteries.Turn the key-operated switch to "0" and remove the key.
Disconnect the battery connector.
Drain the waste water.
Pivot the waste water tank upwards.
Disconnect the device-end cable from the negative terminal at the battery.
Disconnect the remaining cables from the battery.
Remove the battery.
Dispose of the used batteries in accordance with statutory provisions.
Inappropriate use of the charger
Flammable gases are generated when the battery is charged
Electric shock
Risk of explosion
Adhere to the mains voltage and fuse values specified on the device type plate.Only use the charger in dry rooms with sufficient ventilation.Only charge the battery in a suitable room. The room must have a minimum volume depending on the battery type and an adequate air exchange rate with a minimum air flow (see "Recommended batteries").Accumulation of dangerous gases under the tank during the charging process
Risk of explosion
Pivot the waste water tank upwards before charging low-maintenance batteries.The average charging time is approx. 10-15 hours.
The device cannot be used during the charging process.
The device has deep discharge protection, i.e. the brush motor and turbine are switched off automatically when the permitted minimum capacity level is reached.
Drive the device directly to the charger and do not drive on slopes.
Before the initial startup, after a service reset or when changing to a different battery type, it is essential to set the charging characteristic.
Danger due to the device inadvertently starting up
Risk of injury
Disconnect the spark plug connector or disconnect the battery before performing any work on the device.Risk of damage to the battery
The service life and charging capacity of the battery can be affected by an incorrect charging characteristic.
Make sure that the battery characteristic curve that matches the battery is selected in the machine.The currently selected battery characteristic curve can be seen on the display or via the app in the "Device status" area during charging.The charging characteristic can only be adjusted by Kärcher Service.
Battery characteristics are available for the following batteries:
EXIDE GF12105V
HOPPECKE TB115
EXIDE GF12076V
EXIDE FF12080W
TROJAN 27TMX
HOPPECKE TB80
ZENITH L120185
To enable the use of other batteries as well, a custom battery characteristic curve can be created by the Kärcher service department.
Risk of damage due to unsuitable charger!
Do not connect the charger to the device-side battery connector.
Use only a charger suitable for the type of battery installed.Battery | Capacity | Charger |
|---|---|---|
4.039-352.7 | 170 Ah | 6.654-436.0 |
4.039-354.7 | 180 Ah | 6.654-434.0 |
4.039-353.7 | 285Ah | 6.654-419.0 |
Unlock the waste water tank and pivot it up.
Pull out the device-side battery connector.
Connect the battery-side battery connector to the charger.
Plug the mains plug of the charger into the socket.
Carry out the charging process in accordance with the operating instructions for the charger.
Connect the device-side battery connector to the battery-side battery connector.
Pivot the waste water tank forwards and then close it.
Unlock the waste water tank and pivot it up.
Plug the mains plug of the internal charger into the mains socket.
The charging state of the battery is shown on the control panel display.
Unplug the charger mains plug from the mains socket after charging.
Pivot the waste water tank forwards.
Refilling discharged batteries with water
Danger of acid burns from escaping acid, destruction of clothing
Wear safety goggles, protective clothing and protective gloves when handling the battery acid.Observe the applicable regulations.Immediately rinse off any splashed acid from the skin or clothing using copious amounts of water.Using water with additives
Defective batteries, loss of warranty eligibility
Top up the batteries using only distilled or desalinated water (EN 50272-T3).Do not use any foreign additives, so-called enhancing agents, because this will invalidate the warranty.Add distilled water one hour before the charging process comes to an end. Observe the correct acid level according to the battery label.
All cells must produce gas at the end of the charging process.
Clean up any spilled water. To do this, proceed as described in the Care and maintenance chapter in the "Cleaning the batteries" section.
Falling objects
Risk of injury
Do not drive the device into areas where there is a possibility of the operating personnel being hit by falling objects.Risks during operation
Risk of injury
In the event of danger, set the safety switch to "0".To push the device, the brake must be unlocked.
Danger of accident
When the brake is unlocked, the function of the brake is permanently out of operation.
Be sure to remove the coins for unlocking immediately after the sliding process has ended.Swing the unlocking lever away from the wheel and hold it there.
Insert a coin between the casing and the lever at both ends of the lever.
Release the unlocking lever.
Push the device.
Remove both coins immediately after pushing.
Stand next to the device.
Raise the seat at the back.
Align the front seat bracket to the desired height of the device.
Lower the seat at the back.
Operate the seat adjustment lever and move the seat to the desired position.
Release the seat adjustment lever and latch the seat into position.
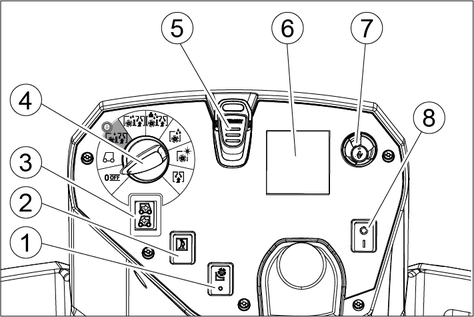
Sit in the driver's seat.
Insert the Intelligent Key.
Set the safety switch to "1".
Turn the program switch to the desired function.
If one of the displays below appears on the display, take your foot off the accelerator pedal, set the safety switch to "0" and carry out the necessary maintenance work.
Display | Activity |
|---|---|
maintenance squeegee | Clean the suction bar. |
maintenance brush head | Check the brushes for wear and clean them. |
maintenance squeegee blade | Check the suction lips for wear and correct adjustment. |
maintenance turbine filter | Clean the fluff filter. |
maintenance fresh water filter | Clean the fresh water filter. |
Press the Info button.
Reset the counter for the corresponding maintenance (see "Grey Intelligent Key / Reset maintenance counter").
If the counter is not reset, the maintenance display appears again each time the device is switched on.
The daytime running light is in operation when the device is switched on.
The sidelight lights up as soon as the program switch is set to a cleaning program.
Defective parking brake
Danger of accident
Before each operation, check the function of the parking brake on level ground.Switch the device on.
Set the travel direction switch to "Forward".
Set the program selector switch to "TRANSPORT MODE".
Press the accelerator pedal lightly.
The brake must audibly unlock. The appliance must roll easily on a plane surface.
Release the accelerator pedal.
The brake must be audibly engage.
If this is not the case, take the device out of operation and call Customer Service.
Lack of braking
Danger of accident
Before using the device, it is essential to check the function of the parking brake. Never use the device if the parking brake does not work.Careless driving
Danger of tipping over
Only drive on gradients up to a maximum of 10% in the direction of travel and across the direction of travel.Do not turn up or down gradients.Drive slowly in corners and on wet ground.Only drive the device on stable ground.The travel direction can be changed while driving. This means that very dull spots can be polished by moving back and forth several times.
Assume a seated position.
Insert the Intelligent Key.
Turn the safety switch to "1".
Set the program selector switch to "TRANSPORT MODE".
Set the direction of travel using the drive direction button on the control panel.
Specify the travel speed by pressing the accelerator pedal.
Release the accelerator pedal.
The device stops.
The driving motor is switched off in the event of an overload. A fault message appears on the display. If the controller overheats, the affected power unit is switched off.
Allow the device to cool down for at least 15 minutes.
Set the program switch to “OFF”, wait briefly and set to the desired program.
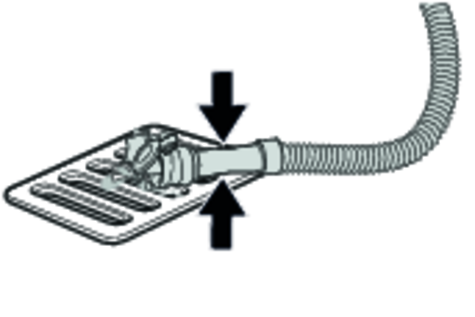
Connect the water hose to the connection nozzle of the filling system (maximum water temperature 50 °C).
Open the water inlet.
Monitor the device, the automatic filling system interrupts the water supply when the fresh water tank is full.
Close the water inlet.
Remove the water hose.
Open the fresh water tank cap.
Fill fresh water (max. 50 °C) to the lower edge of the filling nozzle.
Note: The fresh water hose can be clamped with the hose holder during filling.
Close the fresh water tank lock.
Unsuitable detergents
Health risk, damage to the device
Use only recommended detergents. The operator carries all increased risks relating to operational safety and increased risk of accidents if using other detergents.Use only detergents free of chlorine, solvents, salt and hydrofluoric acid.Adhere to the safety instructions stated on the detergent packaging.Do not use heavily foaming detergent.
Recommended detergents
Application | Detergent |
|---|---|
Maintenance cleaning of all water-resistant floors | RM 746 RM 756 RM 780 |
Maintenance cleaning of polished hard surfaces (e.g. granite) | RM 755 es |
Maintenance cleaning, intermediate cleaning and basic cleaning of industrial floors | RM 69 ASF |
Maintenance cleaning and basic cleaning of fine stone tiles | RM 753 |
Maintenance cleaning of tiles in sanitary areas | RM 751 |
Coating removal on all alkaline-resistant floors (e.g. PVC) | RM 752 |
Coating removal on linoleum floors | RM 754 |
Only with DOSE variant:
Detergent is added to the fresh water on the way to the cleaning head by a dosing device.
Unlock the waste water tank and pivot it up.
Fill the detergent canister with detergent.
Pivot the waste water tank forwards.
A maximum of 3% detergent can be added with the dosing device. If the dosage is higher, the detergent must be added to the fresh water tank.
Fill the detergent into the fresh water tank.
Note: The lid for the filling hole of the fresh water tank can be used to measure the detergent. It has a measuring scale marked on the inner side.
Set the program switch to the desired cleaning program.
Turn the Info button until the desired parameter is displayed.
Press the Info button.
The adjusted value flashes.
Set the desired value by turning the Info button.
Confirm the changed setting by pressing the Info button or wait until the set value is automatically accepted after 10 seconds.
The yellow Intelligent Key authorizes functions that are required for the cleaning task.
The parameters for the various cleaning programs are preset in the device. Individual parameters can be changed depending on the authorization of the yellow Intelligent Key.
The display texts for parameter setting are largely self-explanatory.
"FACT" parameters (only available with R cleaning head):
"Fine Clean": Low brush speed for removing grey film from fine stone.
"Whisper Clean": Medium brush speed for maintenance cleaning with reduced noise level.
"Power Clean": High brush speed for polishing, crystallizing and sweeping.
The inclination must be adjusted so that the suction lips of the suction bar make even contact with the floor over the entire length of the suction bar.
Park the device on a surface without a slope.
Turn the program switch to the "Vacuum" position.
Drive the device a small distance forwards.
Read the spirit level.
Unscrew the nut.
Adjust the screw so that the spirit level indicator is between the two lines.
Tighten the nut.
To check the new setting, move the device forward again a short distance. Repeat the adjustment process if necessary.
Turn the key-operated switch to "OFF".
The height adjustment affects the bending of the suction lips on contact with the floor.
Standard setting: 3 washers above, 3 washers below the suction bar.
Uneven floor: 5 washers above, 1 washer below the suction bar.
Very smooth floor: 1 washer above, 5 washers below the suction bar.
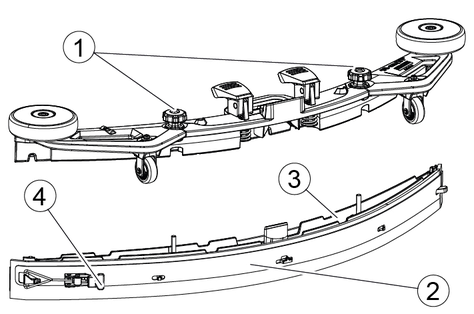
Unscrew the nuts.
Place the desired number of washers between the suction bar and the spacer roller.
Fit the remaining unused washers above the spacer roller.
Screw on the nut and tighten.
Repeat the entire procedure at the second spacer roller.
Set both spacer rollers to the same height.
The squeegee blades only need to be adjusted on the D cleaning head.
Adjust the squeegee blades by turning the setting wheel so that the squeegee blade touches the ground.
Turn the adjustment wheel an additional 1 rotation down.
Sit on the seat.
Insert the Intelligent Key.
Set the safety switch to "1".
Set the travel direction switch to forward travel.
Set the program switch to the desired cleaning program.
Determine the speed with the accelerator pedal.
Determine the travel direction with the steering wheel.
Drive over the surface to be cleaned.
The side scrubbing deck makes working close to the edge easier.
The side scrubbing deck is not active in the polish and vacuum cleaning programmes.
Operate the side scrubbing deck switch.
The side scrubbing deck is activated.
To finish working with the side scrubbing deck, set the side scrubbing deck switch to "0" .
Set the programme switch to Drive.
Continue moving a short distance.
The residual water is vacuumed up.
Turn the key-operated switch to "OFF".
Remove the Intelligent Key.
Charge the battery if necessary.
Improper disposal of waste water
Environmental pollution
Observe the local waste water treatment regulations.When the waste water tank is full, the suction flow is interrupted by a float to prevent the waste water tank from overflowing. In this case, drain the waste water.
Remove the waste water drain hose from the support and open the drain hose cover.
Squeeze the end of the hose and lower it over the disposal facility.
Adjust the strength of the waste water jet by squeezing the end of the hose.
Rinse the waste water tank with clear water.
Close the drain hose cover.
Press the waste water hose into the support on the device.
Remove the waste water drain hose from the support and open the drain hose cover.
Close the cover of the waste water tank.
Connect a water supply hose to the water connection of the waste water tank flushing system.
Open the water inlet and rinse the waste water tank for about 30 seconds.
Repeat the rinsing process 2 to 3 times if necessary.
Close the water inlet.
Disconnect the water supply hose from the device.
Close the waste water drain hose and press it into the support.
Lift the coarse dirt container and pull it out.
Empty the coarse dirt container.
Reinstall the coarse dirt container.
Open the fresh water tank cap.
Drain the fresh water.
Clean the filter.
Fit the fresh water tank cap.
Turn the key-operated switch to "OFF".
Remove the Intelligent Key.
Secure the device against rolling away.
Open the lid of the waste water tank and secure it with the support so that the waste water tank can dry out. To do this, swing the support down and position the lower end at the desired level when swinging down the cover.
Charge the battery if necessary.
The grey Intelligent Key grants the supervisory staff extended authorizations and setting options.
Insert the Intelligent Key.
Select the desired function by turning the info button.
Set the program selector switch to "TRANSPORT MODE".
Press the Info button.
The following functions can be executed from the TRANSPORT MODE menu:
Set maximum speed
Show operating hours counter
Clearing the maintenance counter
Show software versions
Adjust the R or D cleaning head
Switch speed-dependent water dosage on / off
Setting after-running times
Setting the language
Key management
Switch attachment kits on / off
Activate factory setting
The maximum speed can be limited in the "max speed" menu.
Turn the info button until "max speed" is shown on the display.
Press the Info button.
Turn the info button until the desired maximum speed is displayed.
Press the Info button.
The working speed cannot exceed the maximum speed set.
If maintenance work shown in the display has been carried out, the corresponding maintenance counter must then be reset.
Turn the Info button until "maintenance count." is displayed.
Press the Info button.
The counter readings are displayed.
Turn the info button until the counter to be cleared is highlighted.
Press the Info button.
Select "yes" by turning the Info button.
Press the Info button.
The counter is cleared.
Turn the Info button until "brush head" is displayed in the menu.
Press the Info button.
Turn the info button until the type of the built-in cleaning head is highlighted.
“Roll" = R cleaning head
"Disc" = D cleaning head
Press the Info button.
If the speed-dependent water dosing is switched on, the brush irrigation changes proportionally with the speed.
The water dosing is also influenced by the setting of the respective cleaning program (0 ... 100%).
Setting | ON [ml/m2] | OFF[l/min] |
|---|---|---|
0% | 0 | 0 |
10% | 7.5 | 0.6 |
20% | 15 | 1.1 |
30% | 22.5 | 1.7 |
40% | 30 | 2.3 |
50% | 37.5 | 2.8 |
60% | 45 | 3.4 |
70% | 52.5 | 3.9 |
80% | 60 | 4.5 |
90% | 67.5 | 5.1 |
100% | 75 | 5.7 |
Set speed-dependent or constant water dosing:
Turn the Info button until “water dosage mode” is shown on the display.
Press the Info button.
Turn the info button until the desired function is highlighted.
Press the Info button.
Turn the info button until the "delay times" menu item appears on the display.
Press the Info button.
Turn the info button until the desired assembly is highlighted.
Press the Info button.
Turn the info button until the desired after-running time is displayed.
Press the Info button.
Turn the info button until the "language" menu item appears on the display.
Press the Info button.
Turn the info button until the desired language is highlighted.
Press the Info button.
The menu item "key menu" enables authorizations for yellow Intelligent Keys and the language of the display.
Insert the grey Intelligent Key.
Turn the info button until the "key menu" menu item appears on the display.
Press the Info button.
Remove the grey Intelligent Key and insert the yellow Intelligent Key to be personalized.
Select the menu item to be changed by turning the info button.
Press the Info button.
Select the setting of the menu item by turning the info button.
Confirm the setting by pressing the menu item.
Select the next menu item to be changed by turning the info button.
After all settings have been made, call up the "save" menu by turning the info button.
Press the Info button.
The authorizations are saved.
Turn the info button until the desired attachment kit is shown on the display.
Press the Info button.
Turn the info button until the desired function of the attachment kit is displayed.
Press the Info button.
The factory settings for all cleaning parameters are restored.
Turn the info button until the "factory settings" menu item is displayed.
Press the Info button.
Turn the Info button until "yes" is highlighted.
Press the Info button.
All parameters for cleaning programs are retained until another setting is selected.
Set the program switch to the desired cleaning program.
Press the Info button.
The first adjustable parameter is displayed.
Press the Info button
The adjusted value flashes.
Set the desired value by turning the Info button.
Confirm the changed setting by pressing the Info button or wait until the set value is automatically accepted after 10 seconds.
Select the next parameter by turning the Info button.
After changing all desired parameters, turn the Info button until the "exit" menu item is displayed.
Press the Info button.
The menu is exited.
Driving on slopes
Risk of injury
Observe the maximum permissible gradient when driving the device on slopes for loading and unloading purposes (see chapter "Technical data").Drive slowly.Failure to observe the weight
Risk of injury and damage
Be aware of the weight of the device during transportation.With the D cleaning head installed, remove the disc brushes from the brush head.
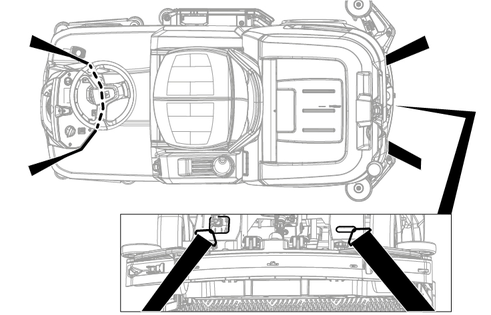
When transporting in vehicles, secure the device against slipping and tipping over according to the applicable guidelines.
Risk of injury or damage due to non-observance of the weight
Be aware of the weight of the device during storage.Frost
Destruction of the device through freezing water
Drain all water from the device.Store the device in a frost-free location.This device may only be stored indoors.
Fully charge the batteries before storing them for a long period.
Fully charge the batteries at least every month during storage.
Inadvertently starting up device
Risk of injury, electric shock
Turn the program switch to the “OFF” position.Remove the Intelligent Key prior to all work on the device.Pull out the charger mains plug.Unplug the battery connector.Drain and dispose of the waste water and fresh water.
Improper cleaning
Risk of damage.
Do not spray the device with water.Do not use aggressive cleaning agents.A detailed description of the individual maintenance work is provided in the chapter "Maintenance Work".
Drain the waste water.
Rinse the waste water tank with clear water.
Clean the coarse dirt sieve.
Only with R cleaning head: Remove the coarse dirt container and empty it.
Clean the exterior of the device using a damp cloth, wetted with a mild washing lye.
Check the suction lips, check for wear and tear and replace if necessary.
Clean the squeegee blades, check for wear and tear and replace if necessary.
Clean the brushes, check for wear and tear and replace if necessary.
Charge the battery.
Lead-acid battery:
If the charging state of the battery is below 50%, charge the battery fully and without interruption.
If the charging state of the battery is above 50%, only recharge the battery if the entire operating duration will be required when next used.
Li-Ion battery:
Recharge as necessary.
When used regularly, charge the battery fully and without interruption at least once a week.
A detailed description of the individual maintenance work is provided in the chapter "Maintenance Work".
If the device is temporarily shut down: Perform equalization charging of the battery.
Check battery poles for oxidation, brush off if necessary. Make sure the connection cables are firmly in place.
Clean the seals between the waste water tank and the cover, check for leaks and replace if necessary.
Drain the fresh water tank and flush out deposits.
Clean the fresh water filter.
Check the acid density of the cells if the batteries are not maintenance-free.
Only with R cleaning head: Clean the brush tunnel.
Only with R cleaning head: Clean the water distribution strip on the cleaning head.
For longer periods of disuse, shut down the device when the battery is fully charged. Fully charge the battery at least once a month.
Have the prescribed inspection performed by Customer Service.
You can agree on regular safety inspections or close a maintenance contract with your dealer. Please seek advice on this.
The suction lips must be turned over or replaced when worn out.
The suction lips can be turned 3 times until all 4 edges are worn.
Remove the suction bar.
Unscrew the star handles.
Pull out the inner part of the suction bar.
Open the tension lock.
Remove the strap.
Release the suction lips from the inner part.
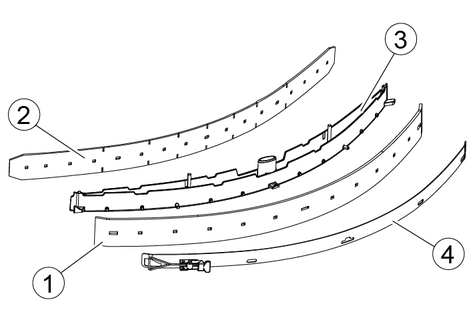
Press the turned or new suction lips onto the knobs of the inner part of the suction bar.
Attach the strap.
Push the inner part of the suction bar into the upper part.
Screw in and tighten the star handles.
Open the waste water tank cover.
Pull the coarse dirt filter upwards and off.
Rinse off the coarse dirt filter under running water.
Reinsert the coarse dirt filter into the waste water tank.
Open the waste water tank cover.
Rinse the float with clear water.
Rinse the float switch with clear water.
Remove and clean the fluff filter.
Replace the disc brushes when the bristle length has reached 10 mm.
Raise the cleaning head.
Push the brush replacement pedal down.
Pull the disc brush sideways and out from underneath the cleaning head.
Hold the new disc brush under the cleaning head, then press upwards and latch it into position.
Replace the roller brushes when the bristle length has reached 10 mm.
Raise the cleaning head.
Pull out the brush replacement handle.
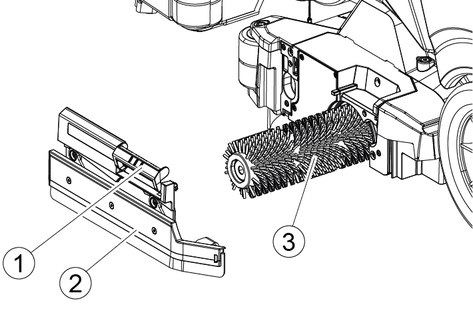
Remove the bearing cover including the squeegee blade.
Pull out the roller brush.
Fit the new roller brush and centre it on the driver.
Install the bearing cover with the squeegee blade.
Make sure the roller brush sits on the mounting mandrel and not underneath.
Pivot the brush replacement handle upwards and latch it into place.
Repeat the entire procedure at the other side.
Press the brush replacement lever downwards.
The brush falls out of the support.
Hold the new brush under the side scrubbing deck, then press upwards and latch it into position
Drain the fresh water (see chapter "Draining fresh water").
Unscrew the fresh water tank cap.
Pull out the fresh water filter and rinse with clean water.
Insert the fresh water filter.
Fit the fresh water tank lock.
Note: Take care to ensure that the hose connection in the fresh water tank cap is positioned at the lowest point in the tank after screwing the cap in place.
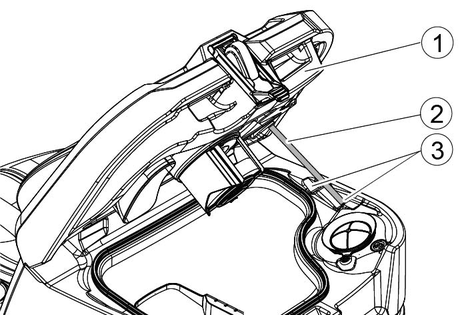
Press the latch in the direction of the arrow and hold it there.
Pivot the water distribution strip forward.
Pull out the water distribution strip lengthways.
Clean the water distribution strip.
Fit the water distribution strip back into the cleaning head and snap the lock into place.
Wear safety goggles, protective clothing and protective gloves.
Keep the battery cell plugs closed.
Remove the batteries.
Only clean the plastic parts of the batteries and the battery compartment with water or water-soaked cleaning cloths without additives.
Dry the surfaces after cleaning.
Reinstall the batteries.
If maintenance work shown in the display has been carried out, the corresponding maintenance counter must then be reset.
Resetting the maintenance counters is described in the chapter "Grey Intelligent Key".
The device can start unintentionally
People working on the device can be injured.
Remove the Intelligent Key prior to all work on the device.Before carrying out any work, pull the mains plug of the internal charger out of the socket.Disconnect the battery connector before performing any work.Drain the waste water.
Drain the remaining fresh water.
If the malfunction cannot be remedied with the following instructions, contact Customer Service.
If the displayed malfunction is not in the following list, do the following:
Turn the key-operated switch to "OFF".
Wait 10 seconds.
Set the program switch to the previous function.
If the malfunction recurs, call Customer Service.
The device cannot be started
Remedy:
Sit in the driver's seat.
Take your foot off the accelerator before switching on the safety switch.
Turn the safety switch to "1".
Check the battery and charge if necessary.
Set the programme switch to "OFF".
Wait 10 seconds.
Set the program switch to the desired program.
If possible, only drive the device on level ground.
Check the parking brake if necessary.
If the fault still occurs, call Customer Service.
The device is no longer running, display shows "battery empty"
Remedy:
Set the programme switch to "OFF".
Wait 10 seconds.
Set the program selector switch to "TRANSPORT MODE".
Drive to the charging station.
If the device still does not run, charge the battery on site or unlock the brake (see "Operation/pushing the device") and push the device to the charging station.
The device moves unevenly (jerks) when starting and stopping.
Remedy:
Unlock the brake lock (see "Operation/pushing the device").
The fresh water display shows the wrong filling level after emptying the tank manually.
Remedy:
Use the device. During operation, the hose system will vent and the filling level display will correct itself.
The bar of the filling level display is flashing, "fresh water empty” display
Remedy:
Refill the fresh water tank.
The water volume is insufficient
Remedy:
Check the fresh water filling level, if necessary fill the tank completely so that the air is pressed out.
Remove and clean the fresh water filter.
Insert the filter and screw on the cap.
Only with R cleaning head: Pull off the water distribution strip on the cleaning head.
Only with R cleaning head: Clean the water channel.
Check the hoses for clogging and clean if necessary.
The suction performance is too low
Remedy:
Clean the seals between the waste water tank and the cover, check for leaks and replace if necessary.
Check the fluff filter for soiling and clean if necessary.
Clean the suction lips at the suction bar, turn over or replace if necessary.
Close the lid on the waste water drain hose.
Close the cover of the waste water tank rinsing system.
Check the suction hose for clogging and clean if necessary.
Check the suction hose for leaks and replace if necessary.
Check the adjustment of the suction bar.
The cleaning results are unsatisfactory
Remedy:
Set the appropriate cleaning program for the cleaning task.
Use suitable brushes for the cleaning task.
Use a suitable detergent for the cleaning task.
Reduce the driving speed.
Adjust the contact pressure.
Adjust the squeegee blades.
Check the brushes for wear and replace if necessary.
Check the water output.
The brushes do not rotate
Remedy:
Reduce the contact pressure.
Check if the brushes are blocked by a foreign body and remove the foreign body if necessary.
If the motor is overloaded, let the motor cool down.
Set the programme switch to "OFF".
Wait 10 seconds.
Set the program switch to the desired program.
Check that the plug of the device is plugged into the cleaning head.
The device does not brake
Remedy:
Undo the brake lock (see "Operation / Pushing the device").
The waste water drain hose is clogged
Remedy:
Open the dosing unit cover at the drain hose.
Pull the suction hose off the suction bar and close it by hand.
Set the programme switch to "Vacuum".
The blockage is sucked out of the drain hose into the waste water tank.
The "Dose" detergent dosing unit does not work
Remedy:
"Dose" version only: Call Customer Service.
Allgemein | |
Fahr- / Reinigungsgeschwindigkeit | 6 km/h |
Transportgeschwindigkeit | 6 km/h |
Fahrgeschwindigkeit, rückwärts | 4 km/h |
Theoretische Flächenleistung | 41979 (3900) ft2/h (m2/h) |
Theoretische Flächenleistung mit Seitenschrubbdeck | - ft2/h (m2/h) |
Praktische Flächenleistung | 29385 (2730) ft2/h (m2/h) |
Volumen Frischwassertank | 29 (110) gal (l) |
Volumen Schmutzwassertank | 29 (110) gal (l) |
Volumen Grobschmutzbehälter | 0,4 (1,6) gal (l) |
Volumen Reinigungsmitteltank (Option Dose) | 1,3 (5) gal (l) |
Reinigungsmitteldosierung | 0,25...3 % |
Wasserdosierung | 0,04...1,5 (0,15...5,7) gpm (l/min) |
Flächenbelastung (mit Fahrer und vollem Frischwassertank) | |
Flächenpressung | 0,62...0,66 N/mm2 |
Flächenlast (Gewicht/Parkfläche) | 470...542 kg/m2 |
Maße | |
Länge | 5,38 (1640) ft (mm) |
Breite | 2,43 (740) ft (mm) |
Breite Saugbalken | 3,12 (950) ft (mm) |
Höhe | 4,30 (1310) ft (mm) |
Arbeitsbreite | 2,13 (650) ft (mm) |
Arbeitsbreite mit Seitenschrubbdeck | - ft (mm) |
Abmessungen Verpackung lxbxh | 5,74x3,25x4,84 (1750x990x1475) ft (mm) |
Wendekreis | 5,74 (1750) ft (mm) |
Abmessungen Batteriefach lxbxh | 2x(1,03x1,27x1,23) (2x(315x386x375)) ft (mm) |
Bereifung | |
Vorderrad, Breite | 0,30 (90) ft (mm) |
Vorderrad, Durchmesser | 0,82 (250) ft (mm) |
Hinterrad, Breite | 0,25 (75) ft (mm) |
Hinterrad, Durchmesser | 0,95 (290) ft (mm) |
Gewicht | |
Zulässiges Gesamtgewicht | 1433 (650) lbs (kg) |
Leergewicht (Transportgewicht) | 1058 (480) lbs (kg) |
Typisches Betriebsgewicht | 1190 (540) lbs (kg) |
Bürstenanpresskraft, max. | 736 (75) N (kg) |
Bürstenanpressdruck, max. | 581 (570) N/m2 (g/cm2) |
Leistungsdaten Gerät | |
Nennspannung | 24 V |
Batteriekapazität | 170 / 285 Ah (5 h) |
Mittlere Leistungsaufnahme | 3,15 (2350) hp (W) |
Nennleistung | 3,35 (2500) hp (W) |
Leistung Fahrmotor | 0,80 (600) hp (W) |
Leistung Saugturbine | 0,80 (600) hp (W) |
Leistung Bürstenantrieb | 2 x 0,80 (2 x 600) hp (W) |
Schutzart | IPX3 |
Saugen | |
Saugleistung, Luftmenge | ~53 (~25) CFM (l/s) |
Unterdruck (max.) | ~2,47 (~0,17) psi (bar) |
Unterdruck (im Betrieb) | ~0,73 (~0,05) psi (bar) |
Reinigungsbürsten | |
Bürstendurchmesser | 0,33 (100) ft (mm) |
Bürstenlänge | 1,98 (605) ft (mm) |
Bürstendrehzahl | 1200 1/min |
Bürstendurchmesser Seitenschrubbdeck | - ft (mm) |
Bürstendrehzahl Seitenschrubbdeck | - 1/min |
Internes Schnellladegerät (Nur Lithium-Ionen-Variante) | |
Nennspannung | 100...240 V |
Frequenz | 50-60 Hz |
Leistungsaufnahme | 1,75 (1100) hp (W) |
Ladestrom | 35 A |
Internes Ladegerät | |
Kabellänge | 6,5 (2) ft (m) |
Nennspannung | 100...240 V |
Frequenz | 50-60 Hz |
Leistungsaufnahme | 1 (750) hp (W) |
Ladestrom | 28 A |
Wirkungsgrad | 92 % |
Umgebungsbedingungen | |
Zulässiger Temperaturbereich | 41...104 (5...40) °F (°C) |
Wassertemperatur max. | 122 (50) °F (°C) |
Wasserdruck Befüllsystem (Option) | 145 (10) psi (bar) |
Wasserdruck Schmutzwassertank-Spülsystem (Option) | 145 (10) psi (bar) |
Relative Luftfeuchtigkeit | 20...90 % |
Steigung | |
Steigung Arbeitsbereich max. | 10 % |
Steigung Kurzstrecke (max. 10 m) Transport, Verladung | 22 % |
Ermittelte Werte gemäß EN 60335-2-72 | |
Hand-Arm-Vibrationswert | <2,5 m/s2 |
Sitz-Vibrationswert | <0,5 m/s2 |
Unsicherheit K | 0,2 dB(A) |
Schalldruckpegel LpA Eco-Betrieb | 59,2 dB(A) |
Schalldruckpegel LpA Normalbetrieb | 63,6 dB(A) |
Unsicherheit KpA | 1,6 dB(A) |
Schallleistungspegel LWA + Unsicherheit KWA Eco-Betrieb | 74,1 dB(A) |
Schallleistungspegel LWA + Unsicherheit KWA Normalbetrieb | 78,7 dB(A) |
Seitenschrubbdeck | |
Leistung | - hp (W) |
Bürstenanpresskraft, max. | - N (kg) |
Bürstenanpressdruck, max. | - N/m2 (g/cm2) |
Allgemein | |
Fahr- / Reinigungsgeschwindigkeit | 6 km/h |
Transportgeschwindigkeit | 6 km/h |
Fahrgeschwindigkeit, rückwärts | 4 km/h |
Theoretische Flächenleistung | 41979 (3500) ft2/h (m2/h) |
Theoretische Flächenleistung mit Seitenschrubbdeck | - ft2/h (m2/h) |
Praktische Flächenleistung | 29385 (2730) ft2/h (m2/h) |
Volumen Frischwassertank | 29 (110) gal (l) |
Volumen Schmutzwassertank | 29 (110) gal (l) |
Volumen Grobschmutzbehälter | - gal (l) |
Volumen Reinigungsmitteltank (Option Dose) | 1,3 (5) gal (l) |
Reinigungsmitteldosierung | 0,25...3 % |
Wasserdosierung | 0,04...1,5 (0,15...5,7) gpm (l/min) |
Flächenbelastung (mit Fahrer und vollem Frischwassertank) | |
Flächenpressung | 0,62...0,66 N/mm2 |
Flächenlast (Gewicht/Parkfläche) | 470...524 kg/m2 |
Maße | |
Länge | 5,38 (1640) ft (mm) |
Breite | 2,43 (740) ft (mm) |
Breite Saugbalken | 3,12 (950) ft (mm) |
Höhe | 4,30 (1310) ft (mm) |
Arbeitsbreite | 2,13 (650) ft (mm) |
Arbeitsbreite mit Seitenschrubbdeck | - ft (mm) |
Abmessungen Verpackung lxbxh | 5,74x3,25x4,84 (1750x990x1475) ft (mm) |
Wendekreis | 5,74 (1750) ft (mm) |
Abmessungen Batteriefach lxbxh | 2x(1,03x1,27x1,23) (2x(315x386x375)) ft (mm) |
Bereifung | |
Vorderrad, Breite | 0,30 (90) ft (mm) |
Vorderrad, Durchmesser | 0,82 (250) ft (mm) |
Hinterrad, Breite | 0,25 (75) ft (mm) |
Hinterrad, Durchmesser | 0,95 (290) ft (mm) |
Gewicht | |
Zulässiges Gesamtgewicht | 1433 (650) lbs (kg) |
Leergewicht (Transportgewicht) | 1058 (480) lbs (kg) |
Typisches Betriebsgewicht | 1190 (540) lbs (kg) |
Bürstenanpresskraft, max. | 736 (75) N (kg) |
Bürstenanpressdruck, max. | 51 (50) N/m2 (g/cm2) |
Leistungsdaten Gerät | |
Nennspannung | 24 V |
Batteriekapazität | 170 / 285 Ah (5 h) |
Mittlere Leistungsaufnahme | 3,15 (2350) hp (W) |
Nennleistung | 3,35 (2500) hp (W) |
Leistung Fahrmotor | 0,80 (600) hp (W) |
Leistung Saugturbine | 0,80 (600) hp (W) |
Leistung Bürstenantrieb | 2 x 0,80 (2 x 600) hp (W) |
Schutzart | IPX3 hp (W) |
Saugen | |
Saugleistung, Luftmenge | ~53 (~25) CFM (l/s) |
Unterdruck (max.) | ~2,47 (~0,17) psi (bar) |
Unterdruck (im Betrieb) | ~0,73 (~0,05) psi (bar) |
Reinigungsbürsten | |
Bürstendurchmesser | 1,16 (355) ft (mm) |
Bürstenlänge | - ft (mm) |
Bürstendrehzahl | 180 1/min |
Bürstendurchmesser Seitenschrubbdeck | - ft (mm) |
Bürstendrehzahl Seitenschrubbdeck | - 1/min |
Internes Schnellladegerät (Nur Lithium-Ionen-Variante) | |
Nennspannung | 100...240 V |
Frequenz | 50-60 Hz |
Leistungsaufnahme | 1,75 (1100) hp (W) |
Ladestrom | 35 A |
Internes Ladegerät | |
Kabellänge | 6,5 (2) ft (m) |
Nennspannung | 100...240 V |
Frequenz | 50-60 Hz |
Leistungsaufnahme | 1 (750) hp (W) |
Ladestrom | 28 A |
Wirkungsgrad | 92 % |
Umgebungsbedingungen | |
Zulässiger Temperaturbereich | 41...104 (5...40) °F (°C) |
Wassertemperatur max. | 122 (50) °F (°C) |
Wasserdruck Befüllsystem (Option) | 145 (10) psi (bar) |
Wasserdruck Schmutzwassertank-Spülsystem (Option) | 145 (10) psi (bar) |
Relative Luftfeuchtigkeit | 20...90 % |
Steigung | |
Steigung Arbeitsbereich max. | 10 % |
Steigung Kurzstrecke (max. 10 m) Transport, Verladung | 22 % |
Ermittelte Werte gemäß EN 60335-2-72 | |
Hand-Arm-Vibrationswert | <2,5 m/s2 |
Sitz-Vibrationswert | <0,5 m/s2 |
Unsicherheit K | 0,2 dB(A) |
Schalldruckpegel LpA Eco-Betrieb | 59,2 dB(A) |
Schalldruckpegel LpA Normalbetrieb | 63,6 dB(A) |
Unsicherheit KpA | 1,6 dB(A) |
Schallleistungspegel LWA + Unsicherheit KWA Eco-Betrieb | 74,1 dB(A) |
Schallleistungspegel LWA + Unsicherheit KWA Normalbetrieb | 78,7 dB(A) |
Seitenschrubbdeck | |
Leistung | - hp (W) |
Bürstenanpresskraft, max. | - N (kg) |
Bürstenanpressdruck, max. | - N/m2 (g/cm2) |
Allgemein | |
Fahr- / Reinigungsgeschwindigkeit | 6 km/h |
Transportgeschwindigkeit | 6 km/h |
Fahrgeschwindigkeit, rückwärts | 4 km/h |
Theoretische Flächenleistung | 48438 (4500) ft2/h (m2/h) |
Theoretische Flächenleistung mit Seitenschrubbdeck | 54896 (5100) ft2/h (m2/h) |
Praktische Flächenleistung | 33906 (3150) ft2/h (m2/h) |
Volumen Frischwassertank | 29 (110) gal (l) |
Volumen Schmutzwassertank | 29 (110) gal (l) |
Volumen Grobschmutzbehälter | 0,5 (1,8) gal (l) |
Volumen Reinigungsmitteltank (Option Dose) | 1,3 (5) gal (l) |
Reinigungsmitteldosierung | 0,25...3 % |
Wasserdosierung | 0,04...1,5 (0,15...5,7) gpm (l/min) |
Flächenbelastung (mit Fahrer und vollem Frischwassertank) | |
Flächenpressung | 0,62...0,66 N/mm2 |
Flächenlast (Gewicht/Parkfläche) | 470...542 kg/m2 |
Maße | |
Länge | 5,38 (1640) ft (mm) |
Breite | 2,43 (740) ft (mm) |
Breite Saugbalken | 3,12 (950) ft (mm) |
Höhe | 4,30 (1310) ft (mm) |
Arbeitsbreite | 2,46 (750) ft (mm) |
Arbeitsbreite mit Seitenschrubbdeck | 2,79 (850) ft (mm) |
Abmessungen Verpackung lxbxh | 5,74x3,25x4,84 (1750x990x1475) ft (mm) |
Wendekreis | 5,74 (1750) ft (mm) |
Abmessungen Batteriefach lxbxh | 2x(1,03x1,27x1,23) (2x(315x386x375)) ft (mm) |
Bereifung | |
Vorderrad, Breite | 0,30 (90) ft (mm) |
Vorderrad, Durchmesser | 0,82 (250) ft (mm) |
Hinterrad, Breite | 0,25 (75) ft (mm) |
Hinterrad, Durchmesser | 0,95 (290) ft (mm) |
Gewicht | |
Zulässiges Gesamtgewicht | 1433 (650) lbs (kg) |
Leergewicht (Transportgewicht) | 1058 (480) lbs (kg) |
Typisches Betriebsgewicht | 1190 (540) lbs (kg) |
Bürstenanpresskraft, max. | 736 (75) N (kg) |
Bürstenanpressdruck, max. | 510 (500) N/m2 (g/cm2) |
Leistungsdaten Gerät | |
Nennspannung | 24 V |
Batteriekapazität | 170 / 285 Ah (5 h) |
Mittlere Leistungsaufnahme | 3,15 (2350) hp (W) |
Nennleistung | 3,35 (2500) hp (W) |
Leistung Fahrmotor | 0,80 (600) hp (W) |
Leistung Saugturbine | 0,80 (600) hp (W) |
Leistung Bürstenantrieb | 2 x 0,80 (2 x 600) hp (W) |
Schutzart | IPX3 |
Saugen | |
Saugleistung, Luftmenge | ~53 (~25) CFM (l/s) |
Unterdruck (max.) | ~2,47 (~0,17) psi (bar) |
Unterdruck (im Betrieb) | ~0,73 (~0,05) psi (bar) |
Reinigungsbürsten | |
Bürstendurchmesser | 0,33 (100) ft (mm) |
Bürstenlänge | 2,31 (705) ft (mm) |
Bürstendrehzahl | 1200 1/min |
Bürstendurchmesser Seitenschrubbdeck | 0,72 (220) ft (mm) |
Bürstendrehzahl Seitenschrubbdeck | 220 1/min |
Internes Schnellladegerät (Nur Lithium-Ionen-Variante) | |
Nennspannung | 100...240 V |
Frequenz | 50-60 Hz |
Leistungsaufnahme | 1,48 (1100) hp (W) |
Ladestrom | 35 A |
Internes Ladegerät | |
Kabellänge | 6,5 (2) ft (m) |
Nennspannung | 100...240 V |
Frequenz | 50-60 Hz |
Leistungsaufnahme | 1 (750) hp (W) |
Ladestrom | 28 A |
Wirkungsgrad | 92 % |
Umgebungsbedingungen | |
Zulässiger Temperaturbereich | 41...104 (5...40) °F (°C) |
Wassertemperatur max. | 122 (50) °F (°C) |
Wasserdruck Befüllsystem (Option) | 145 (10) psi (bar) |
Wasserdruck Schmutzwassertank-Spülsystem (Option) | 145 (10) psi (bar) |
Relative Luftfeuchtigkeit | 20...90 % |
Steigung | |
Steigung Arbeitsbereich max. | 10 % |
Steigung Kurzstrecke (max. 10 m) Transport, Verladung | 22 % |
Ermittelte Werte gemäß EN 60335-2-72 | |
Hand-Arm-Vibrationswert | <2,5 m/s2 |
Sitz-Vibrationswert | <0,5 m/s2 |
Unsicherheit K | 0,2 dB(A) |
Schalldruckpegel LpA Eco-Betrieb | 59,2 dB(A) |
Schalldruckpegel LpA Normalbetrieb | 63,6 dB(A) |
Unsicherheit KpA | 1,6 dB(A) |
Schallleistungspegel LWA + Unsicherheit KWA Eco-Betrieb | 74,1 dB(A) |
Schallleistungspegel LWA + Unsicherheit KWA Normalbetrieb | 78,7 dB(A) |
Seitenschrubbdeck | |
Leistung | 0,19 (140) hp (W) |
Bürstenanpresskraft, max. | 88 (9) N (kg) |
Bürstenanpressdruck, max. | 30,6 (30) N/m2 (g/cm2) |
Allgemein | |
Fahr- / Reinigungsgeschwindigkeit | 6 km/h |
Transportgeschwindigkeit | 6 km/h |
Fahrgeschwindigkeit, rückwärts | 4 km/h |
Theoretische Flächenleistung | 48438 (4500) ft2/h (m2/h) |
Theoretische Flächenleistung mit Seitenschrubbdeck | 54896 (5100) ft2/h (m2/h) |
Praktische Flächenleistung | 33906 (3150) ft2/h (m2/h) |
Volumen Frischwassertank | 29 (110) gal (l) |
Volumen Schmutzwassertank | 29 (110) gal (l) |
Volumen Grobschmutzbehälter | - gal (l) |
Volumen Reinigungsmitteltank (Option Dose) | 1,3 (5) gal (l) |
Reinigungsmitteldosierung | 0,25...3 % |
Wasserdosierung | 0,04...1,5 (0,5...5,7) gpm (l/min) |
Flächenbelastung (mit Fahrer und vollem Frischwassertank) | |
Flächenpressung | 0,62...0,66 N/mm2 |
Flächenlast (Gewicht/Parkfläche) | 470...542 kg/m2 |
Maße | |
Länge | 5,38 (1640) ft (mm) |
Breite | 2,43 (740) ft (mm) |
Breite Saugbalken | 3,12 (950) ft (mm) |
Höhe | 4,30 (1310) ft (mm) |
Arbeitsbreite | 2,46 (750) ft (mm) |
Arbeitsbreite mit Seitenschrubbdeck | 2,79 (850) ft (mm) |
Abmessungen Verpackung lxbxh | 5,74x3,25x4,84 (1750x990x1475) ft (mm) |
Wendekreis | 5,74 (1750) ft (mm) |
Abmessungen Batteriefach lxbxh | 2x(1,03x1,27x1,23) (2x(315x386x375)) ft (mm) |
Bereifung | |
Vorderrad, Breite | 0,30 (90) ft (mm) |
Vorderrad, Durchmesser | 0,82 (250) ft (mm) |
Hinterrad, Breite | 0,25 (75) ft (mm) |
Hinterrad, Durchmesser | 0,95 (290) ft (mm) |
Gewicht | |
Zulässiges Gesamtgewicht | 1433 (650) lbs (kg) |
Leergewicht (Transportgewicht) | 1058 (480) lbs (kg) |
Typisches Betriebsgewicht | 1190 (540) lbs (kg) |
Bürstenanpresskraft, max. | 736 (75) N (kg) |
Bürstenanpressdruck, max. | 41 (40) N/m2 (g/cm2) |
Leistungsdaten Gerät | |
Nennspannung | 24 V |
Batteriekapazität | 170 / 285 Ah (5 h) |
Mittlere Leistungsaufnahme | 3,15 (2350) hp (W) |
Nennleistung | 3,35 (2500) hp (W) |
Leistung Fahrmotor | 0,80 (600) hp (W) |
Leistung Saugturbine | 0,80 (600) hp (W) |
Leistung Bürstenantrieb | 2 x 0,80 (2 x 600) hp (W) |
Schutzart | IPX3 |
Saugen | |
Saugleistung, Luftmenge | ~53 (~25) CFM (l/s) |
Unterdruck (max.) | ~2,47 (~0,17) psi (bar) |
Unterdruck (im Betrieb) | ~0,73 (~0,05) psi (bar) |
Reinigungsbürsten | |
Bürstendurchmesser | 1,26 (385) ft (mm) |
Bürstenlänge | - ft (mm) |
Bürstendrehzahl | 180 1/min |
Bürstendurchmesser Seitenschrubbdeck | 0,72 (220) ft (mm) |
Bürstendrehzahl Seitenschrubbdeck | 220 1/min |
Internes Schnellladegerät (Nur Lithium-Ionen-Variante) | |
Nennspannung | 100...240 V |
Frequenz | 50-60 Hz |
Leistungsaufnahme | 1,75(1100) hp (W) |
Ladestrom | 35 A |
Internes Ladegerät | |
Kabellänge | 6,5 (2) ft (m) |
Nennspannung | 100...240 V |
Frequenz | 50-60 Hz |
Leistungsaufnahme | 1 (750) hp (W) |
Ladestrom | 28 A |
Wirkungsgrad | 92 % |
Umgebungsbedingungen | |
Zulässiger Temperaturbereich | 41...104 (5...40) °F (°C) |
Wassertemperatur max. | 122 (50) °F (°C) |
Wasserdruck Befüllsystem (Option) | 145 (10) psi (bar) |
Wasserdruck Schmutzwassertank-Spülsystem (Option) | 145 (10) psi (bar) |
Relative Luftfeuchtigkeit | 20...90 % |
Steigung | |
Steigung Arbeitsbereich max. | 10 % |
Steigung Kurzstrecke (max. 10 m) Transport, Verladung | 22 % |
Ermittelte Werte gemäß EN 60335-2-72 | |
Hand-Arm-Vibrationswert | <2,5 m/s2 |
Sitz-Vibrationswert | <0,5 m/s2 |
Unsicherheit K | 0,2 dB(A) |
Schalldruckpegel LpA Eco-Betrieb | 59,2 dB(A) |
Schalldruckpegel LpA Normalbetrieb | 63,6 dB(A) |
Unsicherheit KpA | 1,6 dB(A) |
Schallleistungspegel LWA + Unsicherheit KWA Eco-Betrieb | 74,1 dB(A) |
Schallleistungspegel LWA + Unsicherheit KWA Normalbetrieb | 78,7 dB(A) |
Seitenschrubbdeck | |
Leistung | 0,19 (140) hp (W) |
Bürstenanpresskraft, max. | 88 (9) N (kg) |
Bürstenanpressdruck, max. | 30,6 (30) N/m2 (g/cm2) |
Only use original accessories and original spare parts. They ensure that the appliance will run fault-free and safely.
Information on accessories and spare parts can be found at www.kaercher.com.
A: Packaging unit, B: Quantity required by the device
Description | R 65 Part no. | R 75 Part no. | Description | A | B |
|---|---|---|---|---|---|
Roller brush, red (medium, standard) | 4.035-604.0 | 4.035-605.0 | For maintenance cleaning of heavily soiled floors. | 1 | 2 |
Roller brush, white (soft) | 6.907-770.0 | 6.907-771.0 | For polishing and maintenance cleaning of sensitive floors. | 1 | 2 |
Roller brush, orange (high / low) | 6.907-726.0 | 6.907-730.0 | For scrubbing structural floors (safety tiles, etc.). | 1 | 2 |
Roller brush, green (hard) | 6.907-727.0 | 6.907-731.0 | For basic cleaning of heavily soiled floors and for coating removal (e.g. waxes, acrylates). | 1 | 2 |
Roller brush, black (very hard) | 6.907-728.0 | 6.907-732.0 | 1 | 2 | |
Microfiber roller | 4.114-054.0 | 4.114-007.0 | For maintenance cleaning of smooth floors. | 1 | 2 |
Pad roller shaft | 4.762-626.0 | 4.762-627.0 | For holding roller pads. | 1 | 2 |
Roller pad, yellow (soft) | 6.369-454.0 | 6.369-454.0 | For polishing floors | 20 | 96; 106 |
Roller pad, red (medium) | 6.369-456.0 | 6.369-456.0 | For cleaning lightly soiled floors. | 20 | 96; 106 |
Roller pad, green (hard) | 6.369-455.0 | 6.369-455.0 | For cleaning normal to heavily soiled floors. | 20 | 96; 106 |
A: Packaging unit, B: Quantity required by the device
Description | D 65 Part no. | D 75 Part no. | Description | A | B |
|---|---|---|---|---|---|
Disc brush, natural colour (soft) | 4.905-012.0 | 4.905-020.0 | For polishing floors. | 1 | 2 |
Disc brush, white | 4.905-011.0 | 4.905-019.0 | For polishing and maintenance cleaning of sensitive floors. | 1 | 2 |
Disc brush, red (medium, standard) | 4.905-010.0 | 4.905-018.0 | For cleaning lightly soiled or sensitive floors. | 1 | 2 |
Disc brush, black (hard) | 4.905-013.0 | 4.905-021.0 | For cleaning heavily soiled floors. | 1 | 2 |
Fine diamond pad, green | 6.371-235.0 | 6.371-236.0 | For refreshing lime-containing coverings and epoxy resin-coated floors. | 5 | 2 |
Coarse diamond pad, white | 6.371-250.0 | 6.371-252.0 | 5 | 2 | |
Medium diamond pad, yellow | 6.371-251.0 | 6.371-253.0 | 5 | 2 | |
Pad drive board | 4.762-446.0 | 4.762-447.0 | For holding pads. | 1 | 2 |
A: Packaging unit, B: Quantity required by the device
Description | Part no. | Description | A | B |
|---|---|---|---|---|
Suction lip set, front PU (red), rear Linatex | 4.039-366.0 | Standard | Pair | 1 pair |
Suction lip set, Linatex | 4.039-356.0 | Tear-proof | Pair | 1 pair |
PU suction lip set | 4.039-357.0 | Oil-proof | Pair | 1 pair |
The warranty conditions issued by our relevant sales company apply in all countries. We shall remedy possible malfunctions on your appliance within the warranty period free of cost, provided that a material or manufacturing flaw is the cause. In a warranty case, please contact your dealer (with the purchase receipt) or the next authorised customer service site.
Further information can be found at: www.kaercher.com/dealersearch
Further warranty information (if available) can be found in the service area of your local Kärcher website under "Downloads".