CV 30/2 BpCV 30/2 Bp Pack
59694410 (10/23)
59694410 (10/23)
 Read these original instructions and the enclosed safety instructions before using the device for the first time. Act in accordance with them.
Keep both books for future reference or for future owners.
If the operating instructions and safety instructions are not observed, the device can be damaged and dangers could arise for users and other persons.
Notify the dealer immediately in the case of shipping damage.
Check the package contents when unpacking for missing accessories or for damage.
 The packing materials can be recycled. Please dispose of packaging in accordance with the environmental regulations.
 Electrical and electronic devices contain valuable, recyclable materials and often components such as batteries, rechargeable batteries or oil, which - if handled or disposed of incorrectly - can pose a potential danger to human health and the environment. However, these components are required for the correct operation of the device. Devices marked by this symbol are not allowed to be disposed of together with the household rubbish.
Current information on content materials can be found at: www.kaercher.de/REACH
Health risk
Inhalation of dusts that are harmful to health
Do not use the device for vacuuming up dusts that are harmful to health.
Damage to the device
Short-circuit due to high levels of humidity
Only use and store the device indoors.
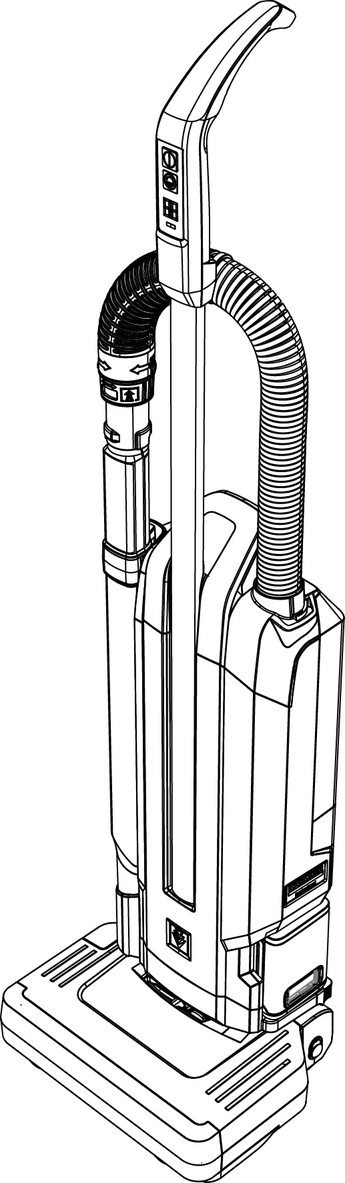
This vacuum brush is suitable for dry cleaning of textile and hard floor coverings.
This device is suitable for commercial use, e.g. in hotels, schools, hospitals, factories, shops, offices, and rental companies.
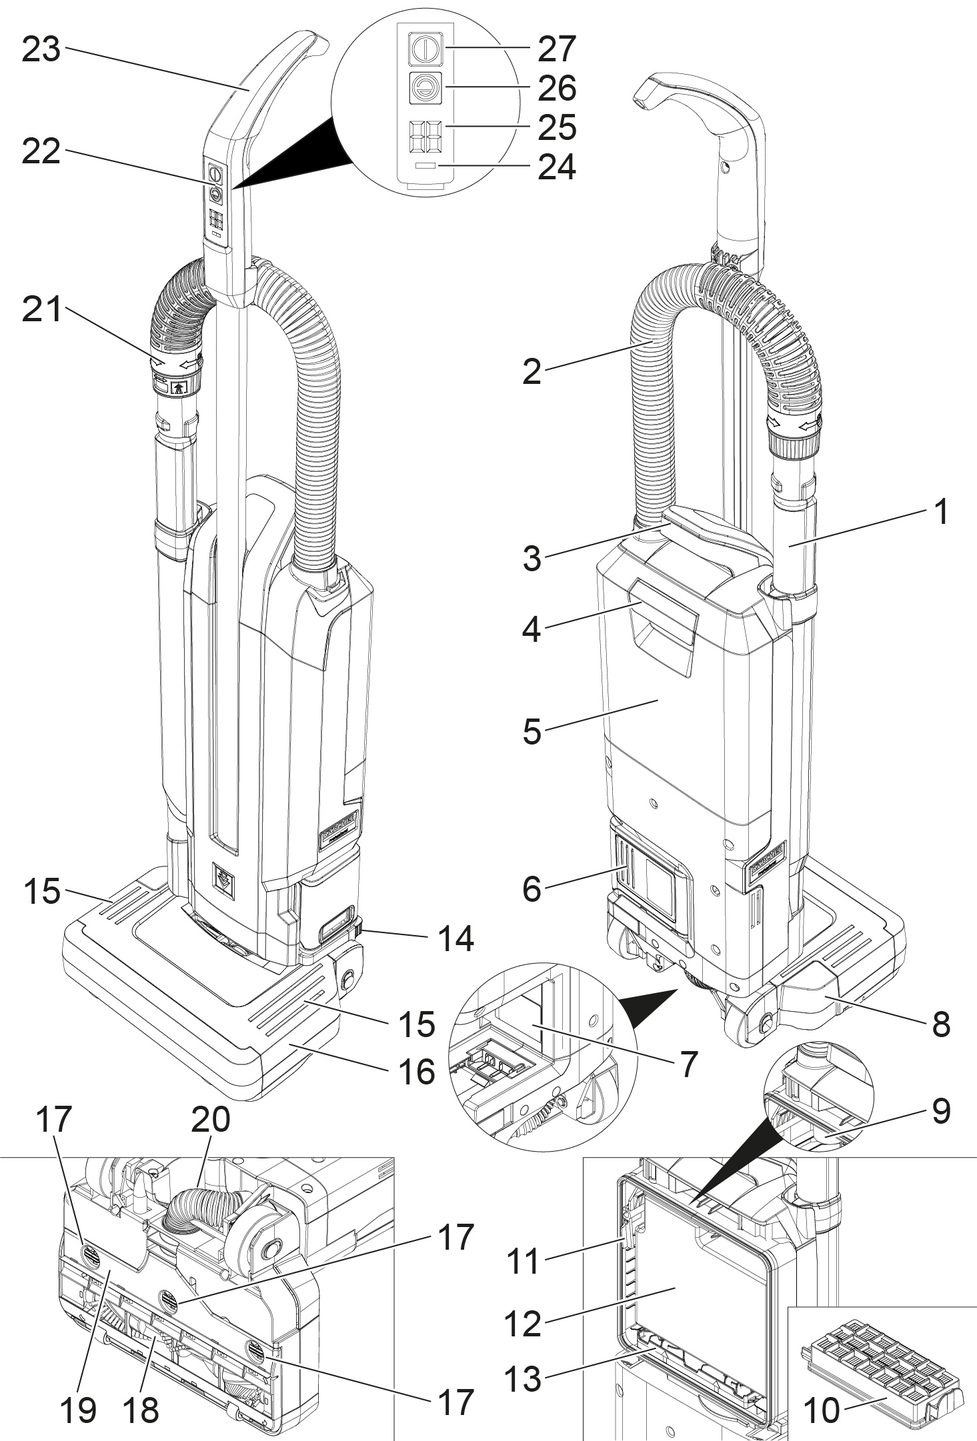
Unpack the device.
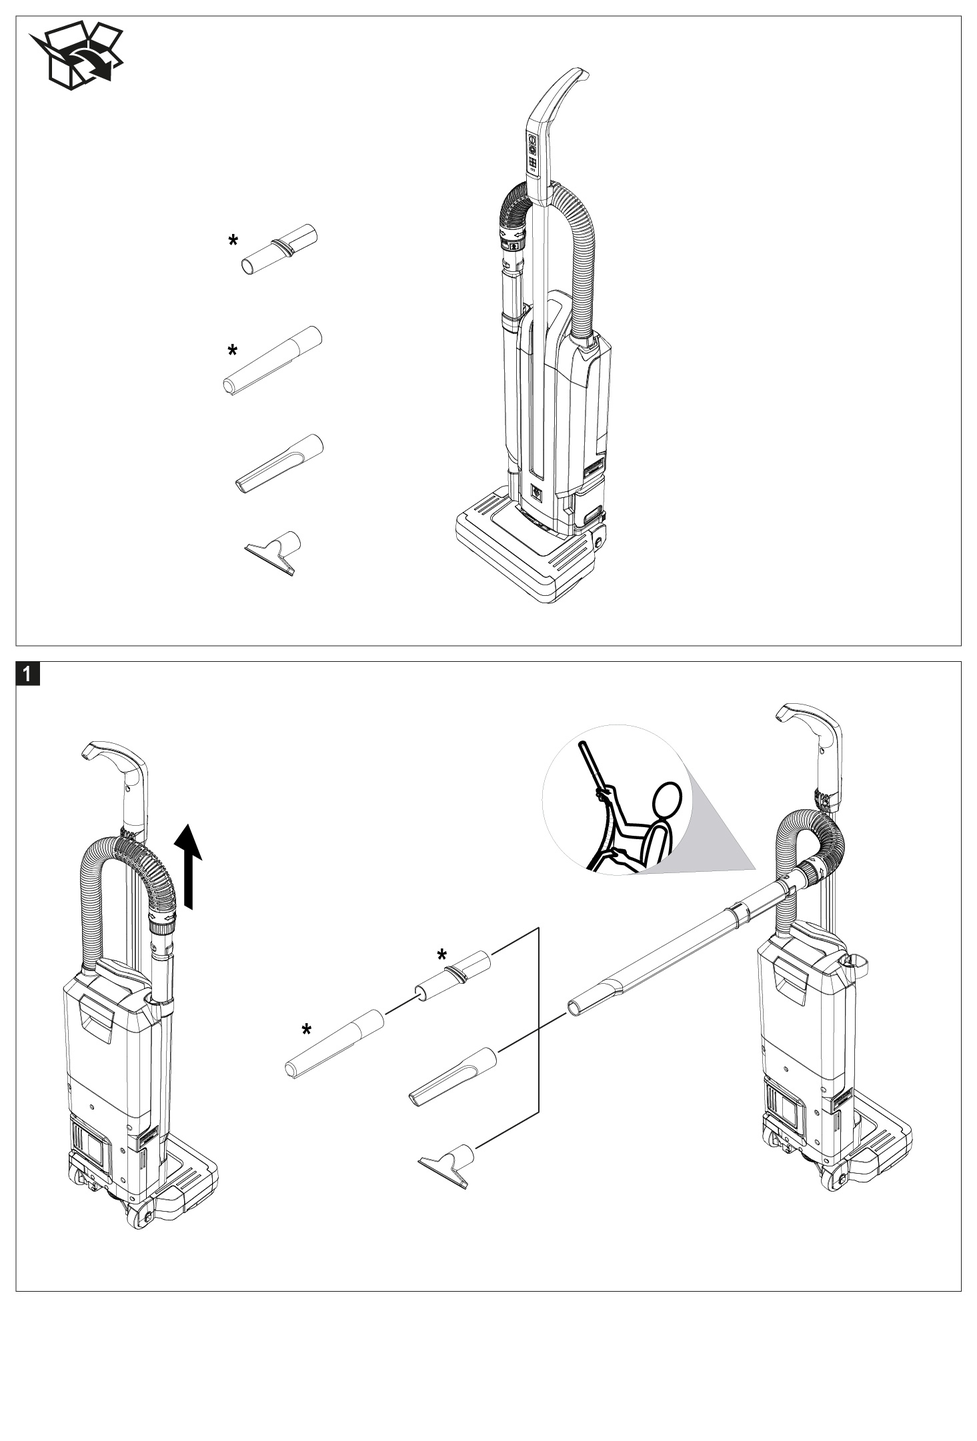
* only included with the scope of delivery for the CV 30/2 Bp Adv *INT
Check that the brush cover is correctly inserted and that all 3 twist locks are closed.
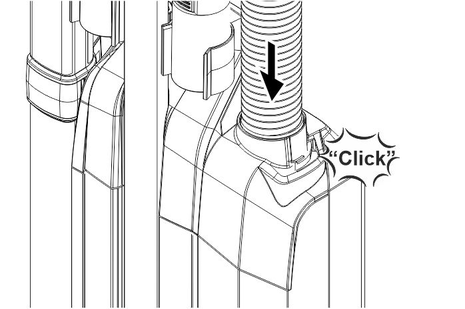
Slide the battery pack into the battery holder and lock it in place.
Please read the operating instructions of the charger manufacturer, especially the chapters on safety instructions!
Please read the operating instructions of the battery pack manufacturer, especially the chapters on safety instructions!
The battery pack is partially charged on delivery. Charge before use and when necessary.
The battery pack can only be charged when it is removed.
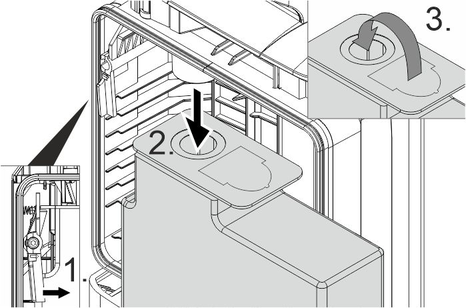
Press the unlocking button and remove the battery pack.
Charge the battery pack according to the operating instructions of the charger manufacturer and the battery pack manufacturer.
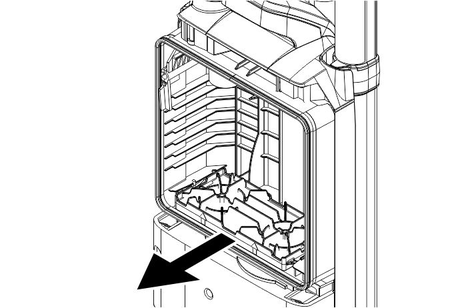
Unlock and remove the filter cover.
Push out and remove the motor protection filter.
Slide the HEPA filter (optional accessory) into the holder, swivel downwards and engage.
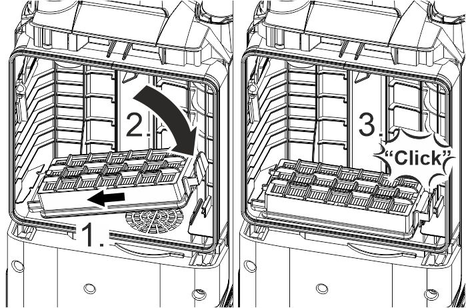
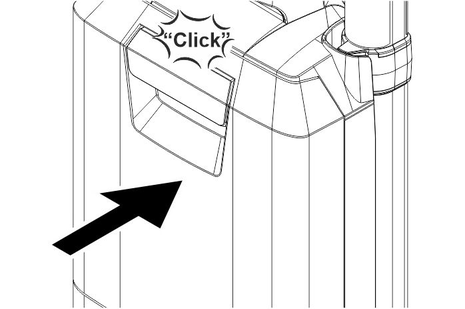
Insert the filter cover and engage audibly.
Unlock and remove the filter cover.
Insert the flange of the filter bag into the intake and swing it upwards.
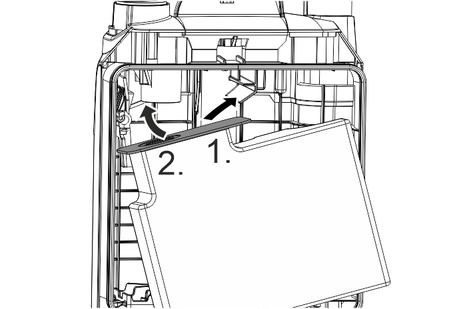
Pull the opening of the filter bag over the suction connection as far as it will go. The locking mechanism of the filter bag engages.
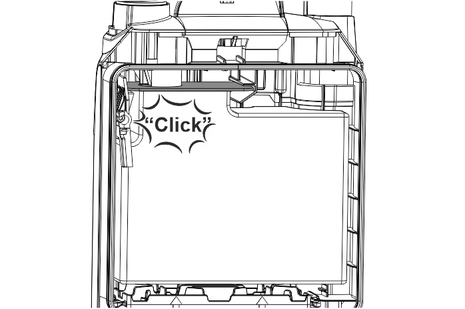
Insert the filter cover and engage audibly.
Switch on the device at the main switch.
Eco button (energy-saving mode): The device works with reduced suction performance. The battery run time is extended.
To activate Eco-mode: Actuate the Eco button.
To switch off Eco-mode: Actuate the Eco button repeatedly.
Reduce the suction power at the control dial to reduce the pushing force on deep-pile carpets. Close the suction control again after working on high-pile carpets, otherwise the brush motor may not start.
Adjust the suction power (min-max) via the rotary control.
Device is operated too long on the same spot
Risk of damage to the floor covering
Only operate the device briefly on the same spot.
Unlock brush head. While doing so, step on the tread and swing the handle backwards. The roller brush is switched on.
Perform cleaning.
Work interruption/end of cleaning: Lock the brush head. While doing so, step on the tread and swing the handle forward. The roller brush is switched off.
The semi-automatic brush cleaning can only be switched on when the device is switched on.
The semi-automatic brush cleaning should be operated at least once a day, depending on the application, to remove light soiling. For heavier soiling, see "Cleaning the roller brush manually".
Recommendation for use of brush cleaning:
For very heavily frequented areas (e.g. in schools), after the full-surface cleaning of approx. 50 m²
For areas with average traffic (e.g. offices), after the full-surface cleaning of approx. 1,000 m²
for less frequented areas (e.g. hotel rooms), approx. 1x daily
Press the foot button of the semi-automatic brush cleaning. Step on the foot pedal 3 times for 5 seconds, but not longer than 20 seconds without interruption. This results in system-related noise development.
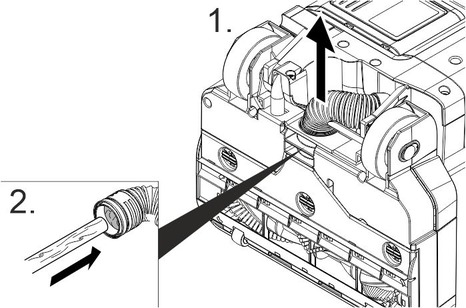
For cleaning, for example, edges, ledges, niches, corners.
Pull the suction pipe out of the mount. The brush motor is switched off.
Attach the desired accessory to the suction tube.
Perform cleaning.
Switch off the device at the main switch.
Failure to observe the weight
Risk of injury and damage
Be aware of the weight of the device during transportation.
Carry the device by the carrying handle.
When transporting the device in vehicles, secure it to prevent it from slipping or overturning in accordance with the respective valid guidelines.
Failure to observe the weight
Risk of injury and damage
Be aware of the weight of the device during storage.
The device may only be stored indoors.
Press the unlocking button and remove the battery pack to prevent discharge.
Danger of electric shock
Injuries due to touching live parts
Switch off the device.
Remove the battery pack.
Perform semi-automatic brush cleaning.
Check roller brush for heavy soiling. If necessary, clean the roller brush manually.
Visual brush inspection: The degree of wear can be determined by comparing the differently coloured indicator tufts. Replace the roller brush when the black bristles are the same height as the red bristles.
Check the wear of the roller brush.
Unlock and remove the filter cover.
Press the filter bag lock to the right and at the same time pull the filter bag downwards by the flange. Remove the filter bag, close it and dispose of it.
Insert the new filter bag and pull the opening of the filter bag over the suction connection as far as it will go. The locking mechanism of the filter bag engages.
Insert the filter cover and engage audibly.
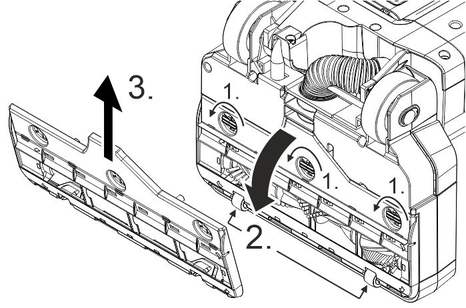
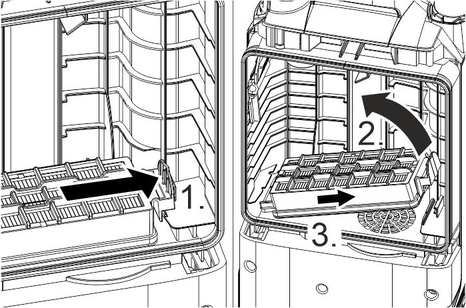
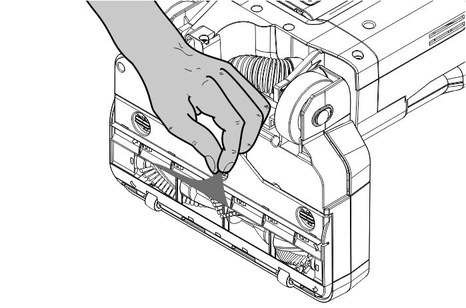
Turn the twist locks by 90° with a coin, fold out the brush cover and remove it.
Cut off hair and threads wound onto the roller brush using scissors and remove them.
Install brush cover in reverse order.
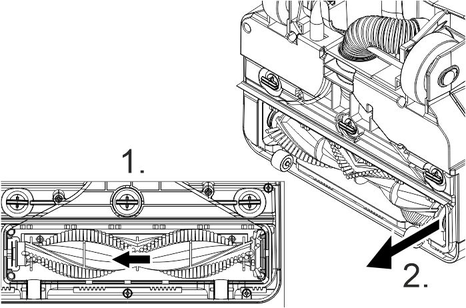
Unlock and remove the filter cover.
Slide out the motor protection filter, remove and dispose of it.
Insert the new motor protection filter and snap it into place.
Insert the filter cover and engage audibly.
Unlock and remove the filter cover.
Unlock the HEPA filter (optional accessory), swing it upwards and remove it.
Slide the new HEPA filter (optional accessory) into the holder, swivel it downwards and lock it in place.
Insert the filter cover and engage audibly.
Turn the twist locks by 90° with a coin, fold out the brush cover and remove it.
Push the roller brush to the left as far as it will go, swing it out, remove it and dispose of it.
Install the new roller brush in the reverse order.
Install brush cover in reverse order.
Danger of electric shock
Injuries due to touching live parts
Switch off the device.
Remove the battery pack.
The device must be switched off immediately if a malfunction occurs (e.g. filter breakage). The malfunction must be eliminated before switching the device on again.
E1
Cause:
Suction volume too low, indicator light flashes
Remedy:
Replace the filter bag.
Remove blockages from the brush head, suction pipe and suction hose.
E2
Cause:
Turbine error, indicator light flashes
Remedy:
Switch off the device and wait 1 minute. Switch the device back on.
If the fault occurs repeatedly, notify customer service.
E3
Cause:
Power transmission to roller brush interrupted, indicator light flashes
Remedy:
Notify Customer Service.
E4
Cause:
Temperature of the battery pack too high, indicator light flashes
Remedy:
Reset the error by actuating the main switch.
If the fault occurs repeatedly, replace the battery pack. Check the removed battery pack according to the manufacturer's operating instructions.
E5
Cause:
Current consumption of the brush motor too high, indicator light flashes
Remedy:
Switching off the device and check the roller brush for blocking objects and remove these if present.
If the malfunction occurs repeatedly, notify customer service.
Cause:
Malfunction occurs during semi-automatic brush cleaning
Remedy:
Switch off the device. Switch on the device and let it run for 20 seconds in roller brush mode. Operate the semi-automatic brush cleaning again.
Repeat this process 2-3 times if necessary.
If the malfunction occurs repeatedly, notify customer service.
E6
Cause:
Current consumption of the turbine too high, indicator light flashes
Remedy:
Notify Customer Service.
E7
Cause:
Turbine defective, indicator light flashes
Remedy:
Notify Customer Service.
E8
Cause:
Current consumption of the battery pack too high, indicator light flashes
Remedy:
Switch off the device. Reset the error by actuating the main switch.
If the fault occurs repeatedly, replace the battery pack. Check the removed battery pack according to the manufacturer's operating instructions.
E9
Cause:
Battery pack error, indicator light flashes
Remedy:
Remove the battery pack and reinsert it.
If the malfunction occurs repeatedly, replace the battery pack. Check the removed battery pack according to the manufacturer's operating instructions.
If the malfunction recurs, notify Customer Service.
E0
Cause:
Interface error
Remedy:
Remove the battery pack and reinsert it.
If the malfunction occurs repeatedly, replace the battery pack. Check the removed battery pack according to the manufacturer's operating instructions.
If the malfunction recurs, notify Customer Service.
The device is not working
Remedy:
Switch on the device.
Charge the battery pack.
Insert the battery pack.
Unsatisfactory vacuuming result
Remedy:
Replace the filter bag.
Remove blockages from the brush head, suction pipe and suction hose.
Replace motor protection filter or HEPA filter (optional accessory).
Brush motor does not start
Remedy:
When working on hard surfaces or short pile carpets: Close the suction control.
Replace the filter bag.
Remove blockages from the brush head, suction pipe and suction hose.
Check that the suction pipe is correctly inserted.
When inserting the suction hose into the suction hose port, make sure that it engages in place.
If necessary, remove the brush cover (see "Cleaning the roller brush manually").
E1
Cause:
Suction volume too low, indicator light flashes
Remedy:
Replace the filter bag.
Remove blockages from the brush head, suction pipe and suction hose.
E2
Cause:
Turbine error, indicator light flashes
Remedy:
Switch off the device and wait 1 minute. Switch the device back on.
If the fault occurs repeatedly, notify customer service.
E3
Cause:
Power transmission to roller brush interrupted, indicator light flashes
Remedy:
Notify Customer Service.
E4
Cause:
Temperature of the battery pack too high, indicator light flashes
Remedy:
Reset the error by actuating the main switch.
If the fault occurs repeatedly, replace the battery pack. Check the removed battery pack according to the manufacturer's operating instructions.
E5
Cause:
Current consumption of the brush motor too high, indicator light flashes
Remedy:
Switching off the device and check the roller brush for blocking objects and remove these if present.
If the malfunction occurs repeatedly, notify customer service.
Cause:
Malfunction occurs during semi-automatic brush cleaning
Remedy:
Switch off the device. Switch on the device and let it run for 20 seconds in roller brush mode. Operate the semi-automatic brush cleaning again.
Repeat this process 2-3 times if necessary.
If the malfunction occurs repeatedly, notify customer service.
E6
Cause:
Current consumption of the turbine too high, indicator light flashes
Remedy:
Notify Customer Service.
E7
Cause:
Turbine defective, indicator light flashes
Remedy:
Notify Customer Service.
E8
Cause:
Current consumption of the battery pack too high, indicator light flashes
Remedy:
Switch off the device. Reset the error by actuating the main switch.
If the fault occurs repeatedly, replace the battery pack. Check the removed battery pack according to the manufacturer's operating instructions.
E9
Cause:
Battery pack error, indicator light flashes
Remedy:
Remove the battery pack and reinsert it.
If the malfunction occurs repeatedly, replace the battery pack. Check the removed battery pack according to the manufacturer's operating instructions.
If the malfunction recurs, notify Customer Service.
E0
Cause:
Interface error
Remedy:
Remove the battery pack and reinsert it.
If the malfunction occurs repeatedly, replace the battery pack. Check the removed battery pack according to the manufacturer's operating instructions.
If the malfunction recurs, notify Customer Service.
The device is not working
Remedy:
Switch on the device.
Charge the battery pack.
Insert the battery pack.
Unsatisfactory vacuuming result
Remedy:
Replace the filter bag.
Remove blockages from the brush head, suction pipe and suction hose.
Replace motor protection filter or HEPA filter (optional accessory).
Brush motor does not start
Remedy:
When working on hard surfaces or short pile carpets: Close the suction control.
Replace the filter bag.
Remove blockages from the brush head, suction pipe and suction hose.
Check that the suction pipe is correctly inserted.
If the malfunction cannot be corrected, the device must be checked by the Customer Service department.
E1
Cause:
Suction volume too low, indicator light flashes
Remedy:
Replace the filter bag.
Remove blockages from the brush head, suction pipe and suction hose.
E2
Cause:
Turbine error, indicator light flashes
Remedy:
Switch off the device and wait 1 minute. Switch the device back on.
If the fault occurs repeatedly, notify customer service.
E3
Cause:
Power transmission to roller brush interrupted, indicator light flashes
Remedy:
Notify Customer Service.
E4
Cause:
Temperature of the battery pack too high, indicator light flashes
Remedy:
Reset the error by actuating the main switch.
If the fault occurs repeatedly, replace the battery pack. Check the removed battery pack according to the manufacturer's operating instructions.
E5
Cause:
Current consumption of the brush motor too high, indicator light flashes
Remedy:
Switching off the device and check the roller brush for blocking objects and remove these if present.
If the malfunction occurs repeatedly, notify customer service.
Cause:
Malfunction occurs during semi-automatic brush cleaning
Remedy:
Switch off the device. Switch on the device and let it run for 20 seconds in roller brush mode. Operate the semi-automatic brush cleaning again.
Repeat this process 2-3 times if necessary.
If the malfunction occurs repeatedly, notify customer service.
E6
Cause:
Current consumption of the turbine too high, indicator light flashes
Remedy:
Notify Customer Service.
E7
Cause:
Turbine defective, indicator light flashes
Remedy:
Notify Customer Service.
E8
Cause:
Current consumption of the battery pack too high, indicator light flashes
Remedy:
Switch off the device. Reset the error by actuating the main switch.
If the fault occurs repeatedly, replace the battery pack. Check the removed battery pack according to the manufacturer's operating instructions.
E9
Cause:
Battery pack error, indicator light flashes
Remedy:
Remove the battery pack and reinsert it.
If the malfunction occurs repeatedly, replace the battery pack. Check the removed battery pack according to the manufacturer's operating instructions.
If the malfunction recurs, notify Customer Service.
E0
Cause:
Interface error
Remedy:
Remove the battery pack and reinsert it.
If the malfunction occurs repeatedly, replace the battery pack. Check the removed battery pack according to the manufacturer's operating instructions.
If the malfunction recurs, notify Customer Service.
The device is not working
Remedy:
Switch on the device.
Charge the battery pack.
Insert the battery pack.
Unsatisfactory vacuuming result
Remedy:
Replace the filter bag.
Remove blockages from the brush head, suction pipe and suction hose.
Replace motor protection filter or HEPA filter (optional accessory).
Brush motor does not start
Remedy:
When working on hard surfaces or short pile carpets: Close the suction control.
Replace the filter bag.
Remove blockages from the brush head, suction pipe and suction hose.
Check that the suction pipe is correctly inserted.
The warranty conditions issued by our sales company responsible apply in all countries. We shall remedy possible malfunctions on your device within the warranty period free of cost, provided that a material or manufacturing defect is the cause. In a warranty case, please contact your dealer (with the purchase receipt) or the next authorised customer service site.
You can find more detailed information at: www.kaercher.com/dealersearch
Only use original accessories and original spare parts. They ensure that the appliance will run fault-free and safely.
Information on accessories and spare parts can be found at www.kaercher.com.
Only use KÄRCHER original battery packs, not non-rechargeable batteries.
Description | Order number, spare part | Item No., unpacked |
|---|---|---|
Battery pack Battery Power+ 36/75 | 2.445-043.0 | 6.445-059.0 |
Battery pack Battery Power+ 36/60 | 2.042-022.0 | 6.445-085.0 |
Battery pack Battery Power 36/50 | 2.445-031.0 | 6.445-039.0 |
Quick charger Battery Power+ 36/60 (EU) | 2.445-045.0 | 6.445-063.0 |
Quick charger Battery Power+ 36/60 (GB) | 2.445-047.0 | 6.445-065.0 |
Quick charger Battery Power+ 36/60 (AU) | 2.445-051.0 | 6.445-069.0 |
EU Declaration of Conformity |
We hereby declare that the machine described below complies with the relevant basic safety and health requirements in the EU Directives, both in its basic design and construction as well as in the version placed in circulation by us. This declaration is invalidated by any changes made to the machine that are not approved by us.
Product: Dry vacuum cleaner
Type: 1.023-xxx
Currently applicable EU Directives2006/42/EC (+2009/127/EC)
2011/65/EU
2014/30/EU
Harmonised standards usedEN IEC 63000: 2018
EN 55014-1: 2017 + A11: 2020
EN 55014-2: 2015
EN 60312-1: 2017
EN 60335-1
EN 60335-2-69
EN 62233: 2008
National standards used-
The signatories act on behalf of and with the authority of the company management.

Documentation supervisor:
S. Reiser
Alfred Kärcher SE & Co. KG
Alfred-Kärcher-Str. 28 - 40
71364 Winnenden (Germany)
Ph.: +49 7195 14-0
Fax: +49 7195 14-2212
Winnenden, 2020/10/01
Declaration of Conformity (UK) |
We hereby declare that the product described below complies with the relevant provisions of the following UK Regulations, both in its basic design and construction as well as in the version put into circulation by us. This declaration shall cease to be valid if the product is modified without our prior approval.
Product: Dry vacuum cleaner
Type: 1.023-xxx
Currently applicable UK RegulationsS.I. 2008/1597 (as amended)
S.I. 2012/3032 (as amended)
S.I. 2016/1091 (as amended)
Designated standards usedEN IEC 63000: 2018
EN 55014-1: 2017 + A11: 2020
EN 55014-2: 2015
EN 60312-1: 2017
EN 60335-1
EN 60335-2-69
EN 62233: 2008
National standards used-
The signatories act on behalf of and with the authority of the company management.
Documentation supervisor:
S. Reiser
Alfred Kärcher SE & Co. KG
Alfred-Kärcher-Str. 28 - 40
71364 Winnenden (Germany)
Ph.: +49 7195 14-0
Fax: +49 7195 14-2212
Winnenden, 2020/10/01
Electrical connection | |
Battery pack nominal voltage | 36 DC V |
Protection class | III  |
Nominal power | 420 W |
Device performance data | |
Tank content | 3 l |
Volume of filter bag | 2,3 l |
Air quantity (max.) | 34 l/s |
Vacuum (max.) | 18,7 (187) kPa (mbar) |
Operating time at full battery charge - Battery Power 36/50 battery pack | 28/Eco: 38 Minutes |
Operating time at full battery charge - Battery Power+ 36/60 battery pack | 32/Eco: 50 Minutes |
Operating time at full battery charge - Battery Power+ 36/75 battery pack | 47/Eco: 67 Minutes |
Dimensions and weights | |
Length x width x height | 250 x 310 x 1150 mm |
Width of roller brush | 252 mm |
Typical operating weight | 8 kg |
Ambient conditions | |
Ambient temperature (max.) | +40 °C |
Determined values in acc. with EN 60335-2-69 | |
Sound pressure level LpA | 64 dB(A) |
Uncertainty KpA | 2 dB(A) |
Sound power level LwA | 77 dB(A) |
Hand-arm vibration value | <2,5 m/s2 |
Uncertainty K | 0,5 m/s2 |