CV 60/1 RS BPCV 60/1 RS Bp Pack

5.978-843.0 (10/23)
5.978-843.0 (10/23)
 Read these original operating instructions and the enclosed safety instructions before using the device for the first time. Proceed accordingly.
Keep both books for future reference or for future owners.
The device is used for vacuuming carpet surfaces. The dirt is loosened from the carpet by brushes, vacuumed and collected in a filter bag.
A working width of 600 mm enables effective use for long periods.
The device is self-propelled.
The batteries can be charged by means of a charger at a 110-240-V socket.
All variants have a built-in charger.
Batteries are included with the CV 60/1 RS Bp Pack variant.
For the CV 60/1 RS Bp variant, the batteries must be ordered separately.The device can be equipped with various accessories to suit the respective cleaning task and operating location.
Request a copy of our catalogue or visit our Internet website at www.kaercher.com.
Use the device only in accordance with the information in these operating instructions.
The device may only be used for vacuuming dry carpets.
The device may only be fitted with original accessories and spare parts.
The device is not intended for cleaning public traffic routes.
The operational temperature range is between +5°C and +40°C.
The device must not be used on pressure-sensitive floors. Take into account the permissible load per unit area of the floor. The load per unit area caused by the device is specified in the technical data.
The device is not suitable for use in potentially explosive environments.
The device is not suitable for vacuuming up dusts that pose a health risk.
Reactive metal dusts (e.g. aluminium, magnesium, zinc) in conjunction with highly alkaline or acidic detergents form explosive gases.
 The packing materials can be recycled. Please dispose of packaging in accordance with the environmental regulations.
 Electrical and electronic devices contain valuable, recyclable materials and often components such as batteries, rechargeable batteries or oil, which - if handled or disposed of incorrectly - can pose a potential danger to human health and the environment. However, these components are required for the correct operation of the device. Devices marked by this symbol are not allowed to be disposed of together with the household rubbish.
Current information on content materials can be found at: www.kaercher.de/REACH
The warranty conditions issued by our sales company responsible apply in all countries. We shall remedy possible malfunctions on your device within the warranty period free of cost, provided that a material or manufacturing defect is the cause. In a warranty case, please contact your dealer (with the purchase receipt) or the next authorised customer service site.
You can find more detailed information at: www.kaercher.com/dealersearch
Check the contents for completeness when unpacking. If any accessories are missing or in the event of any shipping damage, please notify your dealer.
Only use original accessories and original spare parts. They ensure that the appliance will run fault-free and safely.
Information on accessories and spare parts can be found at www.kaercher.com.
Indication of an imminent threat of danger that will lead to severe injuries or even death.
Indication of a potentially dangerous situation that may lead to severe injuries or even death.
Indication of a potentially dangerous situation that may lead to minor injuries.
Indication of a potentially dangerous situation that may lead to damage to property.
Before using the device for the first time, read and observe these operating instructions and the accompanying brochure: Safety information for wet and dry vacuum cleaner No. 5.956-249.0.
Danger of tilting if hill or slope is too steep! Observe the maximum permissible values in the technical data when driving up hills and slopes.
Danger of tilting in case of excessive tilting at side! Observe the maximum permissible values in the technical data when driving lateral to the travel direction.
Danger of tipping on unstable surfaces! Only use the vehicle on stable surfaces.
The list on the risk of overturning is not necessarily comprehensive.
Risk of accident due to not adapting speed. Approach corners slowly.
Adhere to the operating instruction of the manufacturer of the battery and charger. Adhere to the recommendations of the legislature regarding the handling of batteries.
Risk of damage from AGM and gel batteries!
Opening or drilling the battery housing will damage an AGM or gel battery. It must then be replaced.
Do not open the battery housing and do not drill any holes.
Do not cover the pressure relief valve and do not change it.
Risk of damage due to incorrect handling of the battery!
Incorrect handling can damage the battery.
Do not operate the battery if it is visibly damaged.
Only charge, discharge, operate and store the battery within the permissible operating limits.
Do not modify, deform, open or disassemble the battery.
Do not lift the battery by the power cables.
Do not immerse the battery in water or other liquids.
Do not charge the battery near flammable or explosive materials, liquids or surfaces.
In an emergency, press the emergency stop button.
The device is put out of operation and the parking brake is activated.
Missing or modified safety devices!
Safety devices are provided for your own protection.
Do not bypass, remove or render ineffective any safety devices.
Pulling the key out of the key-operated switch secures the device against unauthorised use.
If the emergency off button is pressed, all device functions are immediately shut down.
In addition, the parking brake is activated.
The traction drive can only be activated when the operator is standing on the safety pedal.
As soon as the left or right side door is opened, all device functions are immediately shut down. In addition, the parking brake is activated.
Observe the following warnings when handling the batteries:
 | Observe notes in the instructions for the battery, on the battery and in these operating instructions. |
 | Wear eye protection. |
 | Keep acids and batteries away from children. |
 | Risk of explosion |
 | Fire, sparks, open flames and smoking are prohibited. |
 | Risk of acid burns |
 | First aid. |
 | Warning |
| Disposal |
| Do not throw batteries in the bin. |


* optional

 | Suction |
 | Side brushes |
 | Roller brush |
 | Travel direction forward/backward |
 | Maximum permissible incline (10%) |
Control elements for the cleaning process are yellow.
Control elements for maintenance and servicing are light grey.
Turn the key-operated switch to "1".
Press the desired Cleaning programme.

Description | Description |
“Settings” | To edit the settings. |
“Transport journey” | For transporting the device. |
"Sweep vacuuming" | For cleaning while driving. |
“ECO function” | For quiet cleaning. |
“Accessories”* | For fine cleaning. |
*Optional
Turn the key-operated switch to "1".
Navigation through the menu is done using the buttons below the display.
Select the “Settings” button and press “Confirm" button.

Select the “Configuration” button and press “Confirm" button.

Select the desired language and press “Confirm" button.

Turn the key-operated switch to "1".
Navigation through the menu is done using the buttons below the display.
Select the “Settings” button and press “Confirm" button.
Select the “Configuration” button and press “Confirm" button.
Select the "Device Information" button and press “Confirm" button.

Select the desired information and press “Confirm" button.
Turn the key-operated switch to "1".
Navigation through the menu is done using the buttons below the display.
Select the “Settings” button and press “Confirm" button.
Select the “Configuration” button and press “Confirm" button.
Select the "Preferences" button and press “Confirm" button.

Select the "Reversing signal" button and press “Confirm" button.

Press the "Reversing signal" “switching on” button and the “Confirm" button.

The "Reversing signal" function is now activated.
Select the button and press “Confirm" button.

Press the “Daily maintenance” “switching on” button and the “Confirm" button.

The “Daily maintenance” function is now activated.
The “switching on” button informs the user when the device needs maintenance.
Select the “Restoring the factory settings” button and press “Confirm" button.

Select the "Yes, reset" button and press “Confirm" button.
“Restoring the factory settings”is now being carried out.
Select the “Configuration” button and press “Confirm" button.
Select the "Preferences" button and press “Confirm" button.
Select the ”How-to Guide” button and press “Confirm" button.

Scan the QR code with a smartphone.
Rolling away device
Risk of accidents due to absence of braking power
After the pushing process, press the unlocking lever down.
Excessive speed when pushing
Risk of damage
Do not push the device faster than 7 km/h.
When stationary, the device is prevented from rolling away by an electric parking brake. To push the device, the parking brake must be unlocked.
Push the unlocking lever upwards.
The parking brake is now unlocked.
Unpack the device.
Release the screws and remove the wooden cage.
(The screws will be needed later to fix the wooden panel.)
Cut the plastic packing strap and remove the film.
Remove the fixing on the wheels.
Place the wooden panel under the device behind the pallet as a ramp.
Secure the wooden panel with the screws.
Unscrew the front and rear supports.

Release the parking brake via the lever.
Push the device over the ramp from the pallet (see chapter Pushing the device.

Apply the parking brake with the lever.
Open the cover.
Remove the steering wheel and the bag with the individual parts from inside the cover.
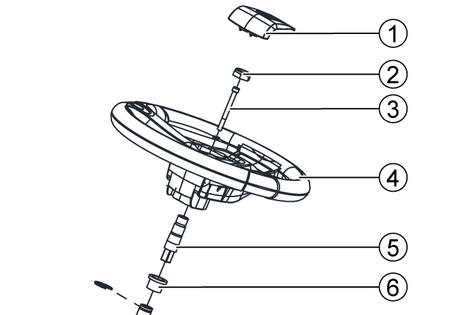
Straighten the front wheel.
Insert the intermediate shaft.
Place the screw and the circlip in the intermediate shaft.
Attach the intermediate shaft.
Fit the steering wheel and fasten the circlip.
Fit the steering wheel cover.
Risk of explosion!
Risk of injury and damage
Do not place any tools or objects on the battery, i.e. on the end poles and cell connectors.
Naked flames and smoking must be strictly avoided.
Ensure the room is well ventilated when charging batteries.
Only use batteries and chargers approved by Kärcher (original spare parts).
Risk of injury!
Ensure that wounds never come into contact with lead.
Always clean your hands after working on batteries.
Maximum battery dimensions
Length | Width | Height |
516 mm | 350 mm | 285 mm |
If wet batteries are used with the Bp variant, the following must be observed:
The maximum battery dimensions must be observed.
The side door must be opened when charging wet batteries.
The battery manufacturer's regulations must be observed when charging wet batteries.
Battery set | Order no. |
Set 3x12V/115Ah, maintenance-free (AGM) | 2.815-145.0 |
Installing and connecting the battery
Risk of damage to the control electronics!
The control electronics can be destroyed by reversing the polarity of the battery connections.
Take care to ensure the correct polarity when connecting the batteries.
With the Bp Pack variant, the battery is already installed.
The deep discharge protection of the device is set to the intended battery type. If a different type of battery is used, the deep discharge protection must be reset by the Customer Service.
Remove the side door.
Place the batteries in the device from the right side.

Connect the battery terminals using the connecting cables provided.
Clamp the supplied connecting cable to the (+) and (‑) battery terminals that are still free.
Connect the black additional cable together with the connection cable (-) to the negative pole.
Risk of damage!
The battery cable can be damaged by crushing.
Replace the damaged battery cable.
Risk of injury from charger!
Electric shock due to improper use of the charger!
Adhere to the mains voltage and fuse values specified on the device type plate.
Only use the charger in dry rooms with sufficient ventilation.
Volume of battery charging room | 3.96 l |
Minimum air exchange rate | 1.6 m³/h |
The device has a deep discharge protection, i.e. if the permitted minimum capacity level is reached, the device can only be driven.
The charging time for the battery Set 3x12V/115Ah, maintenance-free (AGM) is 5,5 hours.
Drive the device directly to the charger and do not drive on slopes.
Turn the key-operated switch to "0" and remove the key.
Remove the mains plug of the device from the holder and connect it to the mains.
After charging, unplug the mains plug of the charger and hook it into the holder on the device.
Risk of injury due to the device tipping over!
The device may tip over when removing and installing batteries.
Ensure that the device is positioned stably when removing and installing the batteries.
Risk of damage to the control electronics!
The control electronics can be destroyed by reversing the polarity of the battery connections.
Take care to ensure the correct polarity when connecting the batteries.
Turn the key-operated switch to "0" and remove the key.
Switch off the main switch.
Open the side door.
Disconnect the cable from the minus terminal at the battery.
Disconnect the remaining cables from the battery.
Remove the battery.
Dispose of the used batteries in accordance with statutory provisions.
For immediate shut down of all functions, take your foot off the accelerator pedal, press the emergency off button and set the key-operated switch to "0".
Perform maintenance work prior to each start of operation (see chapter “Care and maintenance”).
Danger of death due to defective parking brake!
The device may roll uncontrollably if the parking brake is not working properly.
Check the function of the parking brake on level ground before each use.
Turn the key-operated switch to "0".
Press the emergency off button.
If the device can be pushed by hand, the parking brake is not functional.
Press the unlocking lever of the parking brake up.
If the device can be pushed by hand, the parking brake is defective.
Take the device out of operation and call Customer Service.
Danger of accident
If the device does not show sufficient braking effect when driving on a downhill slope, press the emergency off button.
Open the dirt receptacle cover.
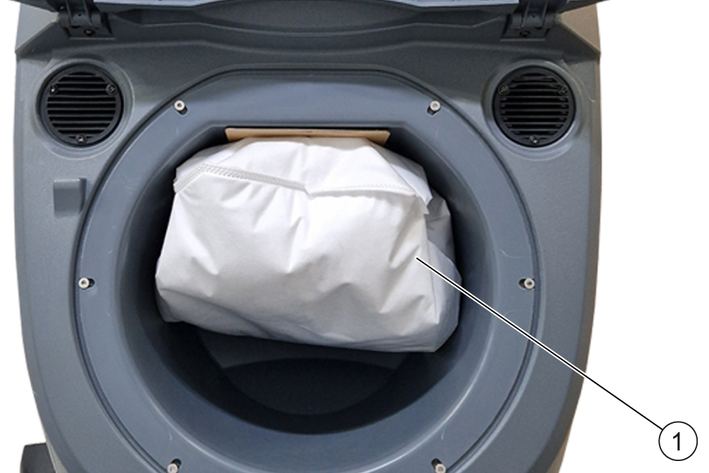
Remove the filter bag from the storage container.
Unfold the filter bag.
Place the filter bag in the dirt receptacle and slide the lip over the nozzle.
The filter bag must be inserted into the hook provided so that the white switch is pressed.
Close the dirt receptacle cover.
Danger to life from fire or explosion if batteries are deeply discharged!
Incorrect charging of deeply discharged batteries can cause a fire.
Do not start the device if the battery is deeply discharged.
Basically, after each cleaning process, the battery should remain connected to the charger until the next cleaning operation.
Make sure that the battery is charged before the initial startup of the device.
Switch off the device's circuit breaker if the device is to be stored for more than two weeks.
Careless driving
Danger of tipping over
Only drive on gradients up to a maximum of 10% in the direction of travel and across the direction of travel.
Do not turn up or down gradients.
Drive slowly in corners and on wet ground.
Only drive the device on stable ground.
To familiarise yourself with the device, carry out initial driving tests on an open space and a flat surface.
The direction of travel can be changed during the cleaning operation. This way, a certain position can be intensively cleaned by driving back and forth several times.
Step onto the stand.
Do not operate the accelerator pedal.
Unlock the emergency-off button by turning it.
Turn the key-operated switch to "1".
Set the speed on the speed knob.
Set the direction of travel using the drive direction button on the control panel.
The travel direction switch also serves as a safety switch. Therefore, it must also be pressed if the desired direction of travel was already set beforehand.
To drive, carefully press the accelerator pedal.
The driving motor is switched off in the event of an overload.
Allow the device to cool down for 5 minutes.
If the device is stationary for more than 2 seconds, the brush drive is interrupted until the device is moved on.
Before vacuuming, remove coarse dirt, wires and cords from the surface to be cleaned to prevent them from getting caught in the brushes.
Step onto the stand.
Do not operate the accelerator pedal.
Unlock the emergency-off button by turning it.
Turn the key-operated switch to "1".
Press the desired Cleaning programme.
Set the forwards direction of travel using the drive direction button on the control panel.
Operate the accelerator pedal and drive over the area to be cleaned.
Press the “tool vacuuming” program.
Remove the suction hose.
Press the “Transport journey” program.
Place the device on a level surface.
Turn the key-operated switch to "0".
Remove the key.
Driving on slopes
Danger of injury
Observe the maximum permissible inclination when driving the device on slopes for loading and unloading purposes (see chapter Technical data).
Drive slowly.
Failure to observe the weight
Risk of injury and damage
Be aware of the weight of the device during transportation.
When transporting in vehicles, secure the device against slipping and tipping over according to the applicable guidelines.
Failure to observe the weight
Risk of injury and damage
Be aware of the weight of the device during storage.
Danger to life from fire or explosion if batteries are deeply discharged!
Incorrect charging of deeply discharged batteries can cause a fire.
Do not start the device if the battery is deeply discharged.
Basically, after each cleaning process, the battery should remain connected to the charger until the next cleaning operation.
Make sure that the battery is charged before the initial startup of the device.
Switch off the device's circuit breaker if the device is to be stored for more than two weeks.
This device may only be stored in a frost-free indoor space.
Fully charge the batteries before storing them for a long period.
Fully charge the batteries at least every month during storage.
Inadvertently starting up device
Risk of injury, electric shock
Turn the key-operated switch to "0" and remove the key before performing any work on the device.
After-running of the suction turbine after switching off
Risk of injury
Only carry out maintenance work after the suction turbine has shutdown.
Check the seal of the dirt receptacle.
Check the condition of the tires.
Check the suction hose for contamination.
Check the socket plug connections of the suction hose for leaks.
Empty and clean the Coarse dirt drawer.
Check the filter bag and replace if necessary.
Check the accelerator pedal, brake and steering wheel for correct operation.
Check the brushes for correct installation.
Check the hoses for deposits.
Empty and clean the Coarse dirt drawer.
Clean the Brush box.
Clean the inside of the brush housing.
Check the brush for wear and clean it.
Remove the bearing cap from the end of the brush. Then clean the bearing and the cap.
Check the filter bag and replace if necessary.
Check the exterior of the device for damage.
Charge the battery.
Clean the top of the batteries.
Check the acid density of the wet batteries.
Check that the battery cable is tight.
Check the acid level of the wet batteries. Top up if necessary.
Risk of damage to the batteries!
Using water with additives will void the battery’s warranty.
Top up the batteries using only distilled or desalinated water (EN 50272-T3).
Do not use any foreign additives or touch-up agents.
Clean the battery compartment and the casing of the batteries.
Check the chain tension on the steering (carried out by Customer Service).
Check the drive chain for wear and tear.
Check all the filters and replace them if necessary.
Have the prescribed maintenance work carried out by Customer Service:
Check the parking brake.
Check the tension of the steering chain.
Check the protective rods of the brush deck for wear and tear.
Check the cables and other electrical components for fraying, heat discolouration, cracked or hardened insulation, broken or loose connections and other defects.
We recommend that you choose a service contract to ensure reliable operation of the device. Please contact your KÄRCHER customer service department responsible.
Pull the quick-release catch and pull out the Coarse dirt drawer.

The roller brushes are worn out when the brush length corresponds to the length of the yellow indicator brush.
As soon as a roller brush is worn out, the entire set of roller brushes should be replaced.
The brushes must be removed in the direction of travel on the right.
Open the main door on the right side of the device.

Pull the yellow lock and release the lock.
Pull out the brush compartment.
Remove the roller brushes.
Insert the new roller brushes and engage them.
Insert the roller brushes in the brush compartment and turn them so that the mark at the end is aligned vertically.
Push the brush compartment back in.
Turn the side brushes anticlockwise as far as it will go.

Remove the side brushes from the drive shaft.
Mount the new side brushes in reverse order.
Turn the brush until it clicks into place.
Inadvertently starting up device
Risk of injury, electric shock
Turn the key-operated switch to "0" and remove the key before performing any work on the device.
After-running of the suction turbine after switching off
Risk of injury
Only carry out maintenance work after the suction turbine has shutdown.
Contact Customer Service in the case of malfunctions that cannot be corrected using this table.
Cause:
The brush motor overheats
Remedy:
Disconnect the power supply with the main switch.
Remove the brush box and clean the brushes.
Allow the motor to cool down for one hour before continuing operation.
Cause:
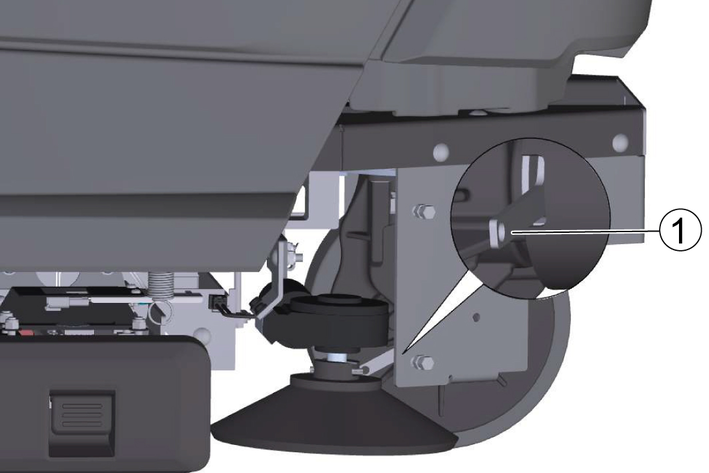
Brake is manually released
Remedy:
Place the device on a surface with a 0% incline or secure the wheels against rolling away.
Locate the brake unlocking lever and pull it down.
Cause:
Drive motor internal motor controller error
Remedy:
Disconnect the power supply with the main switch.
Remove the brush box and clean the brushes.
Allow the motor to cool down for one hour before continuing operation.
Cause:
Drive motor unknown motor controller error
Remedy:
Disconnect the power supply with the main switch.
Remove the brush box and clean the brushes.
Cause:
Drive motor open circuit
Remedy:
Locate and reset the drive motor circuit breaker.
Cause:
Drive motor overheated
Remedy:
Allow the drive motor to cool down for one hour before continuing operation.
Cause:
Suction motor high FET error
Remedy:
Disconnect the power supply with the main switch.
Remove and clean the side brushes.
Cause:
Suction motor internal motor controller error
Remedy:
Locate and reset the suction motor circuit breaker.
Cause:
Suction motor open circuit
Remedy:
Locate and reset the suction motor circuit breaker.
Cause:
Clogged suction hose, funnel or filter bag
Remedy:
Replace the filter bag.
Check the suction hose and funnel for contamination and clean them.
Cause:
Drive motor DMC overtemperature
Remedy:
Disconnect the power supply with the main switch.
Remove and clean the side brushes.
Remove the brush box and clean the brushes.
Allow the controllers to cool down for one hour before continuing operation.
Cause:
Brush motor DMC Overtemperature
Remedy:
Disconnect the power supply with the main switch.
Remove and clean the side brushes.
Remove the brush box and clean the brushes.
Allow the controllers to cool down for one hour before continuing operation.
Cause:
Side brush motor DMC overtemperature
Remedy:
Disconnect the power supply with the main switch.
Remove and clean the side brushes.
Remove the brush box and clean the brushes.
Allow the controllers to cool down for one hour before continuing operation.
Cause:
Suction motor DMC overtemperature
Remedy:
Disconnect the power supply with the main switch.
Remove and clean the side brushes.
Remove the brush box and clean the brushes.
Allow the device to cool down for one hour before continuing operation.
Cause:
Drive motor DMC temperature error (FET)
Remedy:
Disconnect the power supply with the main switch.
Remove and clean the side brushes.
Remove the brush box and clean the brushes.
Allow the device to cool down for one hour before continuing operation.
Cause:
Brush motor DMC temperature error (FET)
Remedy:
Disconnect the power supply with the main switch.
Remove and clean the side brushes.
Remove the brush box and clean the brushes.
Allow the device to cool down for one hour before continuing operation.
Cause:
Side brush motor DMC temperature error (FET)
Remedy:
Disconnect the power supply with the main switch.
Remove and clean the side brushes.
Remove the brush box and clean the brushes.
Allow the device to cool down for one hour before continuing operation.
Cause:
Suction motor DMC temperature error (FET)
Remedy:
Disconnect the power supply with the main switch.
Remove and clean the side brushes.
Remove the brush box and clean the brushes.
Allow the device to cool down for one hour before continuing operation.
Cause:
Lithium battery CAN communication error - Battery CAN module not plugged in, installed upside down or damaged.
Remedy:
Switch off the main switch and wait for 10 seconds.
Switch on the main switch.
Cause:
Brush motor open circuit
Remedy:
Locate and reset the brush motor circuit breaker.
Cause:
Error in the brush motor high voltage protection
Remedy:
Locate and reset the brush motor circuit breaker.
Cause:
Error in the high-voltage protection of the drive motor
Remedy:
Ensure that the Grad is suitable for the device.
Switch off the main switch and wait for 10 seconds.
Switch on the main switch.
Cause:
The battery is empty and must be recharged, transport mode not possible
Remedy:
Switch off the device.
Locate and lift the brake lever on the right side of the drive motor.
Charge the battery.
Make sure that the blue battery light in the left door is on during charging (only for lithium batteries).
If the battery light flashes or does not light up, press the button until it lights up.
Cause:
The filter bag is missing, transport mode still possible
Remedy:
Insert a filter bag.
Make sure that the filter bag is properly fitted in the device.
Cause:
The battery is empty and must be recharged, transport mode still possible
Remedy:
Switch off the device.
Locate and lift the brake lever on the right side of the drive motor.
Charge the battery.
Make sure that the blue battery light in the left door is on during charging (only for lithium batteries).
If the battery light flashes or does not light up, press the button until it lights up.
Cause:
The PWM of the drive motor is limited by an unspecified source. All modes are still possible.
Remedy:
Ensure that the Grad is suitable.
Cause:
Drive motor reverse gear is limited. The reverse gear is limited by a performance-limiting condition. All modes are still possible.
Remedy:
Ensure that the Grad is suitable.
Cause:
Drive motor forward gear is limited. The forward gear is limited by a power-limiting condition. All modes are still possible.
Remedy:
Ensure that the Grad is suitable.
Cause:
Drive motor temperature is high. PWM limitation in the range of high motor temperature. All modes are still possible.
Remedy:
Ensure that the Grad is suitable.
Cause:
Drive motor ANIN Limit. The temperature of the motor is above the software limit. The throttle entrance area is impaired. All modes are still possible.
Remedy:
Ensure that the Grad is suitable.
Cause:
The PWM of the suction motor is limited by an unspecified source. All modes are still possible.
Remedy:
Inform Customer Service.
Cause:
The suction motor is limited by a power-limiting condition. All modes are still possible.
Remedy:
Inform Customer Service.
Cause:
The battery is empty and needs to be recharged soon. All modes are still possible.
Remedy:
Charge the battery as soon as possible.
Cause:
The batteries are being charged and the device is locked.
Remedy:
Ensure that the key is switched off when charging.
Cause:
The PWM of the drive motor is limited by the active current limit.
Remedy:
Ensure that the Grad is suitable.
Description | Part no. |
|---|---|
HEPA filter bags (round) | 8.634-529.0 |
Dust brush | 6.903-887.0 |
| Carpet brush | 8.634-882.0 |
Hard floor brush | 8.634-884.0 |
Crevice nozzle | 6.903-403.0 |
Floor nozzle | 6.907-410.0 |
Extension tube | 8.600-009.0 |
Suction hose (3 m) | 8.645-088.0 |
Key (2 x) | 8.600-486.0 |
Power | |
Nominal voltage | 36 V |
Battery capacity | 115 Ah |
Power input | 1620 W |
Engine performance | 149 W |
Brush | |
Working width | 600 mm |
Wide roller brush | 510 mm |
Diameter of roller brush | 100 mm |
Speed of roller brushes | 1026 1/min |
Brush motor power | 373 W |
Diameter of side brush | 230 mm |
Speed of side brush | 90 1/min |
Side brush motor power | 45 W |
Vacuuming | |
Suction motor power | 470 W |
Max. flow rate of suction motor | 33,98 l/h |
Max. depression of suction motor | 11,7 kPa |
Volume of filter bag | 17,5 l |
Dimensions and weights | |
Maximum speed | 5,6 km/h |
Max. incline | 10 % |
Length | 1254 mm |
Width | 719 mm |
Height | 1321 mm |
Permissible total weight (with batteries and operator) | 385 kg |
Net weight (without batteries and operator) | 187 kg |
Load per unit area | 1641 kPa |
Dimensions of battery compartment (Length x width x height) | 584 x 370 x 315 mm |
Diameter of front wheel | 250 mm |
Diameter of rear wheel | 200 mm |
Aisle turning width | 1270 mm |
Determined values in acc. with EN 60335-2-72 | |
Hand-arm vibration value | < 2,5 m/s2 |
Foot vibration value | < 0,5 m/s2 |
Sound pressure level LpA, hardfloor | 68,4 dB(A) |
Uncertainty KpA | 2,5 dB(A) |
81,8 dB(A) | |
Uncertainty KpA | 2,5 dB(A) |
Sound pressure level LpA, hardfloor | 67,7 dB(A) |
Uncertainty KpA | 2,5 dB(A) |
81,8 dB(A) | |
Uncertainty KpA | 2,5 dB(A) |
Charger | |
Voltage | 110-240 V |
Nominal voltage | 100-240 V |
Frequency | 50/60 Hz |
Power input max. | 14 A |
Output power | 1200 W |
Current output, max. | 33 A |
Degree of protection | IP66 |
Ambient temperature, operation | -40/+65 °C |
Ambient temperature, storage | -40/+65 °C |
EU Declaration of Conformity |
We hereby declare that the machine described below complies with the relevant basic safety and health requirements in the EU Directives, both in its basic design and construction as well as in the version placed in circulation by us. This declaration is invalidated by any changes made to the machine that are not approved by us.
Product: Floor cleaner
Type: 1.012-xxx
Currently applicable EU Directives2006/42/EC (+2009/127/EC)
2014/30/EU
Harmonised standards usedEN 60335-1
EN 60335-2-29
EN 60335-2-72
EN 62233: 2008
EN 55012: 2007 + A1: 2009
EN 61000-6-2: 2005
EN 61000-6-3: 2007 + A1:2011
National standards used-
The signatories act on behalf of and with the authority of the company management.

Documentation supervisor:
S. Reiser
Alfred Kärcher SE & Co. KG
Alfred-Kärcher-Str. 28 - 40
71364 Winnenden (Germany)
Ph.: +49 7195 14-0
Fax: +49 7195 14-2212
Winnenden, 2023/03/01
Declaration of Conformity (UK) |
We hereby declare that the product described below complies with the relevant provisions of the following UK Regulations, both in its basic design and construction as well as in the version put into circulation by us. This declaration shall cease to be valid if the product is modified without our prior approval.
Product: Floor cleaner
Type: 1.012-xxx
Currently applicable UK RegulationsS.I. 2008/1597 (as amended)
S.I. 2016/1091 (as amended)
Designated standards usedEN 60335-1
EN 60335-2-29
EN 60335-2-72
EN 62233: 2008
EN 55012: 2007 + A1: 2009
EN 61000-6-2: 2005
EN 61000-6-3: 2007 + A1:2011
National standards used-
The signatories act on behalf of and with the authority of the company management.
Documentation supervisor:
S. Reiser
Alfred Kärcher SE & Co. KG
Alfred-Kärcher-Str. 28 - 40
71364 Winnenden (Germany)
Ph.: +49 7195 14-0
Fax: +49 7195 14-2212
Winnenden, 2023/03/01

2-2-SC-A4-GS-aw19869