NT 50/1 Mwf
59793540 (06/23)
59793540 (06/23)
 Read these original instructions and the enclosed safety instructions before using the device for the first time. Act in accordance with them.
Keep both books for future reference or for future owners.
If the operating instructions and safety instructions are not observed, the device can be damaged and dangers could arise for users and other persons.
Notify the dealer immediately in the case of shipping damage.
Check the package contents when unpacking for missing accessories or for damage.
 The packing materials can be recycled. Please dispose of packaging in accordance with the environmental regulations.
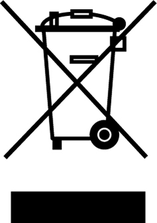 Electrical and electronic devices contain valuable, recyclable materials and often components such as batteries, rechargeable batteries or oil, which - if handled or disposed of incorrectly - can pose a potential danger to human health and the environment. However, these components are required for the correct operation of the device. Devices marked by this symbol are not allowed to be disposed of together with the household rubbish.
Current information on content materials can be found at: www.kaercher.de/REACH
Health risk
Inhalation of dusts that are harmful to health
Do not use the device for vacuuming up dusts that are harmful to health.
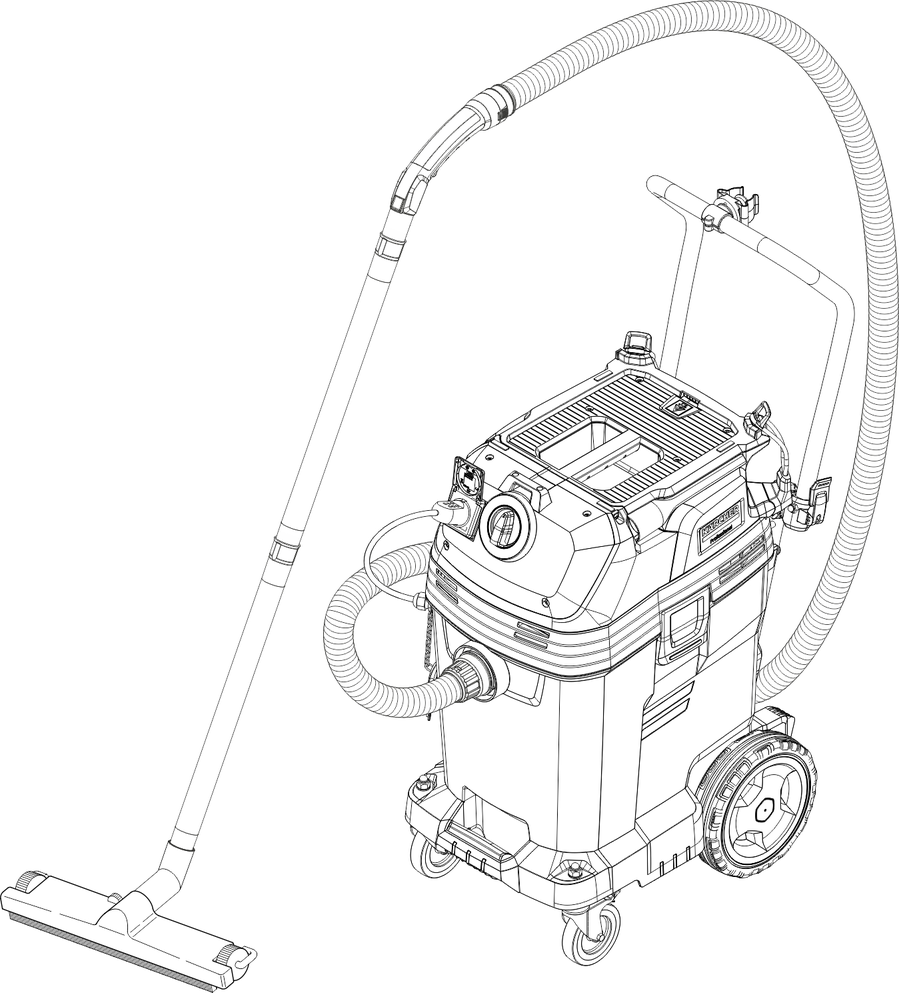
This vacuum cleaner is intended for the continuous disposal of large fluid amounts (flood damage, vacuuming out containers, basins or tanks, etc.), as well as for the wet and dry cleaning of floor and wall surfaces.
WARNING - The MWF hoover (mobile wet hoover for rescue and firefighting service) must not be used without a PRCD (fault current protection switch). Use without a PRCD can cause serious dangers.
The KÄRCHER NT 50/1 Mwf has a mains cable with a PRCD-K fault current protection switch, which ensures that the vacuum cleaner can be used with a power generator.
This device is suitable for commercial use, e.g. for trade, industry, fire brigades and technical relief organisations.
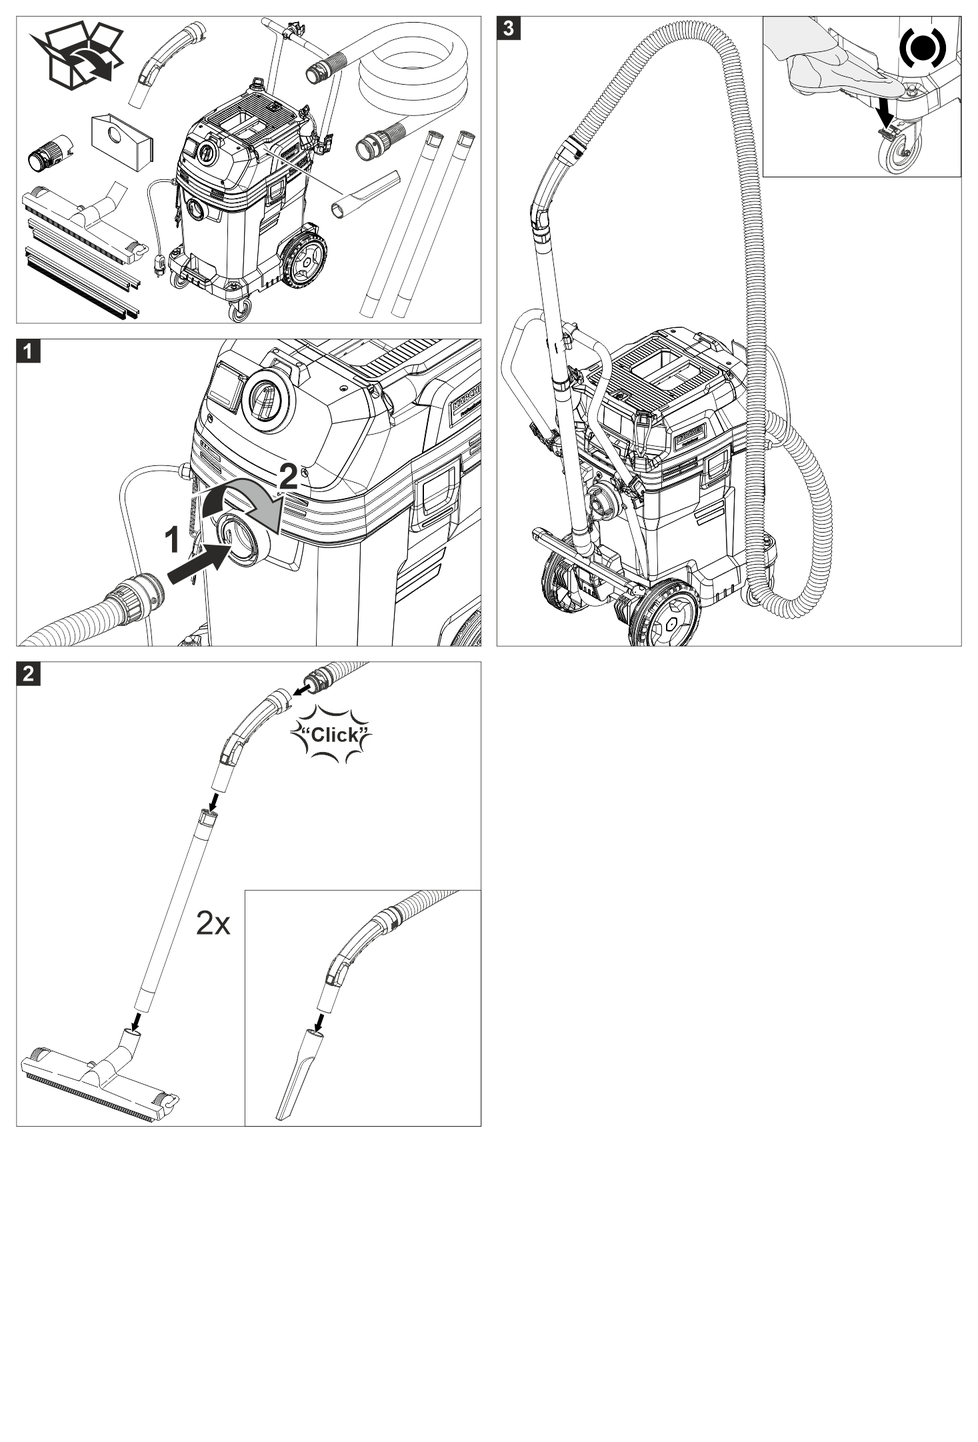
Unpack the device and install the accessories.
Only applies when operating without a power generator:
It is recommended that this device only be connected to a socket that is protected by a 30 mA error current circuit breaker.
Danger from sharp edges
Risk of injury
Wear suitable gloves when handling the pre-filter.
Wet vacuum cleaning with disposal pump
Wet vacuum cleaning without disposal pump
Dry vacuuming
Wet vacuuming is also possible when the disposal pump is switched off or removed. Remove disposal pump, see dry vacuuming.
Remove the brush strip.
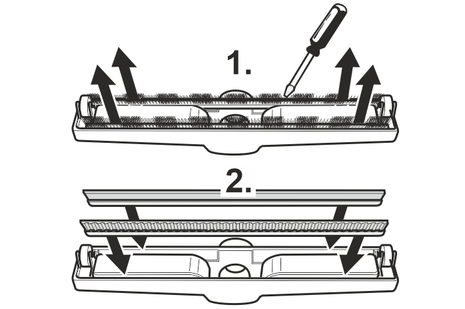
Install the squeegees.
The fleece filter bag (special accessory) must always be removed when vacuuming fluids or wet substances.
Unlock and remove the suction head.
Pull the fleece filter bag (special accessories) out to the rear.
Fold in the lock latch and seal the fleece filter bag tight (special accessories).
Fit and lock the suction head.
The dust bag (special accessories) must always be removed when vacuuming fluids or wet substances.
Unlock and remove the suction head.
Fold up the dust bag (special accessories).
Open the dust bag (special accessory) by pulling back the suction hose port.
Close the dust bag (special accessory) tightly with the closing strip underneath the opening.
Take out the dust bag (special accessories).
Fit and lock the suction head.
Open the filter cover.
Flat fold filter only: Remove the filter frame. Remove the flat fold filter (optional accessory) from the filter frame.
Candle filter only: Take out the candle filter (special accessories).
Insert coarse dirt filter in the filter frame.
Insert the filter frame into the suction head.
Close the filter cover until it audibly latches into place.
Unlock and remove the suction head.
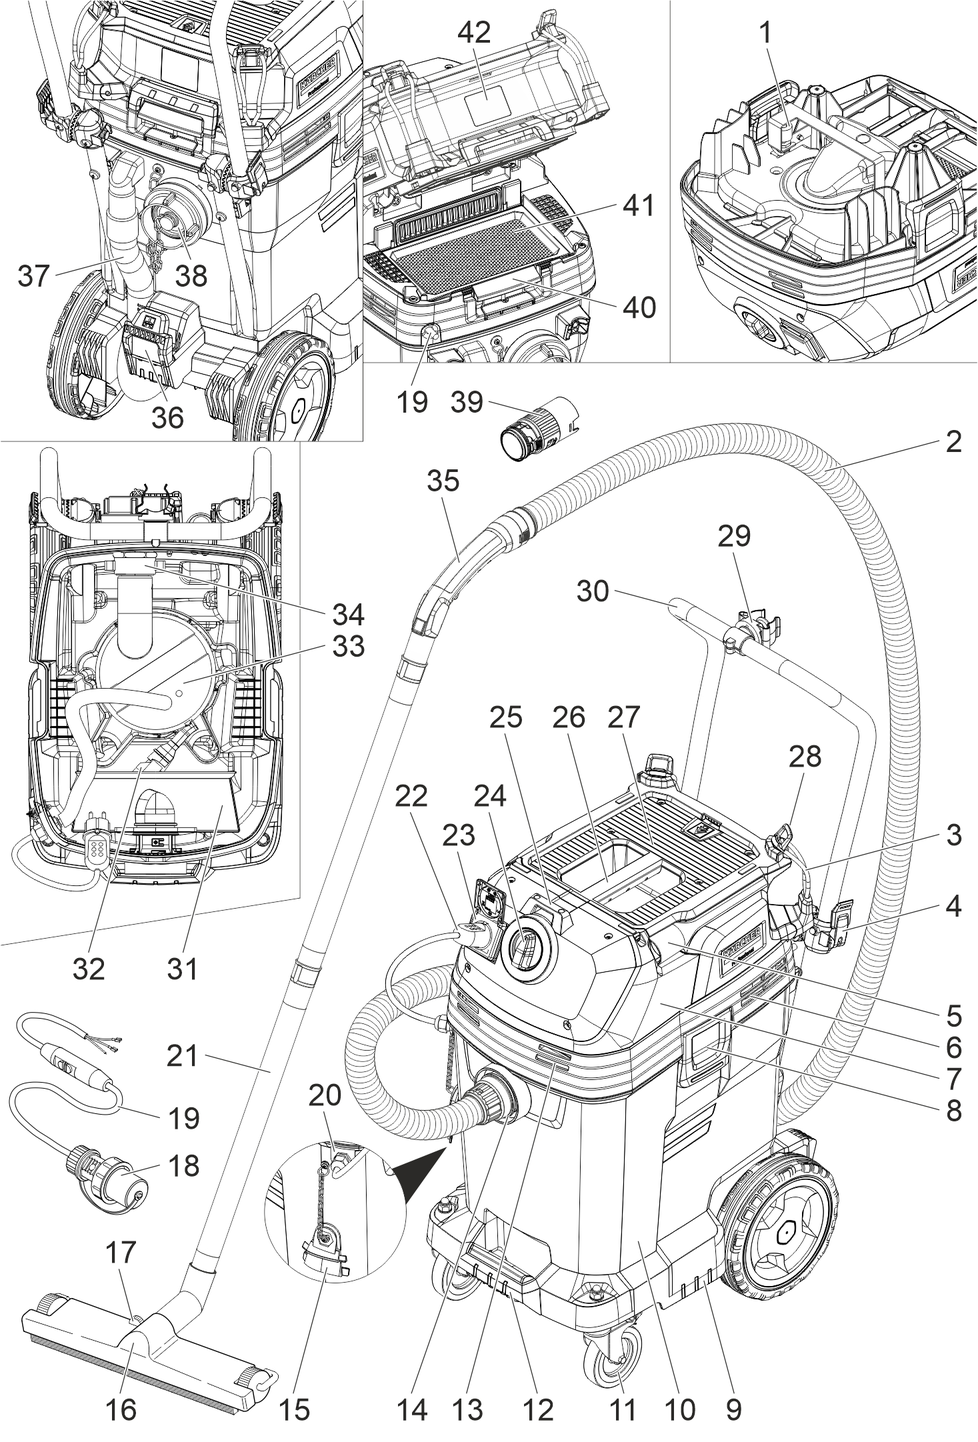
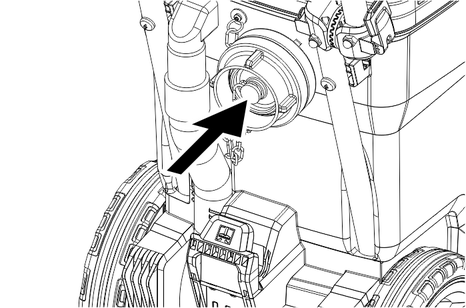
Remove the cable clip of the disposal pump.
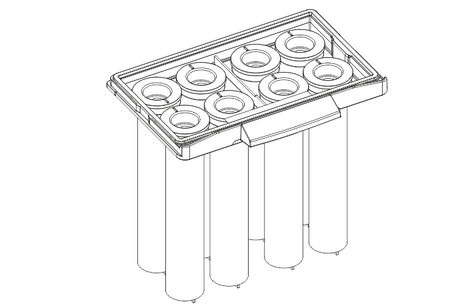
When inserting the pre-filter, push it over the suction hose port until it touches the container wall.
Insert the cable clip of the disposal pump.
Fit and lock the suction head.
Remove the cap.
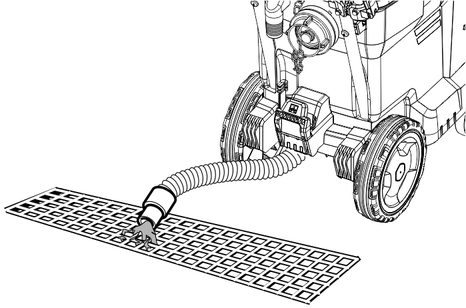
Connect the disposal hose (nominal width 3/4” or larger).
Environmental pollution!
Environmental pollution due to improper disposal in waste water.
Observe the local waste water treatment regulations.
Drain the waste water via the drain hose.
Danger of coarse dirt
Risk of damage to the suction motor.
Never remove the coarse dirt filter when vacuuming.
The device switches off automatically when the maximum fluid level is reached.
On completion of wet vacuum cleaning: Clean the float, container and, if necessary, the disposal pump with a damp cloth and dry.
Before dry vacuum cleaning: Remove the disposal pump and install the flat fold filter or candle filter.
A flat fold filter or candle filter should generally be used for dry vacuuming.
Danger due to fine dust entering
Risk of damage to the suction motor.
Never remove the flat fold filter or candle filter when vacuuming.
When vacuuming fine dust, a fleece filter (special accessory) or dust bag (special accessory) can also be used.
Unplug the mains plug of the disposal pump.
Unlock and remove the suction head.
Take out the cable holder of the disposal pump and replace it with a latch plate.
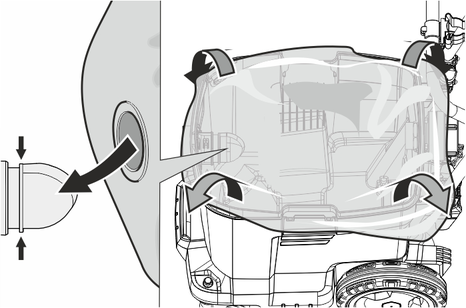
Pull the pre-filter over the suction hose port and remove it.
Unscrew the union nut of the disposal pump.
Remove the disposal pump and plastic insert from the container.
Attach the cap instead of the disposal hose.
Fit and lock the suction head.
A flat fold filter or candle filter is not included in the scope of delivery.
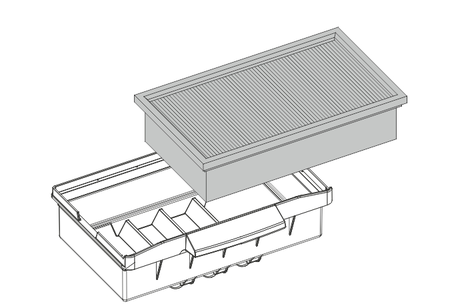
Open the filter cover.
Remove the filter frame.
Remove the coarse dirt filter from the filter frame.
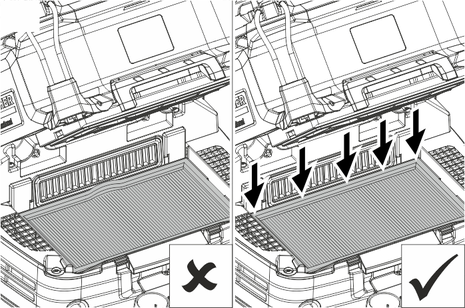
Flat fold filter only: Insert the flat fold filter (special accessory) into the filter frame. During insertion, ensure that the flat fold filter is flush on all sides. Insert the filter frame into the suction head.
Candle filter only: Insert the candle filter (special accessory) into the suction head.
Close the filter cover until it audibly latches into place.
Remove the squeegee.

Install the brush strip.
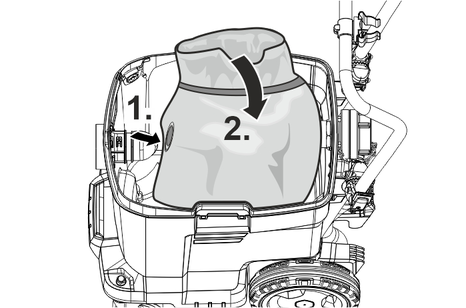
Unlock and remove the suction head.
Fit the fleece filter bag (special accessory).
Fit and lock the suction head.
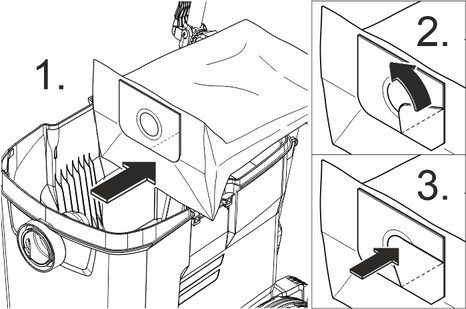
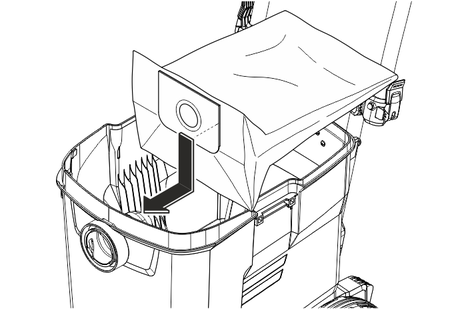
The dust bag opening must be pulled fully over the suction hose port.
Unlock and remove the suction head.
Attach dust bag (special accessories).
Pull the dust bag (special accessories) over the container.
Fit and lock the suction head.
Turn the adjustment screw clockwise: High position of the floor nozzle
Turn the adjustment screw anti-clockwise: Low position of the floor nozzle
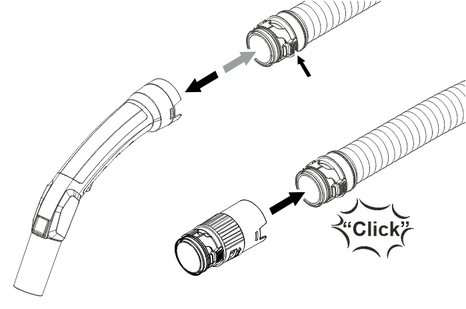
The suction hose is equipped with the clip 2.0 connection. All accessory parts with nominal width DN 40 and a clip 2.0 connection can be connected.
Danger of electric shock
Risk of injury and damage.
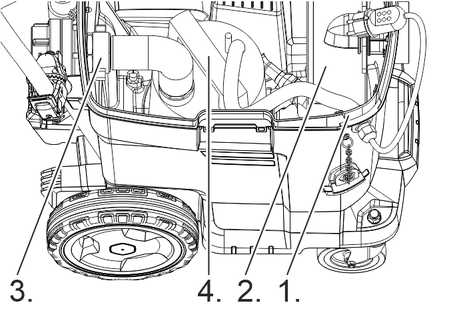
The socket is only intended for direct connection of the disposal pump to the vacuum cleaner. Any other use of the socket is prohibited.
Operators must be informed of the applicable PRCD system before use.
Plug in the device’s mains plug.
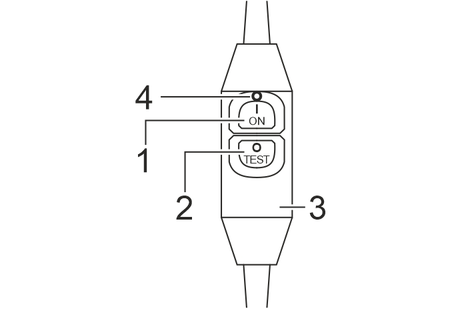
Press the on switch; the red indicator light illuminates. The circuit breaker is on standby.
Press the off switch/test button of the circuit breaker; the red indicator light goes out. The circuit breaker switches off.
Press the on switch; the red indicator light illuminates. The circuit breaker is on standby.
Switch on the device at the turn switch.
Continuously dispose of large fluid amounts: Switch on the disposal pump.
With the aid of the suction control, the amount of water sucked in (pump capacity of the suction turbine) can be adjusted to the output of the disposal pump. This prevents the suction turbine from constantly switching off and on and ensures continuous suction.
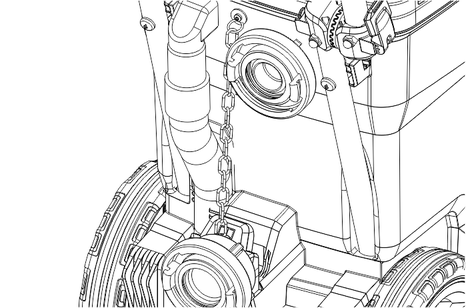
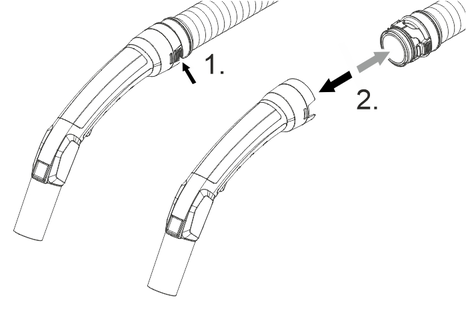
Remove the angle piece from the suction hose.
Install the suction control on the suction hose.
Connect the angle piece to the suction control. Make sure that the clip ring is aligned as shown in the illustration.
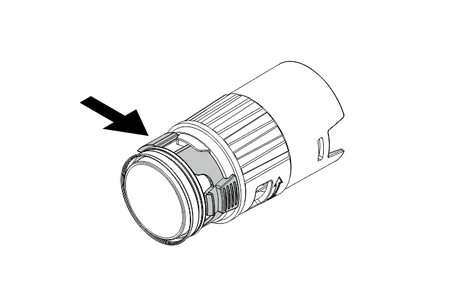
Regulate the suction power on the suction control (3-stage).
Continuously dispose of liquids or perform cleaning.
Unlock and remove the suction head.
Remove the cable clip of the disposal pump.
Pull the pre-filter over the suction hose port and remove it.
Empty the pre-filter.
When inserting the pre-filter, push it over the suction hose port until it touches the container wall.
Insert the cable clip of the disposal pump.
Fit and lock the suction head.
If necessary, switch off the disposal pump.
Switch off the device at the turn switch.
Press the off switch/test button of the circuit breaker; the red indicator light goes out. The circuit breaker switches off.
Pull out the device's mains plug.
Empty the container.
Vacuum off the inside and outside of the device and clean with a moist cloth.
Release the push handle lock and adjust the push handle.
Store the suction hose and mains cable as shown in the illustration.

Store the device in a dry room and secure it against unauthorised use.
Failure to observe the weight
Risk of injury and damage
Be aware of the weight of the device during transportation.
Improper transportation
Risk of damage
Protect the mains plug of the disposal pump from damage, as it reaches down to the ground when unplugged.
Remove the suction hose with floor nozzle from the support. Carry the device by the carrying handle and the suction pipe, not by the push handle.
When transporting the device in vehicles, secure it to prevent it from slipping or overturning in accordance with the respective valid guidelines.
Failure to observe the weight
Risk of injury and damage
Be aware of the weight of the device during storage.
The device may only be operated indoors.
Danger of electric shock
Injuries due to touching live parts
Switch off the device.
Remove the mains plug.
Open the filter cover.
Remove the filter frame.
Take out the flat fold filter (special accessories).
Insert the flat fold filter (special accessories). During insertion, ensure that the flat fold filter is flush on all sides.
Insert the filter frame.
Close the filter cover until it audibly latches into place.
Open the filter cover.
Take out the candle filter (special accessories).
Insert the new candle filter (special accessories).
Close the filter cover until it audibly latches into place.
Open the filter cover.
Remove the filter frame.
Replace the coarse dirt filter.
Insert the filter frame.
Close the filter cover until it audibly latches into place.
Unlock and remove the suction head.
Pull the fleece filter bag (special accessories) out to the rear.
Fold in the lock latch and seal the fleece filter bag tight (special accessories).
Fit new fleece filter bag (special accessory).
Fit and lock the suction head.
Unlock and remove the suction head.
Fold up the dust bag (special accessories).
Open the dust bag (special accessory) by pulling back the suction hose port.
Close the dust bag (special accessory) tightly with the closing strip underneath the opening.
Take out the dust bag (special accessories).
Attach new dust bag (special accessories).
Pull the dust bag (special accessories) over the container.
Fit and lock the suction head.
Unlock and remove the suction head.
Remove the cable clip of the disposal pump.
Pull the pre-filter over the suction hose port and remove it.
Clean pre-filter.
When inserting the pre-filter, push it over the suction hose port until it touches the container wall.
Insert the cable clip of the disposal pump.
Fit and lock the suction head.
Unlock and remove the suction head.
Clean the float with a damp cloth.
Fit and lock the suction head.
Unlock and remove the suction head.
With disposal pump: Lay the container on its side and rinse it out with a water stream.
Without disposal pump: Remove the disposal pump (see dry vacuum cleaning) and clean the container.
Fit and lock the suction head.
Danger of electric shock
Injuries due to touching live parts
Switch off the device.
Remove the mains plug.
The suction head cannot be positioned properly
Remedy:
Push the pre-filter over the suction hose port until it touches the container wall.
The circuit breaker cannot be switched on
Remedy:
Have the power supply socket checked by a qualified electrician.
Connect the mains plug of the device to another socket on a different circuit.
Notify Customer Service.
Circuit breaker switches off repeatedly when the vacuum cleaner is switched on
Remedy:
Notify Customer Service.
Suction turbine does not start up
Remedy:
Check the socket and the power supply fuse.
Check the mains cable and the mains plug of the device.
Press the on switch of the circuit breaker.
Switch on the device.
Check the float.
Suction turbine switches off
Remedy:
Switch on the disposal pump.
Release the jammed float switch in the container.
Suction power decreases
Remedy:
Remove any blockages from the suction nozzle, suction pipe, suction hose or coarse dirt filter / flat fold filter / candle filter.
Change the filled fleece filter bag (special accessory).
Change the filled dust bag (special accessories).
Correctly engage the filter cover.
Change the flat fold filter (special accessory).
Change the candle filter (special accessory).
Check the drain hose for leaks.
Empty/clean the pre-filter.
Check the correct installation position of the flat fold filter (special accessory) or the candle filter (special accessory).
Check that the coarse dirt filter is correctly fitted.
Escaping dust when dry vacuuming
Remedy:
Install flat fold filter (special accessory) or candle filter (special accessory).
Only with flat fold filters: Check that the flat fold filter (special accessory) is correctly fitted and correct if necessary.
Change flat fold filter (special accessory) or candle filter (special accessory).
Disposal pump does not run
Remedy:
Check the socket of the device.
Release the jammed float switch in the container.
Release the jammed impeller in the pump.
Disposal pump is not extracting very much
Remedy:
Lay the disposal hose out without kinks.
Check the disposal hose for clogging.
The suction turbine stops during operation, disposal pump continues to run
Remedy:
Set the suction power on the suction control (3-stage) so that continuous suction is possible.
If the malfunction cannot be corrected, the device must be checked by the Customer Service department.
The suction head cannot be positioned properly
Remedy:
Push the pre-filter over the suction hose port until it touches the container wall.
The circuit breaker cannot be switched on
Remedy:
Have the power supply socket checked by a qualified electrician.
Connect the mains plug of the device to another socket on a different circuit.
Notify Customer Service.
Circuit breaker switches off repeatedly when the vacuum cleaner is switched on
Remedy:
Notify Customer Service.
Suction turbine does not start up
Remedy:
Check the socket and the power supply fuse.
Check the mains cable and the mains plug of the device.
Press the on switch of the circuit breaker.
Switch on the device.
Check the float.
Suction turbine switches off
Remedy:
Switch on the disposal pump.
Release the jammed float switch in the container.
Suction power decreases
Remedy:
Remove any blockages from the suction nozzle, suction pipe, suction hose or coarse dirt filter / flat fold filter / candle filter.
Change the filled fleece filter bag (special accessory).
Change the filled dust bag (special accessories).
Correctly engage the filter cover.
Change the flat fold filter (special accessory).
Change the candle filter (special accessory).
Check the drain hose for leaks.
Empty/clean the pre-filter.
Check the correct installation position of the flat fold filter (special accessory) or the candle filter (special accessory).
Check that the coarse dirt filter is correctly fitted.
Escaping dust when dry vacuuming
Remedy:
Install flat fold filter (special accessory) or candle filter (special accessory).
Only with flat fold filters: Check that the flat fold filter (special accessory) is correctly fitted and correct if necessary.
Change flat fold filter (special accessory) or candle filter (special accessory).
Disposal pump does not run
Remedy:
Check the socket of the device.
Release the jammed float switch in the container.
Release the jammed impeller in the pump.
Disposal pump is not extracting very much
Remedy:
Lay the disposal hose out without kinks.
Check the disposal hose for clogging.
The suction turbine stops during operation, disposal pump continues to run
Remedy:
Set the suction power on the suction control (3-stage) so that continuous suction is possible.
The warranty conditions issued by our sales company responsible apply in all countries. We shall remedy possible malfunctions on your device within the warranty period free of cost, provided that a material or manufacturing defect is the cause. In a warranty case, please contact your dealer (with the purchase receipt) or the next authorised customer service site.
You can find more detailed information at: www.kaercher.com/dealersearch
Only use original accessories and original spare parts. They ensure that the appliance will run fault-free and safely.
Information on accessories and spare parts can be found at www.kaercher.com.
EU Declaration of Conformity |
We hereby declare that the machine described below complies with the relevant basic safety and health requirements in the EU Directives, both in its basic design and construction as well as in the version placed in circulation by us. This declaration is invalidated by any changes made to the machine that are not approved by us.
Product: Wet/dry vacuum cleaner
Type: 1.148-xxx
Currently applicable EU Directives2006/42/EC (+2009/127/EC)
2011/65/EU
2014/30/EU
Harmonised standards usedEN IEC 63000: 2018
EN 55014-1: 2017 + A11: 2020
EN 55014-2: 2015
EN 60335-1
EN 60335-2-69
EN 61000-3-2: 2014
EN 61000-3-3: 2013
EN 62233: 2008
National standards used-
The undersigned act on behalf and under the power of attorney of the company management.

Documentation supervisor:
S. Reiser
Alfred Kärcher SE & Co. KG
Alfred-Kärcher-Str. 28 - 40
71364 Winnenden (Germany)
Ph.: +49 7195 14-0
Fax: +49 7195 14-2212
Winnenden, 2020/10/01
Declaration of Conformity (UK) |
We hereby declare that the product described below complies with the relevant provisions of the following UK Regulations, both in its basic design and construction as well as in the version put into circulation by us. This declaration shall cease to be valid if the product is modified without our prior approval.
Product: Wet/dry vacuum cleaner
Type: 1.148-xxx
Currently applicable UK RegulationsS.I. 2008/1597 (as amended)
S.I. 2012/3032 (as amended)
S.I. 2016/1091 (as amended)
Designated standards usedEN IEC 63000: 2018
EN 55014-1: 2017 + A11: 2020
EN 55014-2: 2015
EN 60335-1
EN 60335-2-69
EN 61000-3-2: 2014
EN 61000-3-3: 2013
EN 62233: 2008
National standards used-
The undersigned act on behalf and under the power of attorney of the company management.
Documentation supervisor:
S. Reiser
Alfred Kärcher SE & Co. KG
Alfred-Kärcher-Str. 28 - 40
71364 Winnenden (Germany)
Ph.: +49 7195 14-0
Fax: +49 7195 14-2212
Winnenden, 2020/10/01
Electrical connection | |
Mains voltage | 230 V |
Phase | 1 ~ |
Power frequency | 50 Гц |
Degree of protection | IPX4 |
Protection class | I |
Nominal power | 1200 Вт |
Power (tot.) | 2000 Вт |
Maximum power (EU) | 2350 Вт |
Power of the disposal pump | 810 Вт |
Device performance data | |
Tank content | 50 л |
Fluid filling quantity | 37 л |
Air quantity (max.) | 40 l/s |
Vacuum (max.) | 22,0 (220) kPa (mbar) |
Air quantity (max., suction motor) | 74 l/s |
Vacuum (max., suction motor) | 27,3 (273) kPa (mbar) |
Dimensions and weights | |
Typical operating weight | 28,0 кг |
Length x width x height | 640 x 370 x 1045 мм |
Filter area of the flat fold filter | 0,6 m2 |
Candle filter area | 0,2 m2 |
Diameter of the suction hose | 40 мм |
Length of the suction hose | 4,0 м |
Determined values in acc. with EN 60335-2-69 | |
Sound pressure level LpA | 67 dB(A) |
Uncertainty KpA | 2 dB(A) |
Hand-arm vibration value | <2,5 m/s2 |
Uncertainty K | 0,2 m/s2 |
Mains cable | |
Power cord type | H07RN-F 3G 1,5 mm2 |
Part number (EU) | 6.652-171.0 |
Cable length | 10 м |
Filtersysteme / Filter Systems / Système de filtres
 | |  |  |  |  | |
Flachfaltenfilter (Zellulose) * Flat pleated filter (cellulose) * Filtre plat à plis (cellulose) * | Flachfaltenfilter (PES) * Flat pleated filter (PES) * Filtre plat à plis (PES) * | Kerzenfilter * Candle filter * Filtre à bougie * | Grobschmutzfilter Rough dirt filter Filtre à déchets grossiers | Vliesfiltertüte, 3-lagig * Fleece filter bag, triple layered * Sachet filtre en tissu non tissé à 3 épaisseurs * | Entsorgungsbeutel Disposal bag Sachet d’élimination | |
Bestellnummer Order No. Numéro de référence | 6.904-367.0 | 6.907-662.0 | 2.414-000.0 | 6.904-287.0 | 6.907-480.0 | 6.596-886.0 |
Menge Quantity Quantité | 1 | 1 | 1 | 1 | 5 | 10 |
Normalstäube Normal dust Poussières normales | x | x | x | x | x | |
Feinstäube Fine dust Poussières fines | x | x | x | x | x | |
Abrasive Stäube Abrasive dust Poussières abrasives | x | x | x | x | x | |
Flüssigkeiten, nasser Schmutz Liquids, wet dirt Liquides, saletès humides | x | x |
* Staubklasse M, Rückhaltevermögen ≥ 99,9 %
* Dust class M, Retention ≥ 99,9 %
* Classe de poussière M, Conservation ≥ 99,9 %