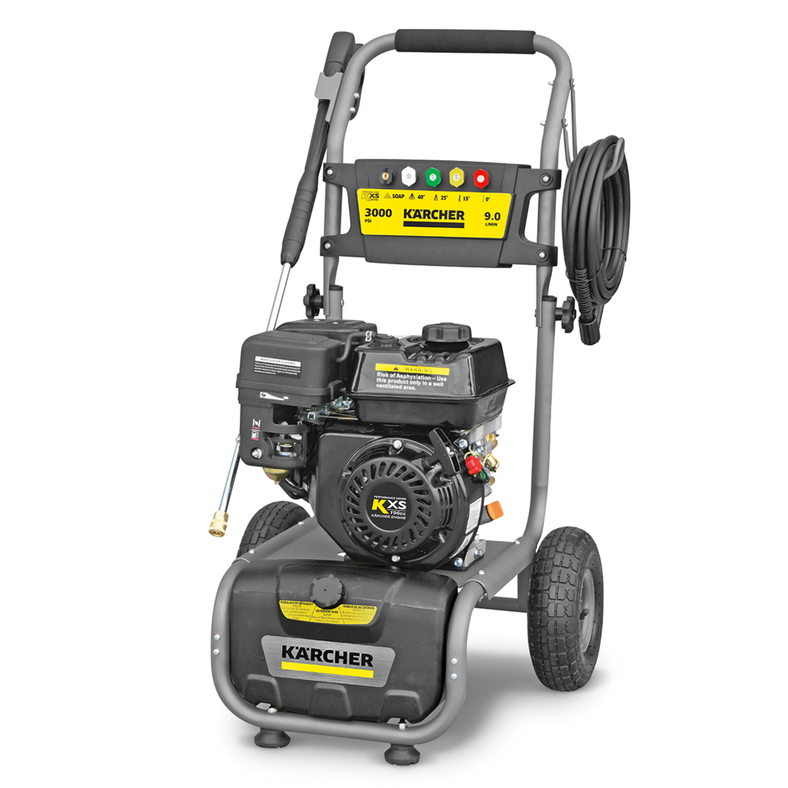
G 3000
59789340 (09/22)
59789340 (09/22)
 Read these original operating instructions and the safety instructions of the engine before using the device for the first time. Act in accordance with them. Keep all booklets for future reference or for future owners.
In addition to the notes in the operating instructions, you also need to take into consideration the general safety regulations and accident prevention regulations applicable by law.
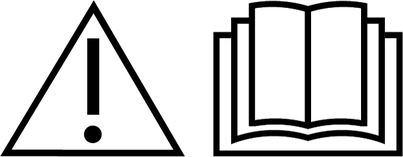
Warnings and information notices attached to the device provide important information for hazard-free operation.
Indication of an imminent threat of danger that will lead to severe injuries or even death.
Indication of a potentially dangerous situation that may lead to severe injuries or even death.
Indication of a potentially dangerous situation that may lead to minor injuries.
Indication of a potentially dangerous situation that may lead to damage to property.
Wear suitable protective clothing and safety goggles to protect yourself from water or dirt backsplash.
Aerosols can be formed when using high-pressure cleaners. Inhaling aerosols can be harmful for your health. Depending on the application, the use of fully shielded nozzles (e.g. surface cleaners) can significantly lower the emission of aqueous aerosols. Depending on the environment to be cleaned, wear a suitable respiratory protective mask of class FFP 2 or comparable to protect yourself from inhaling aerosols if the use of a fully shielded nozzle is not possible.
Risk of asphyxiation. Keep packaging film out of the reach of children.
Only use the device for its proper use. Take into account the local conditions and beware of third parties, in particular children, when working with the device.
This device must not be used by persons (including children) with restricted physical, sensory or mental abilities or those lacking in experience and knowledge.
Children must not operate the device.
Children must be supervised to prevent them from playing with the appliance.
Safety devices are provided for your own protection. Never modify or bypass safety devices.
Operation in explosive atmospheres is prohibited.
Never suction solvents, liquids containing solvents or undiluted acids. This includes e.g. petrol, paint thinner or heating oil. The spray mist is highly flammable, explosive and poisonous.
Do not refuel in confined spaces.
Never operate the device in confined spaces.
Damaged wheels / tyre valves are extremely dangerous. Damaged wheels / tyre valves can be damaged by the high-pressure jet and explode. The first sign of this is discolouration of the tyres. Keep a spray distance of at least 30 cm when cleaning the wheels / tyre valves.
Make sure that exhaust emissions are not near air intakes.
Do not use the device if people without the proper protective clothing are in its reach.
High-pressure jets can be dangerous if used improperly. Do not direct the jet at persons, animals, live electrical devices or at the device itself.
Do not aim the high-pressure jet at yourself, e.g. to clean clothes or shoes.
Do not spray any objects which contain harmful substances (e.g. asbestos).
Check the device and the accessories, such as the high-pressure hose, high-pressure gun and safety devices, to make sure they are in proper safe and reliable condition before each operation. Do not use the device if it is damaged. Replace damaged components immediately.
Only use high-pressure hoses, control panels and couplings specified by the manufacturer.
Risk of scalding. When disconnecting the supply or high-pressure hose, hot water can leak out of the connections after operation.
According to the applicable regulations, the appliance may never be used with the drinking water network without a system separator. Ensure that the connection to your house water system, with which the high-pressure cleaner is operated, is equipped with a system separator according to EN 12729 type BA.
Water that has flowed through a system separator is no longer classified as drinkable.
Never leave the device unsupervised while it is in operation.
Recoil force from the water stream emerging at the high-pressure nozzle acts on the high-pressure gun. Keep proper footing and hold the high-pressure gun and spray lance firmly.
Accidents or damage due to the device falling over. Before all actions with or on the device, you must make sure that it is stable.
Only use the device on surfaces that are not sensitive to moisture.
First check the effect of the device at an inconspicuous place, especially on sensitive surfaces such as e.g. wood.
Do not operate the device at temperatures below 0 °C.
Incorrect use of detergents can cause serious injuries or poisoning.
Keep the detergent out of the reach of children.
Only use the detergents supplied or specified by the manufacturer. The use of other detergents or chemicals can impair the safety of the device.
Before carrying out any care and maintenance work, switch off the engine, let it cool down and remove the spark plug cap from the spark plug.
Have repair work and work on electrical components carried out by the authorised customer service only.
Do not use acetone, undiluted acids or solvents, as they corrode the materials used on the device.
Risk of accidents and injuries. Take into account the weight of the device for transportation and storage. See chapter Technical data in the operating instructions.
 The packing materials can be recycled. Please dispose of packaging in accordance with the environmental regulations.
 Electrical and electronic devices contain valuable, recyclable materials and often components such as batteries, rechargeable batteries or oil, which - if handled or disposed of incorrectly - can pose a potential danger to human health and the environment. However, these components are required for the correct operation of the device. Devices marked by this symbol are not allowed to be disposed of together with the household rubbish.
Cleaning work that produces oily waste water, e.g. washing engines or undercarriages etc., may only be performed at washing stations with an oil separator.
Working with detergents may only be performed on watertight surfaces with a connection to the waste water sewage system. Do not allow detergent to enter waterways or the soil.
Notes on the content materials (REACH)Current information on content materials can be found at: www.kaercher.de/REACH
Use at petrol stations or other hazard zones
Risk of injury
Adhere to the respective safety regulations.
Do not allow waste water containing mineral oil to penetrate soil, waterways or the sewage system. Only wash the motor or the undercarriage in suitable places with an oil separator.
Use the high-pressure cleaner in private households only.
Never operate the device in confined spaces.
The device is intended for cleaning machines, vehicles, buildings, tools, façades, terraces, garden machines etc. using a high-pressure water jet.
Only use original accessories and original spare parts. They ensure that the appliance will run fault-free and safely.
Information on accessories and spare parts can be found at www.kaercher.com.
The scope of delivery for the appliance is shown on the packaging. Check the contents for completeness when unpacking. If any accessories are missing or in the event of any shipping damage, please notify your dealer.
Black (SOAP)
White, 40° jet angle
Green, 25° jet angle
Yellow, 15° jet angle
Red, 0° jet angle
Missing or modified safety devices
Safety devices are provided for your own protection.
Never modify or bypass safety devices.
The power switch prevents unintentional operation of the device.
The trigger can be locked against unintentional operation by latching the pawl in the groove on the rear handle of the high-pressure gun.
Locking the trigger:
Fold up the pawl on the trigger until it latches in the groove on the rear handle of the high-pressure gun.

The trigger is locked.
Unlocking the trigger:
Disengage the pawl from the groove on the rear handle of the high-pressure gun and fold it onto the trigger.
The trigger is unlocked.
The thermostat valve opens when the maximum permissible water temperature is exceeded and discharges the hot water outdoors.
 | Do not connect the device directly to the public drinking water network. |
 | Do not direct the high-pressure jet at persons, animals, live electrical equipment or at the device itself. Protect the device from frost. |
 | Risk of burns! Do not touch these hot components. |
 | Danger of poisoning! Never inhale the exhaust gases. |
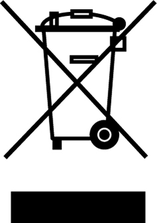
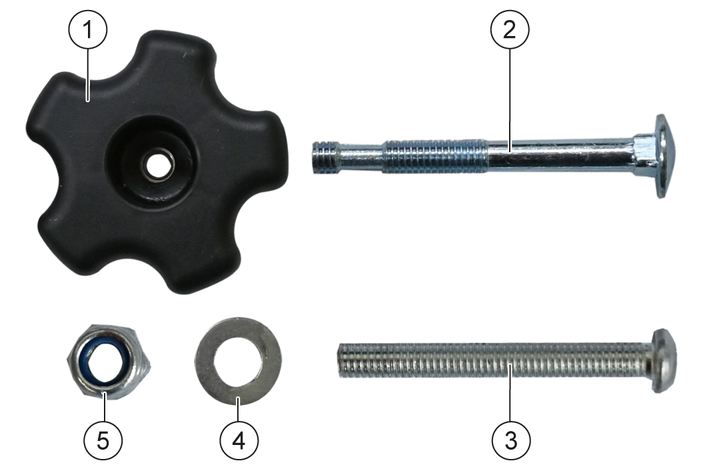
Fit the supplied loose parts onto the device before starting up the device.
Position the wheel axle in the mount on the device frame as shown.
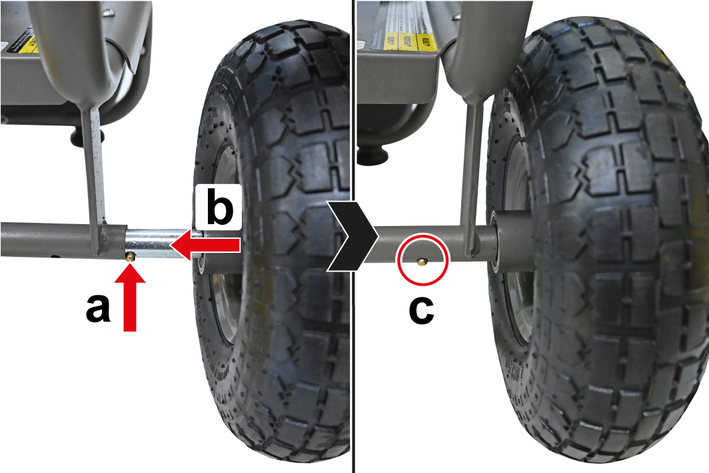
Press the spring-loaded pin and push the wheel axle into the mount until the spring-loaded pin engages in the hole.
Install the second wheel in the same way.
Attach the handle to the device frame.
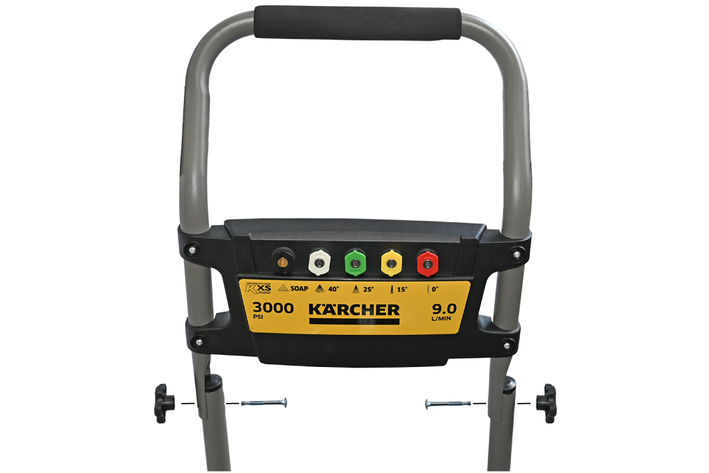
Secure the handle with the 2-thread screws and the star grip nuts.
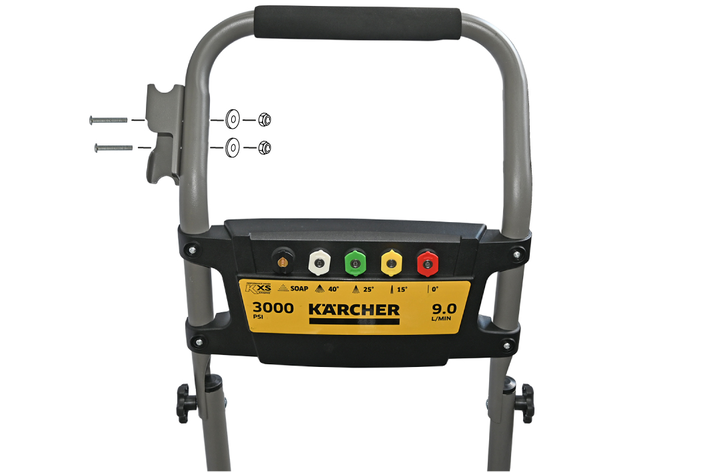
Install the high pressure gun holder on the left side of the handle with the M5x38 screws, washers and M5 stop nuts.
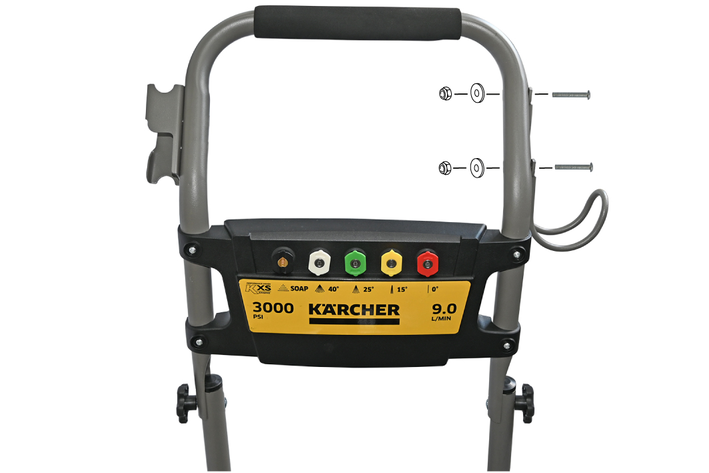
Install the high-pressure hose hook on the right-hand side of the handle with the M5x38 screws, washers and M5 stop nuts.
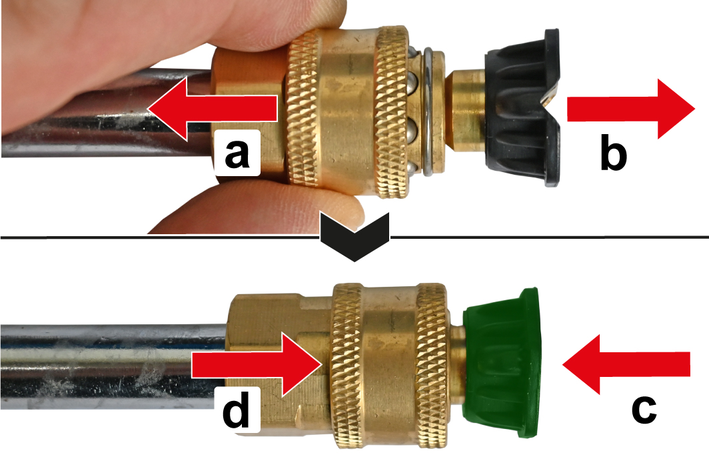
Pull the cap out of the union nut on the water spigot.
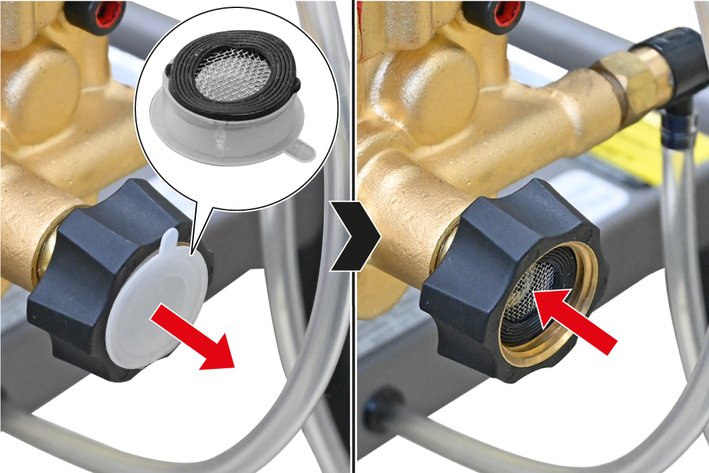
Remove the water sieve from the cap.
Carefully fit the water sieve into the union nut on the water spigot.
Screw the coupling plug into the union nut on the water spigot.
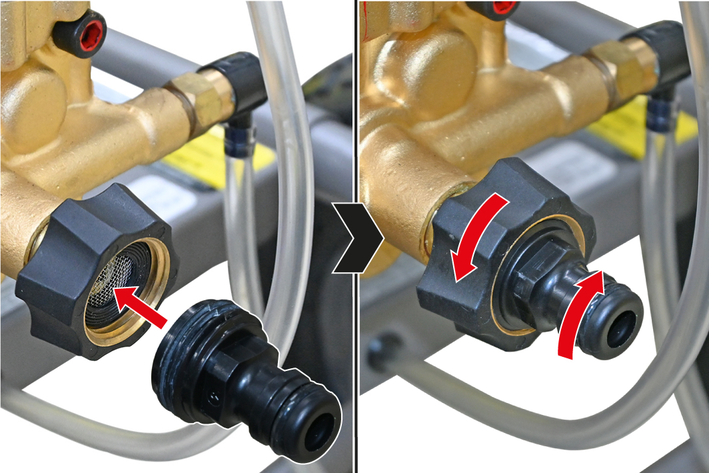
Hold the square end of the coupling plug with an open-end wrench and hand-tighten the union nut.
Removal is performed in the reverse sequence.
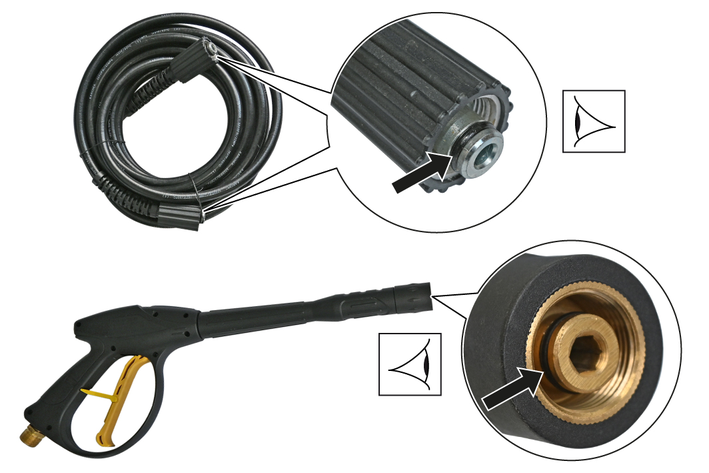
Screw the spray lance onto the high-pressure gun and hand-tighten the union nut.
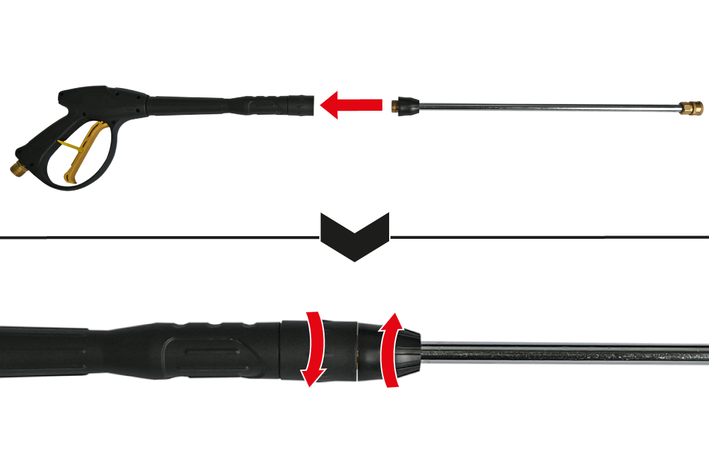
Removal is performed in the reverse sequence.
With new devices, there is no engine oil in the crankcase of the engine, it is provided in a separate container.
Risk of damage!
Operating the engine with unsuitable oil or too high or too low an engine oil level can lead to increased engine wear and damage.
Only fill with engine oil that complies with the specifications in the operating instructions for the engine.
Ensure that the engine oil level is always within the designated range between the MIN and MAX marks.
Fill the engine oil provided into the engine crankcase using the funnel, see the operating instructions for the engine.
Observe the safety instructions!
Before initial startup, read the operating instructions for the engine and observe the safety instructions in particular.
Check the general condition of the engine and attachments, see the engine operating instructions.
Check the engine oil level and correct if necessary, see the engine operating instructions.
Fill the fuel tank with suitable fuel, see the engine operating instructions.
Remove the cover on the high-pressure spigot.
Fit the high-pressure hose into the high-pressure spigot and hand-tighten the union nut.
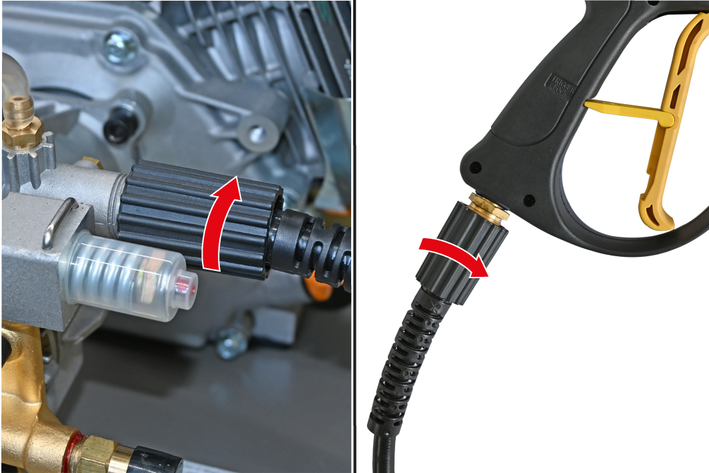
Fit the high-pressure hose into the high-pressure gun and hand-tighten the union nut.
Removal is performed in the reverse sequence.
Select the jet nozzle suitable for the cleaning task.
Black jet nozzle (SOAP)
For applying detergents and working at low pressure.
White jet nozzle, 40° jet angle
For light soiling on large surfaces and working at moderate pressure.
Green jet nozzle, 25° jet angle
For heavier soiling on large surfaces and working at high pressure.
Yellow jet nozzle, 15° jet angle
For stubborn dirt and working at very high pressure.
Risk of damage!
When using a point jet nozzle, there is a risk of damage to sensitive surfaces!
Do not use the point jet nozzle for soft, sensitive or painted surfaces, vehicles, façades, wood etc.
Red jet nozzle, 0° jet angle, point jet
For the most stubborn dirt and work with maximum pressure.
Fit a jet nozzle suitable for the cleaning task onto the spray lance, see chapter Selecting the jet nozzle and chapter Changing the jet nozzle.
Risk of damage through contaminated water!
Contamination in the water can damage the high-pressure pump and accessories.
Operate the device only with clear fresh water without contamination or additives.
Never use contaminated water, waste water or salt water.
Check the pressure, temperature and quantity of the supply water for compliance with the requirements, see chapter Technical data.
Observe the water distribution company regulations.
Risk of damage when using a hose coupling with "Aquastop" on the water connection of the device!
Using a hose coupling with "Aquastop" on the water connection of the device can damage the high-pressure pump.
Never use a hose coupling with "Aquastop" on the water connection of the device.
You can use a hose coupling with "Aquastop" on the tap.
Attach the coupling socket of the water hose to the coupling plug.
Connect the water hose to the water tap of the water line.
Open the water tap fully.
Open the water tap fully.
Remove the jet nozzle from the spray lance, see chapter Changing the jet nozzle.
Start the engine, see engine operating instructions.
Unlock the trigger of the high-pressure gun, see chapter Trigger lock.
Press the trigger of the high-pressure gun until the water comes out of the spray lance without bubbles.
The device is vented.
Release the trigger of the high-pressure gun.
Lock the trigger of the high-pressure gun, see chapter Trigger lock.
Fit the jet nozzle onto the spray lance, see chapter Changing the jet nozzle.
Risk of damage due to dry running of the high-pressure pump!
Dry running can damage the high-pressure pump.
Switch off the device if it does not build up pressure within 1 min and proceed according to the instructions in chapter Troubleshooting guide.
Risk of damage when operating in an inclined position!
The engine and the high-pressure pump can be damaged when operated in an inclined position.
Only operate the device when it is standing horizontally level on the wheels and vibration dampers.
You can find areas of application and examples of Kärcher high-pressure cleaners as well as information about Kärcher detergents on the Kärcher homepage.
Open the water tap fully.
Unlock the trigger of the high-pressure gun, see chapter Trigger lock.
Pull the trigger and start the engine, see the operating instructions for the engine.
Note: The spray lance or the jet nozzle can be removed to facilitate the starting procedure, see chapter Installing the spray lance on the high-pressure gun or Changing the jet nozzle.
Release the trigger when the engine is running.
Lock the trigger of the high-pressure gun, see chapter Trigger lock.
Let the cold engine warm up for 1 min.
Unlock the trigger of the high-pressure gun, see chapter Trigger lock.
Risk of damage!
There is a risk of damage if the distance between the jet nozzle and sensitive or painted surfaces is too small!
Always keep a sufficiently large spray distance from sensitive or painted surfaces.
Do not remain in one area, but rather keep the high-pressure gun moving.
Do not clean car tyres, paint or sensitive surfaces such as e.g. wood with the point jet nozzle.
First test the cleaning effect on an inconspicuous spot.
Pull the trigger and carry out the cleaning process.
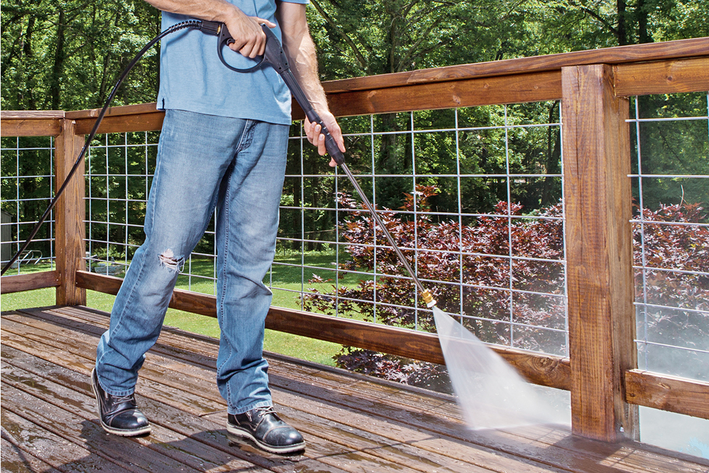
Guide the spray lance at an angle of approx. 45° to the surface to be cleaned.
Keep a distance of approx. 15...20 cm (6"...8") between the jet nozzle and the surface to be cleaned.
Regulate the high pressure according to the cleaning task by reducing or increasing the engine speed, see the operating instructions of the engine.
Do not reduce the engine speed too much, otherwise the engine will stop.
Risk of damage from unsuitable detergents!
Risk of damage if unsuitable detergents are used.
Only use detergents that have been approved by Kärcher and are suitable for the objects to be cleaned.
Observe the safety instructions, dosage recommendations and notes enclosed with the detergents.
Use detergents sparingly to help conserve the environment.
Kärcher detergents guarantee trouble-free work. Ask us for advice, request our catalogue or our detergent information sheets.
Install the black jet nozzle (SOAP) on the spray lance, see chapter Changing the jet nozzle.
Unscrew the screw cap on the detergent tank.
Fill the detergent tank with a detergent suitable for the cleaning task.
Screw the screw cap onto the detergent tank.
Risk of damage due to detergents acting too long and drying out!
Detergent can damage hot surfaces and damage surfaces if left to act for too long.
Do not apply detergent to hot surfaces and observe the maximum contact time.
Do not allow detergent to dry on the surfaces being cleaned.
Pull the trigger of the high-pressure gun and spray the detergent sparingly onto the dry surfaces.
Allow the detergent to act, but not to dry.
Replace the black jet nozzle (SOAP) with a jet nozzle suitable for the cleaning task, see chapter Changing the jet nozzle.
Rinse off loose dirt.
Risk of damage due to dried detergent!
Dried detergent can damage the device.
Rinse the device after each use of detergent.
Replace the black jet nozzle (SOAP) on the spray lance with a high-pressure jet nozzle, see chapter Changing the jet nozzle.
Unlock the trigger of the high-pressure gun, see chapter Trigger lock.
Press the trigger for 1 min to flush the detergent out of the device.
Danger to life and risk of injury from the high-pressure water jet!
A high-pressure water jet may be emitted from the pressurised device.
Depressurise the device before releasing, removing or installing the high-pressure hose or the high-pressure gun.
Lock the trigger of the high-pressure gun before releasing, removing or installing the jet nozzle or spray lance.
Lock the trigger of the high-pressure gun, see chapter Trigger lock.
Pull back the ring on the jet nozzle coupling and pull off the jet nozzle.
Insert the desired jet nozzle into the jet nozzle coupling and release the ring on the jet nozzle coupling.
Use the black jet nozzle (SOAP) to add detergent or to work at low pressure.
Pull the jet nozzle to check that it is correctly seated. If necessary, fit the jet nozzle back into the jet nozzle coupling.
Release the trigger of the high-pressure gun.
Note: The engine continues to run after releasing the trigger.
Lock the trigger of the high-pressure gun, see chapter Trigger lock.
Danger of scalding when opening the thermostat valve!
When the thermostat valve is opened, hot water escapes which can cause scalding.
Do not bring any parts of your body near the outlet opening of the thermostat valve.
Stop the engine of the device if interruptions in operation last longer than 1 min.
Stop the engine if the interruption of operation lasts longer than 1 min, see the engine operating instructions.
Stop the engine, see engine operating instructions.
Pull the trigger of the high-pressure gun until the high pressure is completely released.
Close the water tap.
Depressurise the device, see chapter Depressurising the device.
Lock the trigger of the high-pressure gun, see chapter Trigger lock.
Remove the water hose at the coupling plug.
Remove the high-pressure hose at the high-pressure spigot, see chapter Fit the high-pressure hose to the high-pressure spigot and high-pressure gun.
Remove the high-pressure hose from the high-pressure gun, see chapter Fit the high-pressure hose to the high-pressure spigot and high-pressure gun.
Wind up the high-pressure hose and hang it on the high-pressure hose hook.
Hang the high-pressure gun in the high-pressure gun holder.
Allow the device to cool down.
Danger of explosion and fire if the device is tilted too far!
Fuel may leak and ignite or explode if the device is tilted too far.
Tilt the device max. 45° when pushing or pulling.
Store and transport the device so that it stands horizontally on the vibration dampers and the wheels.
Risk of injury, risk of damage!
Note the weight of the device during transport.
Store or secure the device in accordance with applicable guidelines so that it cannot slip or be thrown around during transport.
Grasp the handle and tilt the device backwards via the wheels by max. 45°.
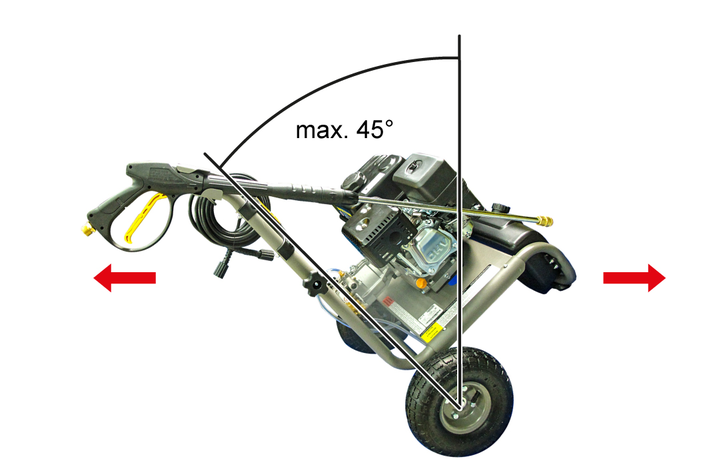
Pull or push the device by the handle.
If necessary, fold the handle over, see chapter Folding the handle.
Before transporting the device, stow or secure the device and the accessories so that they will not slip or be thrown around when accelerating, braking, cornering or in the event of an accident.
Failure to observe the weight
Risk of injury and damage
Be aware of the weight of the device during storage.
Danger of frost
Incompletely emptied devices can be destroyed by frost.
Completely empty the device and accessories.
Protect the device from frost.
Close the water tap.
Remove the coupling socket of the water hose at the coupling plug.
Start the engine, see engine operating instructions.
Unlock the trigger of the high-pressure gun, see chapter Trigger lock.
Operate the trigger lever for max. 1 min until the water is completely expelled from the device.
Stop the engine, see engine operating instructions.
Remove the high-pressure hose at the high-pressure spigot, see chapter Fit the high-pressure hose to the high-pressure spigot and high-pressure gun.
Allow the water to drain completely from the high-pressure hose and the high-pressure gun with spray lance.
Wind up the high-pressure hose and hang it on the high-pressure hose hook.
Hang the high-pressure gun in the high-pressure gun holder.
Allow the device to cool down.
If necessary, fold the handle forwards or backwards, see chapter Folding the handle.
Store the device in a frost-protected room, together with all accessories.
The handle can be folded forwards or backwards for space-saving transport and storage.
Finish operation, see chapter Finishing operation.
Remove the high-pressure gun from the high-pressure gun holder.
Remove the high-pressure hose from the high-pressure hose hook.
Screw down both star grip nuts on the second thread of the 2-thread screws.
Release the handle on the device frame and fold it forwards or backwards.
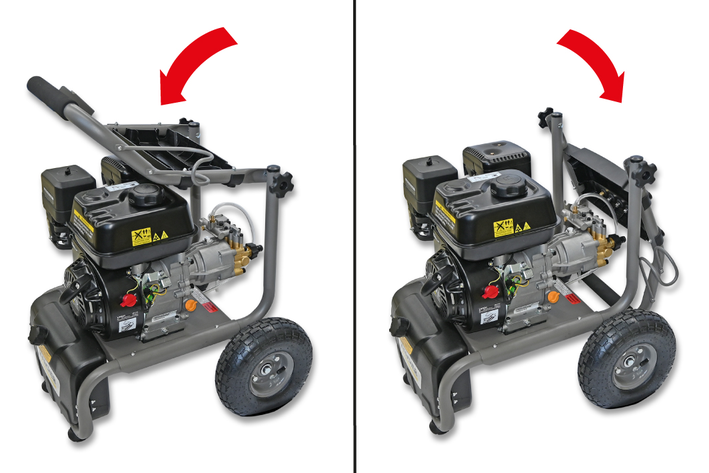
Erecting the handle is performed in the reverse order.
Timely and correctly performed maintenance is a prerequisite for the safety, economy and reliable, trouble-free operation of the device. This also helps to reduce environmental pollution.
Risk of damage if maintenance is not carried out on time or is carried out incorrectly!
Maintenance that is not carried out on time or is carried out incorrectly can cause damage to the device.
Observe the specified maintenance intervals and carry out the maintenance work as described.
Only use original Kärcher original parts or equivalent parts for maintenance.
Service the engine according to the instructions in the engine operating instructions.
Risk of damage!
When operating without a water sieve or with a damaged one, contamination may enter the device and damage it.
Check the water sieve for damage before fitting it into the water spigot. Replace a damaged water sieve.
Do not operate the device without a water sieve.
Stop the engine, see engine operating instructions.
Close the water tap.
Remove the water hose at the coupling plug.
Remove the coupling plug on the water spigot, see chapter Installing the coupling plug on the water spigot.
Remove the water sieve from the union nut on the water spigot.
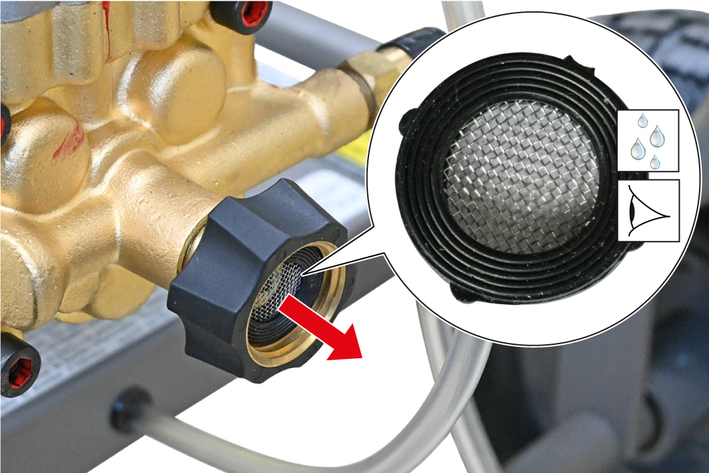
Clean the water sieve under running water.
Check the water sieve for damage and replace if necessary.
Fit the water sieve into the union nut on the water spigot.
Mounting the coupling plug on the water spigot, see chapter Installing the coupling plug on the water spigot.
Remove the jet nozzle from the spray lance, see chapter Changing the jet nozzle.
Risk of damage!
There is a danger of damaging the nozzle geometry when cleaning the jet nozzle.
Never insert the cleaning needle or other objects into the nozzle opening.
Only apply the cleaning needle to the back of the jet nozzle.
Insert the cleaning needle into the jet nozzle from the rear and loosen the dirt.

Flush the jet nozzle with water from the front and rear.
Fit the jet nozzle onto the spray lance, see chapter Changing the jet nozzle.
Depressurise the device, see chapter Installing the coupling plug on the water spigot.
Remove the high-pressure hose from the high-pressure nozzle and high-pressure gun, see chapter Fit the high-pressure hose to the high-pressure spigot and high-pressure gun.
Replace the sealing rings on the connections of the high-pressure hose.
Remove the spray lance from the high-pressure gun, see chapter Installing the spray lance on the high-pressure gun.
Replace the sealing ring on the front connection of the high-pressure gun.
Risk of injury and damage due to incorrect tyre pressure!
Incorrect tyre pressure can cause the tyre to burst. A burst tyre can cause injuries.
Check the tyre pressure regularly and set it correctly.
Observe the max. tyre pressure indicated on the tyre.
Check the tyre pressure and correct it if necessary, see chapter Technical data.
Malfunctions often have simple causes that you can remedy yourself using the following overview. When in doubt, or in the case of malfunctions not mentioned here, please contact your authorised Customer Service.
The engine does not start.
Cause:
Various causes possible.
Remedy:
See the operating instructions of the engine.
The engine has insufficient power.
Cause:
Various causes possible.
Remedy:
See the operating instructions of the engine.
High-pressure pump not building up pressure.
Cause:
The engine speed is too low.
Remedy:
Check the operating speed of the engine and correct if necessary, see the operating instructions for the engine.
Cause:
The black jet nozzle (SOAP) is installed on the spray lance.
Remedy:
Replace the black jet nozzle (SOAP) with the white, green, yellow or red jet nozzle, see chapter Changing the jet nozzle.
Cause:
The white, green, yellow or red jet nozzle is damaged, blocked or washed out.
Remedy:
Clean the white, green, yellow or red jet nozzle, see chapter Cleaning the jet nozzle (if necessary)or replace it.
Cause:
The water sieve is dirty.
Remedy:
Clean the device water sieve, see chapter Cleaning the water sieve (monthly).
Cause:
Air in the system.
Remedy:
Vent the device, see chapter Vent the device.
Cause:
The water supply quantity is too low.
Remedy:
Open the water tap fully.
Check the water supply quantity and increase if necessary, see chapter Technical data.
Cause:
Supply lines to high-pressure pump leaking or clogged.
Remedy:
Check the supply lines to the high-pressure pump for blockages, damage and leaks and replace if necessary.
Strong pressure fluctuations.
Cause:
The jet nozzle is dirty.
Remedy:
Clean the jet nozzle, see chapter Cleaning the jet nozzle (if necessary).
Cause:
The water supply quantity is too low.
Remedy:
Open the water tap fully.
Clean the device water sieve, see chapter Cleaning the water sieve (monthly).
Check the water supply quantity and increase if necessary, see chapter Technical data.
Device leaking.
Cause:
Minor leakage due to technical reasons.
Remedy:
Minor leakage of the device can occur due to technical reasons and is not a cause for concern.
Cause:
Major leakage.
Remedy:
Contact the authorised Customer Service.
High-pressure hose or connections leaking.
Cause:
The high-pressure hose is damaged.
Remedy:
Shut the device down immediately and replace the high-pressure hose.
Cause:
The sealing rings of the high-pressure hose are damaged or worn.
Remedy:
Replace the sealing rings on the high-pressure hose, see chapter Replacing the sealing rings on the high-pressure hose and high-pressure gun (if necessary).
Cause:
The high-pressure gun sealing ring is damaged or worn.
Remedy:
Replace the high-pressure gun sealing ring with a new one, see chapter Replacing the sealing rings on the high-pressure hose and high-pressure gun (if necessary).
Cause:
The union nut on the water spigot is loose.
Remedy:
Hand-tighten the union nut on the water spigot with an open-end wrench, see chapter Installing the coupling plug on the water spigot.
The high-pressure pump knocks.
Cause:
The supply lines to the high-pressure pump are leaking.
Remedy:
Check the supply lines to the high-pressure pump for leaks and replace if necessary.
Cause:
Air in the system.
Remedy:
Vent the device, see chapter Vent the device.
The detergent is not sucked in.
Cause:
The red, yellow, green or white jet nozzle is installed on the spray lance.
Remedy:
Install the black jet nozzle (SOAP) on the spray lance, see chapter Changing the jet nozzle.
Cause:
The detergent suction hose is kinked, blocked or leaking.
Remedy:
If necessary, route the detergent suction hose without kinks, clean it or replace it.
The warranty conditions issued by our sales company responsible apply in all countries. We shall remedy possible malfunctions on your device within the warranty period free of cost, provided that a material or manufacturing defect is the cause. In a warranty case, please contact your dealer (with the purchase receipt) or the next authorised customer service site.
You can find more detailed information at: www.kaercher.com/dealersearch
Electrical connection | |
Degree of protection | IPX5 |
Internal combustion engine | |
Engine type | Single-cylinder 4-stroke petrol engine, G200F |
Type | Overhead valves (OHV) |
Cooling type | Air-cooled |
Engine capacity | 196 cm3 |
Engine performance | 4.1/5.6 kW/PS |
Engine speed | 3600 1/min |
Fuel type | Petrol, unleaded |
Fuel tank capacity | 3.6 l |
Water connection | |
Feed pressure (max.) | 1.2 (174) MPa (psi) |
Input temperature (max.) | 50 °C |
Input amount (min.) | 9 l/min |
Minimum water supply hose length | 7.5 m |
Minimum water supply hose diameter | 3/4 in |
Device performance data | |
Operating pressure | 19.8 (2872) MPa (psi) |
Operating pressure (max.) | 20.68 (3000) MPa (psi) |
Water flow rate | 9 l/min |
Detergent tank volume | 1.7 l |
High-pressure gun recoil force | 29.85 N |
Dimensions and weights | |
Weight | 35 kg |
Length | 650 mm |
Width | 555 mm |
Height | 1010 mm |
Height, handle folded down | 770 mm |
Tyres | |
Tyre type | TT (tube type) |
Tyre size | 4.10/3.50-4 |
Tyre pressure (max.) | 206 (30) kPa (psi) |
Recommended tyre pressure | 152 (22) kPa (psi) |

2-2-SC-A5-GS-17339