SCV 4 Steam Vac

59793620 (02/26)
59793620 (02/26)
Read this safety chapter and these original instructions before using the device for the first time. Act in accordance with them. Keep the original instructions for future reference or for future owners.
In addition to the notes in the operating instructions, you also need to take into consideration the general safety regulations and accident prevention guidelines applicable by law.
Warnings and information notices attached to the device provide important information for hazard-free operation.
Indication of an imminent threat of danger that will lead to severe injuries or even death.
Indication of a potentially dangerous situation that may lead to severe injuries or even death.
Indication of a potentially dangerous situation that may lead to minor injuries.
Indication of a potentially dangerous situation that may lead to damage to property.
Never touch the mains plug and socket with wet hands.
Do not immerse the device in water.
Only connect the device to alternating current. The voltage indicated on the type plate must match the voltage of the power source.
The mains plug and extension cable connection must not be in water.
Do not clean over floor sockets.
Only connect the device to an electrical connection which has been set up by a qualified electrician as per IEC 60364‑1.
Only operate the device in wet rooms, e.g. bathroom, connected to sockets with upstream residual current device.
Check that the mains connection cable with mains plug is undamaged each time before using the device. To avoid any possible danger, a damaged mains connection cable must be immediately replaced by the manufacturer, or the authorised customer service department or a qualified electrician.
Do not damage the power supply and extension cable by running over it, crushing or yanking it or similar. Protect the power supply cable from heat, oil and sharp edges.
Unsuitable electrical extension cables can be dangerous. Only use electrical extension cables with a splash guard and a diameter of at least 3x1 mm2.
Only replace couplings on the power supply or extension cable with those with the same splash guard and the same mechanical strength.
Disconnect the device from the mains during longer operating breaks, after use or before performing any maintenance work.
Only carry out servicing work when the mains plug is unplugged and the device has cooled down.
The device contains electrical components. Do not clean the device or the top or bottom of the floor head under running water or under a shower spray, otherwise water may enter.
Do not carry/transport the device using the power supply cable.
Do not pull the mains plug out the socket using the power supply cable.
Do not operate the device together with other devices on an extension cable with multiple power sockets.
Have repair work carried out by the authorised customer service only.
Risk of asphyxiation. Keep packaging film out of the reach of children.
Only use the device for its proper use. Take into account the local conditions and beware of third parties, in particular children, when working with the device.
Keep all parts your body (e.g. fingers, hair) away from the rotating cleaning roller.
Adhere to the respective safety regulations in hazard zones (e.g. service stations). Never operate the device in explosive spaces.
Children and persons unfamiliar with these instructions are not allowed to operate the device. The age of the operator may be limited by local restrictions.
The device is not intended for use by children, persons with restricted physical, sensory or mental abilities or persons unfamiliar with these instructions.
Persons with reduced physical, sensory or mental capabilities and persons lacking experience and knowledge may only use the appliance if they are properly supervised, have been instructed on use of the appliance safely by a person responsible for their safety, and understand the resultant hazards involved.
Children must not play with the appliance.
Children must be supervised to prevent them from playing with the appliance.
Keep the device out of the reach of children when it is connected to the mains or when it is cooling down.
Children may only perform cleaning work and user maintenance under supervision.
Risk of injury from sharp objects (e.g. splinters). Protect your hands while cleaning the floor head.
Do not touch the steam cleaning nozzle or adjacent surfaces during steam cleaning or when the nozzle is heated.
Do not direct the steam at people or animals.
Do not use the appliance if it has been dropped beforehand, is visibly damaged or if it is leaking.
Only operate or store the device in accordance with the description or figure.
Accidents or damage due to the device falling over. Before all actions with or on the device, you must make sure that it is stable.
Never leave the device unsupervised while it is in operation.
Stop operation immediately if the device overheats, makes unusual sounds, produces unusual odours or has a low suction performance.
The feet can become hot during use.
Device damage. Never fill the water reservoir with solvents, liquids containing solvents or undiluted acids (e.g. detergents, petrol, paint thinners and acetone).
Do not fill the fresh water container with vinegar, decalcification agents, essential oils or similar substances. Avoid taking up these substances with the device.
Only switch on the device when the fresh water tank, waste water tank and decalcification cartridge are installed.
Do not pick up sharp or larger objects with the device, such as e.g. glass shards, gravel or toy parts.
Do not use the device to vacuum up hazardous materials and chemicals, such as solvents, drain cleaners, strong acids or bases.
Do not use the device to vacuum up ultra-fine particles such as limescale, cement, sawdust, gypsum powder or ash.
Do not use the device to clean leather, waxed furniture or floors, synthetic fibres, velvet or other sensitive / steam-sensitive materials.
Do not guide the device over the floor grilles of convection heating systems. The device cannot vacuum up the escaping water when it is guided over a floor grille.
Do not introduce any objects into the openings. Do not use the device if the openings are blocked. Make sure to keep them free of dust, fluff, hair and anything that could obstruct the airflow.
Do not operate the device at temperatures below 0 °C.
In case of longer work breaks and after use, switch off the device at the main switch / power switch and unplug the mains plug.
Do not place the device in standing water or submerge it, and do not clean flooded areas.
Clean the wastewater container after each use to avoid possible blockages, which can lead to low suction performance, overheating of the motor or a reduced service life of the device.
Protect the device from rain. Do not store the device outdoors.
Risk of injury due to missing or modified safety devices!
Safety devices are provided for your own protection.
Do not bypass, remove or render ineffective any safety devices.In the case of excessively high pressure in the event of a fault, a safety valve relieves the pressure into the atmosphere.
The fuse prevents the device from overheating. If the device overheats, steam operation is switched off. The device can still be used for dry cleaning.
Before restarting the device, contact the responsible KÄRCHER Customer Service.
 The packing materials can be recycled. Please dispose of packaging in accordance with the environmental regulations.
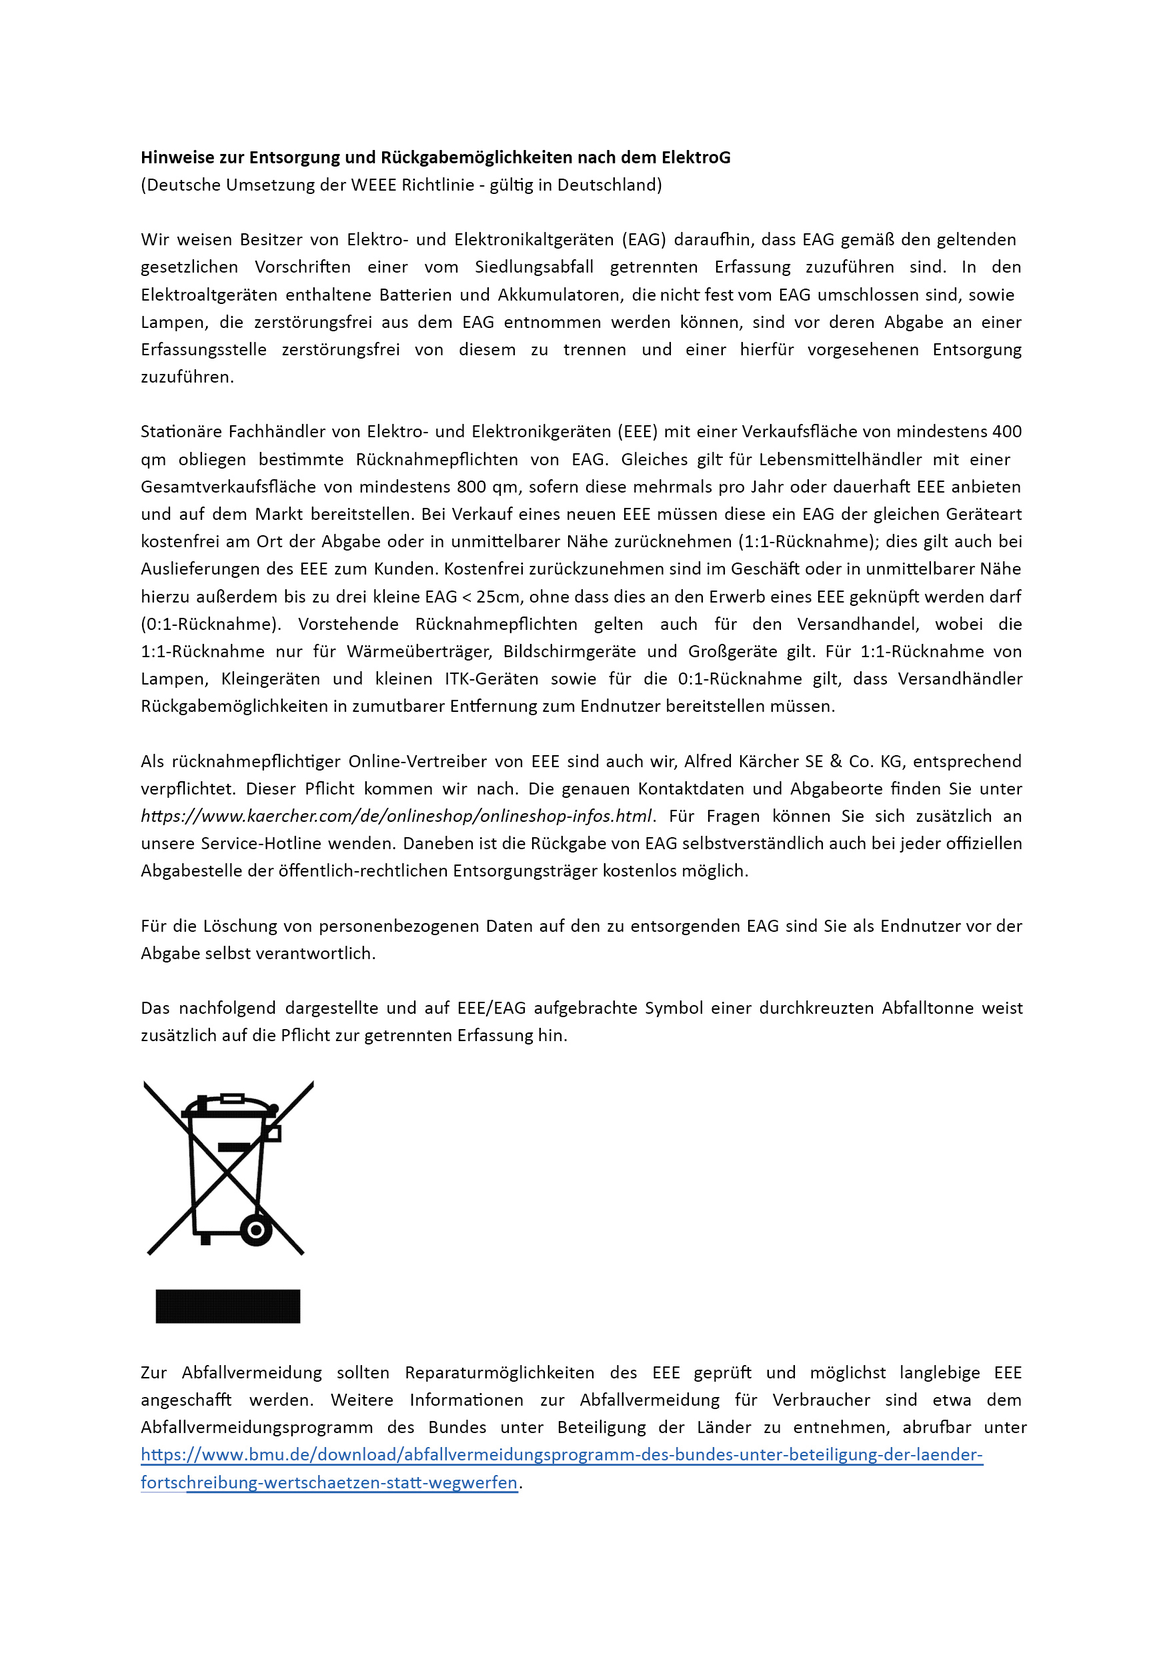
 Electrical and electronic devices contain valuable, recyclable materials and often components such as batteries, rechargeable batteries or oil, which - if handled or disposed of incorrectly - can pose a potential danger to human health and the environment. However, these components are required for the correct operation of the device. Devices marked by this symbol are not allowed to be disposed of together with the household rubbish.
Current information on content materials can be found at: www.kaercher.de/REACH
Use the device only in private households for cleaning level hard floors (e.g. stone floors, tiles, PVC floors, parquet, vinyl and laminate) that can withstand the high temperature, pressure and moisture of the device. Do not clean water-sensitive floor coverings such as untreated cork floors, as moisture can penetrate and damage the floor.
The device is also suitable for vacuuming carpets.
To avoid damaging the carpet, check whether the carpet is suitable before cleaning. If in doubt, test on an inconspicuous area to rule out colour changes, for example.
Detergents are not required.
Only use original accessories and original spare parts. They ensure that the appliance will run fault-free and safely.
Information on accessories and spare parts can be found at www.kaercher.com.
The scope of delivery for the appliance is shown on the packaging. Check the contents for completeness when unpacking. If any accessories are missing or in the event of any shipping damage, please notify your dealer.
The maximum amount of equipment is described in these operating instructions. Depending on the model used, there are differences in the scope of delivery (see packaging).
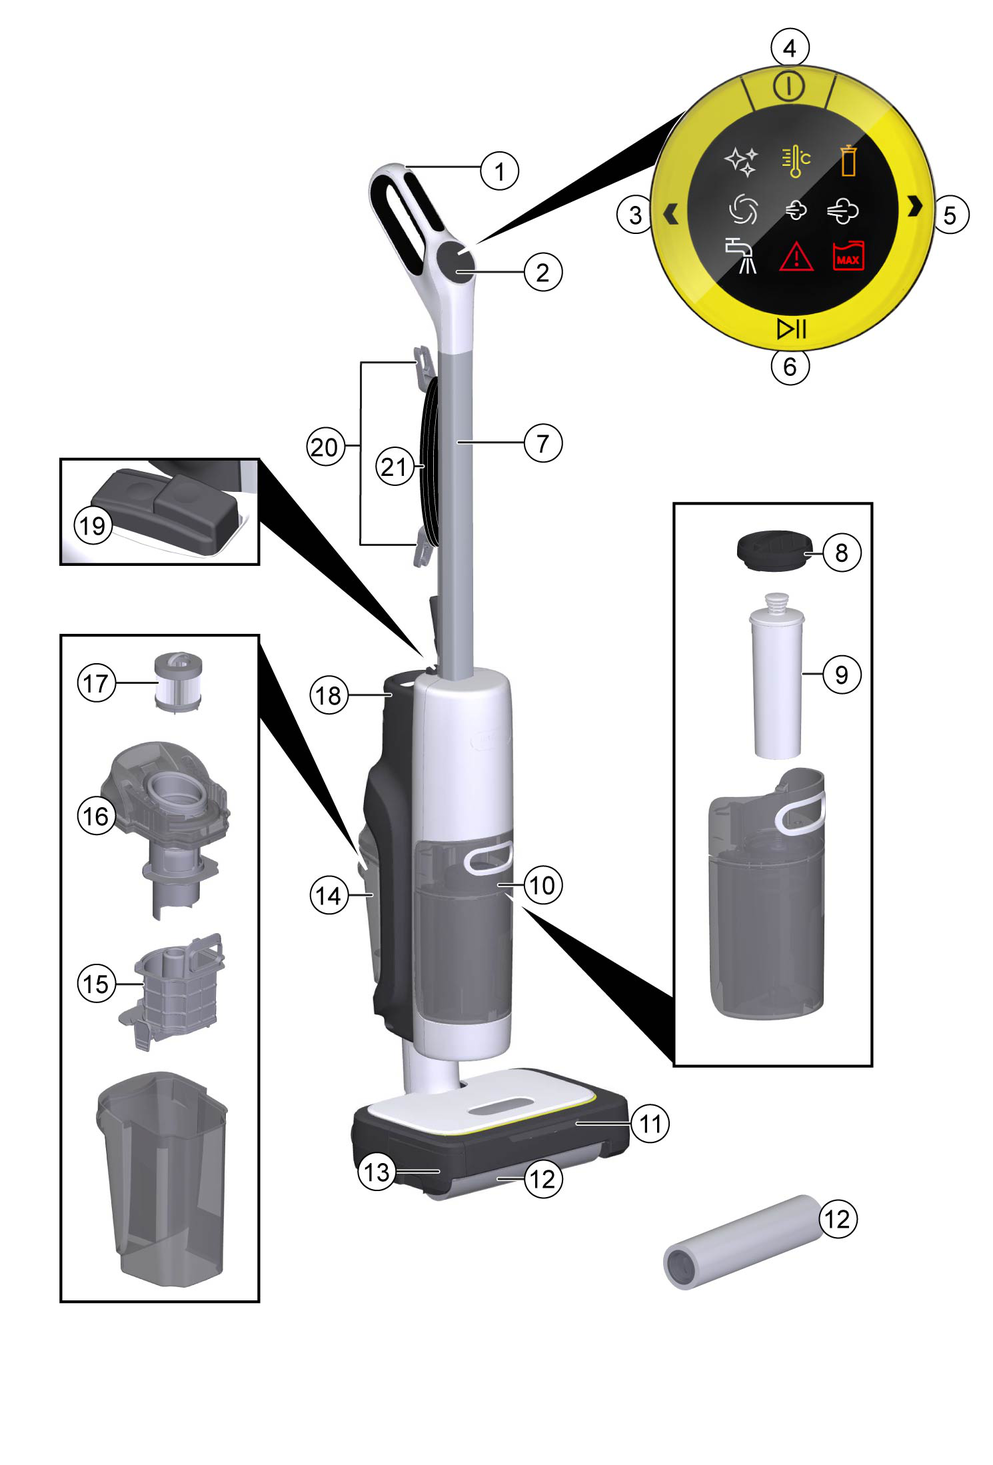
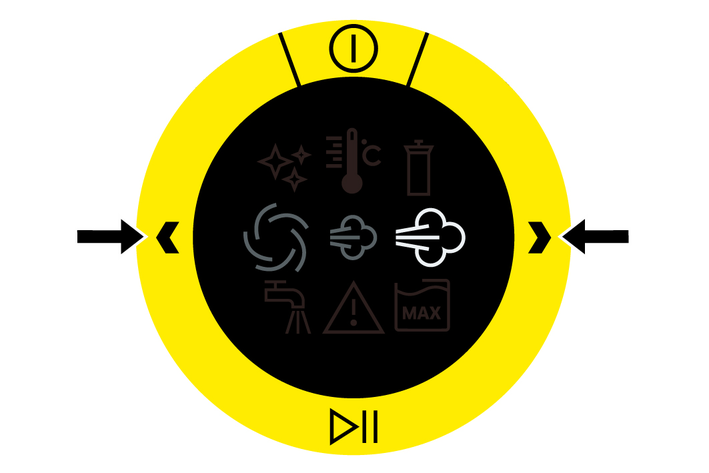
Symbol | Description |
|---|---|
 | The device is performing self-cleaning. |
 | The device is being heated up. |
 | The decalcification cartridge must be replaced, see Troubleshooting guide. |
 | The device is being operated in suction mode. |
 | The device is being operated in sensitive steam mode. The steam volume is lower. |
 | The device is being operated in regular steam mode. |
 | The fresh water tank is empty. |
 | A fault has occurred, see Troubleshooting guide. |
 | The waste water tank is full. |
The device functions as a steam cleaner, hard floor cleaner and vacuum cleaner, thus offering a 3-in-1 solution for all types of coarse and fine dirt.
The rotating roller is moistened with steam and cleans a wide variety of floor types and carpets effectively and quickly.
Detergents are not required.
Device damage
The handle components can be damaged by repeated removal.
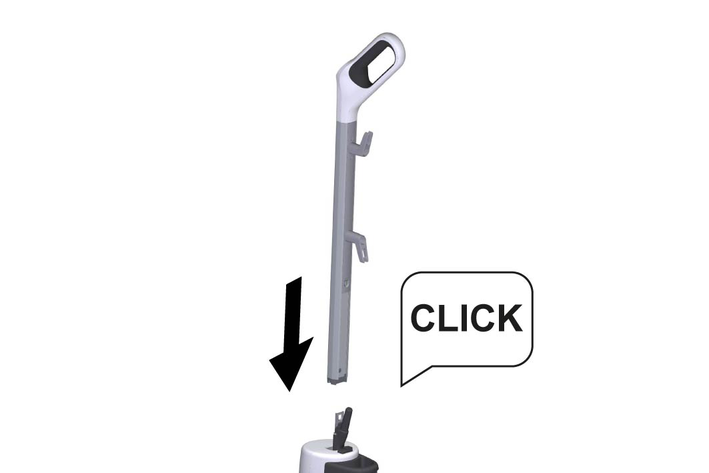
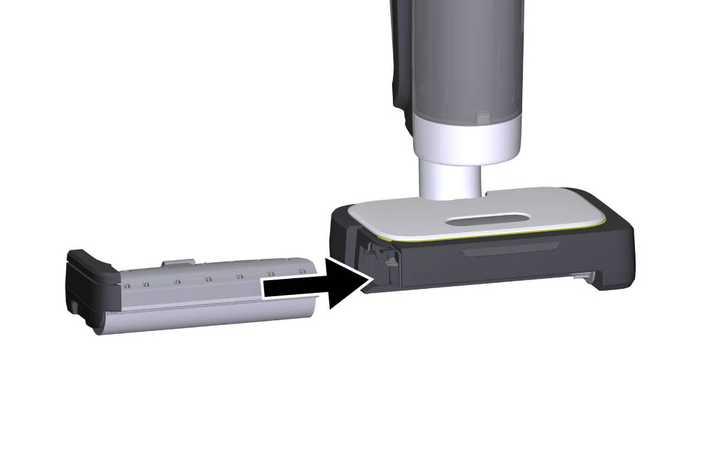
Do not remove the handle from the basic unit once it has been assembled.The handle may only be removed from the basic device if the device is sent out for service purposes.Hold the basic device firmly.
Insert the handle bar into the basic unit as far as it will go, until it audibly clicks into place. The handle bar must sit firmly in the device.
Device damage due to calcification
The decalcification cartridge only works properly if you set the device to the local water hardness before operating it for the first time.
Set the device to the local water hardness.Set the device to the current water hardness before using it in an area with a different water hardness (e.g. after a move).Grasp the fresh water tank by the recessed grip and remove it from the device.
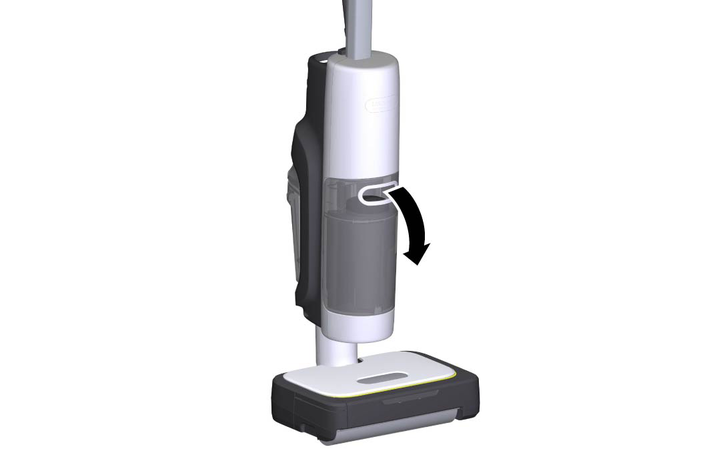
Unscrew the fresh water tank cap.
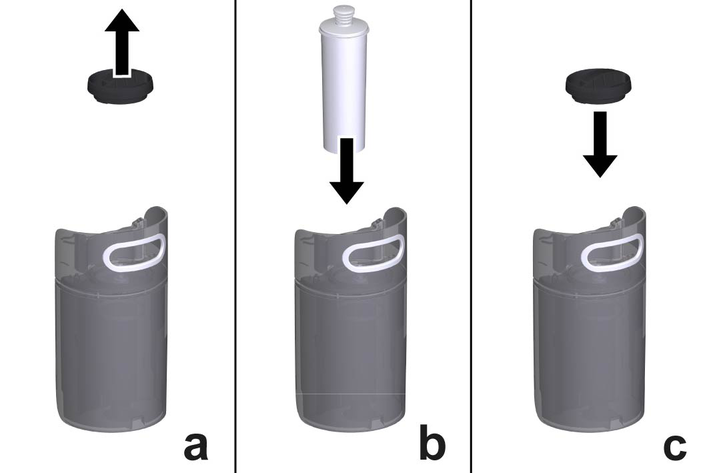
Insert the decalcification cartridge into the water reservoir and press it firmly into place.
Screw the fresh water tank cap back on.
Insert the fresh water tank.
When steaming for the first time after removing and reinserting the decalcification cartridge, the steam jet may be weak or irregular, and individual drops of water may be expelled. The device requires a short running-in period in which the decalcification cartridge fills with water. The steam volume that is expelled increases constantly until the maximum steam volume has been reached after approx. 30 seconds.
Press the unlocking button on the roller cassette.
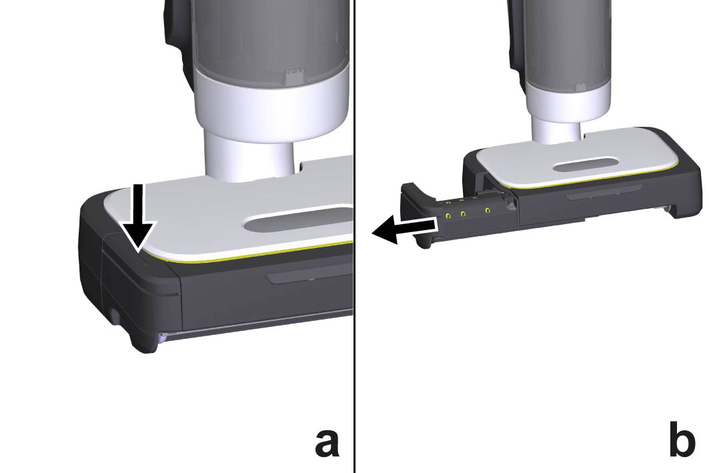
The roller cassette can be detached from the floor head.
Remove the roller cassette.
Push the cleaning roller into the roller cassette mount. Pay attention to the colour coding on the inner side of the roller and on the mount on roller cassette (pink to pink).
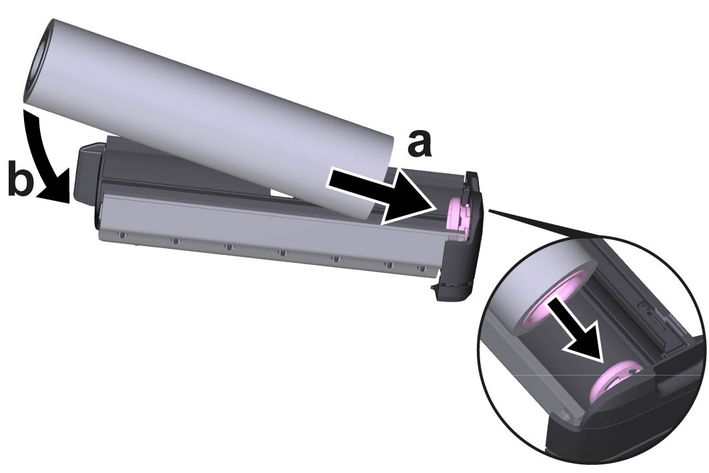
Insert the roller cassette into the floor head.
Risk of electric shock
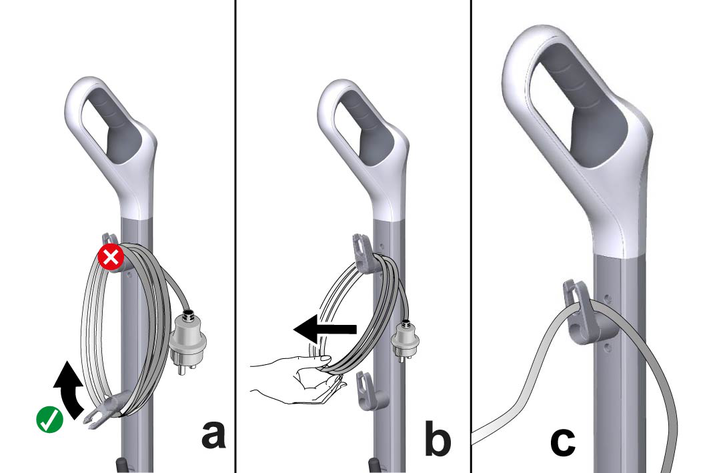
If the power cable is not completely unwound, the danger exists of you straining and damaging the mains cable by overestimating the range of the cable.
Always completely unwind the power cable.The lower cable hook can be rotated by 360° for removing the cable. The upper cable hook cannot be rotated.
Turn the lower cable hook upwards.
Remove the power cable completely from the cable hook.
Fasten the cable in the fastener of the upper or lower cable hook to prevent it from being run over during cleaning work.
Material damage through open reservoir cover or incorrectly seated or loose water reservoir
Liquid can escape and damage the floor covering if the reservoir cover is not correctly closed or the water reservoir is not correctly inserted into the device.
Take care to ensure that the reservoir cover is securely closed and the water reservoir is seated tightly in the device when the water reservoir is full.Damage to the device
Unsuitable water can block the nozzles.
Do not use condensation from the clothes dryer for filling.Do not use collected rain water for filling.Do not use detergents or other additives (e.g. scents or vinegar) for filling.The decalcification cartridge must be installed in the water reservoir when filling the water reservoir.
Grasp the fresh water tank by the recessed grip and remove it from the device.
Unscrew the fresh water tank cap.
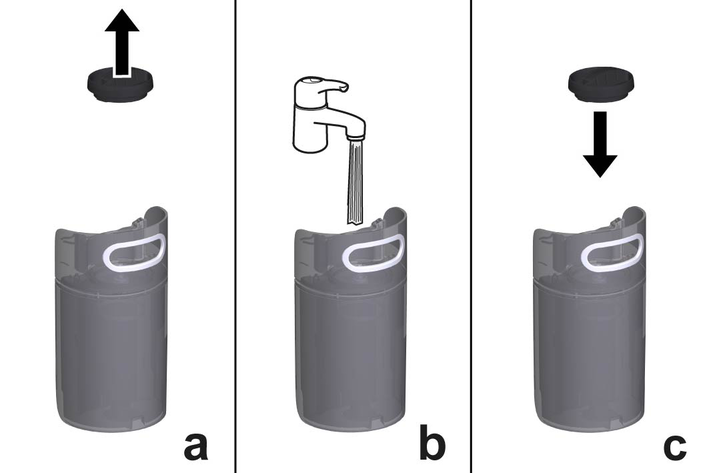
Fill the fresh water tank with tap water.
Screw the fresh water tank cap back on.
Insert the fresh water tank.
Moisture
Material damage to sensitive floors
Check the surface to be cleaned for water sensitivity at an inconspicuous location before using the device. Do not clean water-sensitive floor coverings such as e.g. untreated cork floors, since the moisture can penetrate and damage the floor.Material damage
Material damage to the device from large, pointed, bulky objects.
The device must not be stored or used on hard, coarse dirt or objects, as the parts can become jammed under the cleaning roller and scratch the floor.Before starting work and storing the device, remove objects such as shards, pebbles, screws or toy parts from the floor.Floor cleaning is performed using a to and fro movement at the same speed as when vacuuming.
To ensure thorough cleaning, the cleaning textile must be completely moistened and heated. To do this, use the device for at least 3 minutes in regular steam mode.
For heavier soiling, select the regular steam mode, see Selecting cleaning mode.
Material damage due to rollers
The different rollers (yellow, grey, black) can damage the floor covering.
To avoid damage, test the device in an inconspicuous place before use.The colour of the rollers shows which application they are especially suitable for.
Yellow universal roller: versatile use
Roller with grey stripes: Cleaning carpets
Rollers with black stripes: Cleaning of insensitive hard floors (e.g. stone, ceramics); not suitable for sensitive natural stone floors (e.g. marble, terracotta)
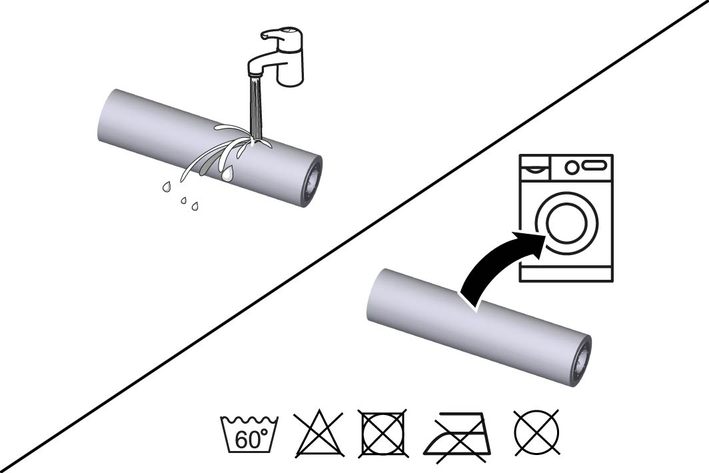
For an optimum cleaning result, wash the roller in the washing machine at 60 °C before initial use.
Material damage due to loose roller
This may damage the washing machine.
Place the roller in a laundry net and load the washing machine with extra laundry.Device and material damage due to tipping over
The device can fall over and be damaged if inadequately secured during work breaks or storage. Liquid can also leak out and damage the floor covering in the process.
Place the device with the floor nozzle on a firm surface.Material damage
Steam can loosen wax, furniture polish, plastic coatings or paint and edge band from edges.
Do not direct the steam at glued laminated edges as the edge band may loosen.Do not use the device for cleaning unsealed wood or parquet floors.Do not use the device for cleaning painted or plastic-coated surfaces such as kitchen or living room furniture, doors or parquet.Soiling of carpets due to the use of a dirty roller
When cleaning carpets, the dirt trapped in the roller can be transferred to the carpets.
Use a clean roller for cleaning carpets.Material damage due to prolonged steaming
Marble floors may become slightly cloudy if an area is subjected to prolonged steaming.
Make sure to keep the device in constant motion when steaming marble floors.Empty and clean the waste water tank after each use of the device, even if the corresponding symbol does not light up on the HMI display.
Plug the mains plug into a mains socket.
Press the ON / OFF switch on the device.
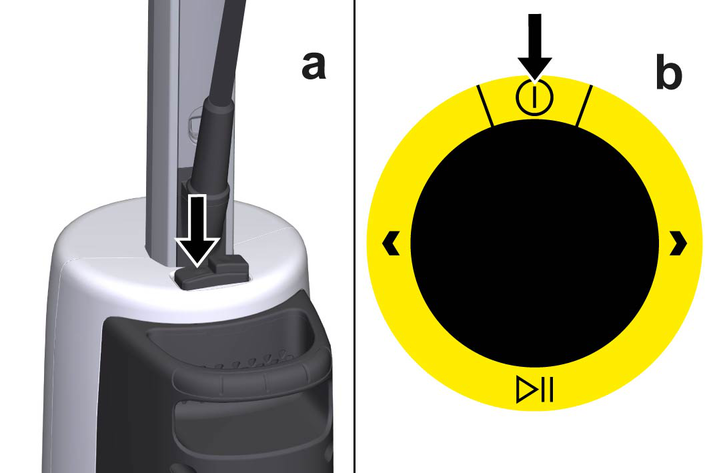
Press the On / Off button on the HMI display.
The symbols for the cleaning modes flash on the HMI display.
The device is being heated up. The corresponding symbol appears on the HMI display and goes out as soon as the device has heated up completely.
Use the navigation buttons to select the desired cleaning mode, see Selecting cleaning mode.
Various cleaning modes are available:
| Vacuuming |
| Regular steam mode |
 | Combination of vacuuming and steam cleaning (regular steam mode) |
 | Combination of vacuuming and steam cleaning (sensitive steam mode) |
Use the navigation buttons to select the desired cleaning mode.
After selecting the cleaning mode, press Start / pause button to start cleaning.
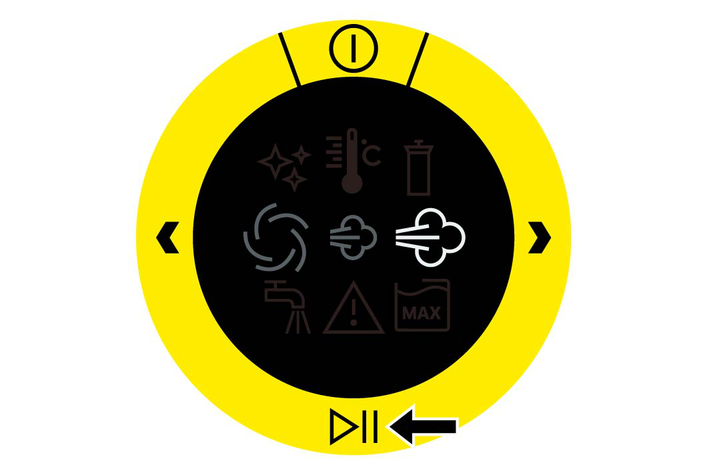
To pause cleaning, press Start / pause button.
If the device is not used for longer than 2 minutes, it automatically switches to standby mode.
If the fresh water tank is empty, the corresponding symbol appears on the HMI display, see Symbols on the display.
Do not remove the decalcification cartridge from the fresh water tank for the process.
Fill the fresh water tank, see Filling the fresh water tank.
If the waste water tank is full, the corresponding symbol appears on the HMI display, see Symbols on the display.
Hold the pressure cap of the waste water tank by the lower handle bar, while pressing the upper handle bar down with your thumb and remove the waste water tank.
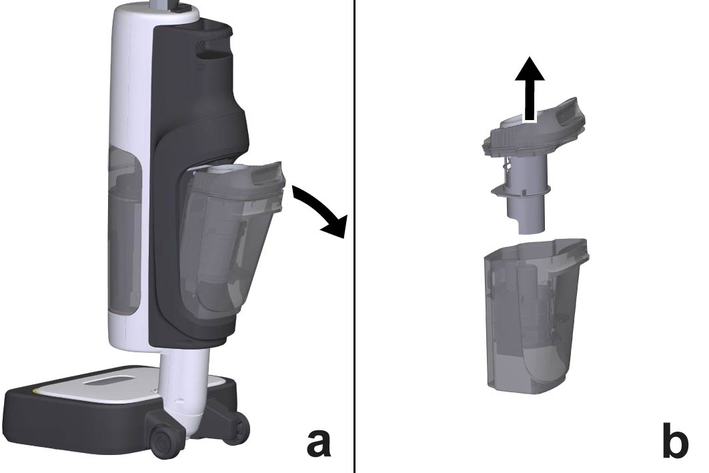
Remove the waste water tank cap.
Remove the coarse dirt strainer basket and press the side clamps to release the lower part.
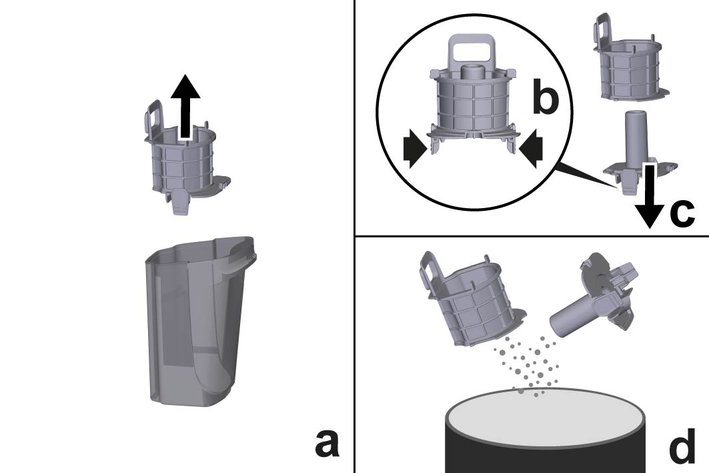
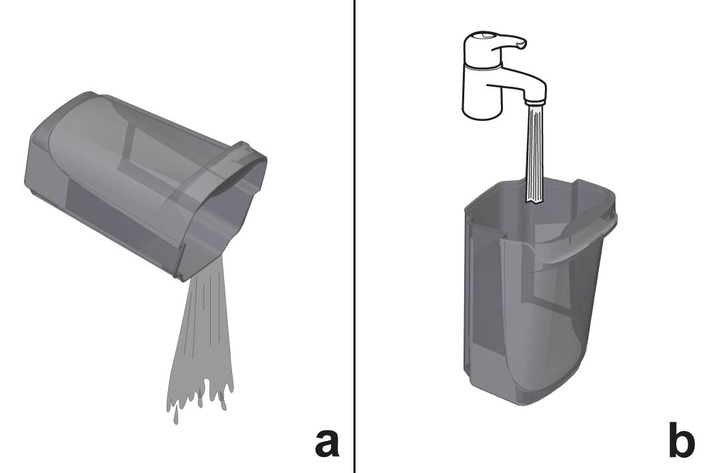
Empty both parts of the coarse dirt strainer basket. In the case of stubborn dirt, rinse out both parts with tap water.
Empty the waste water tank. In the case of stubborn dirt, rinse out the waste water tank with tap water.
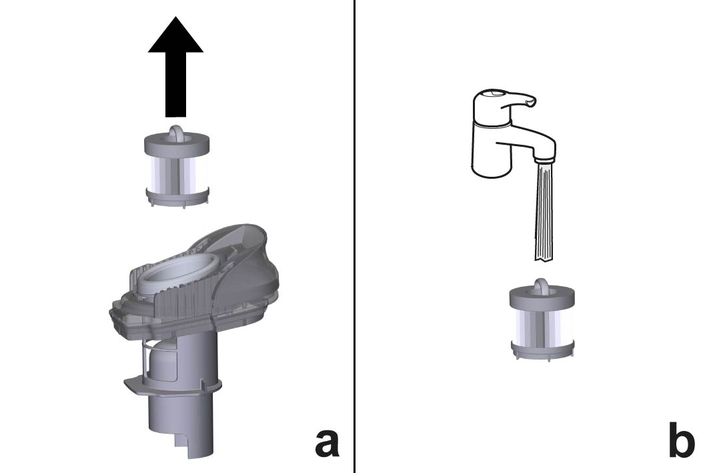
Also check the filter in the waste water tank cap for dirt and rinse it out with tap water if necessary.
Allow the individual parts of the waste water tank to dry.
Assemble both parts of the coarse dirt strainer basket and insert into the waste water tank.
Fit the waste water tank cap.
Insert the waste water tank into the device.
In order to save energy, we recommend that you switch off the device for breaks in operation of longer than 20 minutes.
Press the On / Off button on the HMI display.
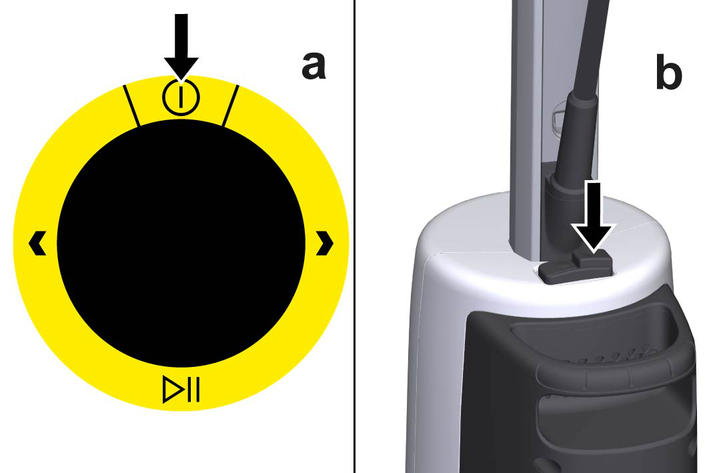
Press the ON / OFF switch on the device.
The device is switched off.
Pull the mains plug out of the socket.
Remove the power cable from the cable hook fastener.
Turn the lower cable hook downwards.
Wind the power cord around the cable hooks.
Device damage due to water putrefaction
The water in the reservoir may putrefy if the device is not put into operation for more than 2 months.
Empty both the fresh water and waste water tanks before long breaks in operation.Empty the waste water tank, see Emptying the waste water tank.
Empty the fresh water tank, see Emptying the fresh water tank.
Do not remove the decalcification cartridge from the fresh water tank for the process.
Grasp the fresh water tank by the recessed grip and remove it from the device.
Unscrew the fresh water tank cap.
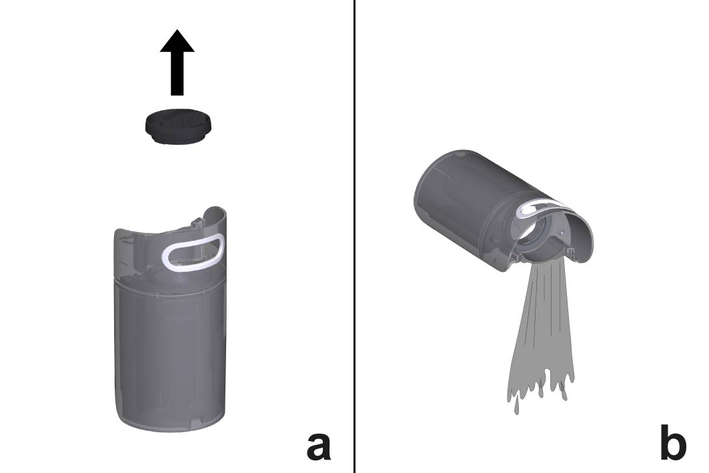
Empty the fresh water tank.
Screw the fresh water tank cap back on.
Insert the fresh water tank.
Material damage due to moisture
The floor covering can be damaged by moisture remaining on the cleaning roller after cleaning.
After cleaning, remove the cleaning roller and allow it to dry.Do not place or store the device on heat-sensitive surfaces.Store the device in the parking and cleaning station.Material damage
The device can tip over if it is put down incorrectly.
Do not put the device down with the handle turned.Do not lean the device against furniture or other objects.Remove and clean the cleaning roller, see Cleaning the cleaning roller.
Insert the roller cassette into the device or place it in the parking and cleaning station to dry.
Park the device in the parking and cleaning station.
The device must be placed upright in an upright position. When parking, the device body must make contact with the magnet on the floor nozzle. This can be perceived acoustically.
Store the device in a dry location that is protected from frost.
Frequent removal of the handle
The handle components can be damaged by repeated removal.
Do not remove the handle from the basic device after assembly.The handle may only be removed from the basic device when the device is sent out for service purposes.Insert the screwdriver at a 90° angle into the small opening on the rear of the handle bar and remove the handle bar.
Device damage due to calcification
Without a decalcification cartridge, the device may calcify if the water hardness is set incorrectly.
Always work with a decalcification cartridge.Set the device to the local water hardness.Set the device to the current water hardness before using it in an area with a different water hardness (e.g. after a move).Your water board or municipal utilities authority can provide information on hardness of tap water.
The water hardness is set using the Navigation button “left” in pause mode. The water hardness setting is stored until a new setting is made (e.g. after a move). The device is set to water hardness level III at the factory. The device indicates the set water hardness with flash pulses.
Hardness range | °dH | mmol/l | Number of flash pulses | |
|---|---|---|---|---|
I | Soft | 0-7 | 0-1,3 | 1x |
II | Medium | 7-14 | 1,3-2,5 | 2x |
III | Hard | 14-21 | 2,5-3,8 | 3x |
IV | Very hard | >21 | >3,8 | 4x |
The anti-calcification effect of the decalcification cartridge is activated as soon as the reservoir is filled with water, and the device is put into operation. Lime in the water is absorbed by the granulate in the decalcification cartridge. Additional descaling is not required.
The granulate in the cartridge may change colour after it comes into contact with water. This depends on the mineral content in the water. This discolouration is harmless and does not have a negative effect on the device, cleaning work or the functionality of the decalcification cartridge.
Switch on the device, see Switching off the device.
To set the desired water hardness, press and hold the Navigation button “left” for 4 seconds, then release it.
The new setting is signalled by the number of flashing pulses by the descaling cartridge symbol on the HMI display .
If necessary, press the Navigation button “left” again to cycle between the different water hardness levels until the desired water hardness level is reached.
Detergent residues from previous floor cleaning
Previous floor cleaning can leave detergent residues on the floor, which can lead to foaming in the cleaning roller.
Wash the cleaning roller under running water or in a washing machine after each use.Damage caused by washing the cleaning roller with fabric softener or using a tumble dryer
Damage to the microfibres
Do not use fabric softener when cleaning in a washing machine.Do not dry the roller in a tumble dryer.Material damage due to loose roller
This may damage the washing machine.
Place the roller in a laundry net and load the washing machine with extra laundry.Press the unlocking button on the roller cassette.
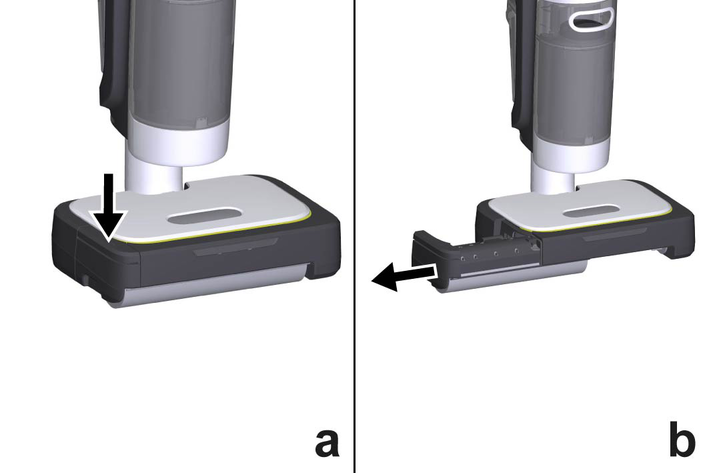
The roller cassette detaches from the device.
Remove the roller cassette.
Remove the cleaning roller from the roller cassette.
Clean the cleaning roller under running water or wash it in the washing machine at max. 60 °C.
Rinse the roller cassette with tap water.
Insert the roller cassette into the device or place it in the parking and cleaning station to dry.
Allow the cleaning roller to air dry.
Device damage and shortened service life
If the replacement intervals (indicator light) for the decalcification cartridge are not observed, there is a risk of device damage and the service life of the device may be shortened.
Observe the replacement intervals (indicator light).The replacement intervals depends on the local water hardness. Areas with hard water (e.g. III/IV) have a higher replacement interval than areas with soft water (e.g. I/II).
Grasp the fresh water tank by the recessed grip and remove it from the device.
Unscrew the fresh water tank cap.
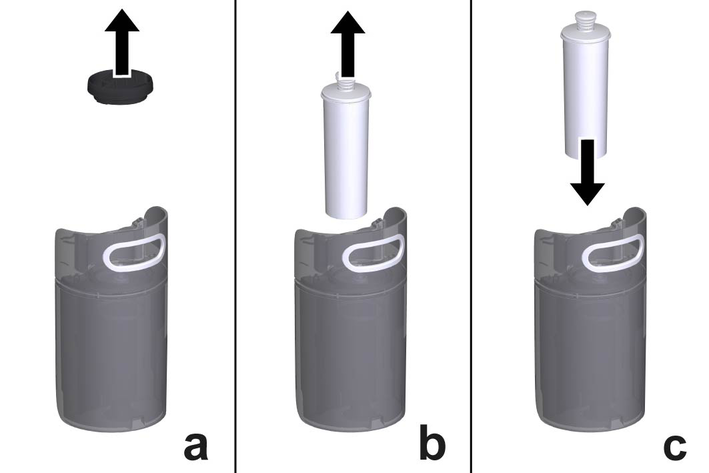
Remove the decalcification cartridge from the water reservoir.
Insert the new decalcification cartridge into the water reservoir and press it firmly into place.
Fill the fresh water tank, see Filling the fresh water tank.
Reset the new decalcification cartridge on the device.
Switch the device on.
While the device is in pause mode, press and hold the Navigation button “right” for 5 seconds.
The decalcification cartridge symbol flashes in the meantime.
If the decalcification cartridge has been successfully reset, the decalcification cartridge symbol flashes green 1x.
When steaming for the first time after removing and reinserting the decalcification cartridge, the steam jet may be weak or irregular, and individual drops of water may be expelled. The device requires a short running-in period in which the decalcification cartridge fills with water. The steam volume that is expelled increases constantly until the maximum steam volume has been reached after approx. 30 seconds.
Odour development due to accumulation of dirt or bacteria
If the device is not cleaned after operation, the accumulation of dirt and bacteria can result in the development of unpleasant odours in the device.
On completion of work, place the device in the parking and cleaning station and start self-cleaning.Clean the floor head in the cleaning station only by using automatic self-cleaning and not by pouring water into the station separately. Make sure that the waste water tank is inserted. Do not clean the device or the top or bottom of the floor head under running water or under a shower spray, otherwise water may enter.Self-cleaning can only be carried out when the device is switched on.
Empty and reinsert the waste water tank, see Emptying the waste water tank.
Fill the fresh water tank with min. 200 ml, see Filling the fresh water tank.
Park the device in the parking and cleaning station.
Press and hold the Start / pause button for 3 seconds to start self-cleaning.

The self-cleaning symbol on the HMI display flashes.
The LED lighting on the floor head flashes.
The rinsing process begins and takes about 3 minutes.
Once the rinsing process is complete, the LED lighting and the self-cleaning symbol on the HMI display go out.
Empty the waste water tank, see Emptying the waste water tank.
Clean the cleaning roller, see Cleaning the cleaning roller.
Clean the underside of the floor head and the roller drive with a moist cloth.
Empty and dry the parking and cleaning station.
If there is still water in the fresh water tank, empty the fresh water tank, see Emptying the fresh water tank.
Malfunctions often have simple causes that you can remedy yourself using the following overview. When in doubt, or in the case of malfunctions not mentioned here, please contact your authorized Customer Service.
No steam / little steam despite sufficient water in the fresh water tank
The decalcification cartridge symbol on the HMI display lights up orange
The decalcification cartridge symbol on the HMI display lights up red
The fresh water tank symbol on the HMI display lights up white
The fresh water tank symbol on the HMI display flashes green
The waste water tank symbol on the HMI display lights up red
The warning triangle symbol on the HMI display lights up red
No steam / little steam despite sufficient water in the fresh water tank
Cause:
The decalcification cartridge has not been inserted or has been inserted incorrectly.
Remedy:
Fit the decalcification cartridge and/or check that the decalcification cartridge sits tightly in the fresh water tank and press in again if necessary.
Cause:
The decalcification cartridge has been removed when filling with water and/or a new decalcification cartridge has been fitted.
Remedy:
Always leave the decalcification cartridge in the fresh water tank during filling.
The decalcification cartridge symbol on the HMI display lights up orange
Cause:
The service life of the decalcification cartridge ends in 2 h.
Remedy:
Replace the descaling cartridge before its service life ends, see Replacing the decalcification cartridge.
The decalcification cartridge symbol on the HMI display lights up red
Cause:
The service life of the decalcification cartridge ends in 1 h.
Remedy:
Replace the descaling cartridge before its service life ends, see Replacing the decalcification cartridge.
The decalcification cartridge symbol on the HMI display flashes red
and the device can only be operated in suction modeCause:
The decalcification cartridge must be replaced.
Remedy:
Replace the decalcification cartridge, see Replacing the decalcification cartridge.
The fresh water tank symbol on the HMI display lights up white
Cause:
The fresh water tank is empty.
Remedy:
Fill the fresh water tank, see Filling the fresh water tank.
The fresh water tank symbol on the HMI display flashes green
Cause:
The system ventilation is active.
Air can enter the system when the fresh water tank or descaling cartridge is removed. This disturbs the vapour discharge. After filling the fresh water tank and restarting the cleaning process, the device vents itself automatically and displays this process on the HMI display. Air is removed from the water and steam pipes and the vapour function is restored.
The device can be used for cleaning while the system ventilation is active. The vapour discharge can be irregular.
Remedy:
Do not interrupt the system ventilation.
After successful venting, the green flashing fresh water tank symbol goes out.
The waste water tank symbol on the HMI display lights up red
Cause:
The waste water tank is full.
Remedy:
Empty the waste water tank, see Emptying the waste water tank.
The warning triangle symbol on the HMI display lights up red
Cause:
The cleaning roller is jammed.
Remedy:
Check the cleaning roller for objects jamming it.
If necessary, remove the cleaning roller.
Remove the objects jamming it.
Reinsert the cleaning roller into the device.
The warning triangle symbol on the HMI display lights up red,
cleaning cannot be started and the housing is hotCause:
The device is overheated.
Remedy:
Allow the device to cool down.
Only switch on the device again when it has cooled down accordingly.
The warning triangle symbol and the waste water tank symbol on the HMI display flash red after the device has been switched on
Cause:
The fill level sensor of the waste water tank is defective. However, the device can still be used for cleaning.
Remedy:
Contact the authorized Customer Service.
If the device continues to be used for cleaning in the meantime, empty and clean the waste water tank manually.
The dirt intake does not work and the floor is very damp
Cause:
The suction channel, the suction pipe or the inlet to the waste water tank may be blocked by foreign objects.
Remedy:
Remove the cleaning roller, the suction channel and the waste water tank.
Empty the waste water tank.
Check all parts of the waste water tank for permeability and remove any foreign bodies and dirt.
Clean the suction channel and remove any foreign bodies. To do this, remove the roller cassette and check the circular opening for foreign objects.
Check the suction hose in the device for free movement.
Carry out self-cleaning after each use of the device.
The wastewater container is filled beyond the filling limit
Cause:
The sensor on the dirt receptacle is dirty and cannot detect the filling limit.
Remedy:
Switch off the device.
Pull the mains plug out of the socket.
Remove the waste water tank and clean.
Clean the sensor on the device on the underside of the waste water tank and inside the waste water tank with a damp cloth.
The warning triangle symbol on the HMI display lights up red and
cleaning can no longer be started after several attemptsCause:
The device is damaged.
Remedy:
Contact the authorized Customer Service.
All symbols on the HMI display light up red
Cause:
The connection to the display is faulty.
Remedy:
Switch off the device.
Pull the mains plug out of the socket.
Ensure that the handle bar is properly connected to the device.
If necessary, dismantle the handle bar and remove any foreign objects.
Install the handle bar.
Plug the mains plug into the socket.
Switch the device on.
The warranty conditions issued by our relevant sales company apply in all countries. We shall remedy possible malfunctions on your appliance within the warranty period free of cost, provided that a material or manufacturing flaw is the cause. In a warranty case, please contact your dealer (with the purchase receipt) or the next authorised customer service site.
Further information can be found at: www.kaercher.com/dealersearch
Further warranty information (if available) can be found in the service area of your local KÄRCHER website under "Downloads".
Electrical connection | |
Voltage | 220-240 V |
Phase | 1 ~ |
Frequency | 50-60 Hz |
Protection type | IPX4 |
Protection class | I |
Device performance data | |
Heating capacity | 1300 W |
Nominal power consumption | 1600 W |
Heating-up time | 30 Seconds |
Steam volume (sensitive mode) | 10 g/min |
Steam volume (regular mode) | 30 g/min |
Run time per tank filling (sensitive mode) | 50 min |
Run time per tank filling (regular mode) | 16,5 min |
Filling quantity | |
Fresh water tank capacity | 0,5 l |
Waste water tank capacity | 0,2 l |
Volume coarse dirt filter basket | 0,15 l |
Dimensions and weights | |
Cable length | 8 m |
Weight | 7,15 kg |
Length | 250 mm |
Width | 300 mm |
Amount | 1220 mm |