DS 1 BT SDS 1 BKM S
######### (03/23)
######### (03/23)
 Read these original operating instructions and the enclosed safety instructions before using the device for the first time. Proceed accordingly.
Keep both books for future reference or for future owners.
Indication of an imminent threat of danger that will lead to severe injuries or even death.
Indication of a potentially dangerous situation that may lead to severe injuries or even death.
Indication of a potentially dangerous situation that may lead to minor injuries.
Indication of a potentially dangerous situation that may lead to damage to property.
Risk of asphyxiation. Keep packaging film out of the reach of children.
Risk of burns, poisoning and explosion. Do not mix chemical cleaning products. Observe the manufacturer's safety data sheet for the cleaning agent when using cleaning agents.
Only use the device for its proper use. Take into account the local conditions and beware of third parties, in particular children, when working with the device.
Risk of injury from the cleaning agent. Follow the safety instructions for the cleaning agent and wear safety goggles and protective gloves when handling cleaning agents.
Only dispense cleaning agents into suitable containers.
Safety devices are provided for your own protection. Never modify or bypass safety devices.
Always assemble the device according to these instructions.
Ensure that all the components are screwed tight or locked
Only use the detergents recommended by the manufacturer and observe the application, disposal and warning instructions of the detergent manufacturers.
Keep the device clean to ensure proper operation.
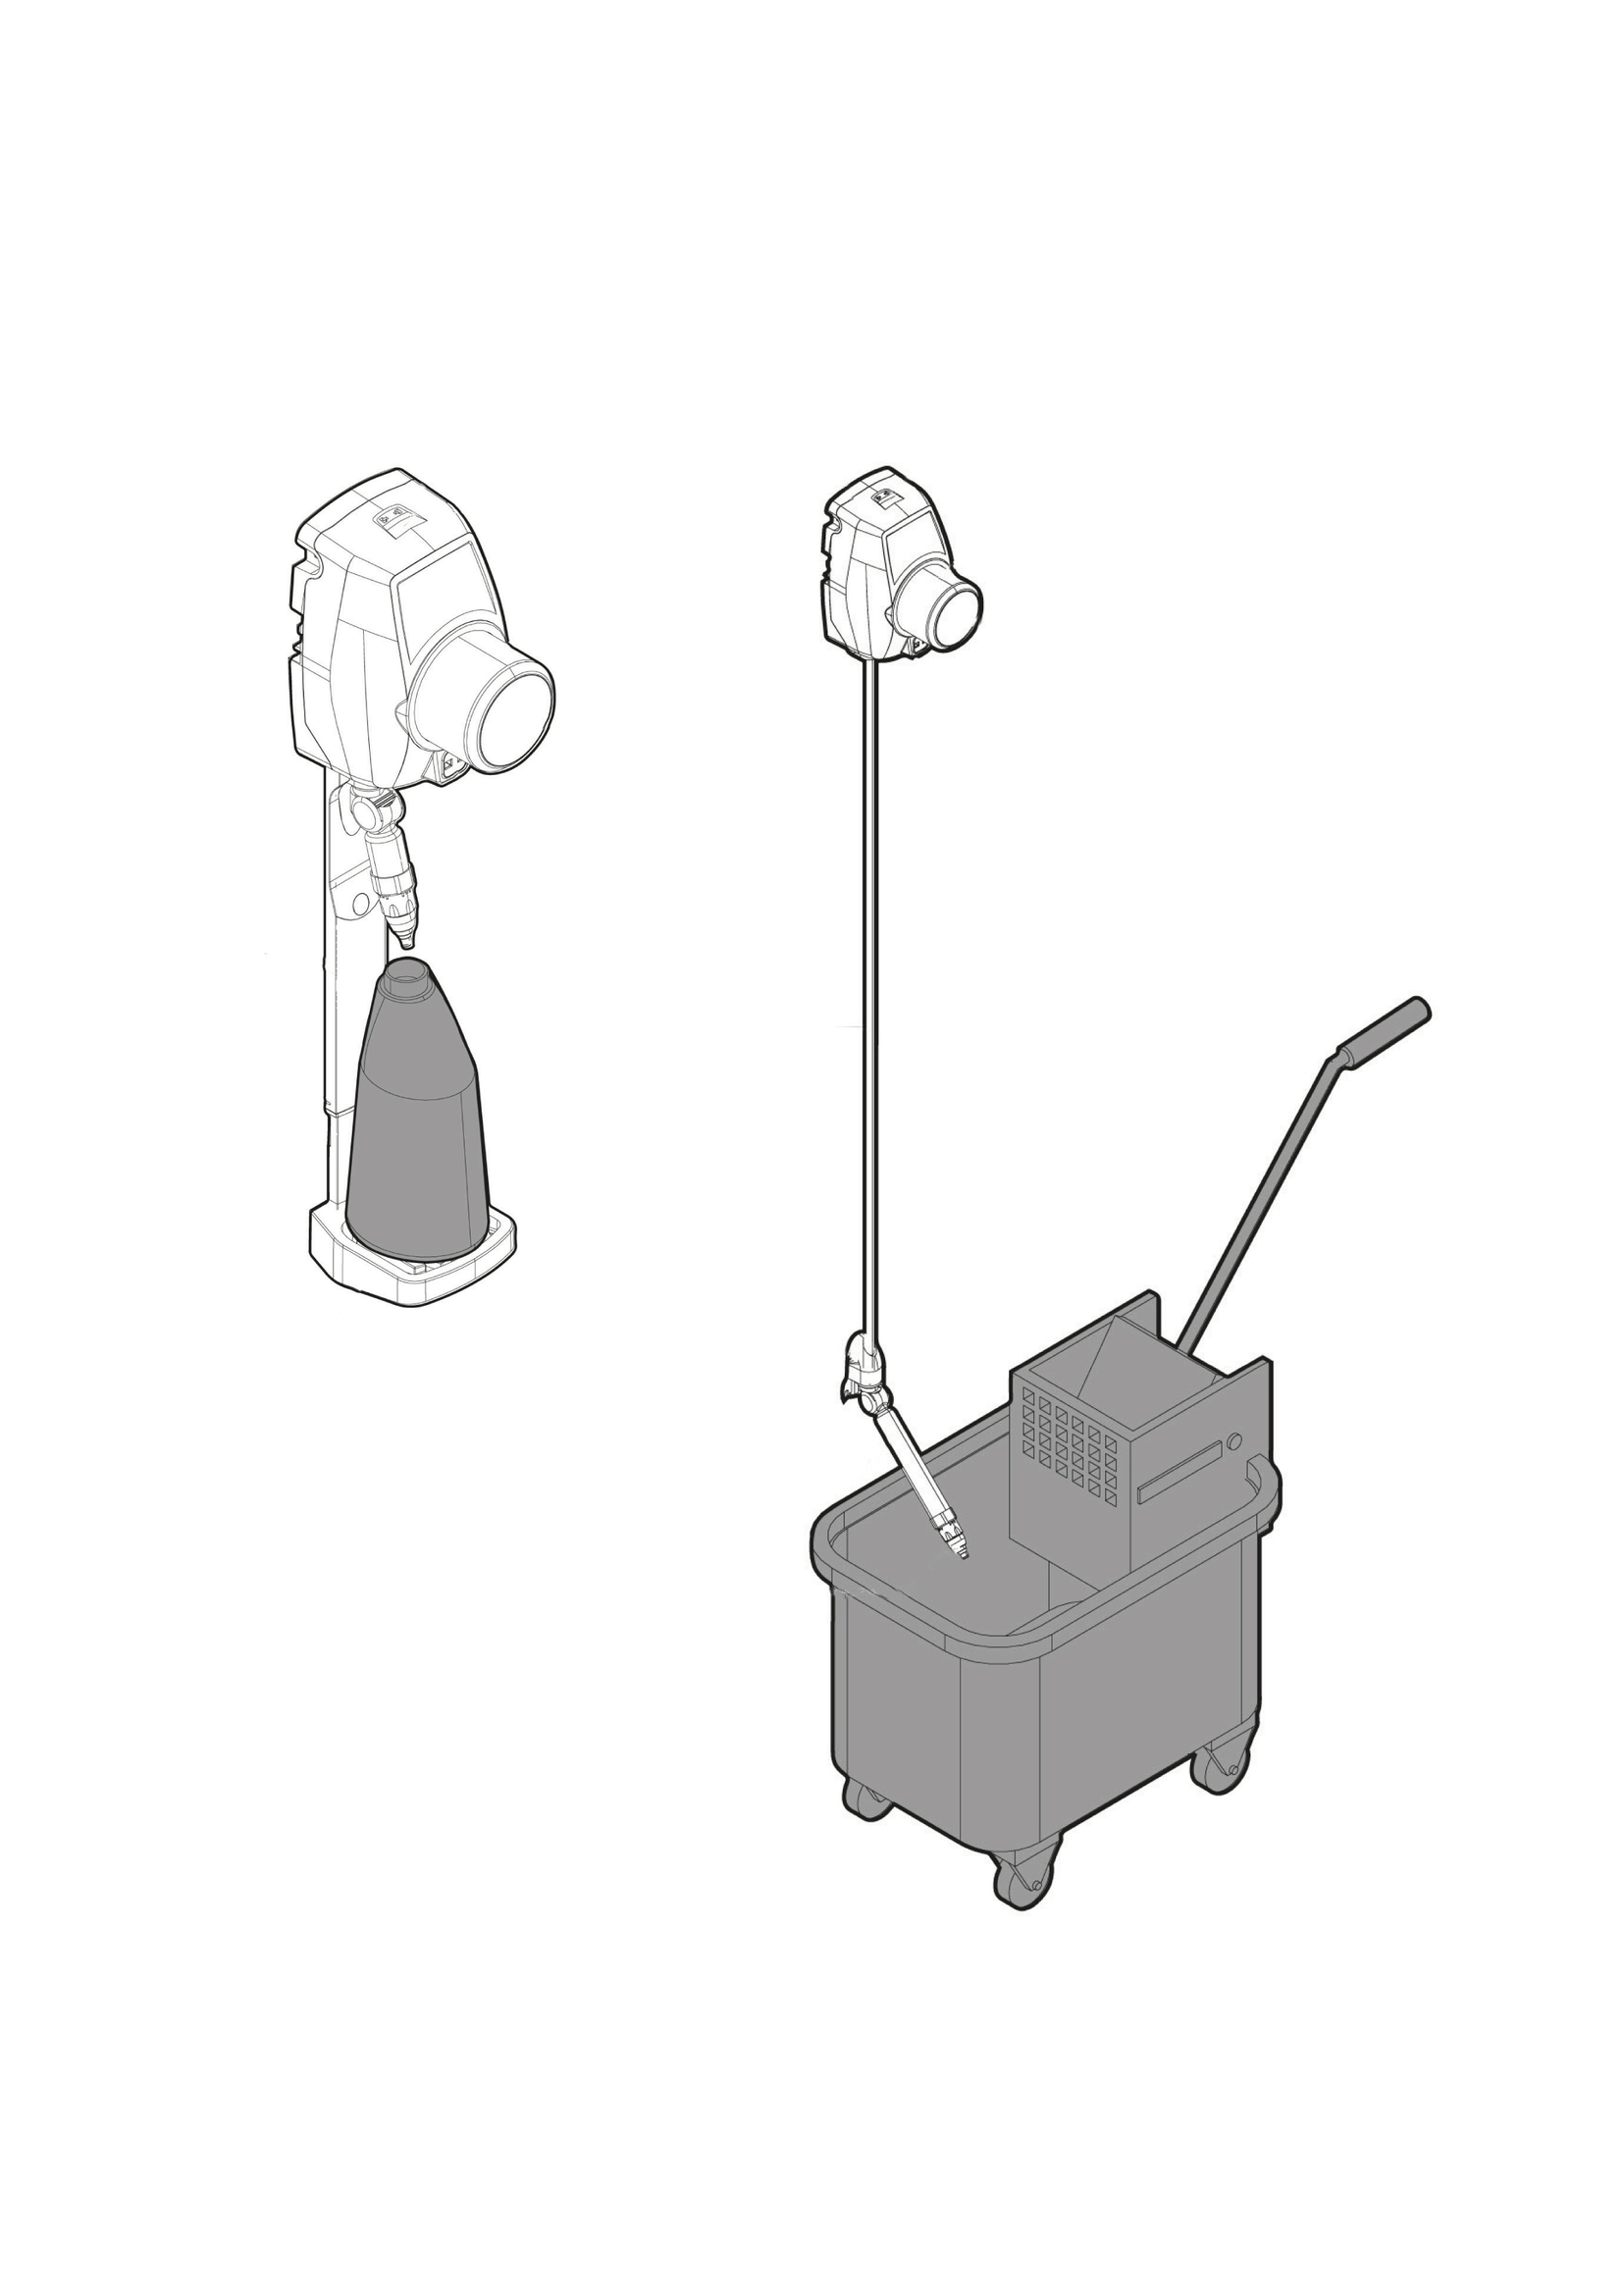
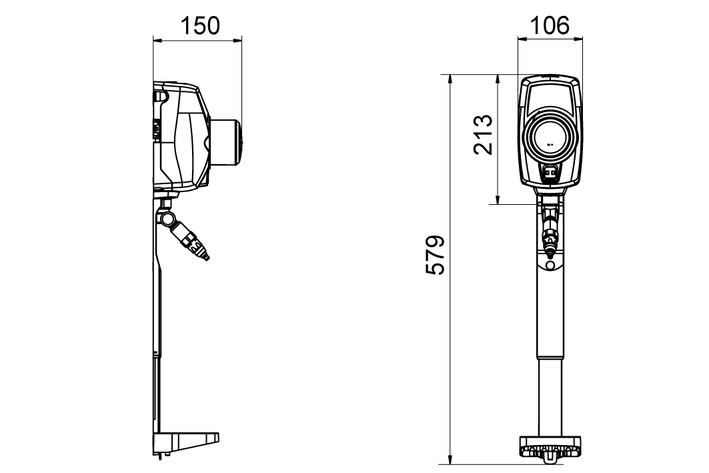
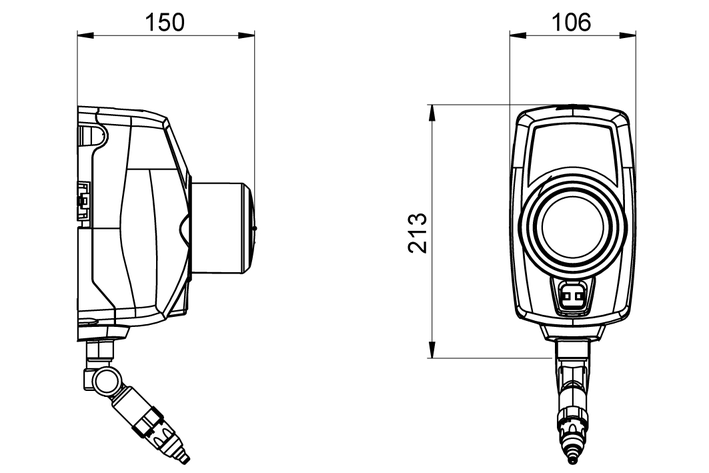
The device is designed to dispense concentrated cleaning agents into bottles and the bottom tank without the need for a water connection.
The device has the following functions:
Variable dosage (5, 10, 15, 20, 25, 30 ml/stroke)
Bottle rack
Delay function for double dose
Cleaning agent suction / mechanical pump
Safe maintenance option. A key or button is required to change the dosing and vent the dosing station
 The packing materials can be recycled. Please dispose of packaging in accordance with the environmental regulations.
 Electrical and electronic devices contain valuable, recyclable materials and often components such as batteries, rechargeable batteries or oil, which - if handled or disposed of incorrectly - can pose a potential danger to human health and the environment. However, these components are required for the correct operation of the device. Devices marked by this symbol are not allowed to be disposed of together with the household rubbish.
Current information on content materials can be found at: www.kaercher.de/REACH
Only use original accessories and original spare parts. They ensure that the appliance will run fault-free and safely.
Information on accessories and spare parts can be found at www.kaercher.com.
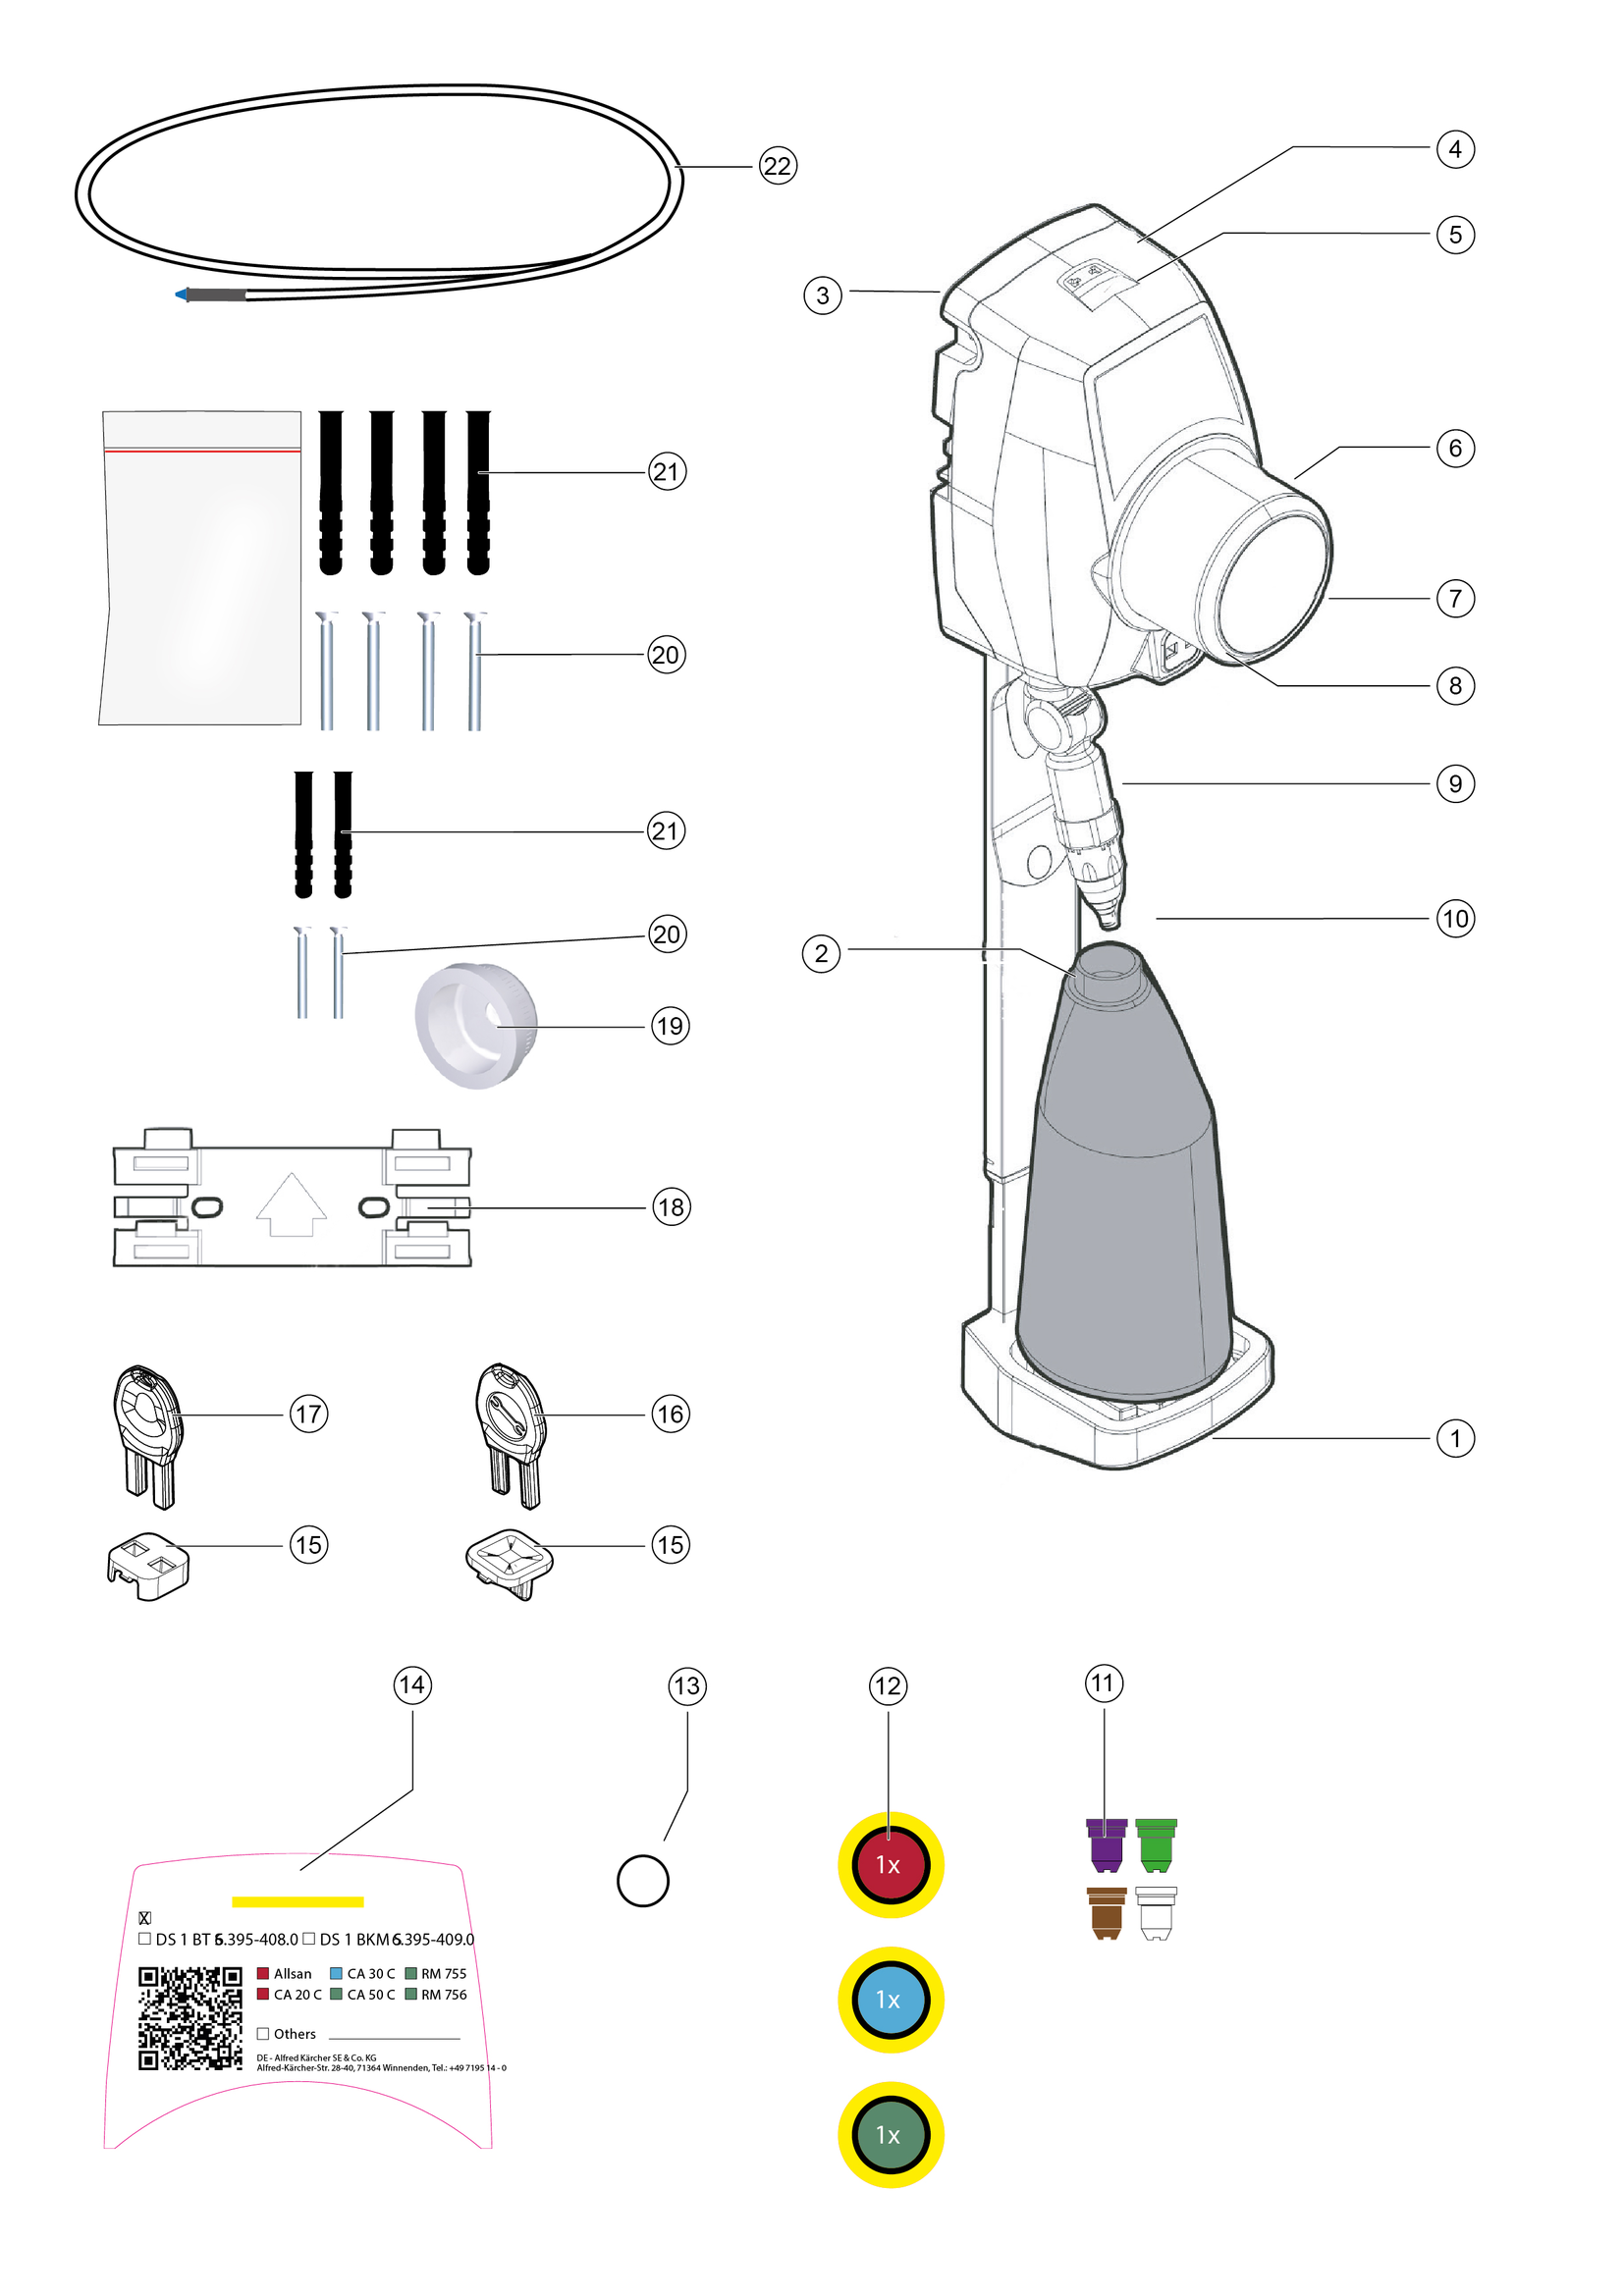
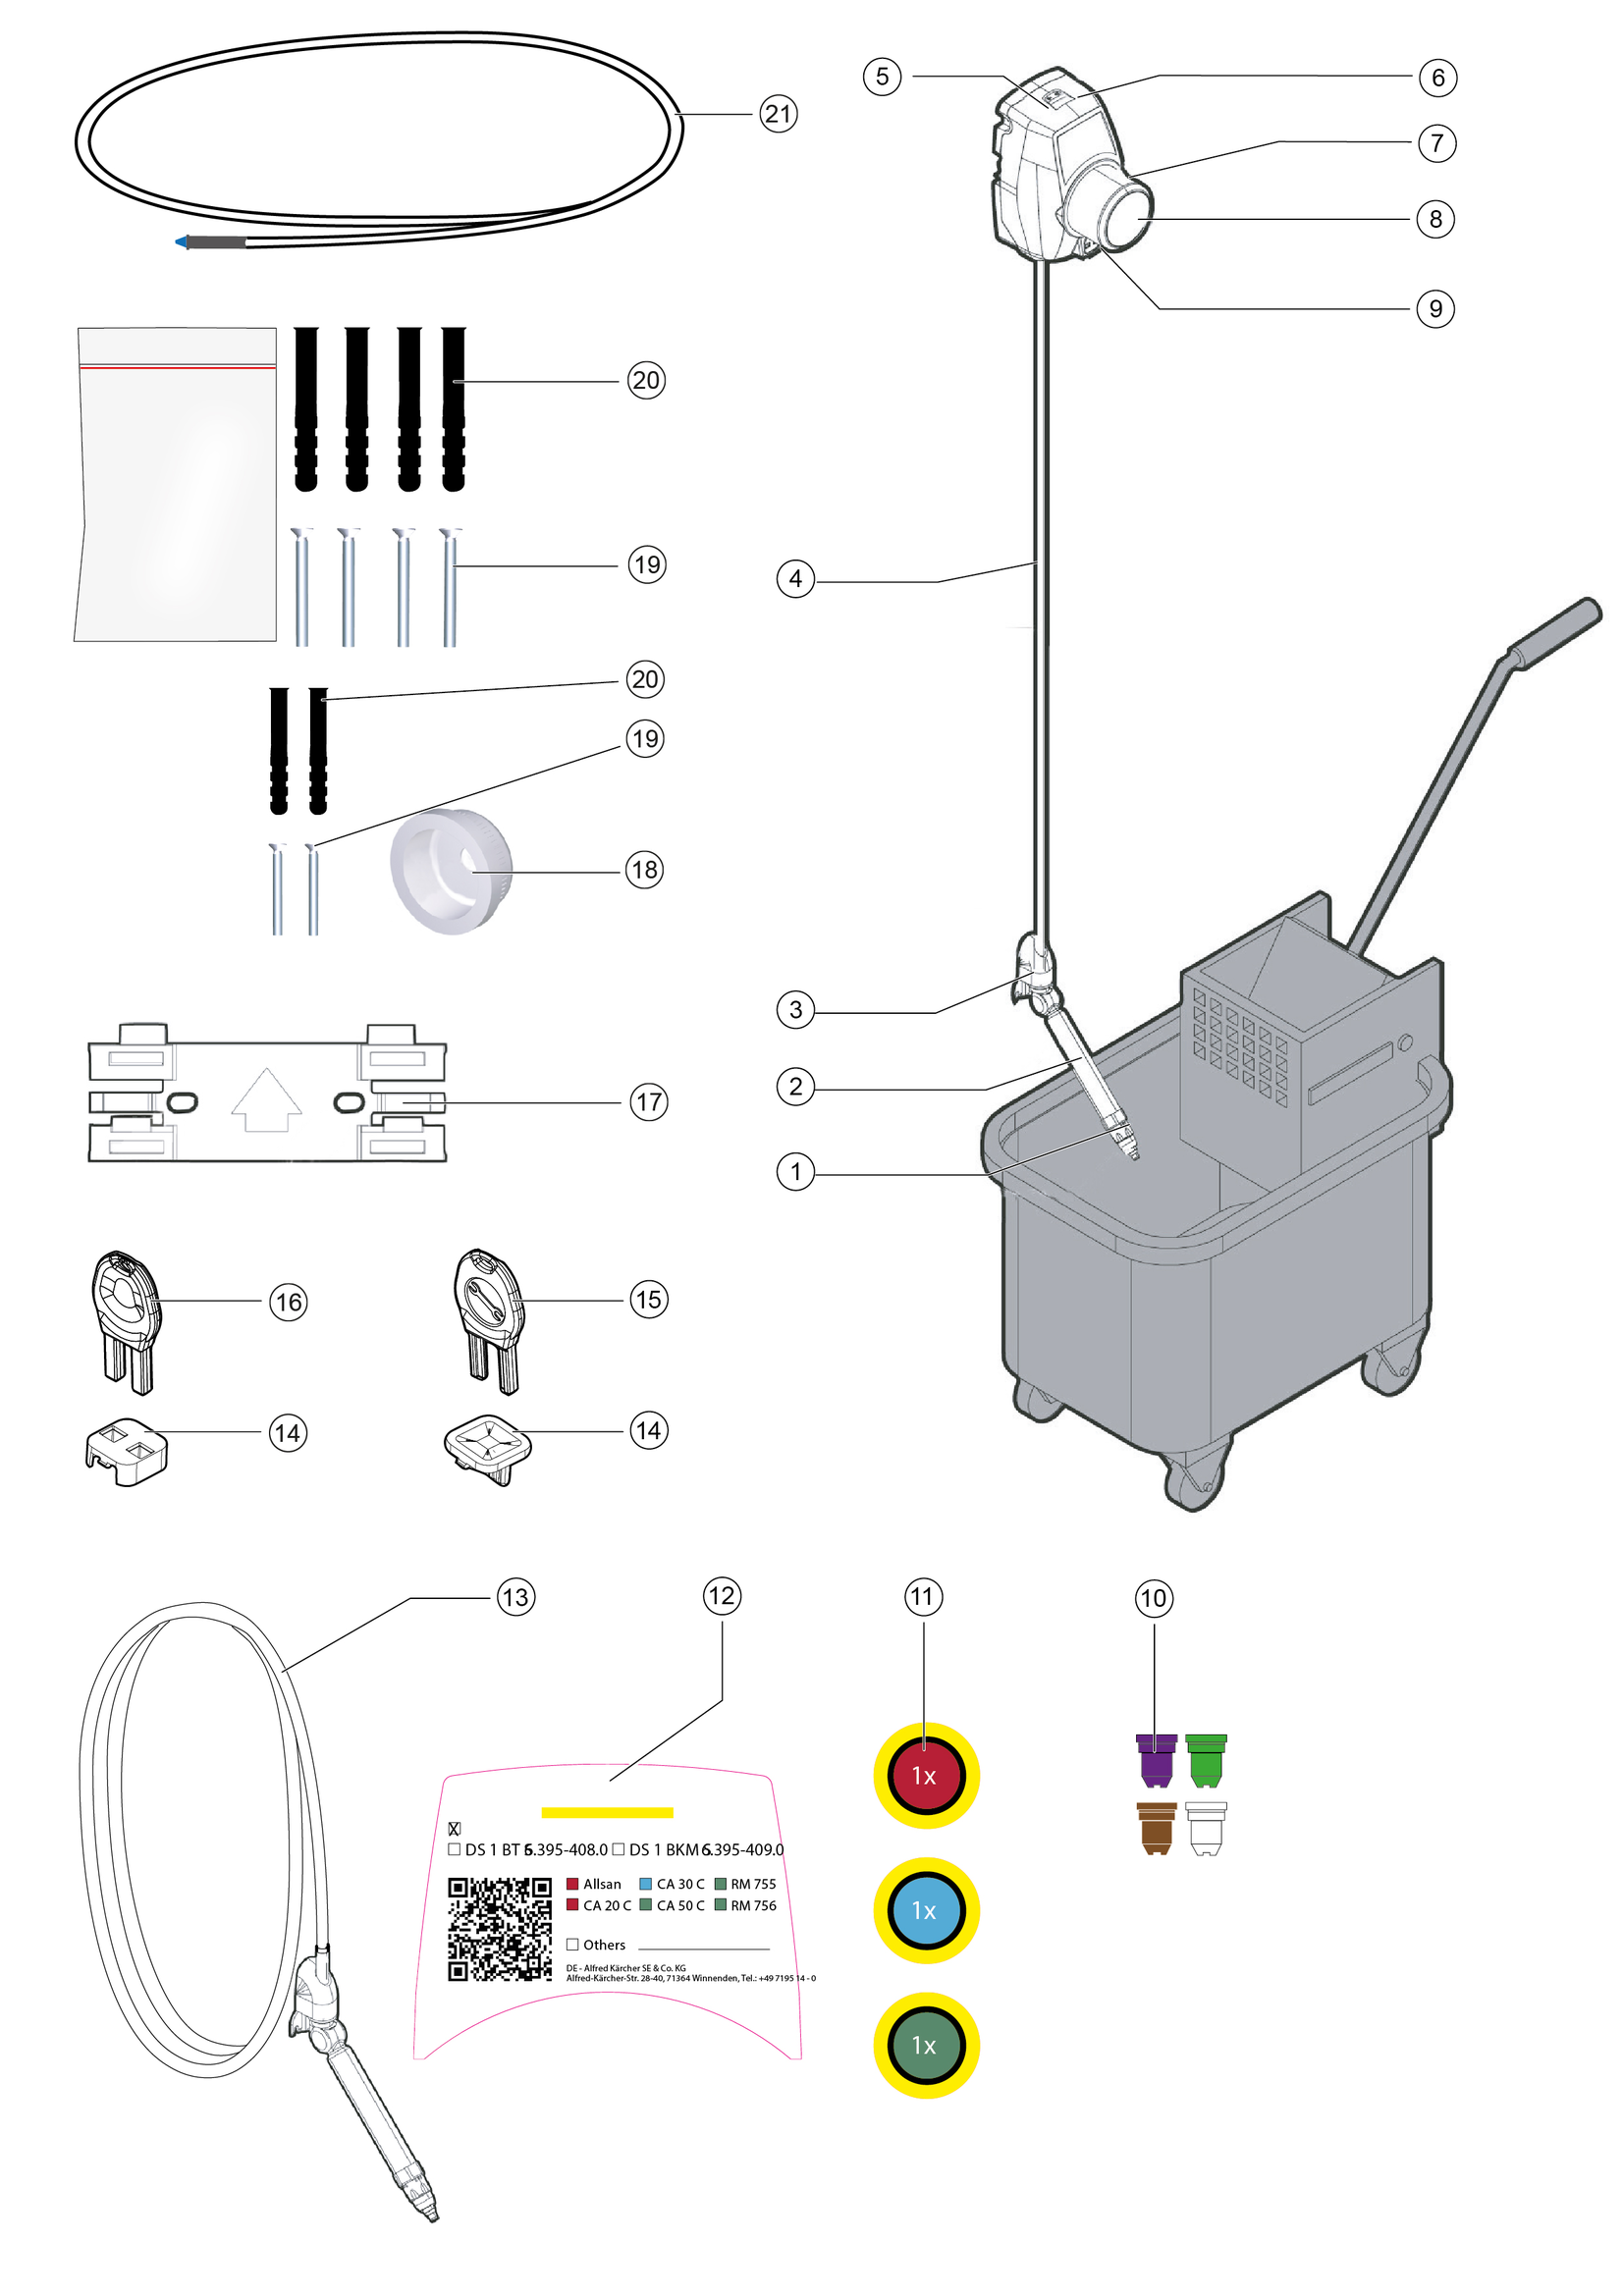
Check the contents for completeness when unpacking. If any accessories are missing or in the event of any shipping damage, please notify your dealer.
To ensure safe operation, the planned site must meet the following requirements:
A risk assessment was carried out for the site.
The wall structure is stable enough to hold the dosing station securely.
Adhesive attachment:
The surface of the wall is smooth.
The surface must be clean.
The surface must be dust-free.
The floor is non-slip or secured against slipping with a suitable mat.
The location is well lit or can be equipped with suitable lighting.
There is sufficient space for operation and maintenance.
There is enough space on the floor for the cleaning agent container.
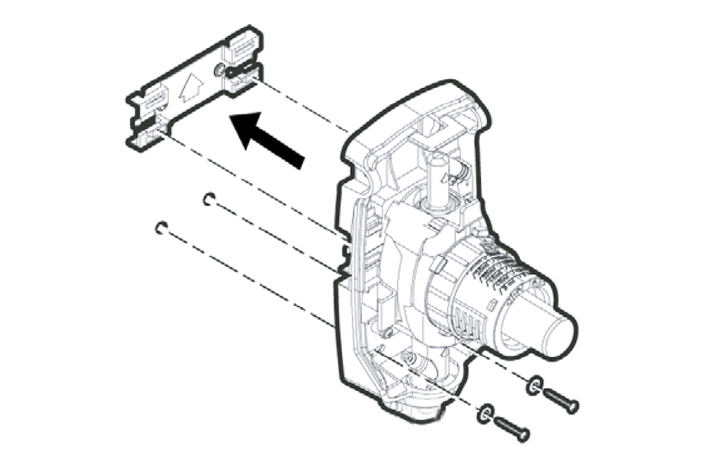
Mark the position for the wall bracket at a height of 1.5 m so that the wall bracket is horizontal.
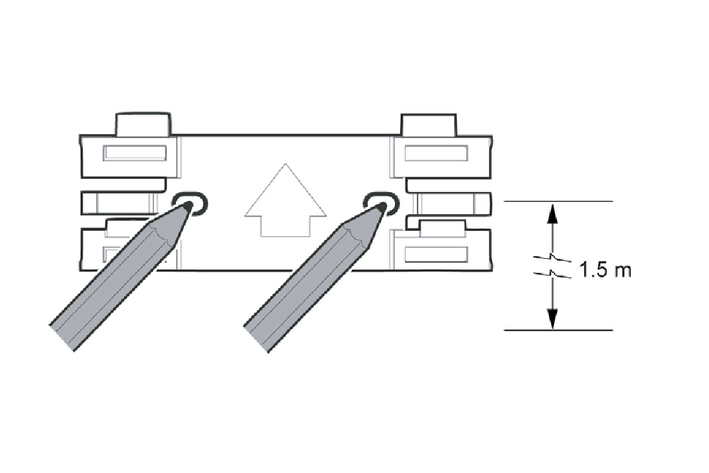
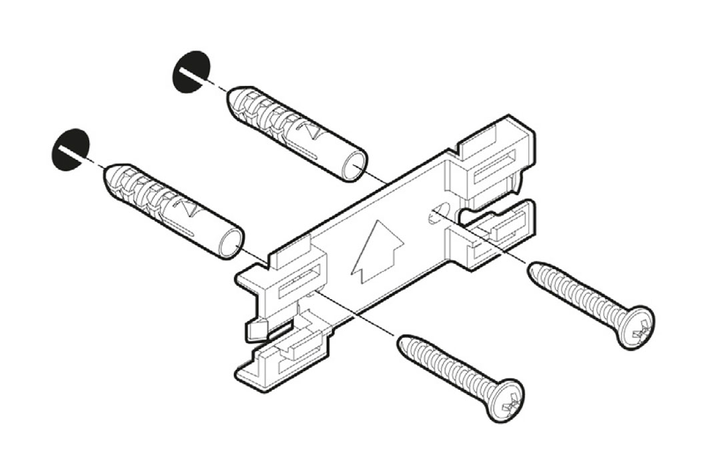
Fix the wall bracket with dowels and screws.
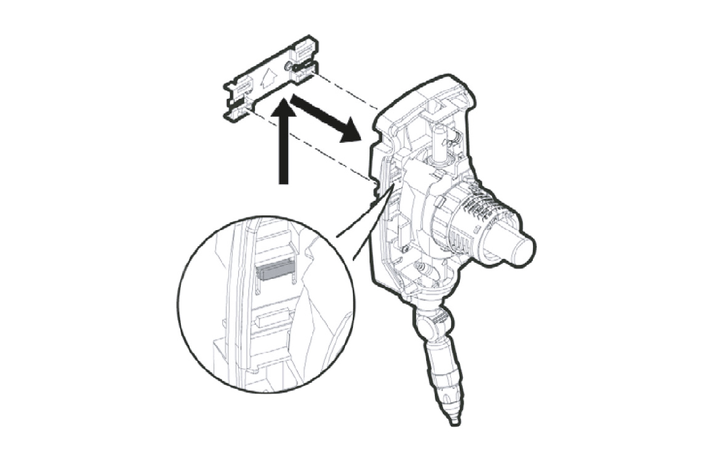
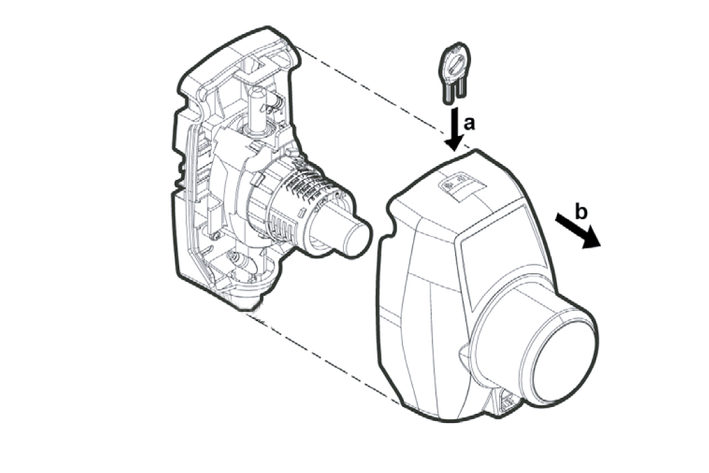
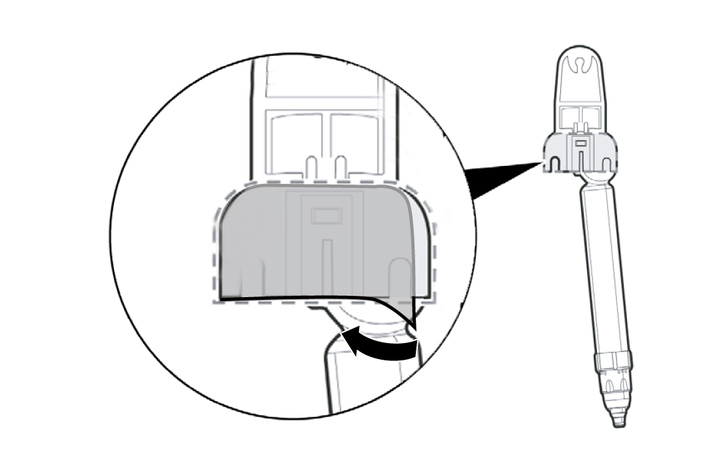
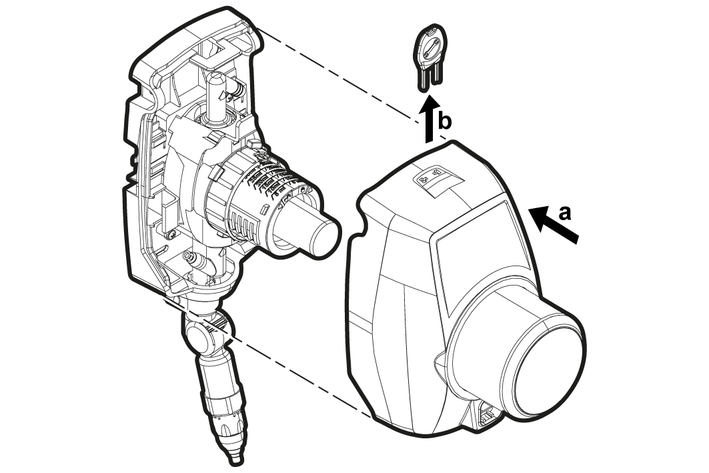
Remove the front cover of the dosing station.
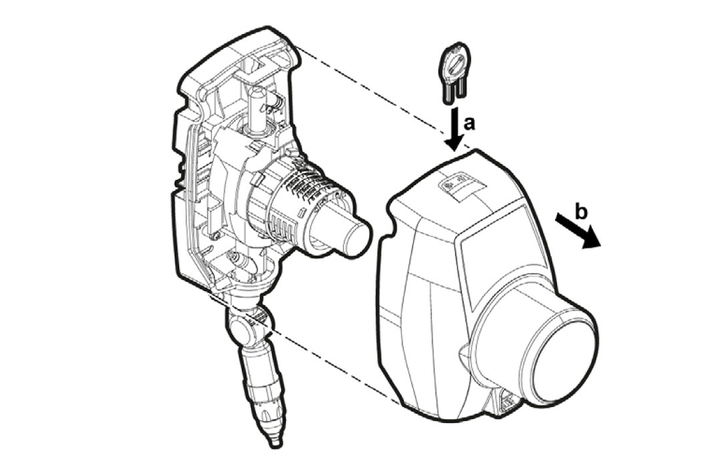
Insert the maintenance key into the front cover.
Remove the front cover.
Two inserts for the venting function are included in the scope of delivery (key or push button).
Press the desired venting insert into the front cover of the dosing station.

Optionally, fix the dosing station with additional dowels and screws to increase stability.
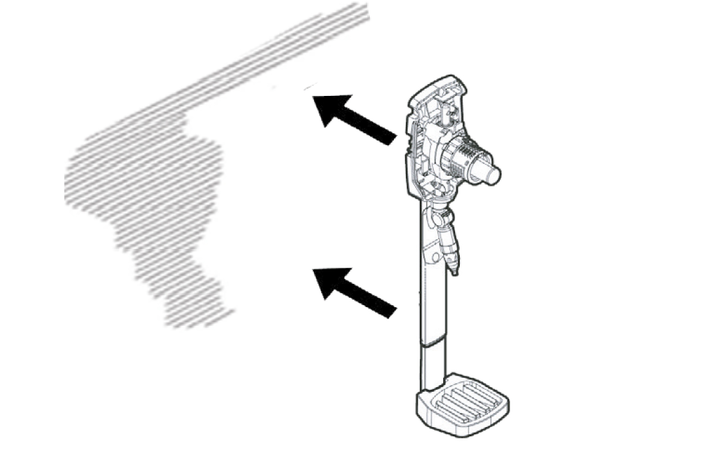
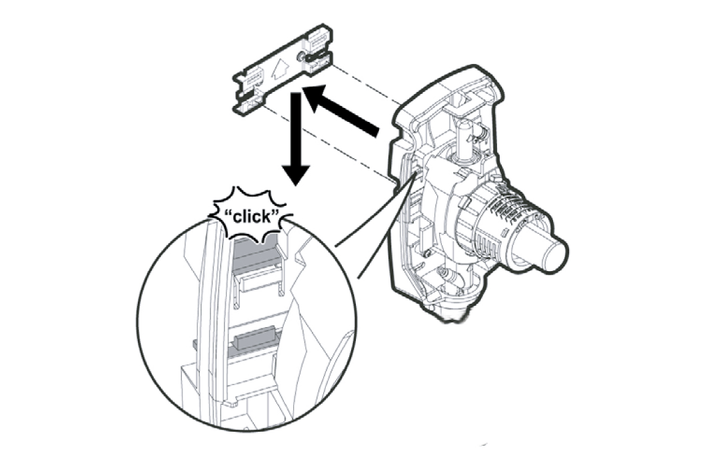
Place the dosing station on the wall bracket and press down until it audibly engages.

Mark the dowel holes of the lower fixing holes.
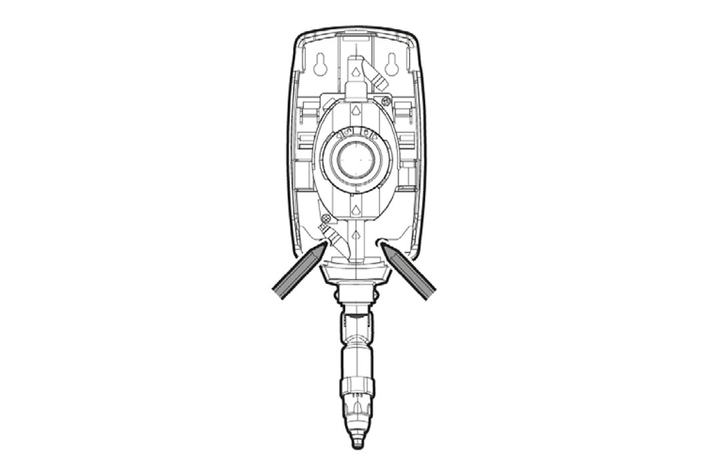
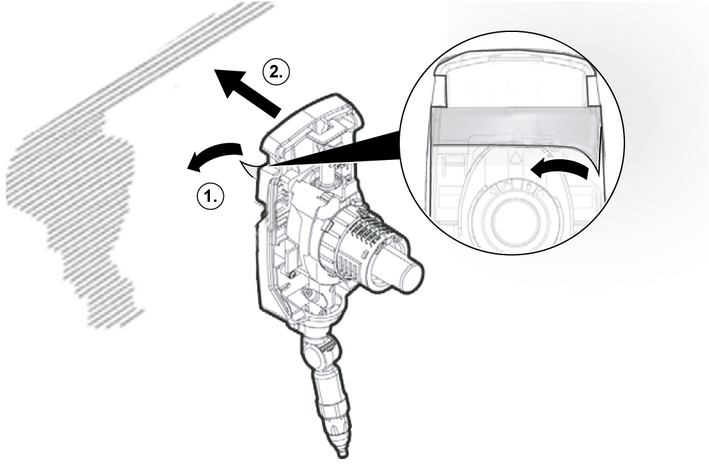
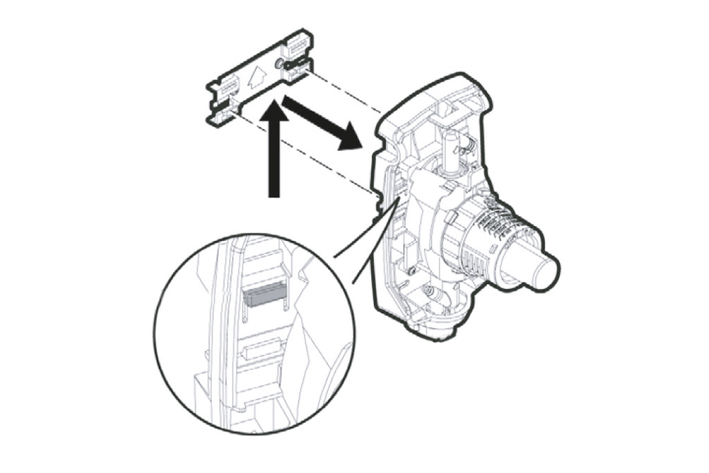
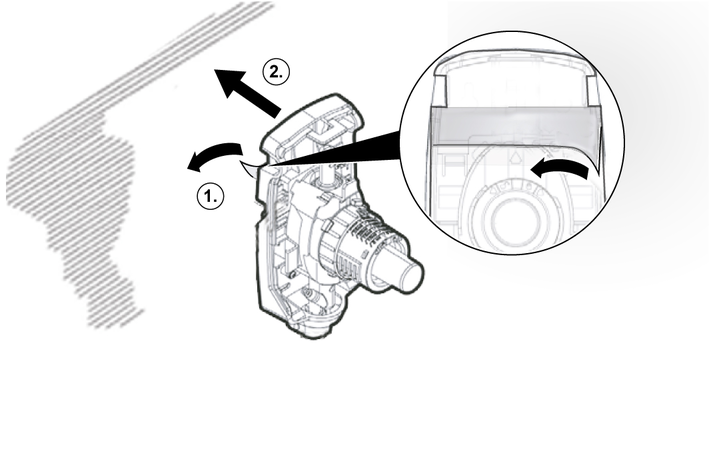
Pull the tab forward on both sides of the dosing station.
Lift the dosing station up and off the wall.
Drill the holes for the dowels and insert the dowels for wall mounting.
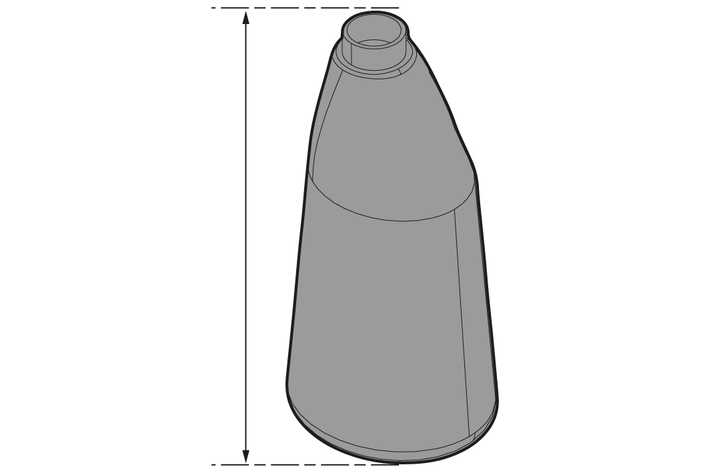
Measure the height of the bottle.
Insert the lower su\ of the bottle rack on the back of the upper support at the desired height.

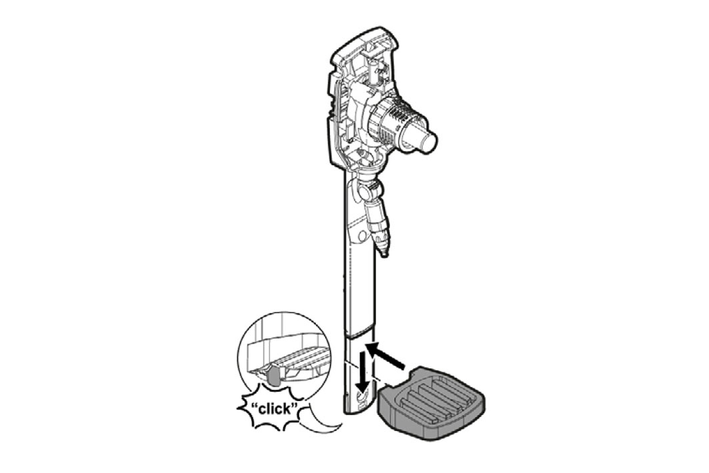
Press the support of the bottle rack into the dosing station from below until it audibly engages.
If required, a drain pipe can be attached to the bottle rack.
If necessary, drill a hole (ø 3 mm) for the drain hose in the centre of the pipe socket.

Fix the support of the bottle rack with dowels and screws.
Place the dosing station on the wall bracket and press down until it audibly engages.
Mark the position of the fixing holes.

Pull the tab forward on both sides of the dosing station.
Lift the dosing station up and off the wall.
Drill the holes for the dowels and insert the dowels for the dosing station and the support for the bottle rack.
Place the dosing station on the wall bracket and press down until it audibly engages.
Tighten the fastening screws of the dosing station and the support for the bottle tray.
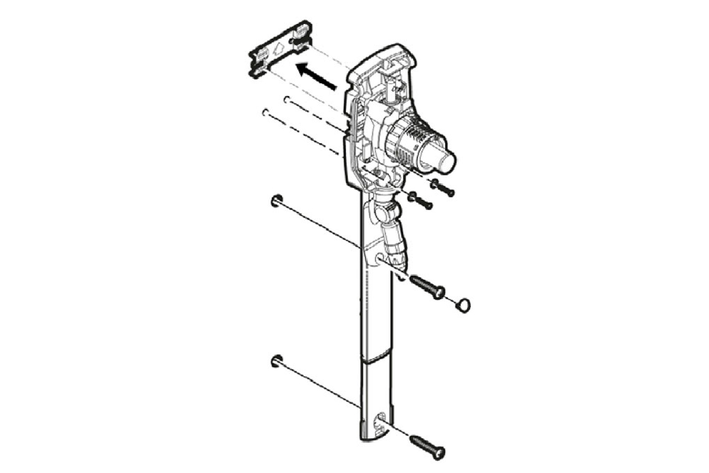
Insert the screw cover.
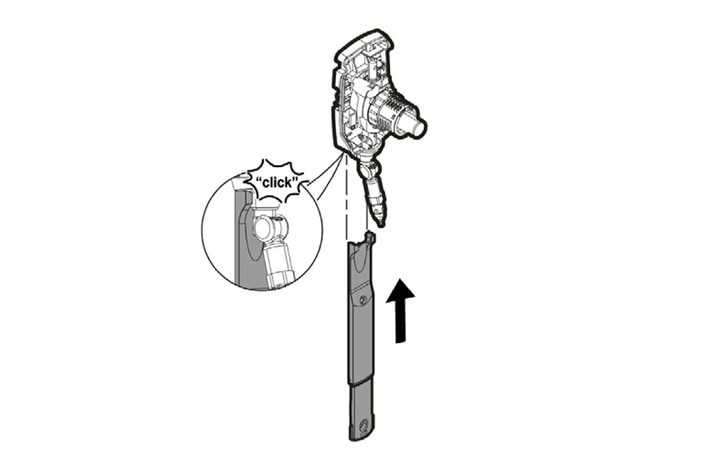
Insert the bottle rack into the support and push it down until it audibly clicks into place.
If necessary, connect the drain hose to the pipe socket of the bottle rack.
If necessary, fit the double-dosing delay function (option), see chapter
Mount the suction hose, see chapter
Remove the front cover of the dosing station.
Insert the maintenance key into the front cover.
Remove the front cover.
Mark the desired position for the dosing station on the wall.
Measure the height of the bottle.
Press the desired venting insert into the front cover of the dosing station.
Insert the lower su\ of the bottle rack on the back of the upper support at the desired height.
Insert the bottle rack into the support and push it down until it audibly clicks into place.
Peel off the adhesive protection from the dosing station and wall bracket
Press the dosing station with bottle tray firmly against the wall.
Two inserts for the venting function are included in the scope of delivery (key or push button).
If required, a drain pipe can be attached to the bottle rack.
If necessary, drill a hole (ø 3 mm) for the drain hose in the centre of the pipe socket.
If necessary, connect the drain hose to the pipe socket of the bottle rack.
If necessary, fit the double-dosing delay function (option), see chapter
Mount the suction hose, see chapter
Mark the position for the wall bracket at a height of 1.5 m so that the wall bracket is horizontal.
Fix the wall bracket with dowels and screws.
Remove the front cover of the dosing station.
Insert the maintenance key into the front cover.
Remove the front cover.
Two inserts for the venting function are included in the scope of delivery (key or push button).
Press the desired venting insert into the front cover of the dosing station.
Optionally, fix the dosing station with additional dowels and screws to increase stability.
Place the dosing station on the wall bracket and press down until it audibly engages.
Mark the dowel holes of the lower fixing holes.
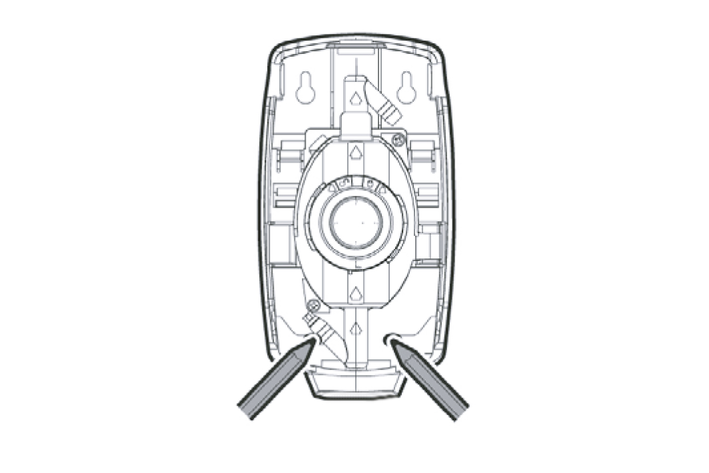
Pull the tab forward on both sides of the dosing station.
Lift the dosing station up and off the wall.
Insert the dowels for wall mounting.
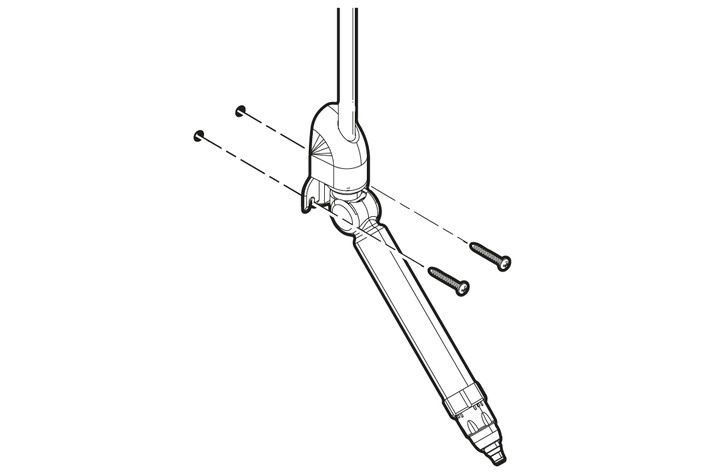
Mark and drill the dowel holes in the outlet pipe.
Attach the outlet pipe and screw in the screws.
If necessary, fit the double-dosing delay function (option), see chapter
Mount the suction hose, see chapter
Remove the front cover of the dosing station.
Insert the maintenance key into the front cover.
Remove the front cover.
Remove the protective film from the adhesive strips.
Press the wall bracket firmly against the wall.
Two inserts for the venting function are included in the scope of delivery (key or push button).
Press the desired venting insert into the front cover of the dosing station.
Remove the protective film from the adhesive strips.
Press the outlet pipe against the wall.

If necessary, fit the double-dosing delay function (option), see chapter
Mount the suction hose, see chapter
The inlet nozzle of the withdrawal tube can be rotated 180° to allow the cleaning agent to be withdrawn from both sides of the dosing station.
Remove the front cover of the dosing station.
Insert the maintenance key into the front cover of the dosing station.
Remove the front cover.
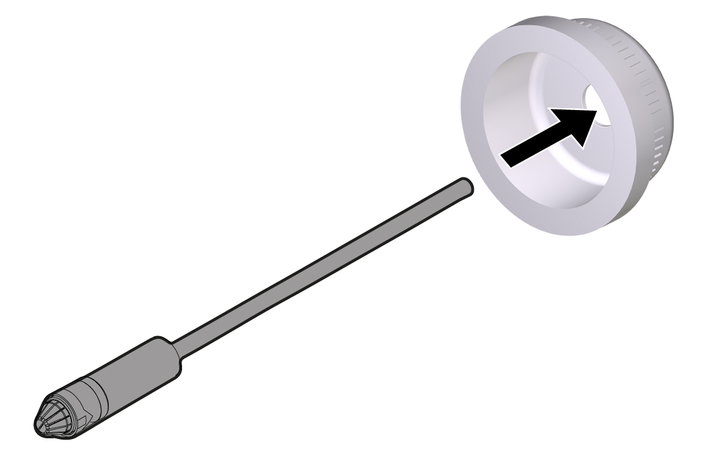
Pass the suction hose through the lid for the canister.
Install the suction hose.
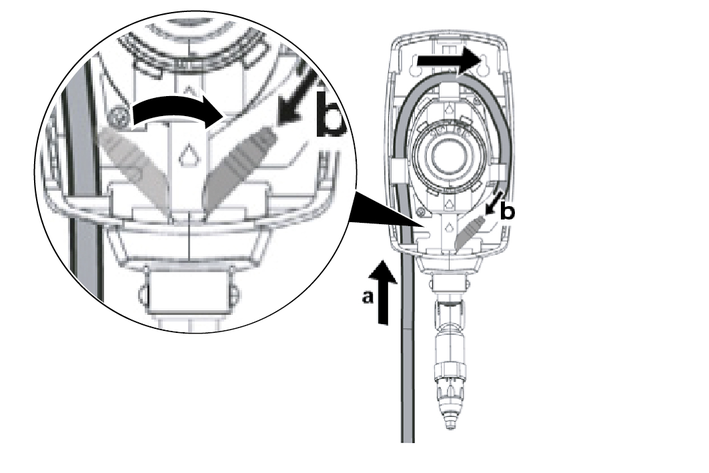
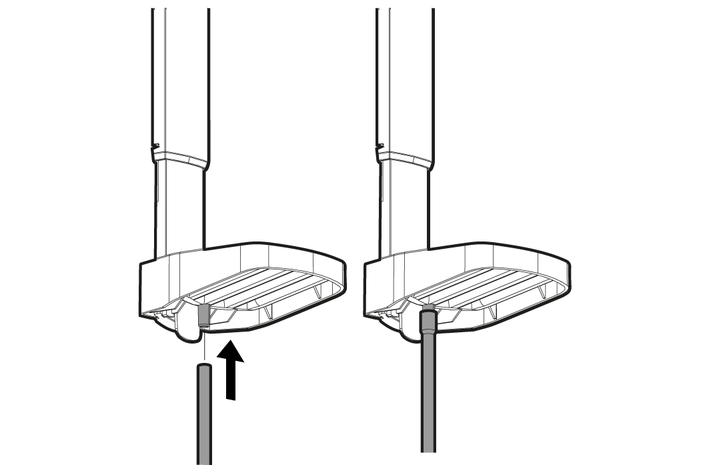
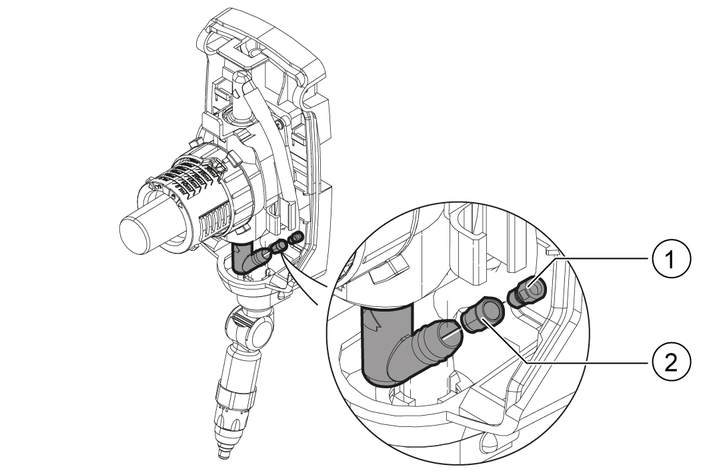
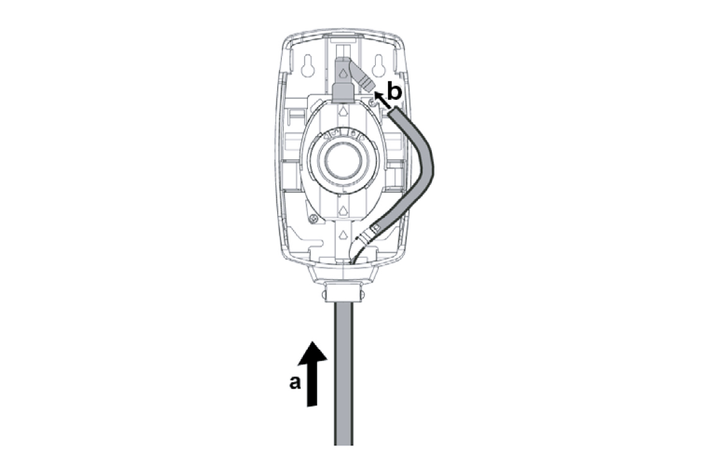
Guide the suction hose into the dosing station from below.
Push the suction hose onto the inlet nozzle.
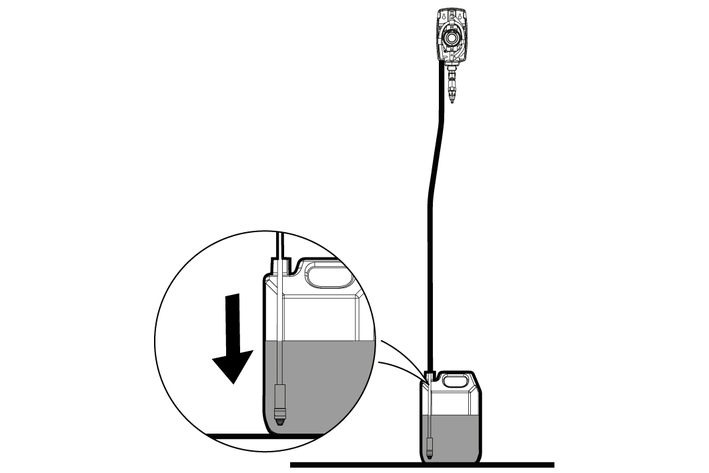
Insert the suction hose with strainer into the canister with the cleaning agent.
Screw the lid onto the canister.
Install the front cover.
Put on the front cover with the maintenance key.
Remove the maintenance key.
The double-dosing delay function prevents overdosing by preventing repeated dosing of cleaning agent in quick succession.
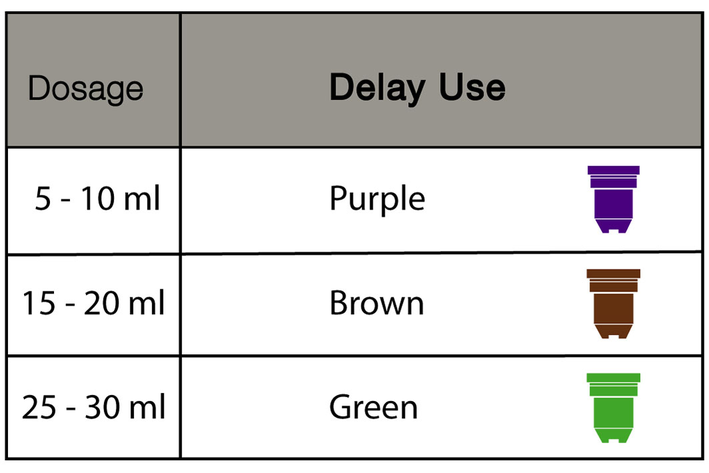
The double-dose delay peak is selected according to the desired time delay. Depending on the product, a delay time of approx. 10 seconds can be selected.
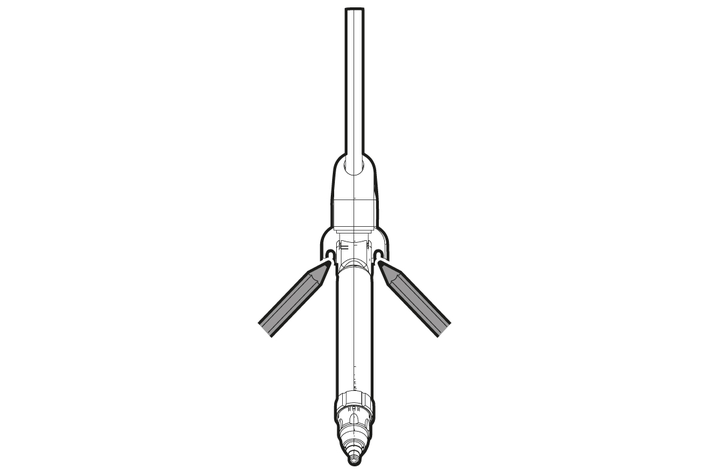
Insert the double-dose delay unit.
Select the appropriate delay insert.
Plug the delay insert into the support.
Vent the dosing station!
Insert the double-dosing delay unit into the inlet nozzle of the outlet pipe.
Press the dosing button to dispense a shot of the cleaning agent.
The dosing button returns to its original position and locks into place.
The dosing button is only released when the internal pump piston has returned to the original position - this is the delay time.
After the delay time has elapsed, another dose can be delivered.
Turn the casing over
Remove the two green pins with pliers.
Press out the transparent cover.
Insert the desired push insert, depending on the colour code, and attach the cover.

Mount the casing.
Remove the front cover of the dosing station.
Insert the maintenance key into the front cover of the dosing station.
Remove the front cover.
Unlock the dosing button by turning it anticlockwise.
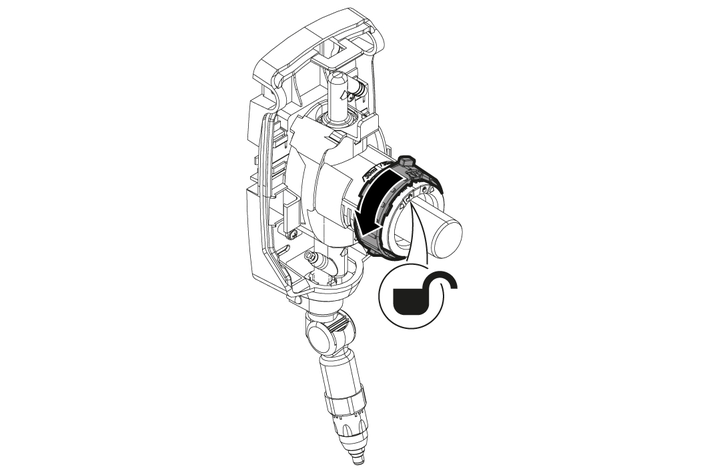
Set the desired dosage.
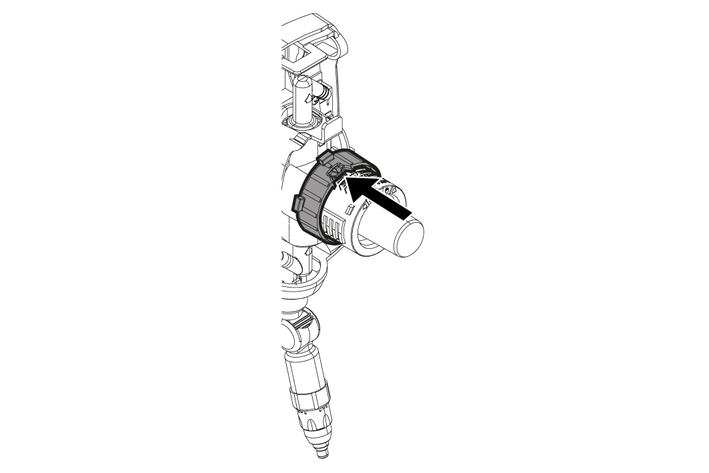
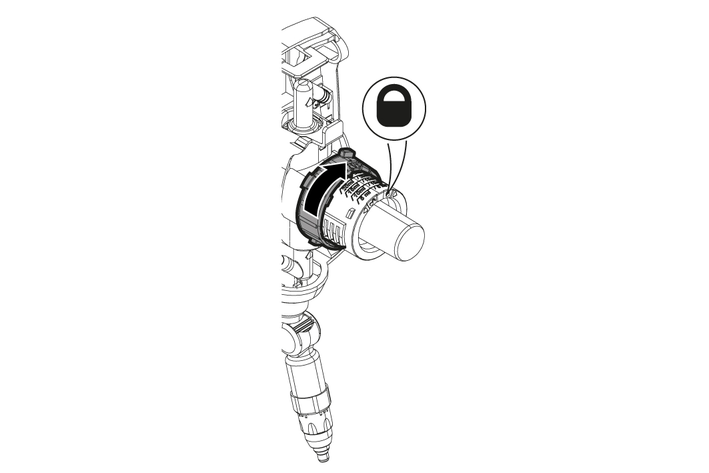
Lock the dosing button by turning it clockwise.
Install the front cover.
Put on the front cover with the maintenance key.
Remove the maintenance key.
To make the suction of the pump faster when dosing below 30 ml, the set shot size can be temporarily overridden.
Operate the venting insert (key or push button).
Turn the dosing button clockwise.
Press the dosing button.

30 ml are dosed out.
Repeat step 4 until the pump is filled.
Remove dust and dirt.
Remove limescale and other deposits.
Clean the outside of the dosing station with a damp cloth.
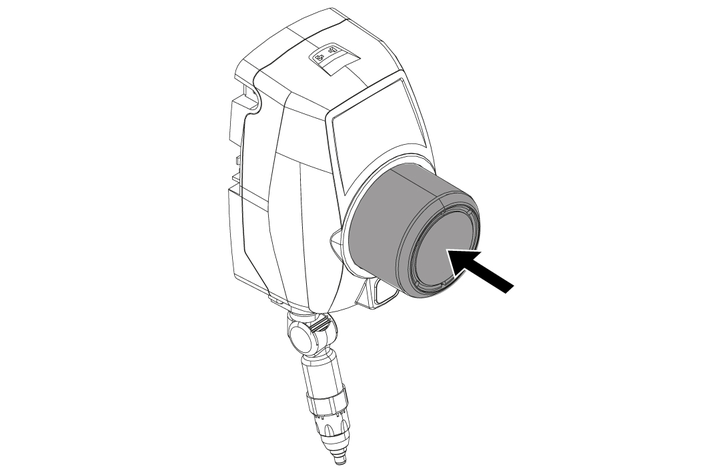
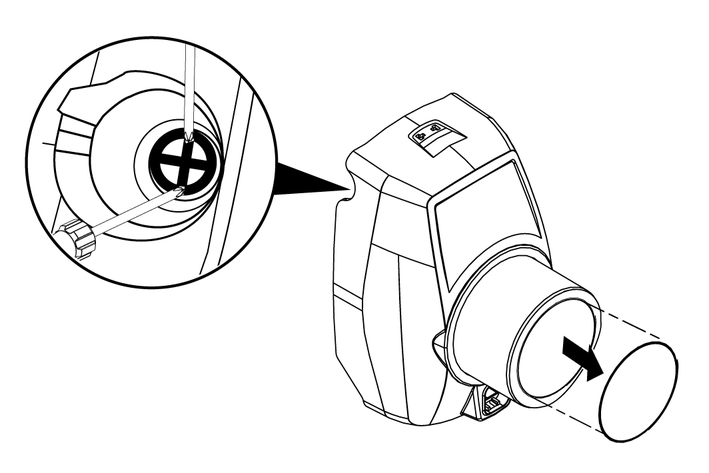
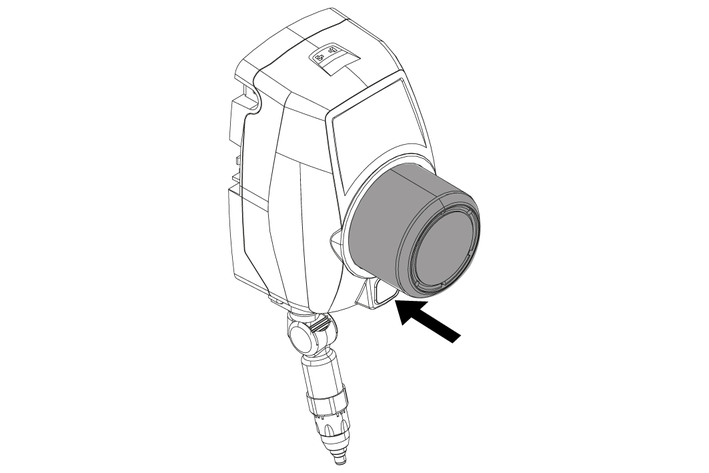
Turn the outlet nozzle 90° and pull it off the outlet pipe.

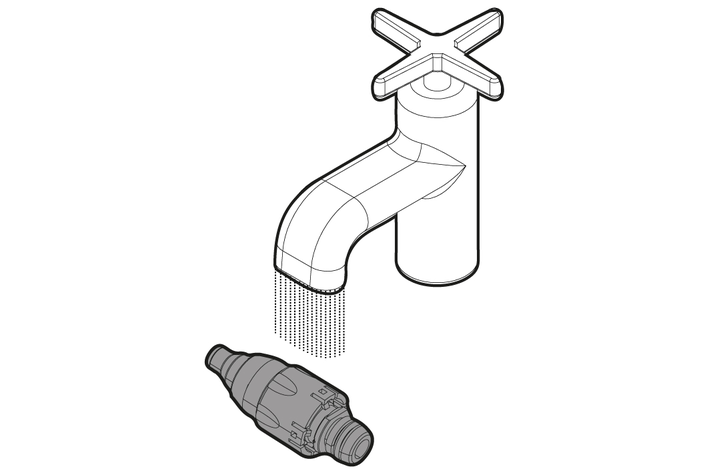
Clean the outlet nozzle under clean running water.
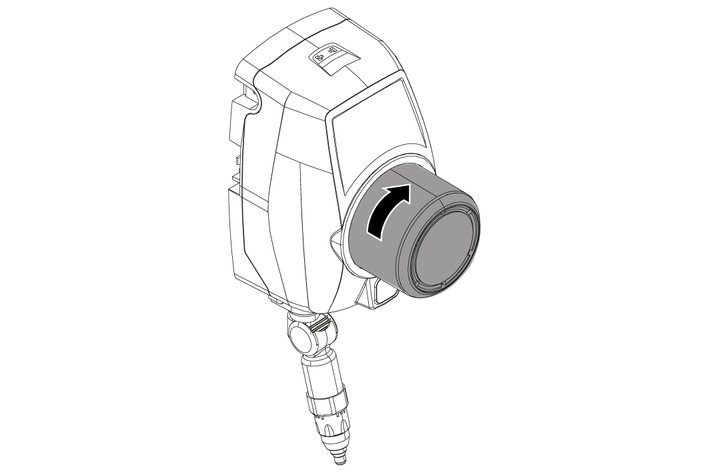
Put the outlet nozzle on the outlet pipe and turn it 90°.
Remove the suction hose from the cleaning agent.
Make sure that there is no cleaning agent left in the hose!
Operate the venting insert (key or push button).
Remove the front cover of the dosing station.
Insert the maintenance key into the front cover of the dosing station.
Remove the front cover.
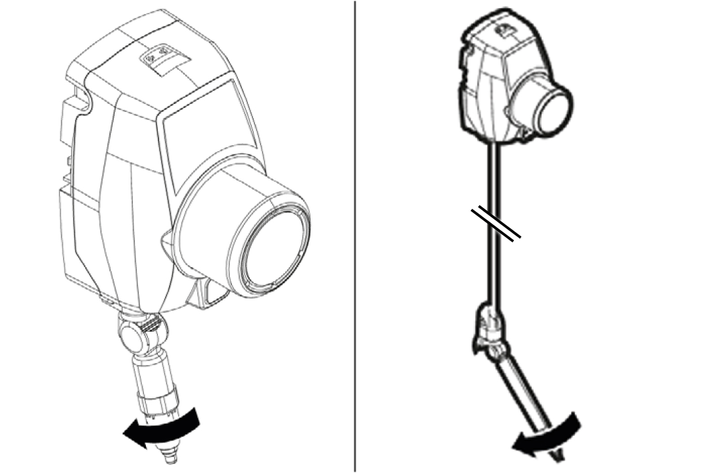
Remove the suction hose.
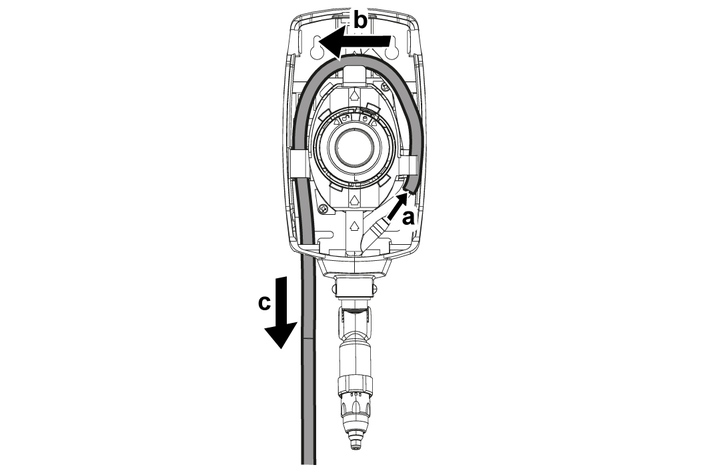
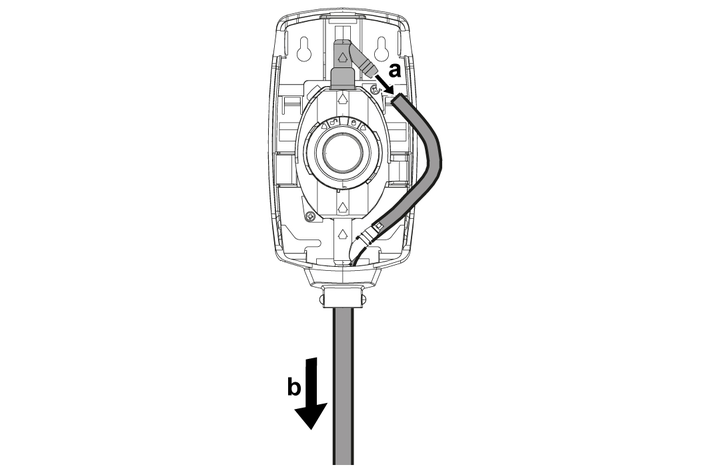
Remove the suction hose from the inlet nozzle.
Pull the suction hose downwards and out of the dosing station.
Unscrew the canister cap.
Remove the suction hose with strainer from the canister.
Remove the suction hose from the lid and screw the lid onto the canister.
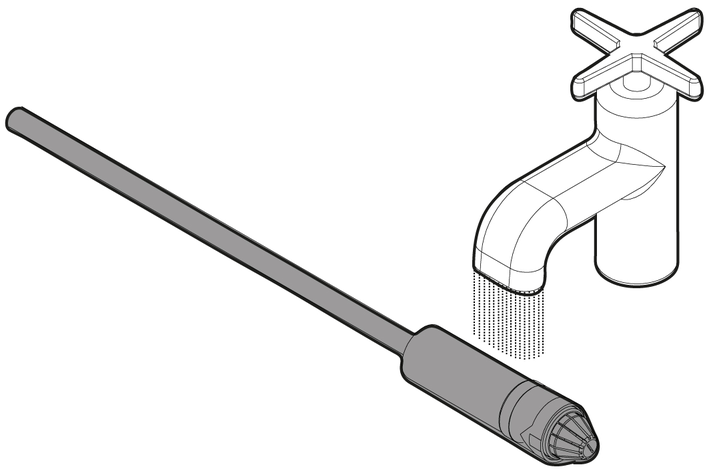
Clean the suction hose under clean running water.
Install the new suction hose. See chapterMounting the suction hose
Install the front cover.
Put on the front cover with the maintenance key.
Remove the maintenance key.
Pump the cleaning agent out of the system.
Operate the venting insert (key or push button).
Remove the front cover of the dosing station.
Insert the maintenance key into the front cover of the dosing station.
Remove the front cover.
Remove the outlet hose.
Remove the outlet hose from the pump outlet inlet nozzle.
Pull the outlet hose through the floor of the dosing station.
Clean the outlet hose under clean running water.
Install the outlet hose.
Feed the outlet hose through the floor of the dosing station.
Connect the outlet hose to the pump outlet inlet nozzle.
Install the front cover.
Put on the front cover with the maintenance key.
Remove the maintenance key.
Turn the outlet nozzle 90° and pull it off the outlet pipe.
Put the new outlet nozzle on the outlet pipe and turn it 90°.
Operate the venting insert (key or push button).
Remove the front cover of the dosing station.
Insert the maintenance key into the front cover of the dosing station.
Remove the front cover.
Remove the suction hose.
Remove the suction hose from the inlet nozzle.
Pull the suction hose downwards and out of the dosing station.
Unscrew the canister cap.
Remove the suction hose with strainer from the canister.
Remove the lid and screw it onto the canister.
Install the new suction hose. See chapter Mounting the suction hose
Install the front cover.
Put on the front cover with the maintenance key.
Remove the maintenance key.
Operate the venting insert (key or push button).
Remove the front cover of the dosing station.
Insert the maintenance key into the front cover of the dosing station.
Remove the front cover.
Remove the outlet hose.
Remove the outlet hose from the pump outlet inlet nozzle.
Pull the outlet hose through the floor of the dosing station.
Install the new outlet hose.
Feed the outlet hose through the floor of the dosing station.
Connect the outlet hose to the pump outlet inlet nozzle.
Install the front cover.
Put on the front cover with the maintenance key.
Remove the maintenance key.
Malfunctions often have simple causes that you can remedy yourself using the following overview. When in doubt, or in the case of malfunctions not mentioned here, please contact your authorised Customer Service.
Detergent is not sucked in
Cause:
The outlet hose is not fitted correctly on the inlet nozzle
Remedy:
Correct the fit of the outlet hose.
Cause:
The outlet hose is damaged.
Remedy:
Replace the outlet hose. See chapter Replacing the outlet hose.
Cause:
The suction hose is damaged.
Remedy:
Replace the suction hose. See chapter Mounting the suction hose
Cause:
The suction hose is not inserted correctly in the cleaning tank.
Remedy:
Correct the fit of the suction hose. See chapter Mounting the suction hose
Cause:
The fluid level in the cleaning agent tank is below the level of the suction hose.
Remedy:
Insert the suction hose deeper into the cleaning tank.
Refill with detergent.
Cause:
The sieve in the suction hose is dirty.
Remedy:
Clean the sieve. See chapter Cleaning the outlet hose
Cause:
The pump suction takes too long.
Remedy:
Change the dosing delay.
Cleaning agent is incorrectly dosed
Cause:
The fluid level in the cleaning agent tank is below the level of the suction hose.
Remedy:
Insert the suction hose deeper into the cleaning tank.
Refill with detergent.
Cause:
The outlet hose is not fitted correctly on the inlet nozzle
Remedy:
Correct the fit of the outlet hose.
Cause:
The outlet hose is not fitted correctly on the outlet nozzle
Remedy:
Correct the fit of the outlet hose.
Cause:
Dirt or particles in the cleaning agent tank
Remedy:
Connect the new cleaning tank.
Station drips
Cause:
Defective hose or incorrectly closed hose connections
Remedy:
Check the hoses and hose connections, replace if necessary. Vent the dosing station.
Remove air from the system.
The warranty conditions issued by our sales company responsible apply in all countries. We shall remedy possible malfunctions on your device within the warranty period free of cost, provided that a material or manufacturing defect is the cause. In a warranty case, please contact your dealer (with the purchase receipt) or the next authorised customer service site.
You can find more detailed information at: www.kaercher.com/dealersearch

#-#-#-A5-#-aw12579