SE 5 SE 5 Upholstery SE 5 Car SE 6 Signature Line
59512100 (08/24)
59512100 (08/24)
 Read these original instructions and the enclosed safety instructions before using the device for the first time. Act in accordance with them.
Keep both books for future reference or for future owners.
Failure to follow the operating instructions can result in damage to the device and danger to the operator or other persons.
Notify the dealer immediately in the case of shipping damage.
When unpacking, check the package contents for missing accessories or signs of damage.
You can find a Code for calling up an application video in:

Read this safety chapter and these original instructions before using the device for the first time. Act in accordance with them. Keep the original instructions for future reference or for future owners.
In addition to the notes in the operating instructions, you also need to take into consideration the general safety regulations and accident prevention guidelines applicable by law.
Warnings and information notices attached to the device provide important information for hazard-free operation.
Indication of an imminent threat of danger that will lead to severe injuries or even death.
Indication of a potentially dangerous situation that may lead to severe injuries or even death.
Indication of a potentially dangerous situation that may lead to minor injuries.
Indication of a potentially dangerous situation that may lead to damage to property.
Wear suitable gloves when working with the device.
Risk of asphyxiation. Keep packaging film out of the reach of children.
Only use the device for its proper use. Take into account the local conditions and beware of third parties, in particular children, when working with the device.
Persons with reduced physical, sensory or mental capabilities and persons lacking experience and knowledge may only use the appliance if they are properly supervised, have been instructed on use of the appliance safely by a person responsible for their safety, and understand the resultant hazards involved.
Only people who have been instructed on how to use the device, or have proven their ability to operate it, and have been explicitly instructed to use it, must use the device.
Children must not operate the device.
Children must be supervised to prevent them from playing with the appliance.
Safety devices are provided for your own protection. Never modify or bypass safety devices.
Only connect the device to alternating current. The voltage indicated on the type plate must match the voltage of the power source.
Never touch the mains plug and socket with wet hands.
Only operate the device via a fault current protection switch (maximum 30 mA).
Never immerse the device, mains cable or mains plug in water or other liquids.
Only work with liquids (e.g. cleaning agents) if the device is connected to a socket protected with a fault current protection switch (maximum 30 mA).
Only connect the device to an electrical connection which has been set up by a qualified electrician as per IEC 60364‑1.
Switch off the device immediately in the event of leaks.
In case of any foam formation or escaping liquids, switch off the device immediately and remove the mains plug.
Check that the mains connection cable with mains plug is undamaged each time before using the device. To avoid any possible danger, a damaged mains connection cable must be immediately replaced by the manufacturer, or the authorised customer service department or a qualified electrician.
Do not damage the power supply and extension cable by running over it, crushing or yanking it or similar. Protect the power supply cable from heat, oil and sharp edges.
Unsuitable electrical extension cables can be dangerous. Only use electrical extension cables with a splash guard and a diameter of at least 3x1 mm2.
Only use the mains connection cable prescribed by the manufacturer, including when replacing the cable. For order no. and type see operating instructions.
Only replace couplings on the power supply or extension cable with those with the same splash guard and the same mechanical strength.
Do not use the device if it has been dropped beforehand, has received an impact or is visibly damaged. Have the device checked by the authorised Customer Service and repaired properly before using the device again. Internal malfunctions could impair the safety of the device.
Switch off the device and unplug the mains plug before performing cleaning/maintenance.
Have repair work and work on electrical components carried out by the authorised customer service only.
In case of longer breaks in operation and after use, switch off the device at the main switch / device switch and pull the mains plug.
Do not pull the mains plug out the socket using the power supply cable.
Do not carry/transport the device using the power supply cable.
When using the device in hazard zones (e.g. service stations), adhere to the respective safety regulations.
Operation in explosive atmospheres is prohibited.
Never use the device to extract any burning or smouldering objects.
Never spray or vacuum fluids, flammable gases, explosive dusts as well as undiluted acids and solvents. These include petrol, paint thinners or heating oil, which can form explosive vapours or mixtures through suction air turbulence, also acetone, undiluted acids and solvents because these attack the materials used in the machine.
Risk of explosion
Never use the device to vacuum up combustible gases, liquids or dusts.
Never use the device to vacuum up reactive metal dusts (e.g. aluminium, magnesium, zinc).
Never use the device to vacuum up undiluted brine or acids.
Never use the device to vacuum up any burning or smouldering objects/matter.
These substances can corrode the materials in use on the device.
Never use the device to vacuum up people or animals.
Do not suck in toxic substances.
Check the device and the accessories each time before operation, in particular the mains connection and extension cable, to make sure it is safe and working correctly. Pull out the mains plug in case of any damage and do not use the device.
Never leave the device unattended when it is not switched off and with the mains plug or the battery pack removed.
Do not use the device if it has been dropped beforehand, has received an impact or is visibly damaged. Have any damage repaired correctly before using the device again.
The device is not suitable for sucking dust that is harmful to health.
The device must be placed on a firm subsurface.
Use the socket on the device, if applicable, only for connecting accessories and attachments specified in the operating instructions.
The device is suitable for damp to wet floors up to a maximum water height of 1 cm. Do not drive into an area if there is a danger of exceeding the maximum water height.
The device is only suitable for use on the coats listed in the operating instructions.
Observe the legal regulations when disposing of waste water and brine.
Do not operate the device at temperatures below 0 °C.
Protect the device from rain and frost. Do not store the device outdoors.
Functional impairments. Do not suck in any substances that can harden in contact with water, such as plaster, cement, etc.
During operation, it is necessary to set the device down horizontally/level.
Keep the detergent out of the reach of children.
Never use the recommended detergents undiluted. These products are operationally safe since they do not contain any acids, alkali or substances that are harmful to the environment. Should detergents come into contact with eyes, rinse these out immediately and thoroughly using water and seek medical attention immediately. The same applies if detergents are swallowed.
Only use the detergents recommended by the manufacturer and observe the application, disposal and warning instructions of the detergent manufacturers.
Prior to cleaning, maintenance and replacement of parts, the device needs to be switched off and the mains plug or battery pack removed. Switch the device off before changing over to another function.
Repairs may only be carried out by approved customer service sites or staff qualified in this area who are familiar with all relevant safety instructions.
Clean the water lever limit facility regularly, checking for any signs of damage.
Short-circuits or other damage. Do not clean the device with a hose or high-pressure water jet.
Do not clean the device with scouring agents, glass cleaners or multi-purpose cleaners.
Only use accessories and spare parts which are approved by the manufacturer. Only original accessories and original spare parts ensure that the appliance will run fault-free and safely.
Switch off the device prior to transport. Secure the device, taking into account its weight. See chapter Technical Data in the operating instructions.
Only use the device in private households.
The device is intended for application as a spray extraction cleaner according to the descriptions given in these operating instructions and the safety instructions for the maintenance cleaning or basic cleaning of carpets with deep cleaning effect.
Hard floors can also be cleaned with a hard surface attachment for the spray extraction floor nozzle (included in the scope of delivery).
With the appropriate accessory (depending on different configurations), the device can also be used for wet and dry vacuum cleaning.
 The packing materials can be recycled. Please dispose of packaging in accordance with the environmental regulations.
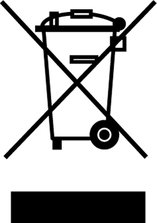 Electrical and electronic devices contain valuable, recyclable materials and often components such as batteries, rechargeable batteries or oil, which - if handled or disposed of incorrectly - can pose a potential danger to human health and the environment. However, these components are required for the correct operation of the device. Devices marked by this symbol are not allowed to be disposed of together with the household rubbish.
Current information on content materials can be found at: www.kaercher.de/REACH
Our local KÄRCHER branch will be happy to help you if you have any questions or problems with the device.
Only use original accessories and original spare parts. They ensure that the appliance will run fault-free and safely.
Information on accessories and spare parts can be found at www.kaercher.com.
The scope of delivery for the appliance is shown on the packaging. Check the contents for completeness when unpacking. If any accessories are missing or in the event of any shipping damage, please notify your dealer.
 | |
|---|---|
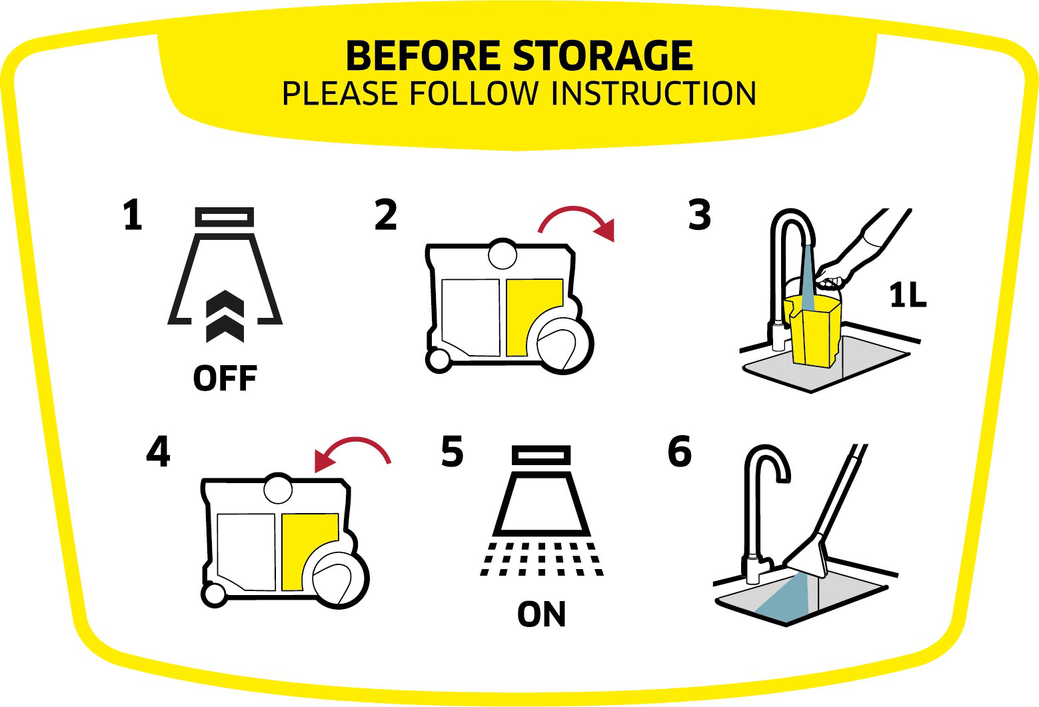
There is a label on the device head describing how to clean the device after use:
|
The device is equipped with different equipment depending on the model selected. The specific equipment is described on the device packaging.
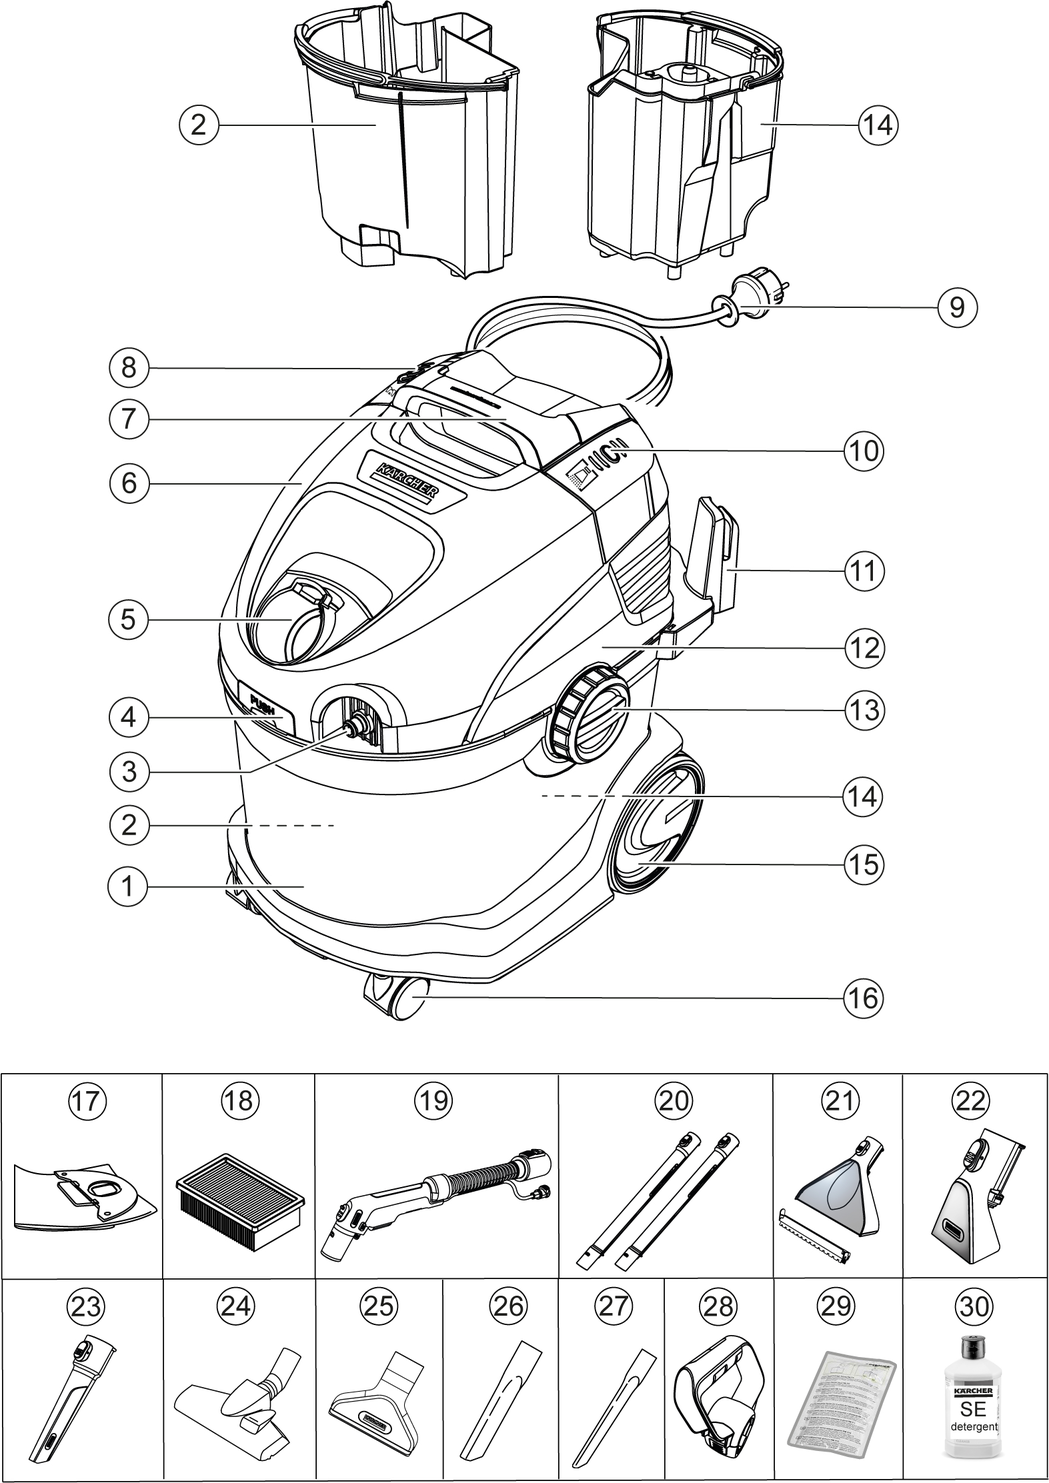
** depending on different configurations
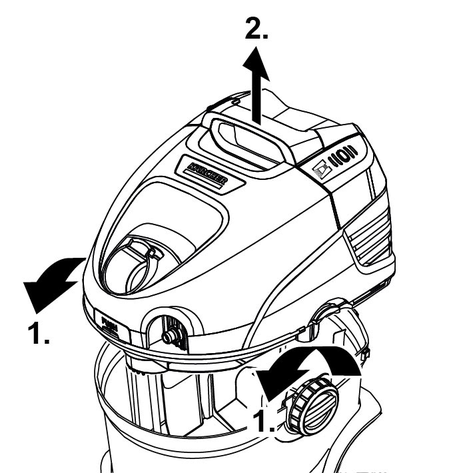
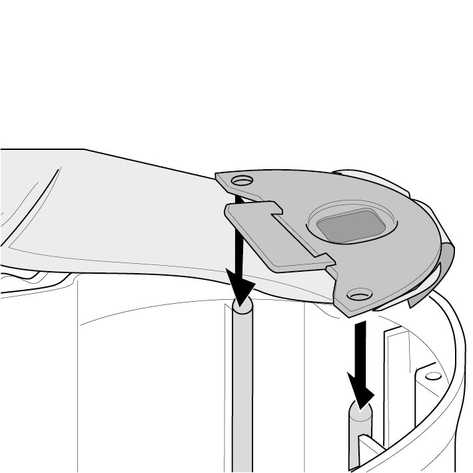
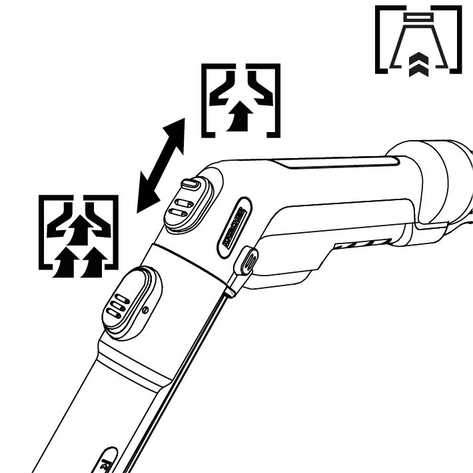
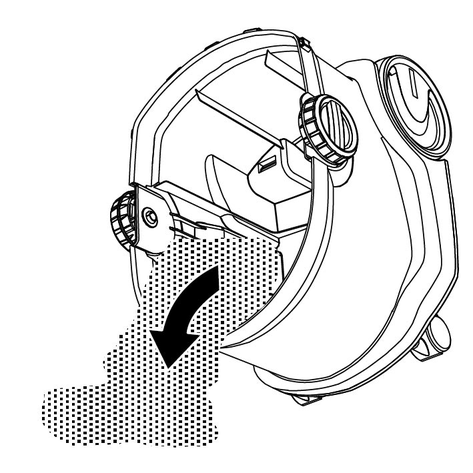
Turn both unlocking mechanisms in the direction of the arrow and remove the device head.
Remove the contents from the container.
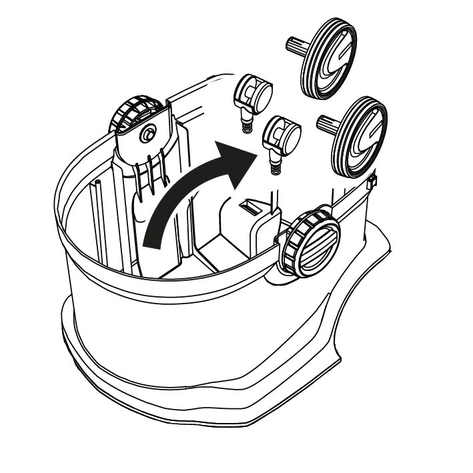
Push both non-driven wheels into the side openings on the container as far as they will go.

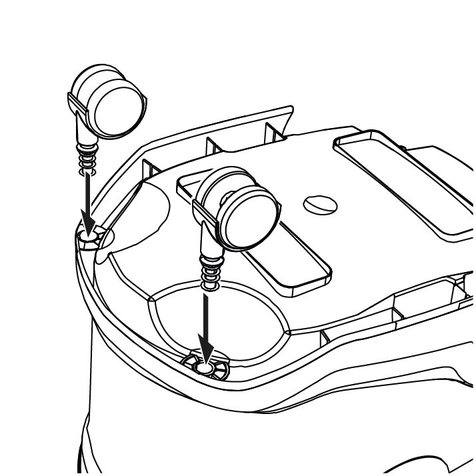
Turn the container upside down and push both steering rollers into the openings at the bottom of the container as far as they will go.
Turn the container upside down and clip on the accessory holder bracket on the back of the device head.

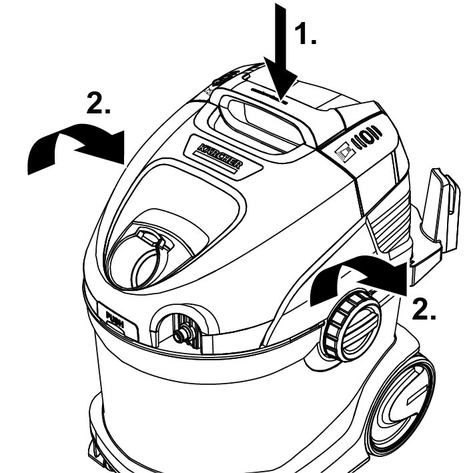
Fit the device head and turn both unlocking mechanisms in the opposite direction of the arrow. The device head is locked.
Depending on cleaning requirements:
For dry vacuum cleaning, insert the filter bag, see chapter Dry vacuuming
For washing vacuum cleaning, insert the waste water tank and fill the fresh water tank, see chapter Filling the fresh water tank.
For vacuum cleaning damp dirt/water, remove the fresh and waste water tank and the filter bag from the container, see chapter Emptying the container after vacuuming
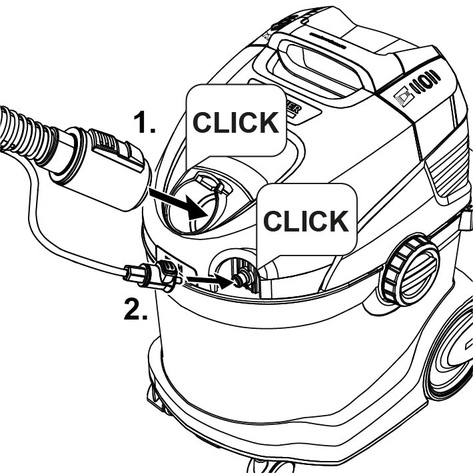
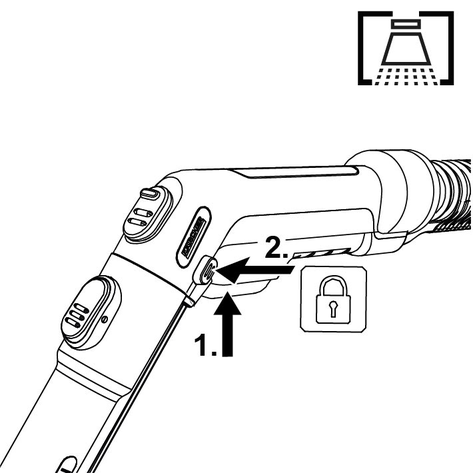
Attach the suction and spray hose to the connection on the device. Both parts must audibly engage.
Fit the accessory as required. See chapter Installing accessories.
Floor cleaning
Use the spray extraction floor nozzle for cleaning carpets or hard floors (with hard floor attachment).
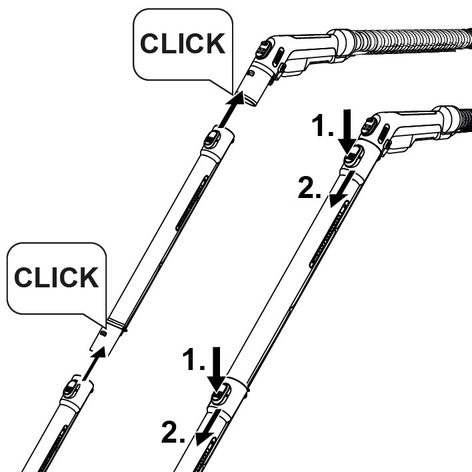
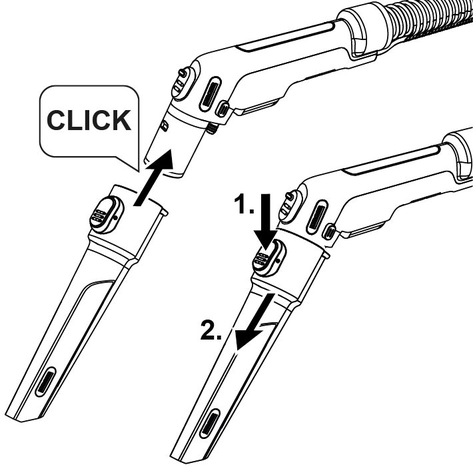
Plug the spray suction tubes together and connect them to the suction hose. All parts must audibly engage.
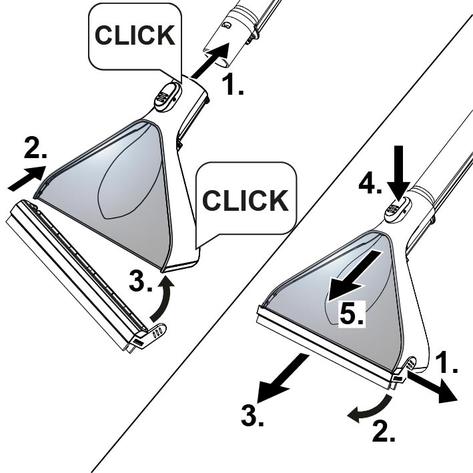
Attach the spray extraction floor nozzle to the spray suction tubes until it audibly engages.
Use the hard floor attachment for hard floor cleaning.
Fit the hard floor attachment on the spray extraction floor nozzle until it audibly engages.
The squeegee points to the front, the brush strips to the back.
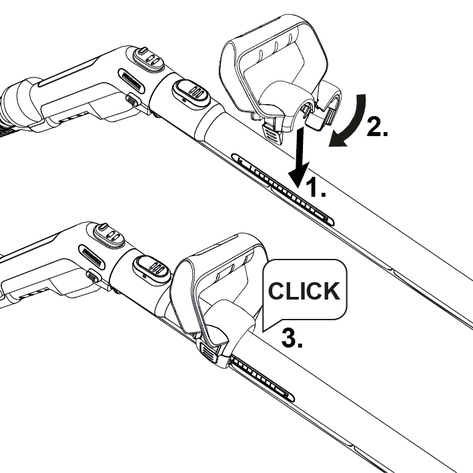
Upholstery cleaning
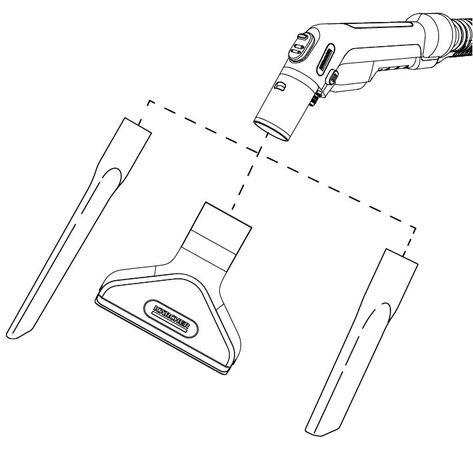
Depending on requirements, use the spray extraction upholstery nozzle or spray extraction crevice nozzle to clean e.g. upholstery and mattresses.
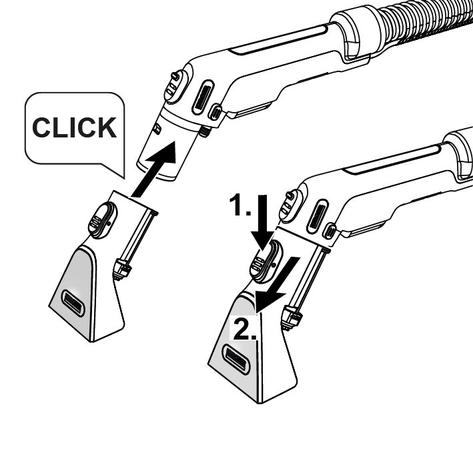
Attach the spray extraction upholstery nozzle or spray extraction crevice nozzle to the handle of the suction hose until it audibly engages.
Floor cleaning
For better handling and more comfortable work, the handle can also be mounted on the spray suction tubes when spray extraction cleaning.
Open the pipe bracket of the handle and attach it to the spray suction tube in the marked area. It must audibly engage.
To change the position of the handle, do not push the handle. Instead, but press the unlocking button and adjust the handle again.
For floor cleaning, plug the spray suction tubes together and connect them to the suction hose. All parts must audibly engage.
Slide the floor nozzle on to the spray suction tubes.

Depending on the floor covering and cleaning requirements, make sure that the floor nozzle settings are correct.
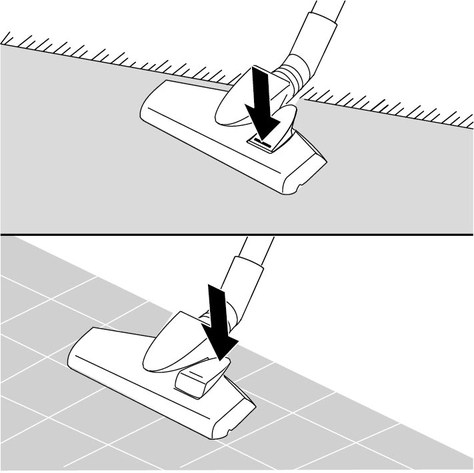
Using the switchable floor nozzle
Only use it to vacuum clean dry dirt.
For carpet cleaning, use the position with the brush strips retracted on the underside.
For hard floor cleaning, use the position with the brush strips extended on the underside.
To clean upholstered furniture, for example, slide the upholstery or crevice nozzle directly on to the handle of the suction hose.
Remove the hard floor attachment from the spray extracting floor nozzle.
Press the unlocking button and disconnect the spray extracting floor nozzle from the spray suction tubes.
Press the unlocking button and disconnect the spray suction tubes from each other.
Press the unlocking button on the spray extracting upholstery or spray extracting crevice nozzle and disconnect it from the suction hose.
Disconnect the floor nozzle from the spray suction tube.
Press the unlocking button and disconnect the spray suction tubes.
Disconnect the upholstery or crevice nozzle from the suction hose.
The use of unsuitable detergents can damage the device and result in loss of eligibility for warranty claims.
The fresh water and waste water tanks must be firmly seated in the device.
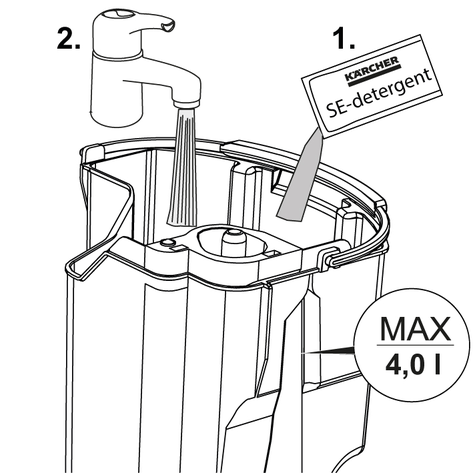
Use KÄRCHER SE detergent as required for textile cleaning.
Pour in the detergent and top up with water.
The total filling quantity is a maximum of 4.0 litres.
The fresh water tank can be removed at any time for filling or be filled directly on the device.
Filling the water reservoir directly in the device
Taking off the device head, see chapter Taking off the device head
Pour 100 - 200 ml of KÄRCHER SE detergent (quantity may vary depending on the degree of contamination) into the fresh water tank, fill up with tap water, do not overfill.
Fitting the device head, see chapter Fitting the device head
Removing the water reservoir for filling
Taking off the device head, see chapter Taking off the device head
Remove the fresh water tank from the container by the handle.

To fill, see “2” in “Filling the water reservoir directly on the device”.
Insert the fresh water tank into the container.
Fitting the device head, see chapter Fitting the device head
Depending on cleaning requirements, the suction and spray functions can be switched on and used independently or simultaneously.
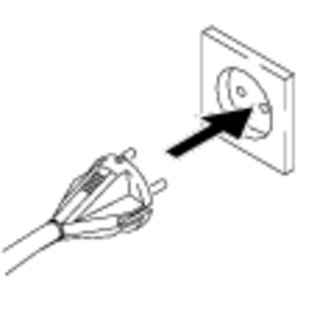
Plug the mains plug into the socket.
To switch on the device vacuum function, press the On/Off switch for vacuum cleaning.
The suction motor starts.

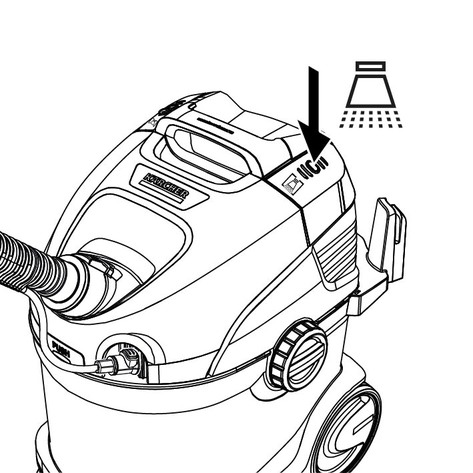
Press the spray switch to spray the water with the detergent.
The pump starts.
Close the air damper completely.

Spray heavily soiled areas in advance and allow the cleaning solution to work for 5 to 10 minutes.
Always work from light to shadow (from window to door).
Always work from the cleaned to the uncleaned area.
The more sensitive the covering (oriental bridges, Berber, upholstery fabric) the lower the concentration of detergent.
Carpets with jute backs can shrink and bleed in colour if the work is too wet.
Brush wet pile carpets in the direction of the pile after cleaning when wet (e.g. with a fibre brush or scrubber).
Impregnating after wet cleaning prevents the textile from being quickly soiled again.
To avoid pressure points or rust stains, do not walk on or furnish the cleaned area until after it has fully dried.
To improve the cleaning result, rinse the object with clean water after using detergents.
Warm water (maximum 50 °C) increases the cleaning effect.
Only use KÄRCHER SE detergent for cleaning.
Danger from cleaning solution
Risk of damage
Before using the device, check the object to be cleaned for colour fastness and water resistance in an inconspicuous place.Only use the device on hard floors with a waterproof coating, such asenamelled tiles or linoleum.
To avoid damaging the filter bag, do not use a filter bag for spray vacuum cleaning.
Make sure that the filter bag is removed.
Install the desired accessory, see chapter Installing accessories.
Fill the fresh water tank with detergent and water, see chapterFilling the fresh water tank.
Switch on the suction motor, see chapter Switching on the device
Close the air damper completely.
Switch on the spray suction function by pressing the On/Off switch for spraying. The pump starts.
Press the lever on the handle to spray the cleaning solution.
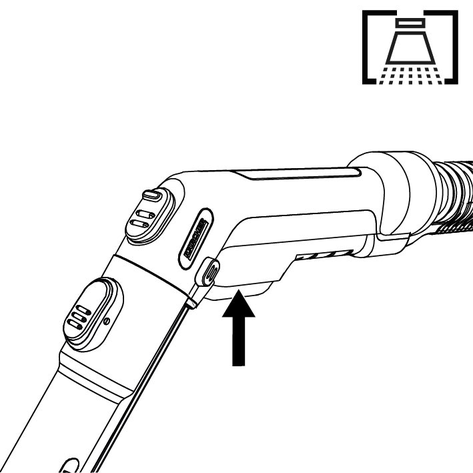
The cleaning solution is sprayed.
To spray large areas, first press the lever on the handle and then press the locking button.
Run over the surface to be cleaned in overlapping paths. In doing so, pull back the nozzle. Do not push it.
If the fresh water tank is empty, air enters the pump and it becomes noisy. In this case, the spray function must be switched off. If water is required, switch off the suction motor and fill the fresh water tank.
When the wastewater container is full, a float switch closes the suction opening and the device runs at a higher speed and becomes loud.
To avoid overfilling the waste water tank, empty the waste water tank directly when filling the fresh water tank.
After the cleaning work, switch off the spray suction function and the suction motor.
After switching off the device, there is still residual liquid in the spray extracting accessory, which runs out onto the floor. To vacuum up this residual liquid, briefly switch on the suction function of the device again and remove the residual liquid from the floor.
Switch on the device, see chapter Switching on the device and vacuum the residual fluid.
Switch off the device again, see chapter Switching off the device
Empty the waste water tank, see chapter Emptying the container after vacuuming
Press the switch for spraying, see chapter Switching on the device
Spray and vacuum clean the cleaning solution in one step.
Switch off the switch for spraying and vacuum clean the remaining detergent solution.
After cleaning, clean the upholstery and carpet with clear, warm water and impregnate if desired.
Press the switch for spraying, see chapter Switching on the device
Apply the cleaning solution and allow it to take effect for 5 - 10 minutes.
The vacuum function remains switched off.
After the contact time, clean the surface as for slight / normal contamination.
After cleaning, clean the upholstery and carpet with clear, warm water and impregnate if desired.
Damage to the filter bag
If a filter bag is used for wet vacuum cleaning, it may be damaged.
Do not use a filter bag when vacuuming wet.Remove the filter bag.
Install the desired accessory, see chapter Installing accessories.
Switch on the device, see chapter Switching on the device.
To vacuum clean large quantities of water, fully open the air damper.
When the wastewater container is full, a float switch closes the suction opening and the device runs at a higher speed and becomes loud.
Empty the container, see chapter Emptying the container after vacuuming.
Material damage due to vacuum cleaning without filter bag
This may damage the device.
Always ensure that the filter bag is inserted for dry vacuuming.Damage to the flat fold filter
When changing from wet to dry vacuum cleaning, a wet flat fold filter can become damaged and unusable.
Allow the flat fold filter to dry completely before dry vacuum cleaning or replace it with a dry one.Replace the flat fold filter as necessary.The container and accessories must be dry, otherwise dirt may adhere.
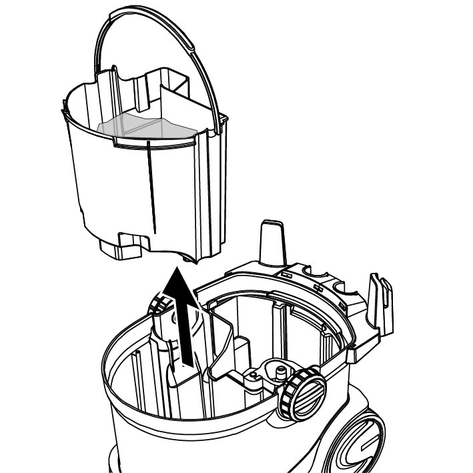
Remove the fresh and waste water tank from the device.
Make sure that the container and accessories are dry.
Attach the fleece filter bag in the container:
Unfold the fleece filter bag. Attach the holes in the cardboard flange of the filter bag to the side holders of the container on both sides.
Fit and lock the device head, see chapter Fitting the device head.
Install the desired accessory, see chapter Installing accessories
Switch on the device, see chapter Switching on the device.
Regulate the suction capacity with the sliding air damper.
Switch off the device, see chapter Switching off the device.
When the container is full, a float switch closes the suction opening and the device runs at a higher speed and becomes loud. Switch off the device immediately and drain the waster water.
Taking off the device head, see chapter Taking off the device head
Empty the container.
Fitting the device head, see chapter Fitting the device head
After spray vacuum cleaning, switch off the spray suction function by pressing the On/Off switch for spray suction.
Switch off the device by pressing the On/Off switch for vacuum cleaning.
Pull the mains plug out of the outlet.
Taking off the device head, see chapter Taking off the device head
Remove the fresh water and waste water tank from the container by the handle.
Empty the fresh water and waste water tank.
Insert the fresh and waste water tank into the container, ensuring that it is firmly seated.
Fitting the device head, see chapter Fitting the device head
To ensure that no cleaning particles and dirt particles remain in the lines, perform cleaning (without the addition of detergent) after each application.
Flush the spray lines in the device.
Switch off the device and remove the device head.
Remove the fresh water tank and fill it with about 1 litre of clear water.
Insert the fresh water tank and attach the device head.
Switch on the device and press the switch for spraying.
The pump starts.
Hold the spray/suction hose over a drain until the clear water has been used up.
Switch off the device, see chapter Switching off the device.
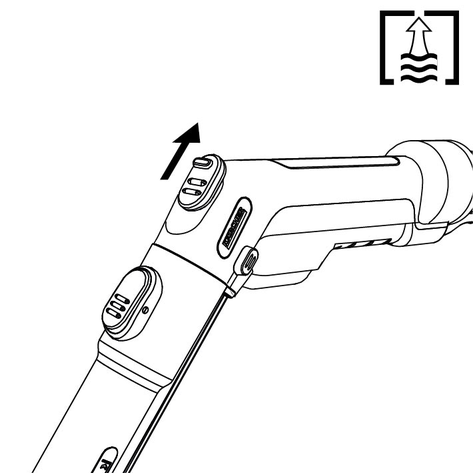
Disconnect the accessory, see chapter Disconnecting accessories
Remove the remaining liquid in the spray/suction hose.
Press the unlocking button and remove the spray/suction hose from the device.
Press the lever on the handle of the suction hose and allow the liquid to flow out.
To allow the liquid to dry completely, do not wrap the spray/suction hose around the device to dry.
To avoid puddles in the living area (e.g. on carpet, parquet), let the remaining liquid run in a suitable container (e.g. sink, bucket).
Clean the accessory parts individually under running water and then allow them to dry.
Any residual water may drip out, therefore it is best to place it in the shower or bath tub.
Empty the container, see chapter Emptying the container after vacuuming.
Thoroughly rinse the container with clear water.
If necessary,e.g. if the sieve in the fresh water tank is soiled, rinse the fresh water tank with clear water, see chapter Cleaning the sieve in the fresh water tank.
Leave the device open to dry.
After complete drying, attach the spray suction tubes to the accessory holder.
Store the device in a dry and frost-proof room.
Clean the device and plastic accessory parts with a commonly available plastic cleaner.
Rinse the container and accessories with water, as necessary, and dry them before further use.
For an optimum device function, clean the flat fold filter if it is contaminated.
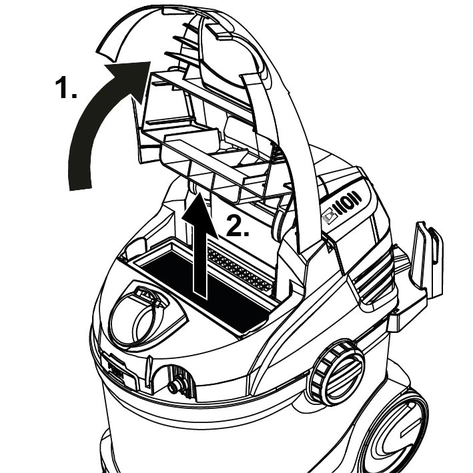
Unlock the cover on the device head.
Open the cover and remove the flat fold filter and grid.
Pull the flat fold filter apart over a waste container and shake it out. In the case of severe contamination, tap the flat fold filter against the edge of the waste container.

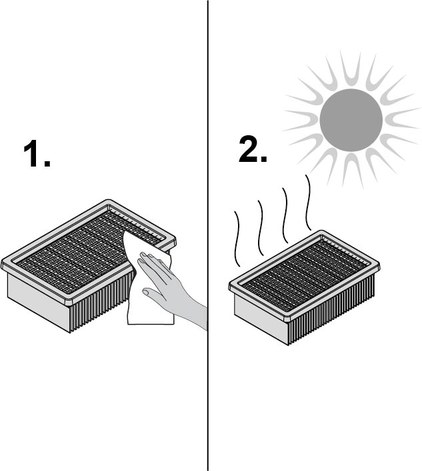
Damp filter cleaning.
If necessary, carefully wipe the flat fold filter with a damp cloth. Do not rub or brush off.
Allow the flat fold filter to dry completely before reusing.
If the spray jet is uneven, the spray nozzle of the spray extracting accessory can be damaged by residues and will need to be cleaned.
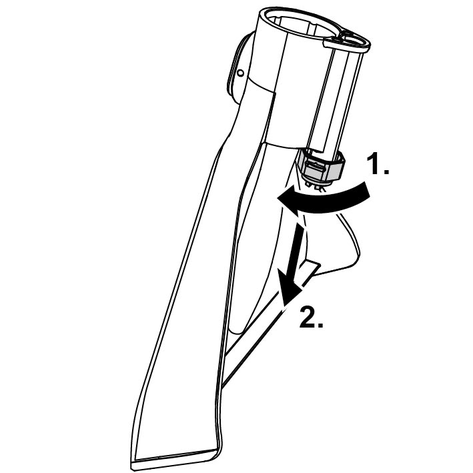
To clean the floor nozzle and spray extracting upholstery nozzle, loosen the nozzle fastener by turning it and pull it out together with the spray nozzle.
Keep the O-ring/sealing ring in a safe place and reinsert it after cleaning.
Clean residues in the spray nozzle under running water.
Insert the spray nozzle into the nozzle fastener and fasten it again by turning it.
Also clean residues in the spray nozzle of the spray extracting crevice nozzle under running water.
On the bottom of the fresh water tank there is a filter on which dirt particles can settle and thereby obstruct the water flow.
Therefore, regularly rinse out the fresh water tank.
Taking off the device head, see chapter Taking off the device head
Remove the fresh water tank from the container, see chapter Filling the fresh water tank
Clean the sieve.
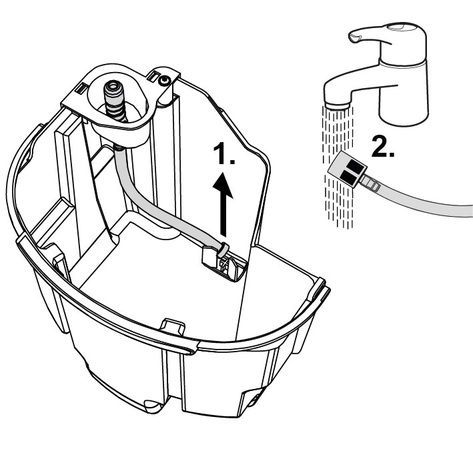
Remove the water hose from the tank.
The sieve is at the end of the water hose.
Clean the sieve under running water.
Rinse the fresh water tank with clear water.
Insert the sieve into the fresh water tank.
Re-insert the fresh water tank into the container.
No water emitted from the nozzle
Cause:
Fresh water tank empty
Remedy:
Fill up the fresh water tank.
Cause:
Fresh water sieve is dirty,
Remedy:
Clean the fresh water filter.
Cause:
Fresh water tank not installed correctly.
Remedy:
Install the fresh water tank correctly.
Cause:
Connection between accessory and spray/suction hose not correct.
Remedy:
Establish the correct connection.
Cause:
Detergent pump defective,
Remedy:
assign Customer Service.
Cause:
Spray nozzle on the accessory for spray extracting cleaning is soiled.
Remedy:
Clean the spray nozzle on the respective accessory.
Poor suction performance
Cause:
The sliding air damper is open too wide.
Remedy:
Close the sliding air damper.
Cause:
Accessory, suction hose or suction tubes are clogged.
Remedy:
Remove the blockage.
Cause:
The filter bag is full.
Remedy:
Empty the filter bag.
Cause:
The flat fold filter is soiled.
Remedy:
Cleaning the flat fold filter
Cause:
The flat fold filter is worn out.
Remedy:
Insert the flat fold filter.
Detergent pump loud
Cause:
Fresh water tank empty
Remedy:
Fill up the fresh water tank.
The warranty conditions issued by our relevant sales company apply in all countries. We shall remedy possible malfunctions on your appliance within the warranty period free of cost, provided that a material or manufacturing flaw is the cause. In a warranty case, please contact your dealer (with the purchase receipt) or the next authorised customer service site.
Further information can be found at: www.kaercher.com/dealersearch
Further warranty information (if available) can be found in the service area of your local Kärcher website under "Downloads".
Electrical connection | |
Frequency | 50-60 Hz |
Voltage | 220-240 V |
Power protection (slow-blowing) | 10 A |
Nominal power | 1000 W |
Device performance data | |
Max. fresh water filling quantity | 4 l |
Max. waste water filling quantity | 4 l |
Max. cleaning solution temperature (T in max.) | 50 °C |
Dimensions and weights | |
Weight (without accessories) | 7,5 kg |
Length x width x height | 424x320x466 mm |
Determined values in acc. with EN 60704-2-1 | |
Sound pressure level | 77 dB(A) |
#-#-#-A5-#-aw13020