KIRA, CV 50
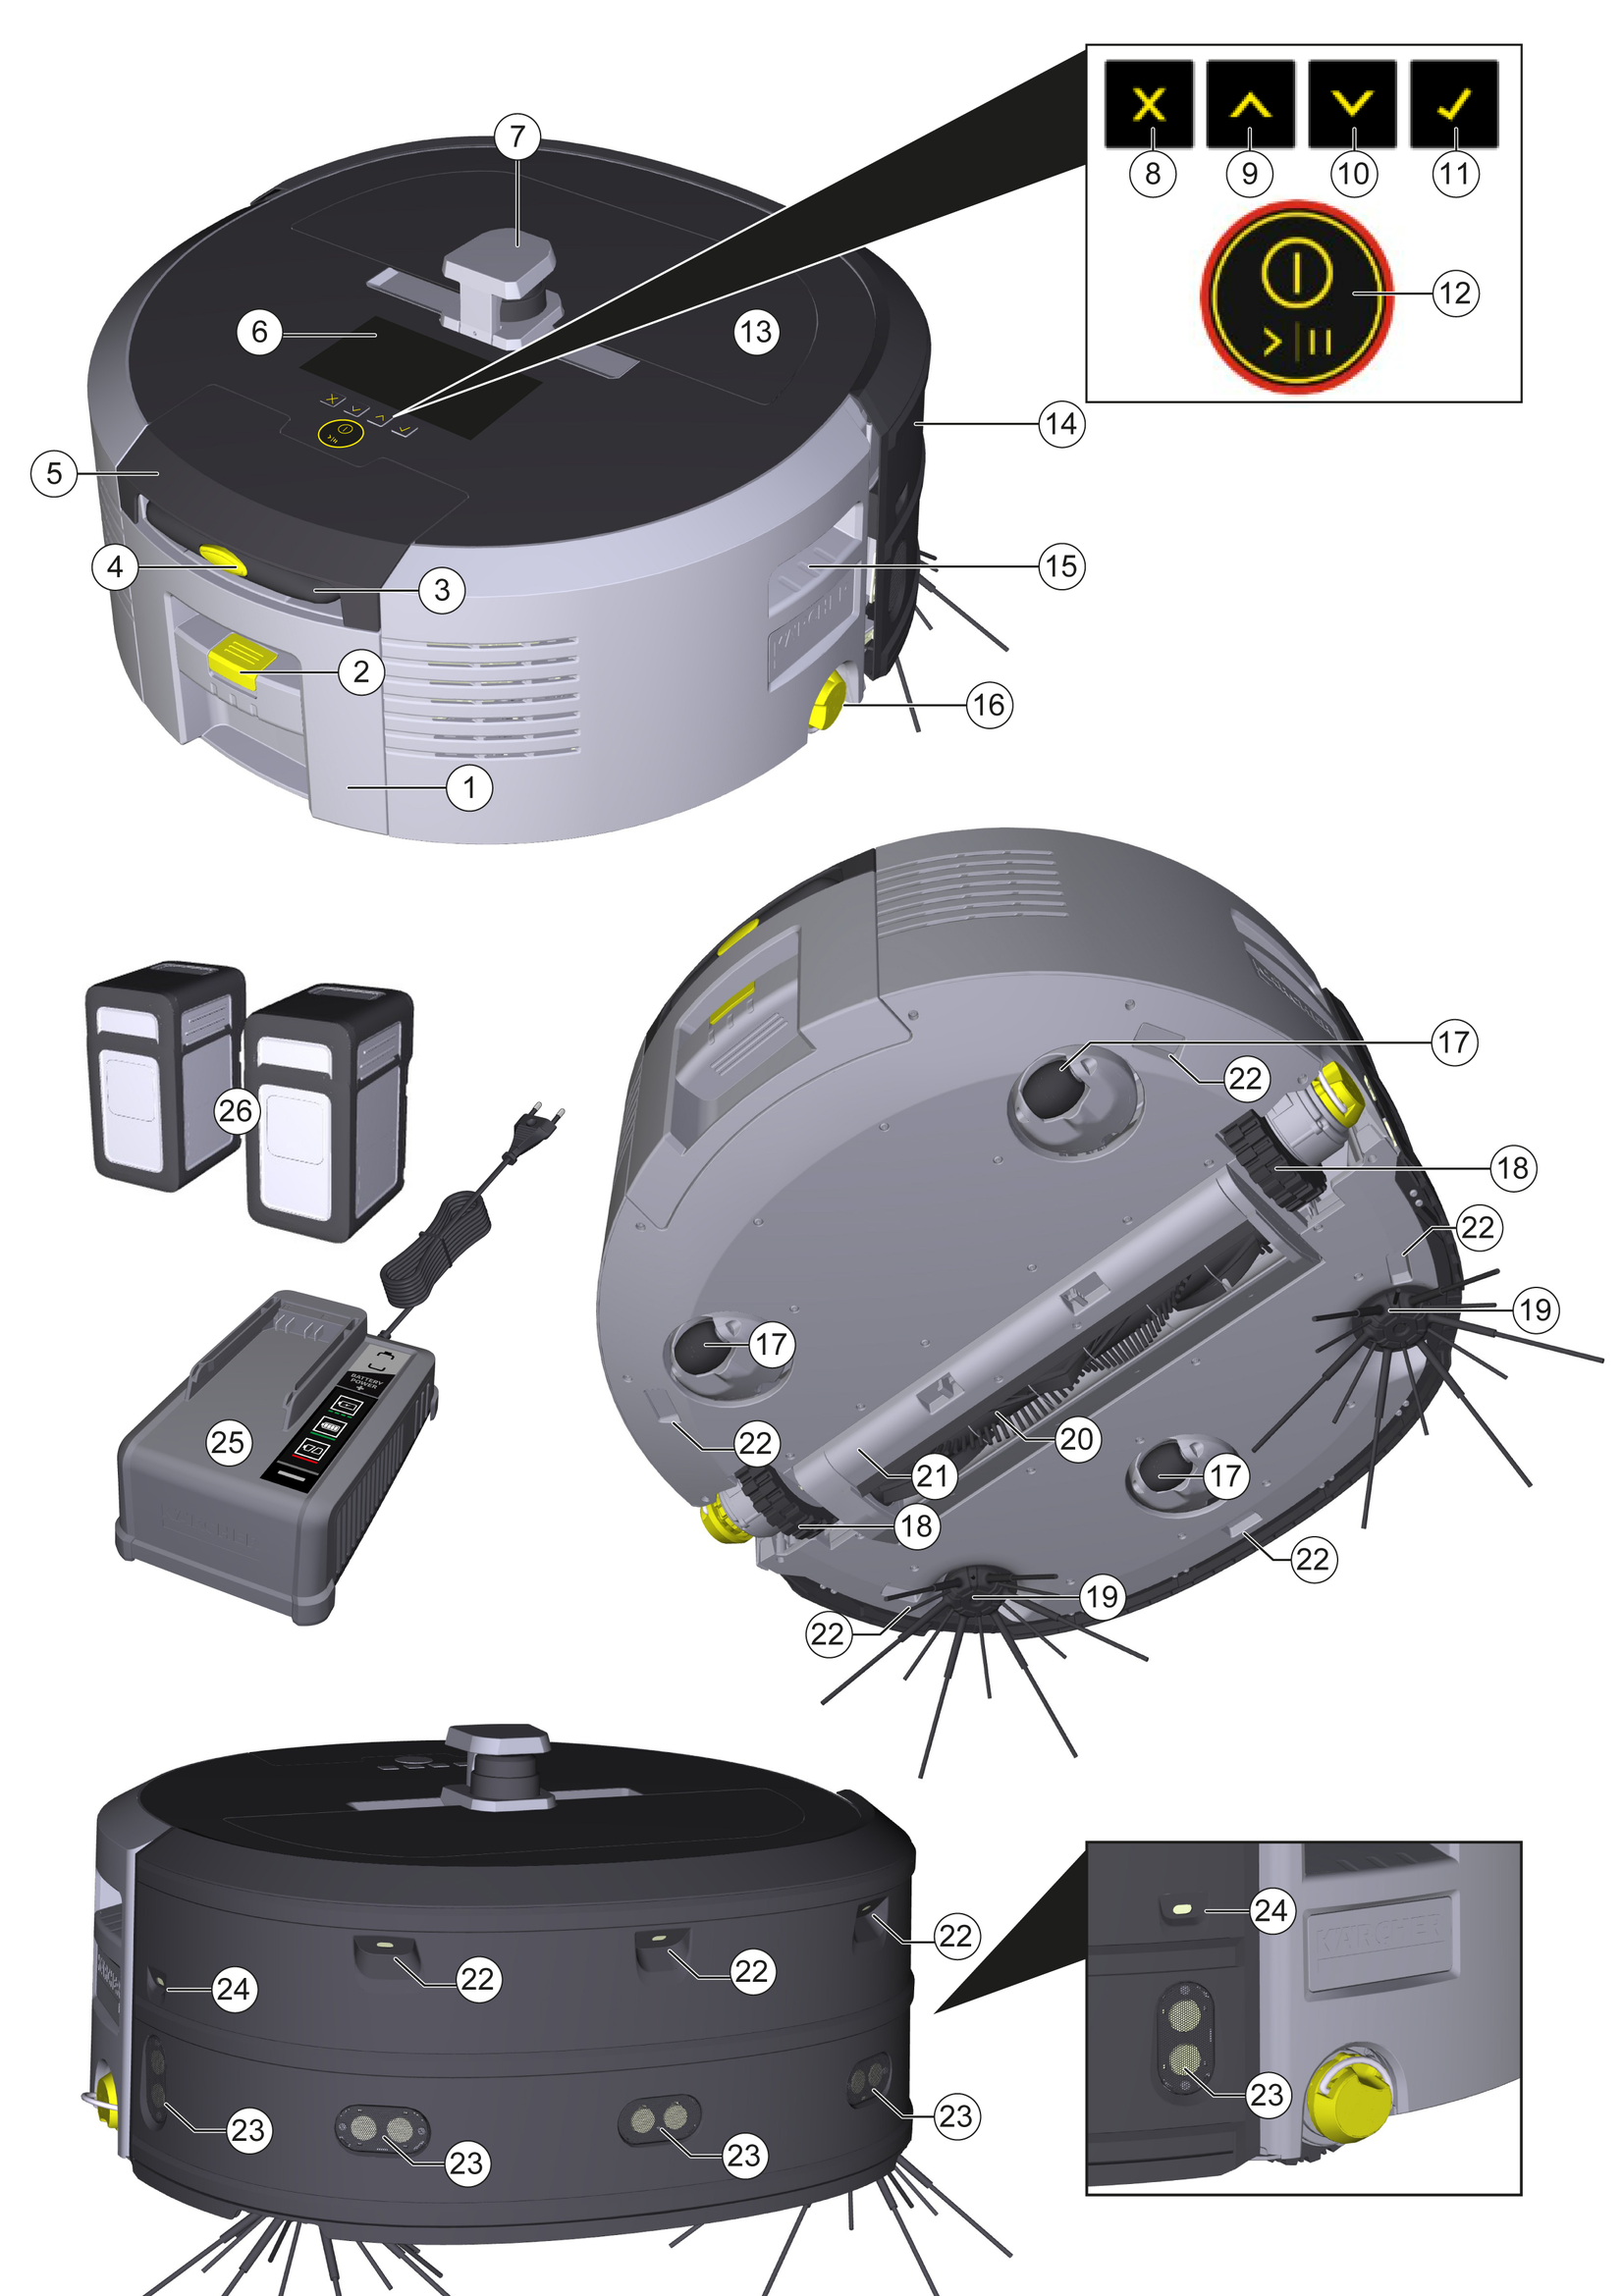
59801680 (01/25)
59801680 (01/25)
 Before using the device read the enclosed original instructions of this device, the battery pack and the charger. Act in accordance with them.
Keep these documents for future reference or for future owners.
If the operating instructions are not observed, the device can be damaged and dangers could arise for users and other persons.
Notify the dealer immediately in the case of shipping damage.
Check the package contents when unpacking for missing accessories or for damage.
You will find a QR® code to download the app and call up the online operating instructions here:
Trademark
QR-Code® is a registered trademark of DENSO WAVE INCORPORATED.
 The packing materials can be recycled. Please dispose of packaging in accordance with the environmental regulations.
 Electrical and electronic devices contain valuable, recyclable materials and often components such as batteries, rechargeable batteries or oil, which - if handled or disposed of incorrectly - can pose a potential danger to human health and the environment. However, these components are required for the correct operation of the device. Devices marked by this symbol are not allowed to be disposed of together with the household rubbish.
Current information on content materials can be found at: www.kaercher.de/REACH
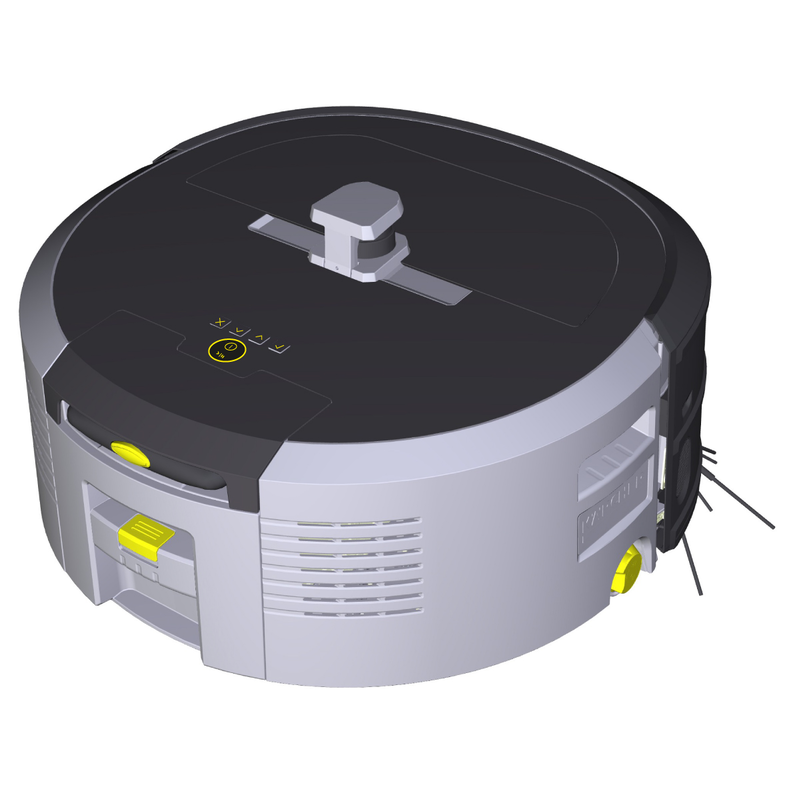
This cleaning robot is intended for autonomous dry cleaning of carpets and hard floors and can be used for autonomous, continuous maintenance cleaning of all common floor coverings.
Do not use the cleaning robot to clean wet floors, washrooms or other damp areas, stairs, table tops, shelves or outdoor areas.
The manufacturer accepts no liability for possible damage caused by improper use or incorrect operation.
This device is suitable for commercial use,e.g. in hotels, schools, shops, offices or libraries.
Only charge the battery pack with the chargers approved for charging:

Indication of an imminent threat of danger that will lead to severe injuries or even death.
Indication of a potentially dangerous situation that may lead to severe injuries or even death.
Indication of a potentially dangerous situation that may lead to minor injuries.
Indication of a potentially dangerous situation that may lead to damage to property.
Risk of asphyxiation. Keep packaging film out of the reach of children.
Only use the device for its proper use. Take into account the local conditions and beware of third parties, in particular children, when working with the device.
This device must not be used by persons (including children) with restricted physical, sensory or mental abilities or those lacking in experience and knowledge.
Only people who have been instructed on how to use the device, or have proven their ability to operate it, and have been explicitly instructed to use it, must use the device.
Children must not operate the device.
Children must be supervised to prevent them from playing with the appliance.
Do not expose the device or the battery to excessive temperatures.
Risk of accidents and injuries. Take into account the weight of the device for transportation and storage. See chapter Technical data in the operating instructions.
Safety devices are provided for your own protection. Never modify or bypass safety devices.
Store the battery pack separately from the device for safety.
Damage to the device. Do not stand on the device or place children, objects or pets on it.
The appliance contains electrical components - do not clean the appliance under running water.
Inspect the charger and battery pack for damage every time before use. Do not use any damaged devices. Only have damaged parts repaired by specialist personnel.
Switch off the device and remove the battery pack before performing any care and service work.
Have repair work and work on electrical components carried out by the authorised customer service only.
Do not operate the device in rooms where the air contains flammable gases from petrol, heating oil, paint thinner, solvents, petroleum or spirit (risk of explosion).
Do not operate the device in rooms with a burning fire or embers in an open fireplace without supervision.
Do not operate the device in rooms with burning candles without supervision.
Do not use non-rechargeable batteries as a replacement for rechargeable batteries.
Short circuit hazard. Keep conductive objects (e.g. screwdrivers or similar tools) away from the charging contacts.
Do not stand or sit on the charging station of the replaceable battery or the cleaning robot.
Be aware of the risk of tripping due to the cleaning robot moving around.
Risk of injury. Never touch the rotating cleaning brush or the rotating side brushes of the device with your fingers or with tools during operation.
Be aware that objects can fall over if the cleaning robot bumps into them (also objects on tables or small pieces of furniture).
The device is not suitable for sucking dust that is harmful to health.
Do not operate the device in rooms that are secured with an alarm system or motion sensor.
Only use the device indoors.
Do not use the device on floors with liquids or sticky substances.
Do not use the device to pick up any sharp or large objects,e.g. shards or packaging film.
Do not spray any liquids into the device and make sure the dust container is dry before fitting it.
The device can get caught in hanging electric cables, tablecloths, cords, etc. and knock over objects.
Pick up all cables from the floor before using the device to prevent it from dragging them when cleaning.
Do not use the device in an area that is above the floor, e.g. on a sofa.
Do not operate the device on elevated levels that are not protected by a physical barrier, e.g.by a railing.
Delimit danger zones such as holes in the floor or dangerous fall points with physical barriers before operation.
There are two options to lock the display of the cleaning robot for unauthorised persons.
Child lock:
The child lock locks the display if the user presses “Up” button and “Down” button simultaneously. To unlock, both buttons must be pressed again.
The childproofing function is also automatically activated when autonomous cleaning has been started or when the cleaning robot has switched to sleep mode when not in use.
The option for switching the child lock on and off can only be selected in the settings menu of the cleaning robot.
When the PIN lock is active, the child lock cannot be used.
PIN lock:
The PIN lock allows the user to set their 4-digit personal security code, which they can use to unlock the cleaning robot.
The PIN lock activates the display when the cleaning robot switches to sleep mode after 5 minutes or when the cleaning robot starts the cleaning process.
When the PIN lock is active, the child lock cannot be used.
The PIN lock can be activated and set in the app. To be able to assign a personal PIN, the initial PIN 9999 must be used.
With the anti-theft function, both the cleaning robot and the battery pack can be protected against theft. This protection can be activated separately in the app.
The anti-theft function can be activated in the app once a PIN has been assigned and the PIN lock is active.
If the battery compartment cover is opened or the cleaning robot is lifted before it has been unlocked via the PIN lock, an alarm in the form of sound and light signals is triggered until the cleaning robot is unlocked using the PIN.
Only use original accessories and original spare parts. They ensure that the appliance will run fault-free and safely.
Information on accessories and spare parts can be found at www.kaercher.com.
Check the contents for completeness when unpacking. If any accessories are missing or in the event of any shipping damage, please notify your dealer.
* optional
Symbol | Meaning |
|---|---|
 | The device is connected to WLAN. |
 | The device is connected to the installed SIM card. |
 | The dot on the symbol indicates a new maintenance notice. |
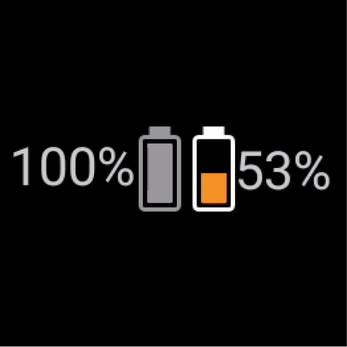 | The percentage value describes the remaining battery run time per battery pack. |
 | The device is operated in Eco mode. |
The mobile cleaning robot draws its energy from replaceable batteries inserted into the device. With two fully charged 36 V battery packs, the cleaning robot can clean up to 210 minutes.
The cleaning robot moves systematically. It scans the room with a LiDAR sensor and then cleans the room in stages. With additional ToF, ultrasonic and crash sensors, it detects obstacles and crashes early and avoids them. It touches low objects with its safety bumper that it cannot recognise with its sensors and avoids them after touching them.
LED light colour | Meaning |
|---|---|
Blue | Autonomous operation |
White | Transport mode |
Yellow |
|
Orange |
|
Red |
|
There are two cleaning modes to choose from. In both modes, the cleaning robot systematically cleans the room by dividing it into segments. A cleaning around the edges of the segment is always carried out first. The cleaning robot then cleans the segment “lanes”.
Basic Modus:
One-time cleaning that cannot be scheduled.
Suitable for closed rooms in which the cleaning robot is allowed to move freely.
The cleaning robot can be operated via the app without any set-up and is ready for use immediately after the initial start-up.
The cleaning robot does not need to be set up in advance. Cleaning is carried out without a previously established and stored map.
After cleaning, the cleaning robot returns to the starting point where it began cleaning.
Routine mode:
Suitable for complex environments that require regular cleaning. To be able to use this mode, a map of the surroundings must be created beforehand. The card is named in the app and should be processed for efficient cleaning.
To carry out cleaning, an already created map is selected on the cleaning robot. This allows the cleaning robot to plan the segments efficiently from the beginning and to work in an even more productive manner. The map adapted by the user is taken into account by the cleaning robot when planning the segments.
The cleaning of a selected map can be started by using the display on the cleaning robot or through a scheduled cleaning in the app.
The cleaning robot must be placed in the starting area (approx. 2 m x 2 m) of the map.
If the map selected on the cleaning robot does not match the outline of the room to be cleaned where the cleaning robot is located, the localisation fails and the cleaning robot does not start cleaning. A notification appears on the display.
The desired suction strength can be selected on the cleaning robot’s display under “Settings” > “Suction mode” or in the app. The setting applies to the entire map, except for special cleaning zones.
Normal mode
Eco mode
Reduced suction performance and brush speed
Energy-saving: resulting in longer run time
Reduced volume: thus suitable for noise-sensitive environments, e.g. in corridors in front of conference rooms or hotel rooms
The cleaning robot automatically switches to sleep mode after 5 minutes of inactivity.
The display is switched off, the cloud or app connection and the buttons remain active. In idle mode, the cleaning robot is online for approx. 3 days before the battery packs are empty.
To exit sleep mode, press any operation button.
When light and sound are activated, the cleaning robot emits an acoustic signal and visual signal as soon as an error occurs.
Critical error (red):
The cleaning robot cannot continue cleaning.
The cleaning robot emits an acoustic signal and the LED strip flashes red
A notification is displayed in the app.
Warning notice (orange):
The cleaning robot emits an acoustic signal and the LED strip flashes orange.
Cleaning continues. Human assistance may be necessary,e.g. to change the battery packs or empty the dirt receptacle. Once the cleaning robot finishes cleaning or a battery change is necessary beforehand, the robot returns to the starting point of the map.
A notification is displayed in the app.
Check the package contents when unpacking.
In case of shipping damage, inform dealer immediately.
Remove the protective film from the top of the device, the battery compartment cover and the lid of the storage compartment for the telescopic handle.
Remove the foam to protect the safety bumper.
Charge the battery packs (see operating instructions and safety instructions for the battery packs and the charger).
Fully charge the battery packs each time they are charged before reinserting them into the device.
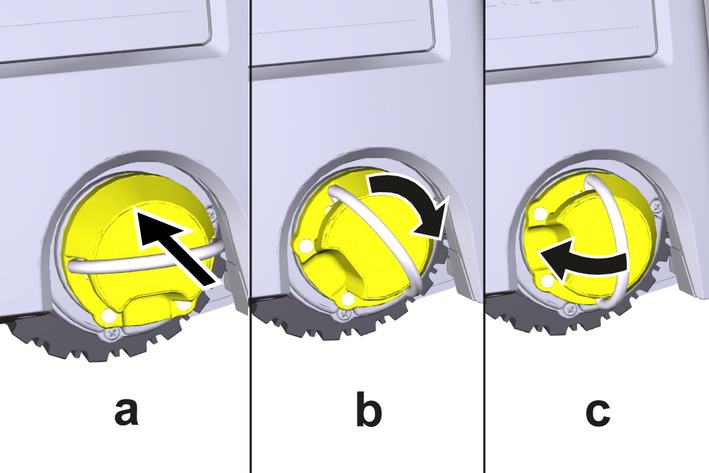
Push the side brushes into the holders at the bottom of the device until they audibly click into place.
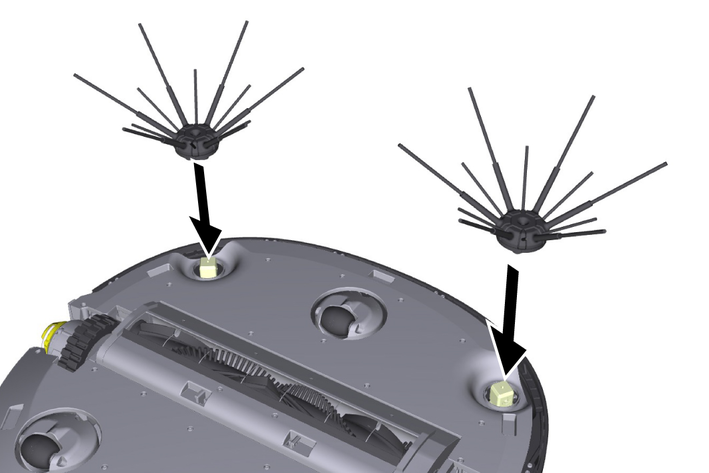
Two screws are included to secure the side brushes to the device if they should come loose during cleaning and require additional securing.
Open the battery compartment cover.

Press one or two battery packs into the battery pack holder on the device until you feel it/them latch into place.
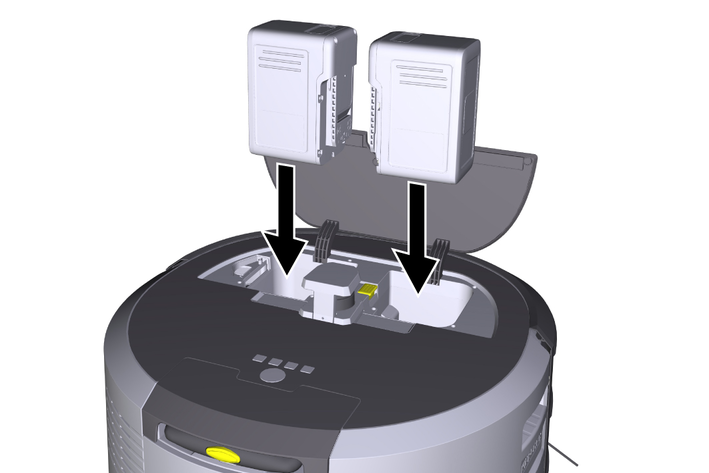
Close the battery compartment cover.
To be able to use all available functions we recommended downloading the Kärcher KIRA Robots app, see Accompanying product information.
Connect cleaning robots with the Kärcher KIRA Robots app:
Download the Kärcher KIRA Robots app.
Open the Kärcher KIRA Robots app.
Log in or create an account.
Follow the step-by-step instructions in the App.
Danger due to obstacles
Risk of damage
Before operating the cleaning robot, make sure that there are no obstacles on the floor.Risk of damage to the floor
During cleaning, small parts could get caught in the Cleaning brush and scratch the floor.
Before each cleaning process, check the Cleaning brush for small parts that are stuck.Risk of damage
The cleaning robot does not recognise escalators, which can cause the device to fall.
Keep the cleaning robot away from escalators.Keep the floor free of objects lying around to ensure efficient cleaning. Obstacles require time-consuming cleaning because the cleaning robot has to drive around objects.
Open the doors of the rooms that were also open during the creation of the map and are to be cleaned.
For cleaning in Routine mode: Carry out the configuration in the app so that the cleaning robot can clean according to individual cleaning requirements (no-go zones, different cleaning parameters, etc.), see chapter Adaptation options in the app.
Danger zones, such as holes in the floor or dangerous fall points, must be manually demarcated with physical barriers. Areas that the cleaning robot is not allowed to enter must be demarcated in the map beforehand with a no-go zone.
Keep On/Off/Pause button pressed for 3 seconds.
The device starts up.
Wait until the dashboard appears on the display.
When starting up the device for the first time, wait briefly until the SIM card establishes reception.
Press any button.
The main menu appears on the display.
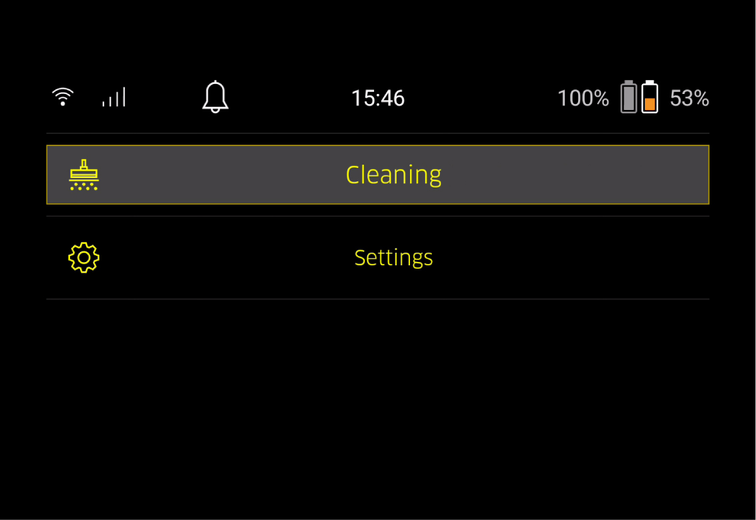
The settings can be accessed in the main menu under “Settings”.
You can choose between Normal mode and Eco mode, see chapter Suction strength.
Select the “Notifications” button in the “Settings” main menu.
The display shows the last five notifications, which could still be relevant.
Settings for light, sound and language can be made on the cleaning robot. Settings can also be reset.
Light:
In the “Settings” main menu, select the “Device settings” button.
Select the “Lights” button.
Select the desired setting using the arrow keys and confirm with “Confirm” button.
Sound:
In the “Settings” main menu, select the “Device settings” button.
Select the “Sound” button.
Select the desired setting using the arrow keys and confirm with “Confirm” button.
If the “Warnings” setting is selected, signals are only emitted when warning or error messages occur.
If the “Device sounds” setting is selected, signals are also emitted when the unit is booted up and shut down.
The language of the display on the cleaning robot can be selected in the main menu via “Settings” > “Device settings” > “Language”.
The unit can be reset to the factory settings in the main menu under “Settings” > “Device settings” > “Reset settings”.
The maps that have already been created and the device settings that have been made are deleted when the device is reset.
In the “Settings” main menu, select the “Locking/security” button.
Select the desired setting using the arrow keys and confirm with “Confirm” button.
Selecting the “Flight mode” setting disconnects the Internet connection.
Selecting the “Child lock” setting activates the child lock.
In the “Settings” main menu, select the “Help” button to call up animations on the maintenance of the device.
Select the desired animation using the arrow keys and confirm with “Confirm” button.
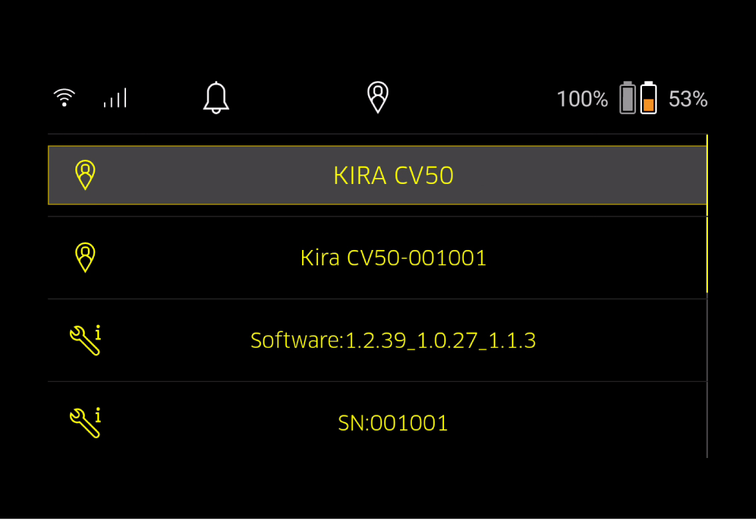
In the “Settings” main menu, select the “My robot” button.
Information about the device is shown on the display:
When opening the app for the first time, step-by-step instructions appear.
Follow the step-by-step instructions in the App.
On the device display, select the “Connect robot to app” button in the “Settings” main menu.
Scan the QR code.
The device is connected to the app.
The cleaning robot can only be added to one account. To connect the cleaning robot to a new account, it must first be removed from the old account. However, a main account can invite several users to give them access to a cleaning robot. However, no cleaning robot may yet be stored in the user's account.
The following settings can only be made in the app:
Create an account and invite other users to this account
Connect a user and cleaning robot
Schedule cleanings and predefine suction modes
Create and edit cleaning maps
Receiving notifications
View detailed cleaning reports
Set a security code
Activate an anti-theft device
Use the “Where is my robot?” search function
Edit data for “My robot”, see chapter My robot.
Assign and change robot names
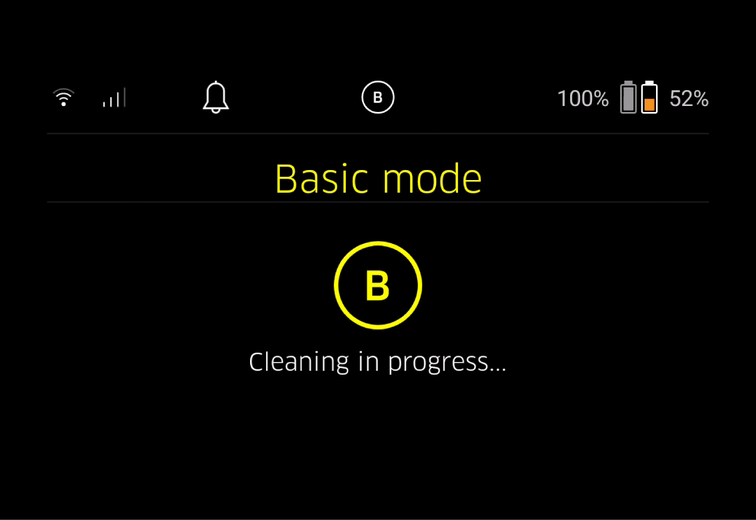
Basic mode can be used without an app.
One-time cleaning that cannot be scheduled.
Suitable for closed rooms in which the cleaning robot is allowed to move freely.
Check the sensors for dirt and clean them with a damp, lint-free cloth if necessary.
In the “Cleaning” main menu, select the “Basic mode” button.
A prompt appears on the display asking whether the device and the environment have been prepared for cleaning.
Prepare the device and the environment accordingly and confirm with the “Confirm” button.
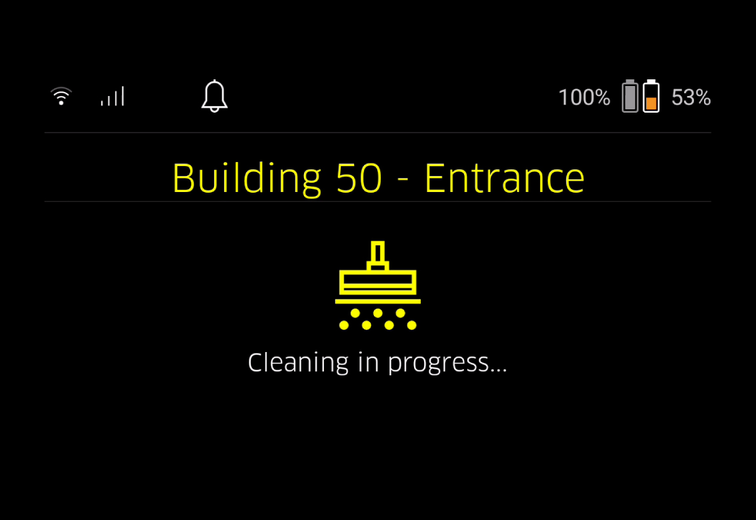
The cleaning robot starts cleaning.
Once cleaning is finished, the cleaning robot returns to the starting area.
The display shows the time needed for cleaning and the size of the cleaned area.
A detailed cleaning report can be viewed in the app.
In the “Cleaning” main menu, select the button “New map” > “Autonomous mapping”.
A prompt appears on the display asking whether the device and the environment have been prepared for cleaning.
Prepare the device and the surrounding area accordingly and keep the floor free of objects lying around. Open the doors of the rooms that are to be cleaned.
Confirm with “Confirm” button
The cleaning robot starts the exploratory run.
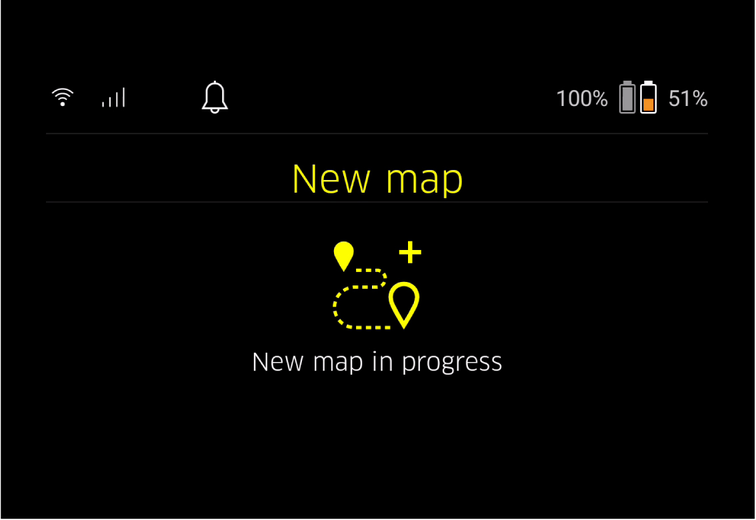
Once the exploratory run is complete, the cleaning robot returns to the starting point.
The display shows the time needed for the exploratory run.
The map is now available in the app and can be named and adapted. If there is no connection to the app when the map is created, the map is still initially saved on the cleaning robot with a date and time stamp.
Manual map creation via remote control is suitable for areas where autonomous map creation could be challenging for the cleaning robot (e.g. glass buildings) or for areas that do not need to be fully mapped, as no complete cleaning of the area is required.
In the “Cleaning” main menu, select the button “New map” > “Map creation via remote control”.
A message that the remote control should be called up in the app appears on the display.
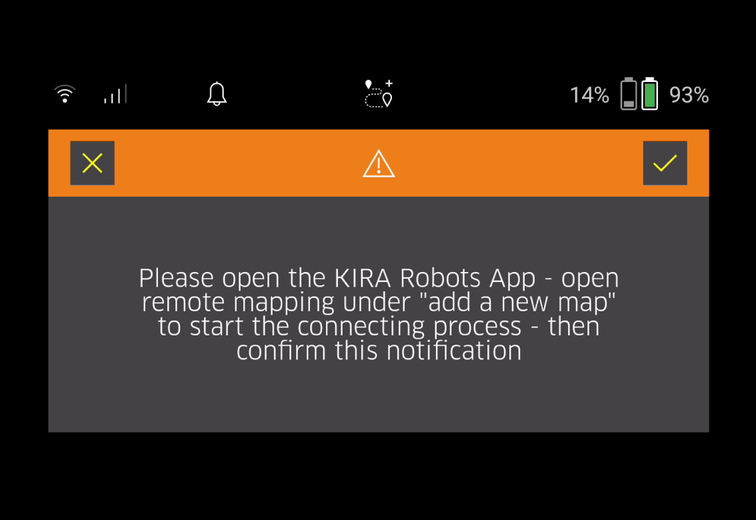
Call up the remote control in the app and confirm the message with “Confirm” button .
Use the remote control to guide the cleaning robot through the areas to be mapped.
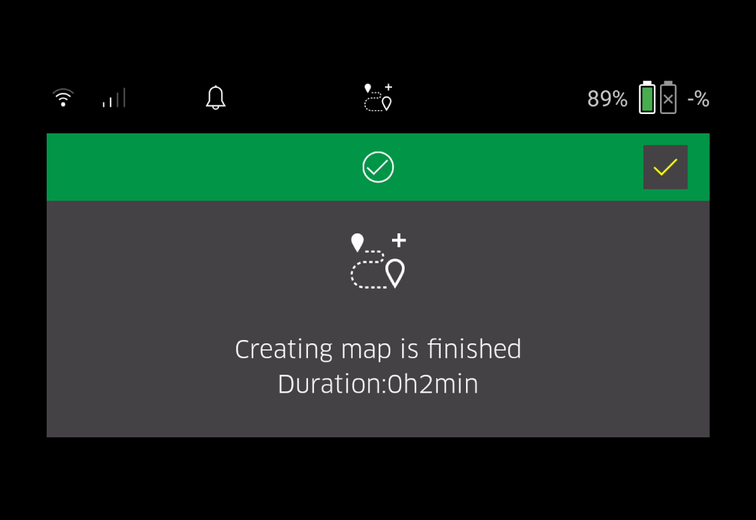
The map creation is shown on the display at the same time.
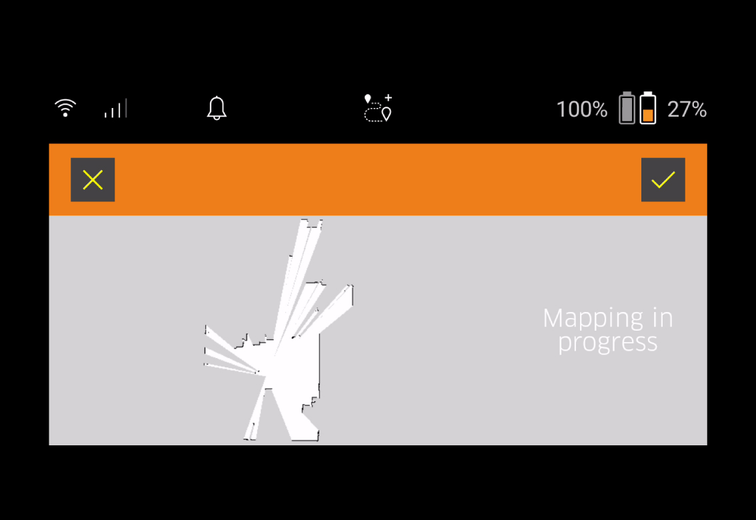
Once the area has been mapped and the area to be cleaned is displayed in white on the map, the map is saved via the app and the map creation is completed.
The display shows the time needed for the exploratory run.
The map is now available in the app and can be named and adapted.
The map can be named and adapted in the app via the “Maps” tab.
Determining no-go zones and virtual walls
Define starting area
Set special cleaning zones and definition of single or double cleaning
Defining suction strength (see chapter Suction strength) for cleaning maps and cleaning zones
Create schedules
The cleaning robot must be placed in the starting area marked on the map before cleaning. The starting area is approx. 2 m x 2 m and initially corresponds to the place where the cleaning robot started creating the map. For easier localisation, it is recommended that the starting area is close to surrounding walls, e.g.in a corner instead of in the centre of the room. The starting area can be subsequently moved in the app. The labels supplied with the device can be attached to the wall or a hard floor to mark the start area. The labels are not detected by the device, but merely serve as a guide for the user.
Check the sensors for dirt and clean them with a damp, lint-free cloth if necessary.
In the “Cleaning” main menu, select the button “Existing maps”.
A list of the stored maps appears on the display.
Select the desired map and confirm with “Confirm” button.
The cleaning robot starts cleaning.
Once cleaning is finished, the cleaning robot returns to the starting point.
The display shows the time needed for cleaning and the size of the cleaned area.
A detailed cleaning report is available in the app.
A scheduled cleaning can be created in the app via the “Tasks” tab.
A card can be assigned to one or more cleaning robots in the app via the “Maps” tab or via the cleaning robot detail view.
Initially, the map is assigned to the cleaning robot with which it was created.
If the battery charge is less than 20%, a notification appears on the display of the device and in the app indicating the need to replace of one or both battery packs so that the cleaning robot can continue cleaning.
If the battery charge is 10%, the cleaning robot stops cleaning and returns to the starting area. A message appears on the display and in the app.
The cleaning robot can only continue cleaning after the battery packs have been replaced.
If the battery packs are not replaced, the cleaning robot switches off.
Open the battery compartment cover.
Remove the battery packs (see chapter Removing the battery pack).
Insert the battery packs, see chapter Fitting the battery packs.
Close the battery compartment cover.
Confirm with “Confirm” button.
Cleaning continues.
Press the On/Off/Pause button.
Cleaning is interrupted.
A message indicating that cleaning has been paused appears on the display for 3 seconds.
Confirm with “Confirm” button or wait 3 seconds.
The options “Continue cleaning”, “Back to starting point”, “End cleaning” appear on the display.
Select the desired setting using the arrow keys and confirm with “Confirm” button.
Depending on the selection, the cleaning robot continues cleaning, returns to the starting point or stops cleaning.
If the child lock is enabled during the interruption, it needs to be unlocked before making a selection.
If the PIN lock is activated during the interruption, a message appears on the display. The code must be entered using the arrow keys and then confirmed before making a selection.
Keep On/Off/Pause button pressed for 3 seconds.
A prompt appears on the display asking whether the cleaning robot should really be switched off.
Confirm with “Confirm” button.
The cleaning robot switches off.
Open the battery compartment cover.
Press the battery pack unlocking button.
The battery pack pops a few centimetres out of the battery pack holder.
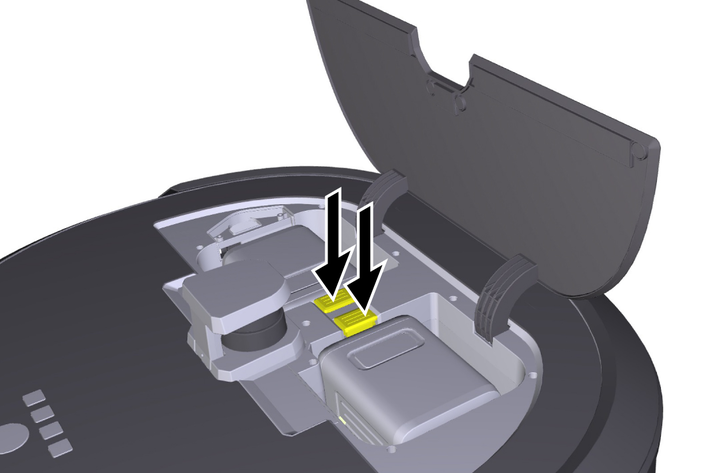
Remove the battery pack.
Risk of injury or damage due to non-observance of the weight
Be aware of the weight of the device during transportation.Before transport, both edges must be decoupled.
Lift up the tab on the decoupler, pull the tab and turn it anticlockwise.
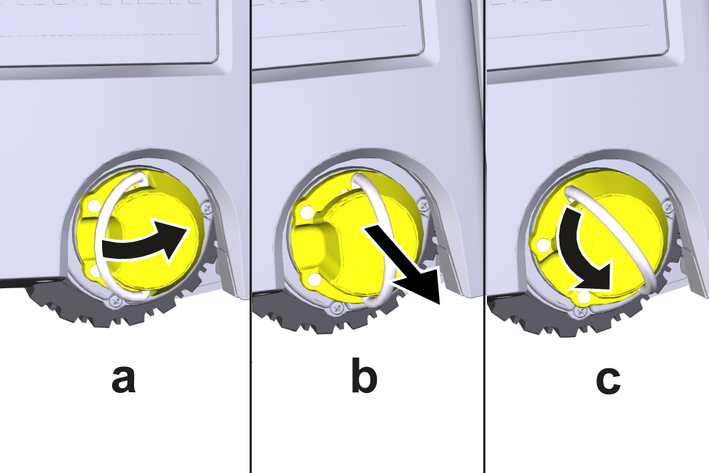
The wheel is decoupled.
Open the lid of the storage compartment for the telescopic handle.
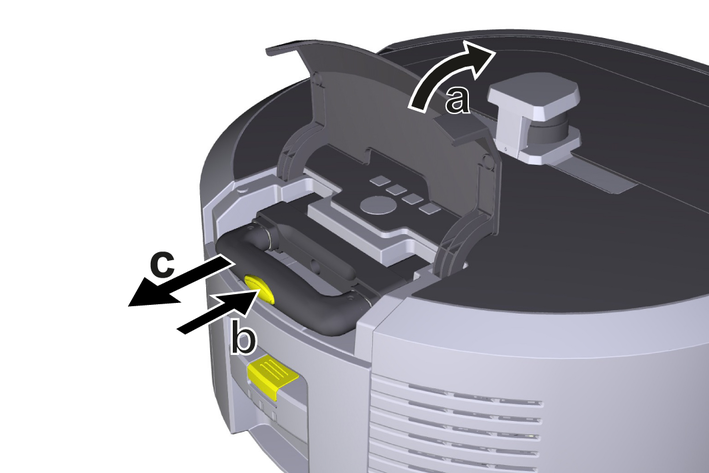
Press the unlocking button on the telescopic handle.
Pull the telescopic handle and remove it from the device.
Use the telescopic handle to transport the unit.
After transport, push the telescopic handle back into the device and close the lid of the storage compartment.
Lift up the tab on the decoupler, press the decoupler in via the tab and turn it clockwise.
The wheel is coupled.
Risk of injury or damage due to non-observance of the weight
Be aware of the weight of the device during storage.The device may only be stored indoors.
If the cleaning robot is not to be used for a longer period of time, proceed as follows:
Charge the battery pack (see operating instructions for the battery pack and charger).
Store the charged battery pack in a cool and dry place.
Notifications appear on the display and in the app to remind the user to maintain the device. The maintenance intervals may differ, depending on how often the cleaning robot is used.
Check the cleaning brush, the side brushes and the wheels and clean them if necessary.
Charge the battery packs.
Check whether the dust container needs to be emptied.
Clean the sensors with a moist, lint-free cloth. If necessary, use additional glass cleaner.
Clean the filter and the pre-filter.
Clean the cleaning brush.
Clean the wheels.
Replace the side brushes.
Replace the sweeping edge.
Replace the cleaning brush.
Replace the filter.
Replace the button cell.
Various maintenance tasks are stored as animations in the device and can be called up on the display or in the app, see chapter Help.
Dirt particles (e.g. sand.) can get stuck on the running surface and then damage sensitive, smooth floor surfaces.
Clean the wheel running surfaces.
Press the unlocking button on the dust container and remove the dust container from the device.
If necessary, lift up the handle on the dust container.
Press the unlocking button on the door of the dust container.
Lower the door of the dust container.
Empty the dust container.
Press the unlocking button on the dust container and remove the dust container from the device.
Press the tab on the filter cover and lift up the filter cover.
Remove the filter.
Knock out the filter.
Remove the cover of the cleaning brush with sweeping edge.
Remove the cleaning brush.
Remove tangled threads and hairs.
Remove the side brush from the holder.
Remove tangled threads and hairs.
Clean the sensors with a moist, lint-free cloth. If necessary, use additional glass cleaner.
Remove the battery packs, see Removing the battery pack.
Use a screwdriver to remove the screws from the cap next to the left battery pack holder.
Replace the button cell type CR2032.
Use a screwdriver to reinsert the screws into the cap.
Insert the battery packs, see Fitting the battery packs.
If an error occurs, a notification appears on the device display with instructions that must be followed to correct the problem.
For error messages that can only be rectified by a service technician, an error code is also displayed. If this still occurs after several restarts, please contact customer service.
Further troubleshooting aids can be found in the Kärcher KIRA Robots app under FAQ.
The cleaning robot cannot be switched on
Remedy:
Check whether the battery packs are charged and charge them if necessary.
If the malfunction cannot be corrected, the device must be checked by the Customer Service department.
The warranty conditions issued by our relevant sales company apply in all countries. We shall remedy possible malfunctions on your appliance within the warranty period free of cost, provided that a material or manufacturing flaw is the cause. In a warranty case, please contact your dealer (with the purchase receipt) or the next authorised customer service site.
Further information can be found at: www.kaercher.com/dealersearch
Further warranty information (if available) can be found in the service area of your local Kärcher website under "Downloads".
EU Declaration of Conformity |
We hereby declare that the machine described below complies with the relevant basic safety and health requirements in the EU Directives, both in its basic design and construction as well as in the version placed in circulation by us. This declaration is invalidated by any changes made to the machine that are not approved by us.
Product: Autonomous vacuum cleaner
Type: 1.454-500.0
Currently applicable EU Directives2006/42/EC (+2009/127/EC)
2014/53/EU
2011/65/EU
Harmonised standards usedEN 60335-1
EN 60335-2-72
EN 62368-1: 2014
EN 62311: 2020
EN IEC 63000: 2018
EN IEC 55014-1: 2021
EN IEC 55014-2: 2021
EN 301 489-1 V2.2.3
EN 301 489-17 V3.2.4
EN 301 489-52 V1.2.1
EN 301 908-1 V15.1.1
EN 301 908-2 V13.1.1
EN 301 908-13 V13.2.1
EN 301 511 V12.5.1
EN 300 328 V2.2.2
EN 301 893 V2.1.1
Additional implemented standardIEC63327:2021
EN 60335-2-69
The signatories act on behalf of and with the authority of the company management.

Documentation supervisor:
S. Reiser
Alfred Kärcher SE & Co. KG
Alfred-Kärcher-Str. 28 - 40
71364 Winnenden (Germany)
Ph.: +49 7195 14-0
Fax: +49 7195 14-2212
Winnenden, 2024/11/01
Declaration of Conformity (UK) |
We hereby declare that the product described below complies with the relevant provisions of the following UK Regulations, both in its basic design and construction as well as in the version put into circulation by us. This declaration shall cease to be valid if the product is modified without our prior approval.
Product: Autonomous vacuum cleaner
Type: 1.454-500.0
Currently applicable UK RegulationsS.I. 2008/1597 (as amended)
S.I. 2017/1206 (as amended)
S.I. 2012/3032 (as amended)
Designated standards usedEN 60335-1
EN 60335-2-72
EN 62368-1: 2014
EN 62311: 2020
EN IEC 63000: 2018
EN IEC 55014-1: 2021
EN IEC 55014-2: 2021
EN 301 489-1 V2.2.3
EN 301 489-17 V3.2.4
EN 301 489-52 V1.2.1
EN 301 908-1 V15.1.1
EN 301 908-2 V13.1.1
EN 301 908-13 V13.2.1
EN 301 511 V12.5.1
EN 300 328 V2.2.2
EN 301 893 V2.1.1
Additional implemented standardIEC63327:2021
EN 60335-2-69
The signatories act on behalf of and with the authority of the company management.
Documentation supervisor:
S. Reiser
Alfred Kärcher SE & Co. KG
Alfred-Kärcher-Str. 28 - 40
71364 Winnenden (Germany)
Ph.: +49 7195 14-0
Fax: +49 7195 14-2212
Winnenden, 2024/11/01
Electrical connection | |
Nominal power | 230 W |
Wireless connections | LTE/4G, WLAN |
Frequency | 2400-2483
5170-5835 MHz |
Max. signal strength, WLAN | <20 dBm |
Device performance data | |
Tank content | 4,5 l |
Suction performance, air quantity | 16 l/s |
Suction performance, vacuum | 19,3 (193) kPa (mbar) |
Theoretical surface performance | 525 m2/h |
Operating time with full battery charge (2 batteries) in normal operation (7.5 Ah) | 140 Minutes |
Operating time with full battery charge (2 batteries) in Eco mode (7.5 Ah) | 210 Minutes |
Autonomous travel speed (max.) | 1,5 km/h |
Dimensions and weights | |
Length x width x height | 577 x 580 x 302 mm |
Weight (without accessories) | 15,5 kg |
Working width | 350 mm |
Autonomous passage width (min.) | 650 mm |
Autonomous clearance height (min.) | 320 mm |
Maximum drive-over height | 20 mm |
Incline | |
Climbing ability | 6 % |
Battery pack | |
Number of battery packs | 2 |
Charging time of battery pack with quick charger 80% / 100% | 58/ 81 Minutes |
Charging current | 6 A |
Determined values in acc. with EN 60335-2-69 | |
Sound pressure level LpA | 57 dB(A) |
Sound power level LwA | 70 dB(A) |
LPA and LWA uncertainty | 2 dB(A) |