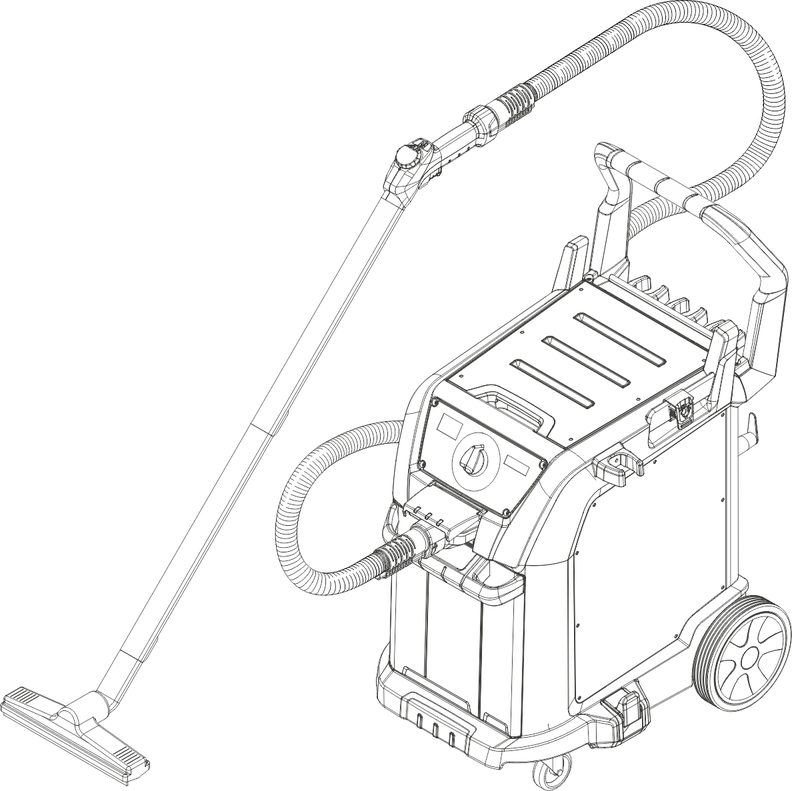
SGV 8/5 Classic
59991530 (04/25)
59991530 (04/25)
READ ALL INSTRUCTIONS BEFORE USING THIS MACHINE
Inform your dealer immediately if there is any shipping damage.
Completely remove the accessories from the box.
The machine is not suitable for sucking up hazardous dusts as asbestos. Please consult your KÄRCHER branch or your KÄRCHER dealer with regard to such applications.
Only operate the appliance from a grounded outlet. Refer to the Technical data for the necessary main fuse.
Connect to a properly grounded outlet only. See Grounding Instructions.
SAVE THESE INSTRUCTIONS
When using an electrical machine, basic precautions should always be followed, including the following:
This appliance is intended for commercial use.
SAFETY INSTRUCTIONSTo reduce the risk of fire, electric shock, or injury:
DISCONNECT APPLIANCE FROM POWER CIRCUIT before removing the cover, performing maintenance work, and when not in use.
DO NOT LEAVE the machine unattended when plugged in.
ALWAYS CHECK THE POWER SUPPLY CORD for damage or signs of any aging before each use.
DO NOT PULL OR CARRY APPLIANCE BY CORD. Do not use cord as a handle. Keep cord away from heated surfaces or fire. Do not close door on cord or pull cord around sharp edges.
KEEP CORD AWAY FROM HEAT AND OIL. Do not leave cord lying around after job is complete. It can become a tripping hazard.
DO NOT RUN MACHINE OVER CORD.
TURN SWITCH TO OFF before unplugging power supply cord.
DO NOT UNPLUG BY PULLING CORD. To unplug, grasp plug, not cord.
DO NOT GRASP PLUG WITH WET HANDS.
A DAMAGED CORD OR PLUG should only be replaced by an authorized service center representative. DO NOT ATTEMPT TO REPAIR POWER CORD.
TO AVOID SHOCK, do not expose to rain. Store indoors.
USE ONLY AS RECOMMENDED BY THIS MANUAL. Use only with recommended attachments.
KEEP HAIR, CLOTHING, LOOSE JEWELRY, FINGERS and all parts of the body away from openings and moving parts.
DO NOT BLOCK OR OBSTRUCT OPENINGS. Keep openings free of lint, hair, dust, and anything that restricts air flow.
DO NOT PICK UP ANYTHING THAT IS BURNING, smoldering, or smoking such as matches, cigarettes, or hot ashes.
DO NOT USE TO VACUUM COMBUSTIBLE EXPLOSIVE MATERIALS, such as coal, grain, and other finely divided combustible material.
DO NOT USE TO VACUUM COMBUSTIBLE, hazardous, toxic, or carcinogenic materials, including gasoline, diesel fuel, acetone, paint thinner, heating oils, undiluted acids and solvents, pesticide, and asbestos.
DO NOT ALLOW APPLIANCE TO BE USED AS A TOY. Keep children away from appliance.
DO NOT LEAVE UNATTENDED while appliance is running.
DO NOT USE IF CORD, PLUG OR MACHINE IS IN POOR CONDITION. If the Appliance has been dropped, damaged, exposed to weather, or dropped into water; have it checked by an authorized service.
ALWAYS USE EYE PROTECTION when operating appliance.
USE EXTRA CAUTION when operating on stairs.
STAY ALERT! Do not use appliance when you are tired or under the influence of drugs, alcohol or medication.
Do not use to pick up flammable or combustible liquids, such as gasoline, or use in areas where they may be present.
To Reduce the Risk of Fire, do not use a flammable or combustible liquid to clean a floor.
Switch off the machine immediately in case foam or liquid escape.
This appliance must be grounded. If it should malfunction or break down, grounding provides a path of least resistance for electric current to reduce the risk of electric shock.
This appliance is equipped with a cord having an equipment grounding conductor and ground plug.
The plug must be inserted into an appropriate outlet that is properly installed and grounded in accordance with all local codes and ordinances.
Improper connection of the equipment grounding conductor can result in a risk of electric shock.
Check with a qualified electrician or service person if you are in doubt as to whether the outlet is properly grounded.
Do not modify the plug provided with the appliance.
If it will not fit the outlet, have a proper outlet installed by a qualified electrician.
This appliance is for use on a nominal 120- volt circuit, and has a grounded plug that looks like the plug illustrated in Fig.A.
A temporary adapter that looks like the adapter illustrated in Fig.B, may be used to connect this plug to a two-pole receptacle as shown in Fig.B, if a properly grounded outlet is not available.
The temporary adapter should be used only until a properly grounded outlet (Fig.A) is installed by a qualified electrician.
The green colored rigid ear, lug, or the like extending from the adapter must be connected to a permanent ground such as a properly grounded outlet box cover.
Whenever the adapter is used, it must be held in place by a metal screw.
IN ALL CASES, MAKE SURE THE RECEPTACLE IN QUESTION IS PROPERLY GROUNDED.
NEVER REMOVE GROUNDING PRONG FROM POWER PLUG.
EXTENSION CORDS
Use only three-wire extension cords that have three-prong grounding-type plugs and three-pole receptacle that accepts the appliance’s plug. Replace damaged or worn cord immediately.
DO NOT ATTEMPT TO REPAIR POWER CORD.
Figure A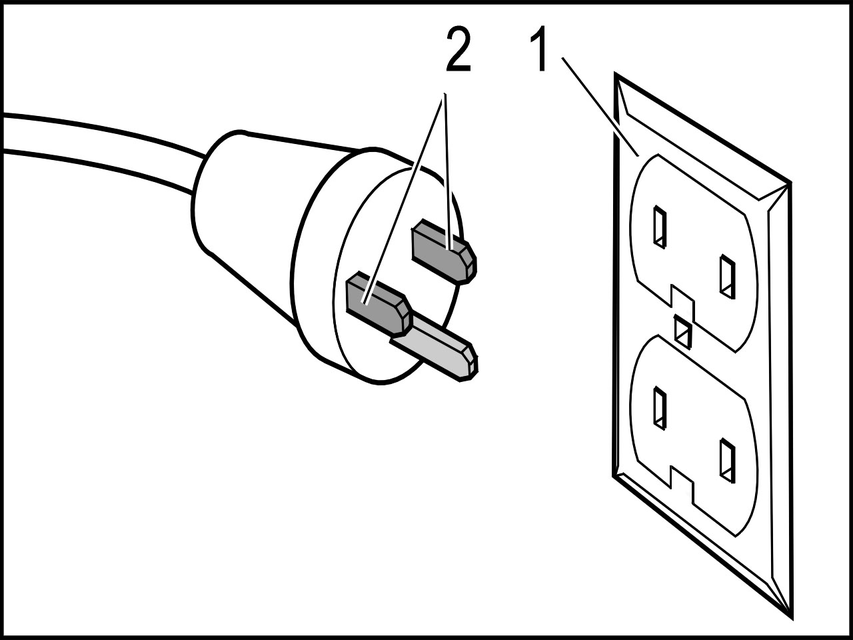
Grounded outlet box
Current carrying prongs
Grounding prong is longest of the 3 prongs.
Figure B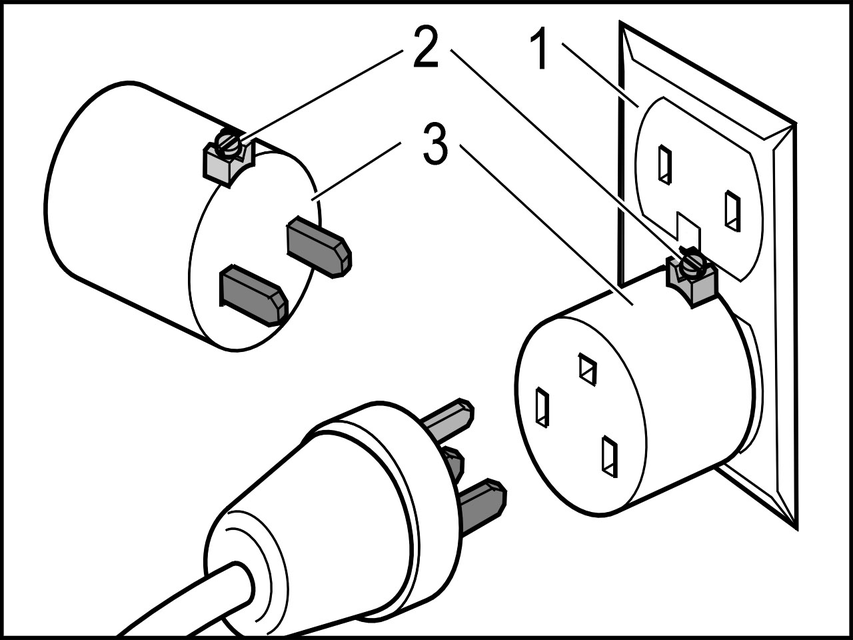
Grounded outlet box
Grounding means
Adapter
In Canada, the use of a temporary adapter is not permitted by the Canadian Electrical Code.
Servicing of double-insulated machines
In a double-insulated machine, two systems of insulation are provided instead of grounding. No grounding means is provided on a double-insulated machine, nor should a means for grounding be added to the machine. Servicing a double-insulated machine requires extreme care and knowledge of the system, and should be done only by qualified service personnel. Replacement parts for a double-insulated machine must be identical to the parts they replace.
 Read the original instructions before using the device for the first time and act in accordance with it. Keep this document for future reference or for future owners.
If the operating instructions and safety instructions are not observed, the device can be damaged and dangers could arise for users and other persons.
Notify the dealer immediately in the case of shipping damage.
Check the package contents when unpacking for missing accessories or for damage.
 The packing materials can be recycled. Please dispose of packaging in accordance with the environmental regulations.
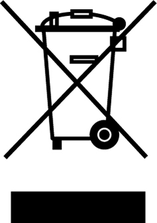 Electrical and electronic devices contain valuable, recyclable materials and often components such as batteries, rechargeable batteries or oil, which - if handled or disposed of incorrectly - can pose a potential danger to human health and the environment. However, these components are required for the correct operation of the device. Devices marked by this symbol are not allowed to be disposed of together with the household rubbish.
Current information on content materials can be found at: www.kaercher.de/REACH
Indication of an imminent threat of danger that will lead to severe injuries or even death.
Indication of a potentially dangerous situation that may lead to severe injuries or even death.
Indication of a potentially dangerous situation that may lead to minor injuries.
Indication of a potentially dangerous situation that may lead to damage to property.
Health risk
Inhalation of dusts that are harmful to health
Do not use the device for vacuuming up dusts that are harmful to health.The device is intended for generating steam and sucking up spilled liquids and solid particles as described in these operating instructions.
This device is suitable for commercial use,e.g. in hotels, schools, hospitals, factories, shops, offices, and rental companies.
 | Steam ATTENTION - risk of scalding |
Safety devices protect the user and may not be disabled or functionally circumvented.
The handle has a safety latch on the steam switch to prevent accidental release of steam flow.
If the steam suction hose is unattended for a short time during operation, it is recommended to activate the fuse (pull out the fuse catch). To release the steam flow again, deactivate the fuse (push in the fuse catch).
Before treating leather, special fabrics and wooden surfaces, read the manufacturer's instructions and always make a test on a hidden spot or sample. Allow the steam treated surface to dry to check if any colour or shape changes have occurred.
When cleaning wooden surfaces (furniture, doors, etc.), it is recommended to be particularly careful, as steam treatment for too long can damage the wax coatings, the gloss or the colour of the surfaces. Therefore, it is recommended to use steam only in short intervals for these surfaces, or to clean them with a previously steamed cloth.
For particularly sensitive surfaces (e.g. synthetic materials, painted surfaces, etc.) it is recommended to use the steam function with minimum thickness.
Cleaning stainless steel: Avoid the use of abrasive brushes. Use the manual nozzle with rubber lip or spotlight nozzle without round brush.
Always check the compatibility of the textiles at a concealed point before using the device on textiles: First steam the textile, allow it to dry and then check it for any change in colour or shape.
Wax, furniture polish, plastic coatings or paint can come off or stains may occur when cleaning painted or plastic-coated surfaces such as e.g. kitchen and living room furniture, doors, parquet or linoleum. To clean these surfaces, steam a cloth briefly and wipe it over the surfaces.
Danger from detergents
Health risk, risk of damage
Observe all instructions that are included with the detergents used.Danger from detergent solutions
Risk of damage
Do not use detergent solutions with a pH value greater than 13 (alkaline) and less than 2 (acidic), as these can cause damage to the device.Use detergents sparingly to conserve the environment.
The spray bottle supplied is empty.
Fill the spray bottle with detergent.
Danger due to unsuitable fluids
Risk of damage
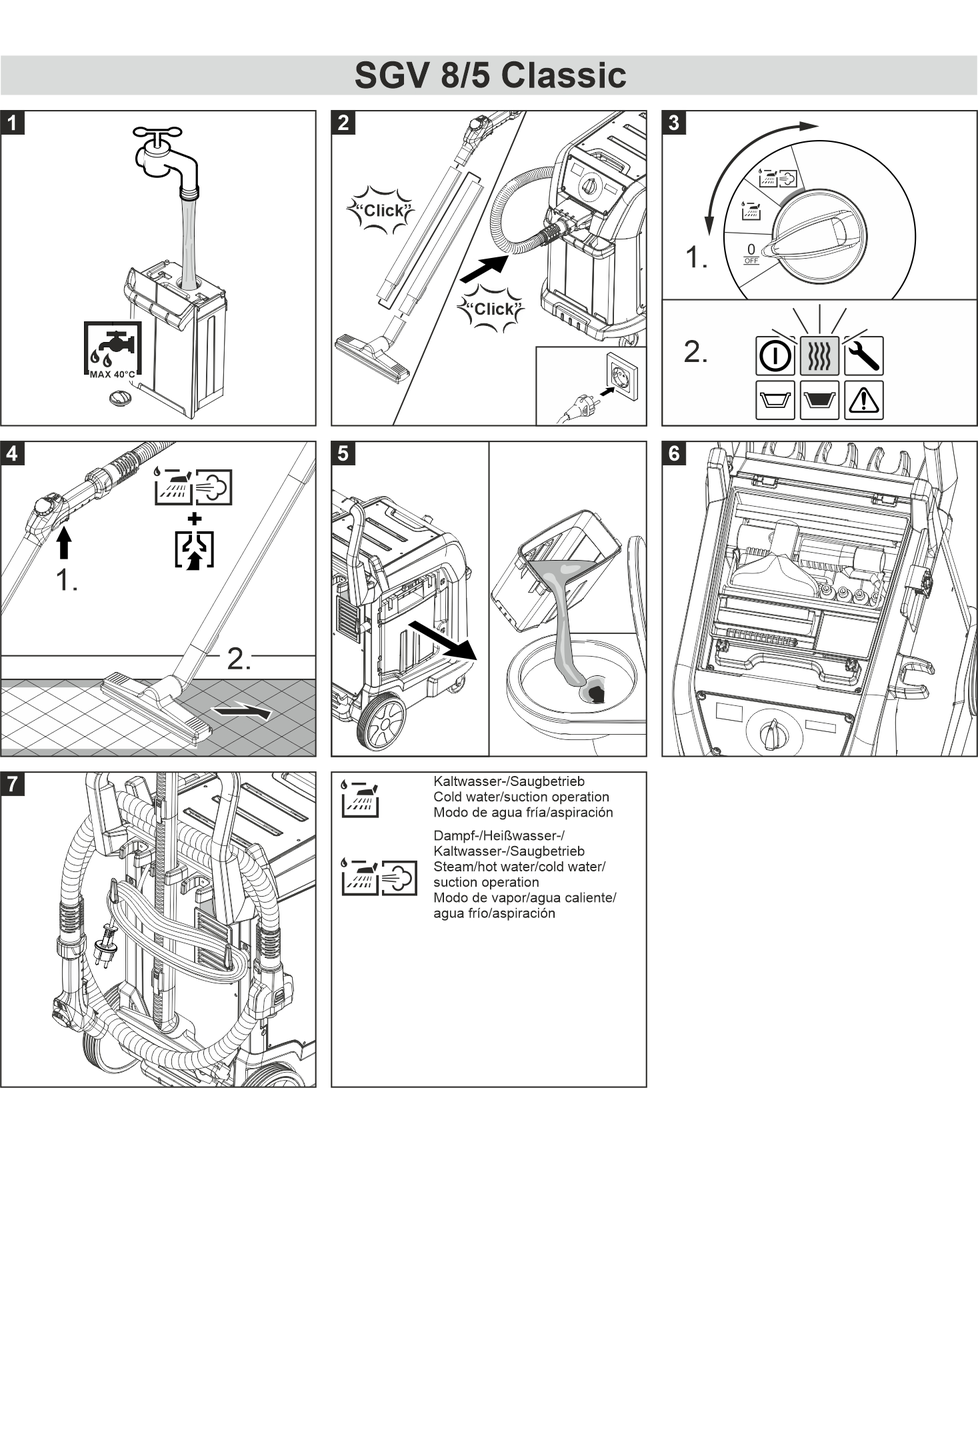
Never fill the fresh water reservoir with demineralised water or detergent. This can lead to malfunctions and damage to the device.Pull out the fresh water reservoir.
Unscrew the twist lock of the fresh water reservoir.
Fill the fresh water reservoir with at least 0.8 gallons (3 litres) of water.
Normal tap water can be used.
Screw in the twist lock of the fresh water reservoir.
Push the fresh water reservoir in as far as it will go.
Danger from steam
Danger of scalding
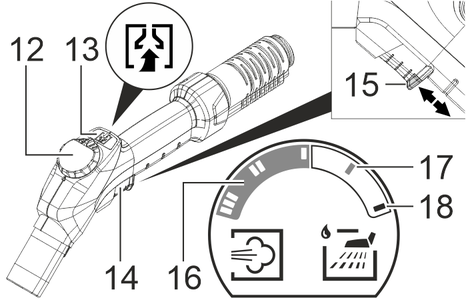
Pull out the safety latch on the steam switch to prevent steam from escaping when disconnecting accessories.Check the accessories for secure connection before use.
Open the cover of the accessory socket, insert the accessory plug into the accessory socket and audibly click it into place.
Connecting accessories: Connect the handle or the steam suction pipe to the desired accessory. Push the parts into each other until the accessory lock engages.
Disconnecting accessories: Hold down the accessory lock and pull the accessories apart.
Connect the screwable accessories and tighten them hand-tight.
During operation it is necessary to place the device horizontally.
Danger due to the device tipping over
Risk of damage
Do not tilt the device when it is switched on.Connect the mains plug.
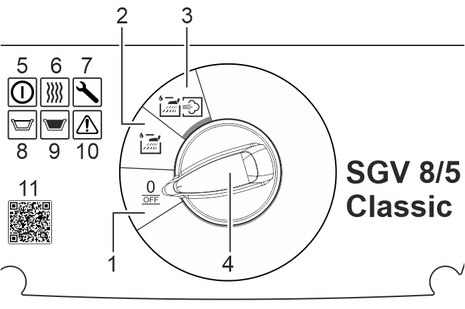
Set the turn switch to the operating mode.
In this operating mode, the handwheel has the function "Apply cold water" in every position. Steam/hot water operation is deactivated.
Set the turn switch to cold water/vacuuming operations.
Press the steam switch. The cold water is dispensed as long as the button is pressed.
Start vacuuming operations: Press the suction button briefly.
End vacuuming operations: Press the suction button again briefly.
Press the steam switch and briefly press the suction button at the same time. Vacuuming operations start and cold water is dispensed at the same time.
Danger from steam
Danger of scalding
Pull out the safety latch on the steam switch to prevent unintentional steam from escaping.Set the turn switch to steam / hot water / cold water / vacuuming operations.
Danger from steam
Danger of scalding
avoid contact with steam.The heating process starts and the indicator light "Heating on" flashes green. After approx. 7 minutes, the heating process is finished. The "heating on" indicator light lights up green.
The heating switches on periodically during use (indicator light flashes green) to maintain the pressure in the boiler.
Press the steam switch. The steam is dispensed as long as the button is pressed.
Light steam (stage I): For minor contamination.
Medium steam (stage II): For medium contamination.
Strong steam (stage III): For removing stubborn dirt.
Set the steam volume control on the handwheel to the desired steam stage.
Hot water
Risk of scalding
Avoid contact with hot water.Hot water (approx. 158 °F / 70°C) increases the cleaning effect. Check the temperature resistance of the surface to be cleaned.
Set the handwheel to hot water.
Press the steam switch. The hot water is dispensed as long as the button is pressed.
Set the handwheel to cold water.
Press the steam switch. The cold water is dispensed as long as the button is pressed.
Start vacuuming operations: Press the suction button briefly.
End vacuuming operations: Press the suction button again briefly.
Press the steam switch and briefly press the suction button at the same time. Vacuuming operations start and steam or hot/cold water is dispensed at the same time.
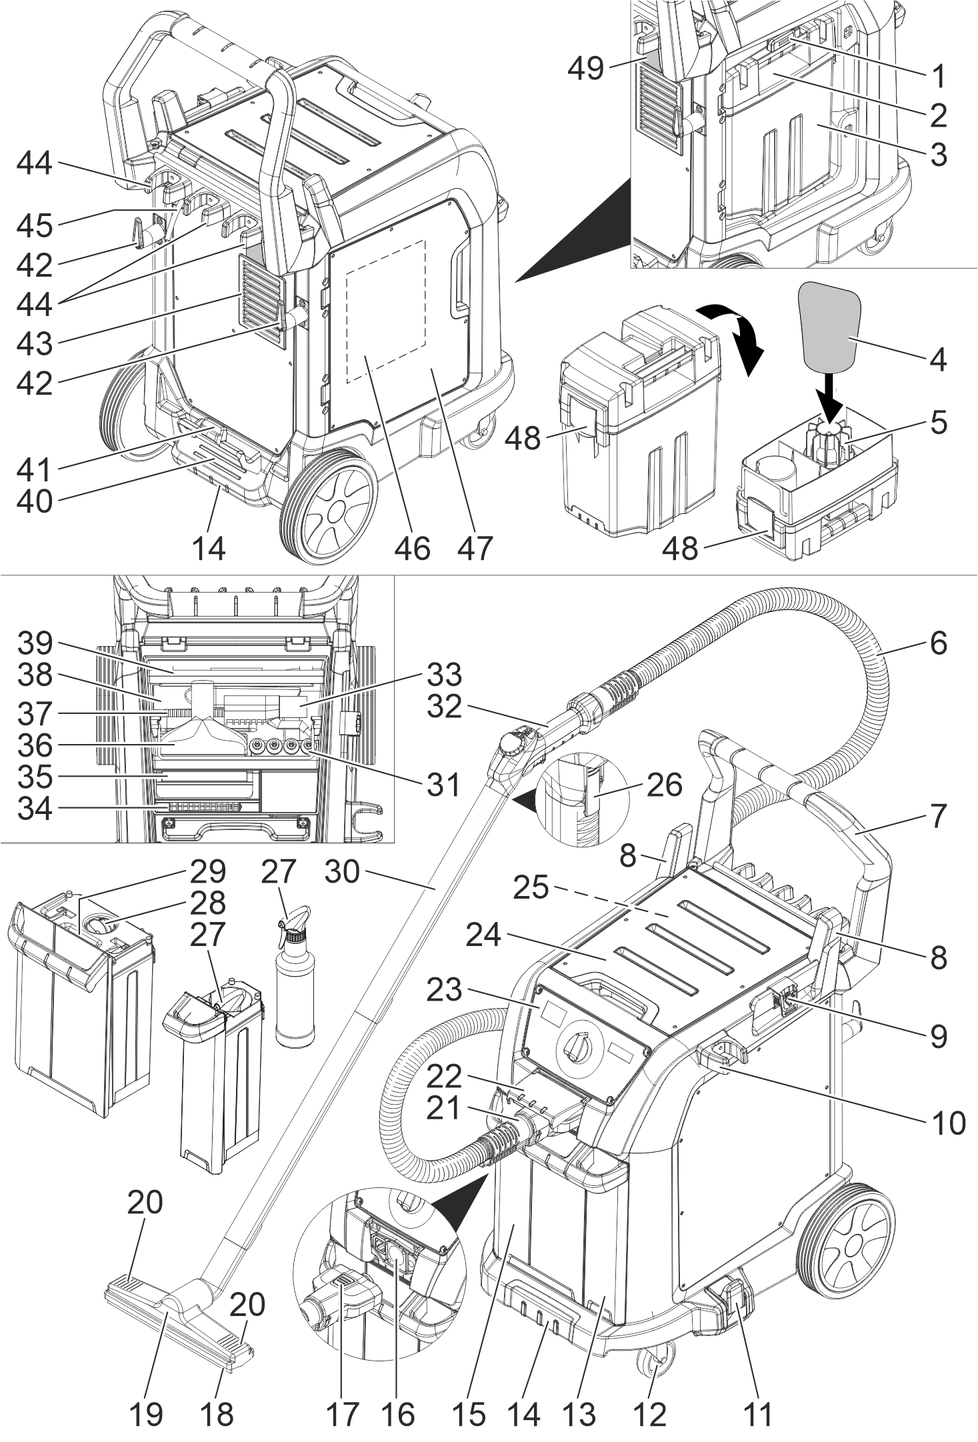
Open the cover of the wastewater container.
Press the lock of the wastewater container upwards.
Remove the wastewater container.
Unlock the wastewater container lock and remove the cover.
Empty the wastewater container.
When there is a short interruption in the work, the floor nozzle can be put in the parking position and the steam suction pipe can be engaged.
Set the turn switch on the device to "0/OFF".
Pull out the mains plug.
Danger from spores
Health risk
Select the cleaning location of the device in such a way that contamination of the surroundings, food and food processing tools and machines,e.g. by spray water, is excluded.Empty the fresh water reservoir and dry it.
Drain and clean the wastewater container and dry it.
Clean the accessories thoroughly: Clean the handle, steam suction hose and accessory plug with a damp cloth. Clean the remaining accessories with hot water and dry them.
Clean the exterior of the device with a damp cloth.
Clean the device with a warm damp cloth and detergent if it is visibly contaminated, or disinfect it if necessary.
Always let the brushes cool down to prevent deformation of the bristles.
Press the accessory plug lock and pull the accessory plug out of the accessory socket.
Allow the accessories to dry sufficiently and place them in the accessory tray.
Empty the fresh water reservoir.
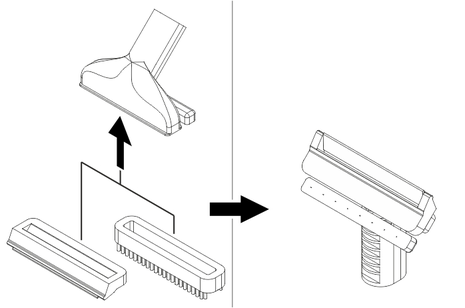
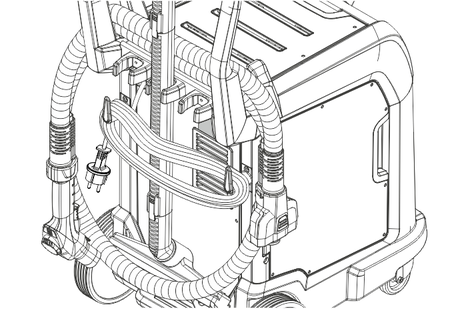
Store the floor nozzle, steam suction pipes, steam suction hose and the mains cable as shown in the illustration.
To avoid unpleasant smells, remove all water from the device before long downtimes.
Allow the device to dry sufficiently: Pull out the waste water tank and the fresh water reservoir a little and open the accessory tray cover.
Store the device in a dry room and secure it against unauthorised use.
Detergent residues or care emulsions on the surface to be cleaned can cause streaks during steam cleaning, but these disappear after repeated use.
Eliminate odours and creases from hanging clothes by steaming them at a distance of 3.9-7.9 inches (10-20 cm).
The cleaning effect increases the closer the nozzle is held to the dirty area, since the temperature and pressure of the steam are greatest at the emission point.
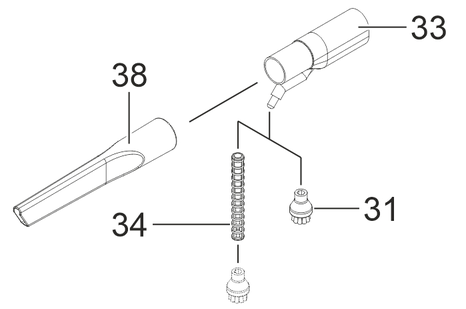
Use of the spotlight nozzle is recommended for hard-to-reach areas.
The cleaning of stainless steel, window panes, mirrors and enamel surfaces.
The cleaning of corners on stairs, window frames, door jambs and aluminium profiles.
The cleaning of fittings.
The cleaning of shutters and radiators. The interior cleaning of vehicles.
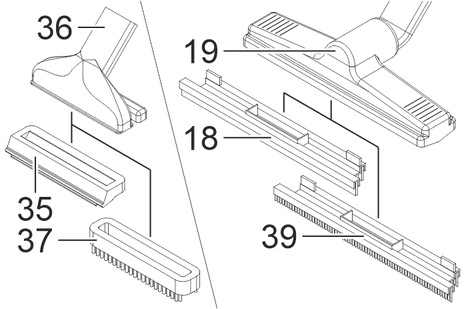
Round brush: Suitable for stubborn dirt on particularly small surfaces such as cooker tops, roller shutters, tile grout, sanitary facilities, etc.
The round brush is not suitable for cleaning sensitive surfaces.
Extension: With this accessory, optimal cleaning is possible for particularly inaccessible places. Ideal for cleaning heaters, door jambs, windows, shutters and sanitary installations.
The cleaning of large surfaces, floors made of ceramics, marble, etc.
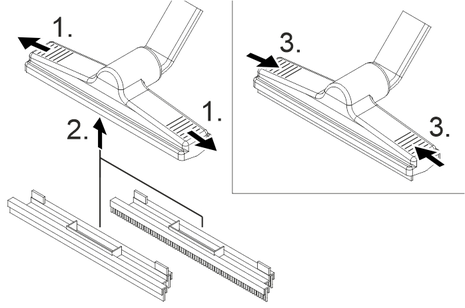
Floor nozzle with rubber lip insert: For absorbing liquids on smooth surfaces.
Floor nozzle with brush strip insert: For dissolving and scrubbing off stubborn contamination.
Cleaning large glass and mirror surfaces, smooth surfaces in general or fabric surfaces such as sofas, etc.
Squeegee: For smaller surfaces,e.g. Muntin windows and mirrors. For window panes and larger surfaces,e.g. Wall tiles, working areas and stainless steel surfaces.
Brush crown: For stairs, automobile interiors, fabric surfaces in general (after testing on a concealed area). For abrasive cleaning and scrubbing.
Preheat the window pane in seasons with particularly low temperatures. To do this, lightly steam the entire glass surface at a distance of approx. 19.7 inches (50 cm). This avoids tension on the surface that can lead to glass breakage.
Steam the glass surface evenly at a distance of approx. 7.9 inches (20 cm) to remove the dirt.
Switch off the steam supply.
Pull off the glass surface in strips from top to bottom with the squeegee and vacuum.
Wipe the squeegee and the lower edge of the window dry if needed.
Failure to observe the weight
Risk of injury and damage
Be aware of the weight of the device during transportation.Place the floor nozzle in the tray at the back of the device and engage the steam suction pipe. Separate the steam suction pipes.
Release the parking brakes and push the device by the push handle.
To load the device, grasp it by the recessed grip and the push handle.
Pull the device behind you via the push handle for transporting over longer distances.
When transporting in vehicles, secure the device against rolling away, slipping and tipping according to the respectively applicable guidelines. Empty all containers beforehand.
Failure to observe the weight
Risk of injury and damage
Be aware of the weight of the device during storage.The device may only be operated indoors.
Danger of electric shock
Injuries due to touching live parts
Switch off the device.Remove the mains plug.Danger from hot water, steam and hot surfaces
Risk of scalding and burns
Allow the device to cool down prior to all work on the device.Damaged or missing O-rings can be the cause of increased temperatures in the handle.
Regularly check the condition of the seals (2x O-ring) in the accessory plug, in the handle and in the steam suction pipes. If necessary, replace the seals.
Open the cover of the wastewater container.
Press the lock of the wastewater container upwards.
Remove the wastewater container.
Unlock the wastewater container lock and remove the cover.
Turn the cover 180° and set it down.
Pull the coarse dirt filter off the filter holder and replace it.
Have the device descaled by Customer Service.
Danger of electric shock
Injuries due to touching live parts
Switch off the device.Remove the mains plug.Danger from hot water, steam and hot surfaces
Risk of scalding and burns
Allow the device to cool down prior to all work on the device.Danger from improper repair work
Risk of injury and damage
ave repair work carried out by the authorised customer service only."Service" indicator light flashes yellow
Cause:
Error: E07
Remedy:
Switch off the device, wait briefly, switch the device on again.
If the indicator light does not go out, repeat the procedure (max. 4 times).
Cause:
Error: E14
Pre-warning for descaling (still 100h)
Remedy:
Have the device descaled by Customer Service.
"Service" indicator light lights up yellow
Cause:
Descaling
Remedy:
Have the device descaled by Customer Service.
"Fresh water reservoir empty" indicator light lights up red
Remedy:
Refill with fresh water.
Correctly insert the fresh water reservoir, push it in as far as it will go.
"Wastewater container full" indicator light lights up red
Remedy:
Drain the waste water.
Fit and lock the wastewater container correctly.
"Malfunction" indicator light flashes red
Remedy:
Switch off the device.
Check the fresh water tank for a correct fit.
Switch the device on again.
If the indicator light does not go out, repeat the procedure (max. 4 times).
The "Service" indicator lamp lights up yellow and the "Malfunction" indicator lamp lights up red at the same time.
Remedy:
Contact Customer Service.
"Malfunction" indicator light lights up red
Cause:
Error: E12
Remedy:
Check the accessory plug for a correct fit.
Switch off the device, wait briefly, switch the device on again.
If the error occurs repeatedly, notify Customer Service.
Cause:
Error: E13
Remedy:
Check the accessory plug for a correct fit.
If water enters the handle, ensure that it is completely dry.
Switch off the device, wait briefly, switch the device on again.
If the error occurs repeatedly, notify Customer Service.
Poor suction performance
Remedy:
Remove blockages from the floor nozzle, the steam suction pipe, the handle and the steam suction hose.
Remove the blockage from the accessory.
Increased temperatures in the handle
Remedy:
Check the seals (2x O-ring) in the handle and in the steam suction pipes.
If the malfunction cannot be corrected, the device must be checked by the Customer Service department.
"Service" indicator light flashes yellow
Cause:
Error: E07
Remedy:
Switch off the device, wait briefly, switch the device on again.
If the indicator light does not go out, repeat the procedure (max. 4 times).
Cause:
Error: E14
Pre-warning for descaling (still 100h)
Remedy:
Have the device descaled by Customer Service.
"Service" indicator light lights up yellow
Cause:
Descaling
Remedy:
Have the device descaled by Customer Service.
"Fresh water reservoir empty" indicator light lights up red
Remedy:
Refill with fresh water.
Correctly insert the fresh water reservoir, push it in as far as it will go.
"Wastewater container full" indicator light lights up red
Remedy:
Drain the waste water.
Fit and lock the wastewater container correctly.
"Malfunction" indicator light flashes red
Remedy:
Switch off the device.
Check the fresh water tank for a correct fit.
Switch the device on again.
If the indicator light does not go out, repeat the procedure (max. 4 times).
The "Service" indicator lamp lights up yellow and the "Malfunction" indicator lamp lights up red at the same time.
Remedy:
Contact Customer Service.
"Malfunction" indicator light lights up red
Cause:
Error: E12
Remedy:
Check the accessory plug for a correct fit.
Switch off the device, wait briefly, switch the device on again.
If the error occurs repeatedly, notify Customer Service.
Cause:
Error: E13
Remedy:
Check the accessory plug for a correct fit.
If water enters the handle, ensure that it is completely dry.
Switch off the device, wait briefly, switch the device on again.
If the error occurs repeatedly, notify Customer Service.
Poor suction performance
Remedy:
Remove blockages from the floor nozzle, the steam suction pipe, the handle and the steam suction hose.
Remove the blockage from the accessory.
Increased temperatures in the handle
Remedy:
Check the seals (2x O-ring) in the handle and in the steam suction pipes.
The warranty conditions issued by our relevant sales company apply in all countries. We shall remedy possible malfunctions on your appliance within the warranty period free of cost, provided that a material or manufacturing flaw is the cause. In a warranty case, please contact your dealer (with the purchase receipt) or the next authorised customer service site.
Further information can be found at: www.kaercher.com/dealersearch
Further warranty information (if available) can be found in the service area of your local Kärcher website under "Downloads".
Only use original accessories and original spare parts. They ensure that the appliance will run fault-free and safely.
Information on accessories and spare parts can be found at www.kaercher.com.
Electrical connection | |
Mains voltage | 120 V |
Phase | 1 ~ |
Power frequency | 60 Hz |
Tension in the handle | 5 V |
Protection type | IPX4 |
Protection class | I |
Rated current | 13 A |
Nominal power of blower | 1200 W |
Steam boiler intake performance | 1600 W |
Main pump power | 52 W |
Water pump power | 27 W |
Device performance data | |
Steam boiler | 0.9 (3.4) gal (l) |
Fresh water reservoir filling quantity | 1.5 (5.6) gal (l) |
Wastewater container filling quantity | 1.3 (5.0) gal (l) |
Air quantity (max.) | 150 (71) CFM (l/s) |
Vacuum (max.) | 2590 (254) mm (kPa) |
Working pressure | 116 (0.8) psi (MPa) |
Steam pressure (max.) | 174 (1.2) psi (MPa) |
Steam volume (max.) - constant | 1.9 (55) oz/min (g/min) |
Heating-up time | 13.5 min |
Hot water operating temperature (maximum) | 158 (70) °F (°C) |
Working temperature of steam operation (max.) | 343 (173) °F (°C) |
Water flow rate | 0.16 (0.6) gal/min (l/min) |
Dimensions and weights | |
Typical operating weight | 85 (39) lbs (kg) |
Length x width x height | 22.2 x 19.5 x 38.0 (640 x 495 x 965) in (mm) |
Tilt angle (max.) | 10 ° |
Determined values in acc. with EN 60335-2-68 | |
Sound level LpA | 67 dB(A) |
Uncertainty KpA | 1 dB(A) |
Mains cable | |
Power cord type | SJOW 3/14 AWG |
Part number (CUL) | 6.650-477.0 |
Cable length | 25 (7.5) ft (m) |