NT 30/1 Tact Te Basic M
59991610 (06/24)
59991610 (06/24)
 Read these original instructions and the enclosed safety instructions number 59562490 (issue 07/19 onward) before using the device for the first time. Act in accordance with them.
Keep both books for future reference or for future owners.
If the operating instructions and safety instructions are not observed, the device can be damaged and dangers could arise for users and other persons.
Notify the dealer immediately in the case of shipping damage.
Check the package contents when unpacking for missing accessories or for damage.
 The packing materials can be recycled. Please dispose of packaging in accordance with the environmental regulations.
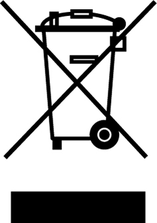 Electrical and electronic devices contain valuable, recyclable materials and often components such as batteries, rechargeable batteries or oil, which - if handled or disposed of incorrectly - can pose a potential danger to human health and the environment. However, these components are required for the correct operation of the device. Devices marked by this symbol are not allowed to be disposed of together with the household rubbish.
Current information on content materials can be found at: www.kaercher.de/REACH
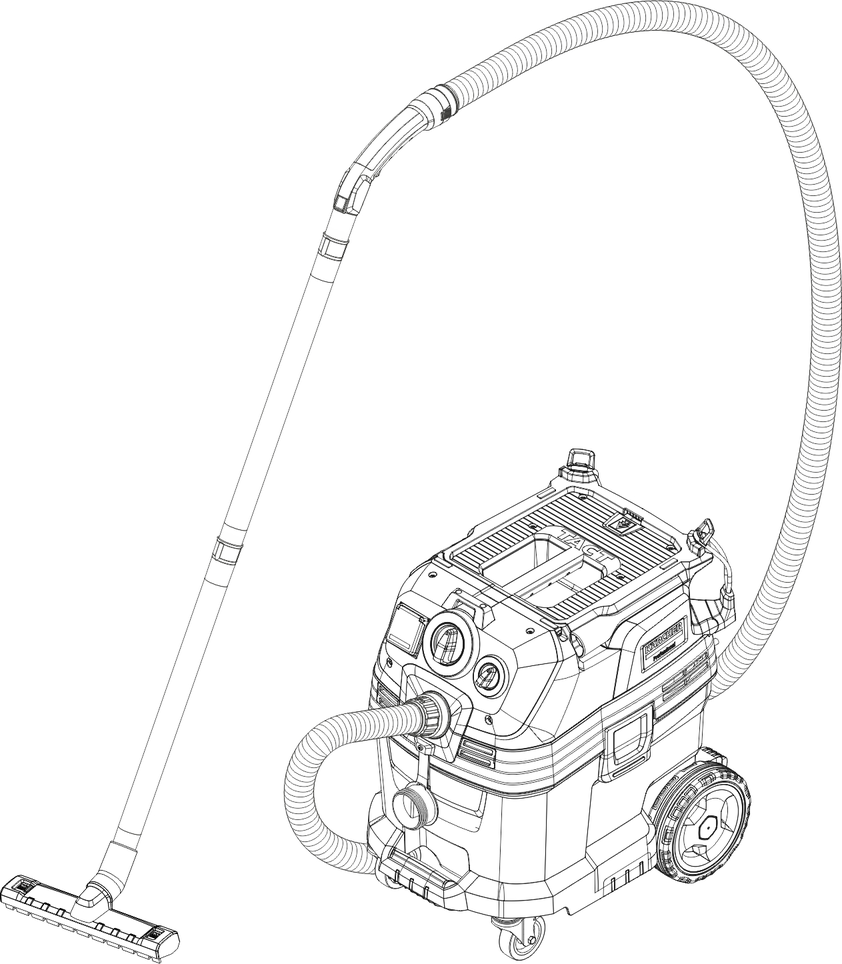
This wet/dry vacuum cleaner is designed to remove dry dirt and liquids.
This device is suitable for vacuuming dry, non-flammable dusts that are harmful to health from machines and devices; dust class M as per EN 60335-2-69. Restrictions: No carcinogenic substances except for wood chips may be vacuumed.
This device is suitable for commercial use, e.g. in hotels, schools, hospitals, factories, shops, offices, and rental companies.
 |
WARNING: This device contains dusts that are harmful to your health. Emptying and maintenance, including removal of the dust bag, may only be performed by appropriately trained personnel wearing suitable personal protective equipment. Do not switch on until the entire filter system has been installed and the volume flow control functionality has been checked. |
 | Flat fold filter (PES) | |
Order number | 6.907-662.0 | |
Flat fold filter (PTFE) | ||
Order number | 6.907-455.0 | |
Flat fold filter (PTFE H) | ||
Order number | 6.907-671.0 | |
 | Candle filter | |
Order number | 2.414-000.0 | |
The device switches off automatically during operation without the main filter element.
Unpack the device and install the accessories.

The device has 2 operating modes:
Industrial vacuum cleaner operation (power socket not used)
Dust removal operation (power socket used)
Danger from dust that is harmful to your health
Respiratory sicknesses through inhalation of dust.
Do not vacuum without correctly installed filter elements, otherwise a danger to health from increased fine dust emission is present.Danger due to fine dust entering
Risk of damage to the suction motor.
Never remove the main filter element when vacuuming.Connect the suction hose and attach a suction nozzle or connect to the dust generating device, depending on the operating mode.
The horn sounds (intermittent tone) when the air speed drops below 20 m/s.
The horn reacts to a vacuum.
Set the turn switch to the correct hose cross-section.
The horn sounds (continuous tone) when the cooling air filter is clogged.
Allow the device to cool down. Clean/replace the cooling air filter.
Static charges are discharged through the earthed connection nozzles. This prevents sparking and electric shocks with electrically conducting accessories (included in the scope of delivery).
For particularly dust-free dirt disposal when vacuuming small to medium quantities of fine dust, we recommend using a fleece filter bag with cap, order number 2.889-154.0 (5 pieces). The device is fitted with a fleece filter bag.
For vacuuming large quantities of fine dust, we recommend using a dust bag with cable tie, order number 2.889-231.0 (10 pieces).
All types of dust up to dust class M can be vacuumed with this device. The use of a dust collection bag (for order no. see filter systems) is required by law.
The device is suitable for industrial extraction and a dust removal device for mobile operation for vacuuming dry, non-inflammable dusts with workplace limit values (AGW) greater than or equal to 0.1 mg/m3.
Unlock and remove the suction head.
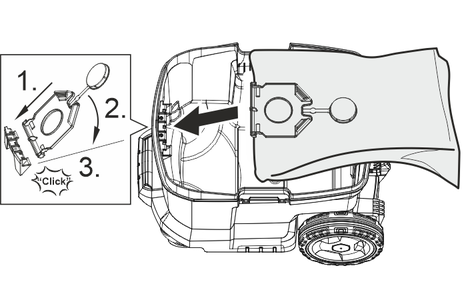
Fit the fleece filter bag.
Fit and lock the suction head.
Unlock and remove the suction head.
Insert the dust bag.
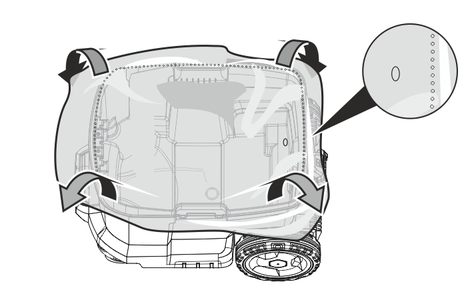
Pull the dust bag over the container. Ensure that the marking line is within the container and the ventilation hole is positioned on the back wall of the container.
Fit and lock the suction head.
Danger from dust that is harmful to your health
Respiratory sicknesses through inhalation of dust.
No dusts harmful to health may be vacuumed when performing wet vacuum cleaning.The candle filter available as an accessory with the order number 2.414-000.0 is not suitable for wet vacuum cleaning.
Remove the brush strip.
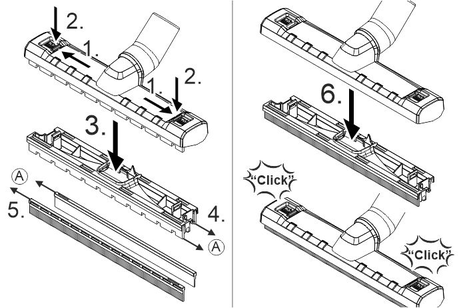
Install the squeegees.
The structured side of the squeegees must face outwards. Note the different lengths of the squeegees.
Fit a plug exactly into the suction connection.
Push the plugs in until they engage.
The fleece filter bag must always be removed when vacuuming wet substances.
Unlock and remove the suction head.
Pull the fleece filter bag on the flange up and out.
Seal the fleece filter bag with cap.
Dispose of the used fleece filter bag in accordance with statutory regulations.
Fit and lock the suction head.
The dust bag must always be removed when vacuuming wet substances.
Unlock and remove the suction head.
Fold up the dust bag.
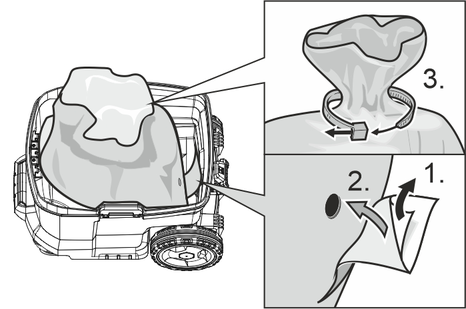
Take off the protective film and close the ventilation hole with a self-adhesive tab.
Seal the dust bag tightly underneath the opening using cable ties.
Remove the dust bag.
Clean the container inside with a moist cloth.
Dispose of the dust bag in accordance with statutory regulations.
Fit and lock the suction head.
We recommend switching off the "Automatic filter dedusting" function when vacuuming wet dirt with the crevice nozzle or the upholstery nozzle (optional), or when sucking mainly water out of a container.
The device switches off automatically when the maximum fluid level is reached.
When vacuuming non-conductive liquids (e.g. drill emulsion, oils and grease) the device does not automatically switch off when the container is full. The filling level must be continuously monitored and the container emptied on a timely basis.
On completion of wet vacuum cleaning: Clean the main filter element using the filter cleaning. Clean the electrodes with a brush. Clean the container with a moist cloth and dry it off.
The suction hose is equipped with a clip system. All accessory parts with a nominal width of 35 mm can be connected.
 | Device OFF |
 |
|
 |
|
Connect the mains plug.
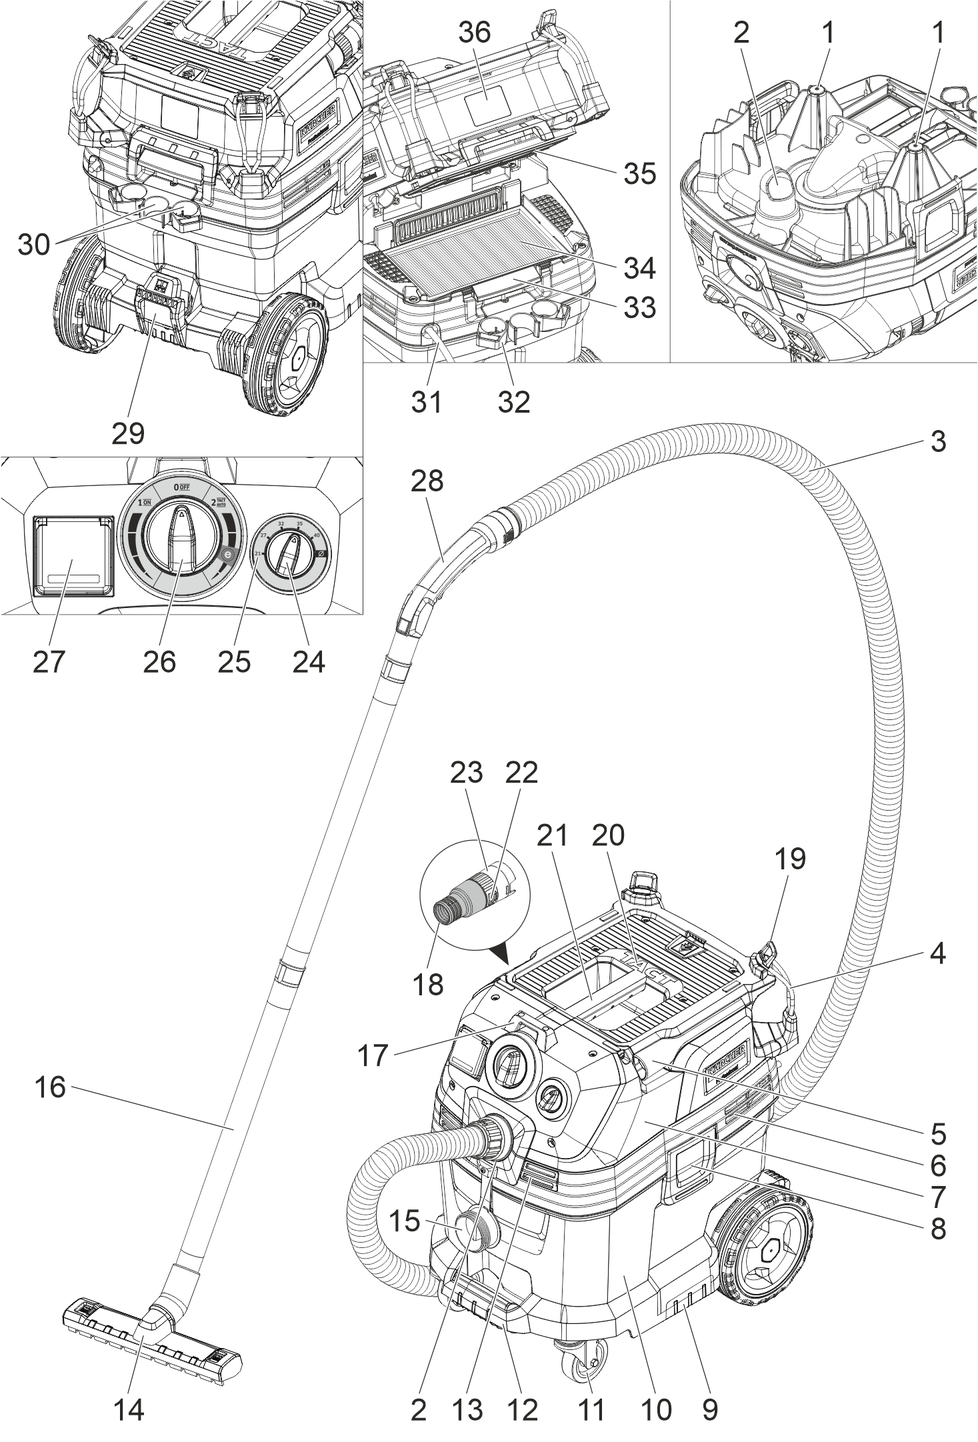
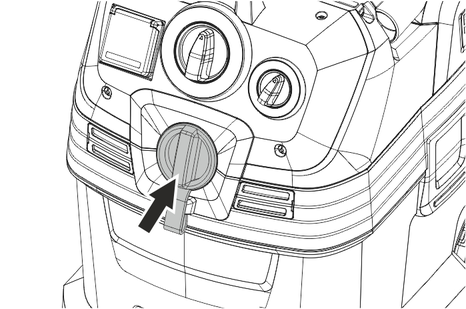
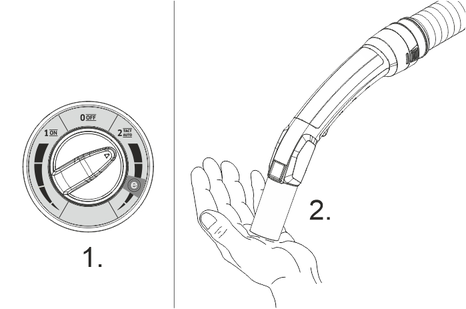
Set the turn switch to the desired program.
Danger of electric shock
Risk of injury and damage.
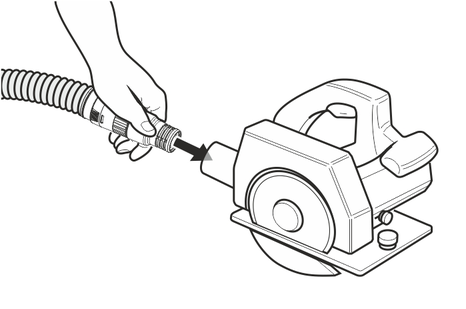
The socket is only intended for direct connection of power tools to the vacuum cleaner. Any other use of the socket is prohibited.Plug the mains plug of the power tool into the power socket on the vacuum cleaner. The vacuum cleaner is in Standby mode.
Switch on the device at the turn switch.
The vacuum cleaner is automatically switched on and off with the power tool.
The vacuum cleaner has a startup delay of up to 0.5 seconds and an after-running time of up to 15 seconds.
See the Technical data for the permissible power rating of the power tool.
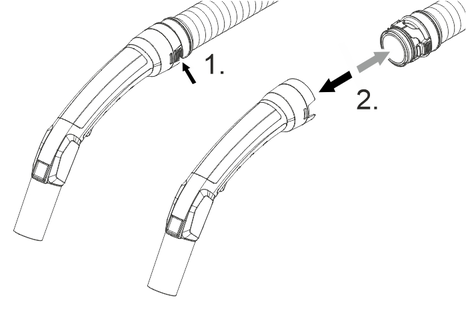
Remove the angle piece from the suction hose.
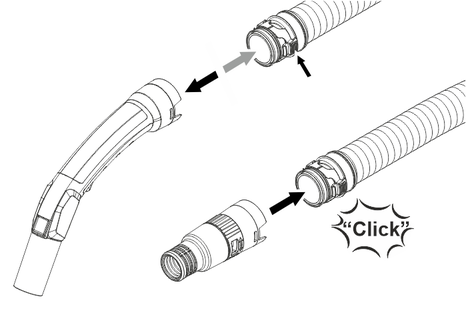
Install the tool adapter on the suction hose.
Connect the tool adapter to the power tool.
Set the minimum volume flow on the turn switch for suction hose cross section. The scale shows the suction hose suction hose cross section.
The different suction hose cross sections are necessary in order to adapt to the different connection cross sections of the processing machines.
For operation as a dust removal device for mobile operation (processing machine plugged into the vacuum cleaner) the integrated monitoring system must be adjusted to suit the connected processing machine (dust generator). This means that the user must be warned when the flow rate drops below the minimum value 20 m/s needed for correct vacuuming.
The device is equipped with a special filter dedusting function, which is particularly effective against fine dust. The main filter element is automatically cleaned every 7.5/15/60 seconds (depending on use) using an airflow (pulsing sound).
Set the turn switch to program 2 (TACT AUTO).
Power dedusting (for particularly severe contamination of the main filter element): Set the turn switch to program 2, seal the suction pipe or bender with your hand and wait for the automatic filter cleaning to finish (lasts 15 seconds).
Switch off the device at the turn switch.
Pull out the mains plug.
Empty the container.
Vacuum off the inside and outside of the device and clean with a moist cloth.
Store the suction hose and mains cable as shown in the illustration.

Store the device in a dry room and secure it against unauthorised use.
Failure to observe the weight
Risk of injury and damage
Be aware of the weight of the device during transportation.Close the suction connection, see wet vacuum cleaning.
Remove the suction hose with floor nozzle from the support. Carry the device by the carrying handle and suction pipe.
When transporting the device in vehicles, secure it to prevent it from slipping or overturning in accordance with the respective valid guidelines.
Failure to observe the weight
Risk of injury and damage
Be aware of the weight of the device during storage.The device may only be operated indoors.
Danger of electric shock
Injuries due to touching live parts
Switch off the device.Remove the mains plug.Dust extraction machines are safety devices for the prevention or elimination of hazards according to the German DGUV regulation 1 (German accident prevention regulation, principles of prevention).
Care agents containing silicone
These can attach plastic components.
Do not use care agents containing silicone for cleaning.You can perform basic maintenance and care work yourself.
Clean the surface of the device and the interior of the container regularly with a moist cloth.
Open the filter cover.
Remove the filter frame.
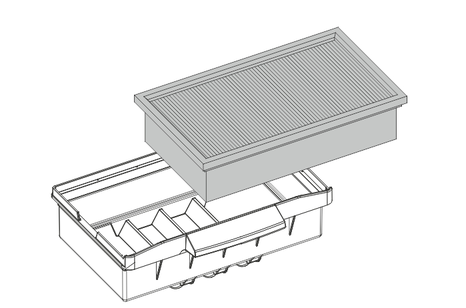
Remove the flat fold filter.
Dispose of the used flat fold filter in accordance with statutory regulations.
Remove any dirt deposits from the clean air side.
Clean the filter frame and the supporting surface of the filter frame with a damp cloth.
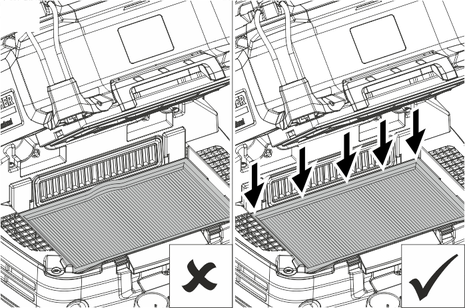
Fit the new flat fold filter. During insertion, ensure that the flat fold filter is flush on all sides.
Insert the filter frame.
Close the filter cover until it audibly latches into place.
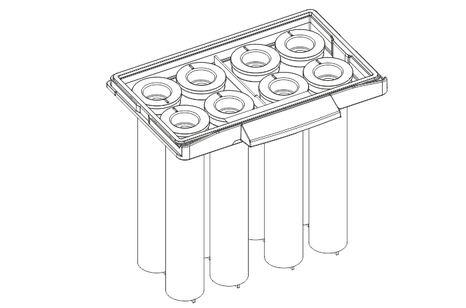
Open the filter cover.
Take out the candle filter (special accessories).
Dispose of the used candle filter (special accessories) in accordance with statutory regulations.
Remove any dirt deposits from the clean air side.
Clean the candle filter frame with a damp cloth.
Insert the new candle filter (special accessories).
Close the filter cover until it audibly latches into place.
Close the suction connection, see wet vacuum cleaning.
Unlock and remove the suction head.
Pull the fleece filter bag on the flange up and out.
Seal the fleece filter bag with cap.
Dispose of the used fleece filter bag in accordance with statutory regulations.
Fit the new fleece filter bag.
Fit and lock the suction head.
Close the suction connection, see wet vacuum cleaning.
Unlock and remove the suction head.
Fold up the dust bag.
Take off the protective film and close the ventilation hole with a self-adhesive tab.
Seal the dust bag tightly underneath the opening using cable ties.
Remove the dust bag.
Clean the container inside with a moist cloth.
Dispose of the dust bag in accordance with statutory regulations.
Fit the new dust bag.
Pull the dust bag over the container. Ensure that the marking line is within the container and the ventilation hole is positioned on the back wall of the container.
Fit and lock the suction head.
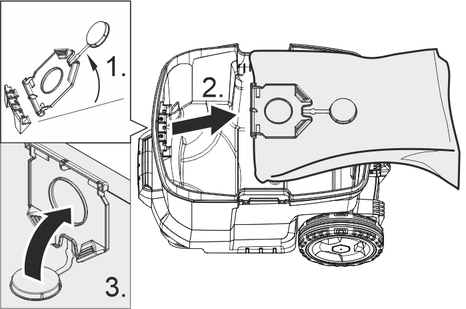
Allow the appliance to cool down.
Unlock the cooling air flaps with a screwdriver and fold them out.
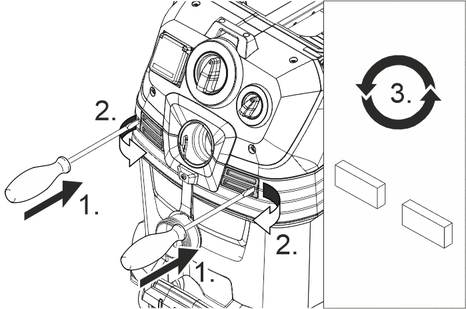
Clean (vacuum, wash) or replace the cooling air filter.
Fold the cooling air flaps in and latch it into place.
Unlock and remove the suction head.
Clean the electrodes with a brush.
Fit and lock the suction head.
Danger of electric shock
Injuries due to touching live parts
Switch off the device.Remove the mains plug.The device must be switched off immediately if a malfunction occurs (e.g. filter breakage). The malfunction must be eliminated before switching the device on again.
Suction turbine does not start up
Remedy:
Check the socket and the power supply fuse.
Check the mains cable, mains plug, electrodes and power socket on the device.
Switch on the device.
Suction turbine switches off
Remedy:
Empty the container.
Insert the main filter element.
Suction turbine does not switch on again after emptying the container
Remedy:
Switch off the device and wait for 5 seconds. Switch on the device.
Clean the electrodes with a brush.
Suction power decreases
Remedy:
Remove any blockages from the suction nozzle, suction pipe, suction hose or main filter element.
Change the filled fleece filter bag.
Dispose of the filled dust bag.
Correctly engage the filter cover.
Change the main filter element.
Escaping dust when vacuuming
Remedy:
Only with flat fold filters: Check that the flat fold filter is correctly fitted and correct if necessary.
Change the main filter element.
The automatic switch-off mechanism (wet vacuum cleaning) does not trigger
Remedy:
Clean the electrodes with a brush.
Continuously monitor the filling level when vacuuming non-conductive liquids.
Horn sounds - intermittent tone
Remedy:
Set the turn switch to the correct hose cross-section.
The fleece filter bag must be replaced when it is full and the air flow drops below the specified minimum flow rate.
The dust bag must be replaced when it is full and the air flow drops below the specified minimum flow rate.
Change the main filter element.
Horn sounds - continuous tone
Remedy:
Allow the device to cool down. Clean/replace the cooling air filter.
Automatic filter dedusting not working
Remedy:
Suction hose not connected.
The automatic filter dedusting function cannot be switched off
Remedy:
Contact Customer Service.
The automatic filter dedusting function cannot be switched on
Remedy:
Contact Customer Service.
If the malfunction cannot be corrected, the device must be checked by the Customer Service department.
Suction turbine does not start up
Remedy:
Check the socket and the power supply fuse.
Check the mains cable, mains plug, electrodes and power socket on the device.
Switch on the device.
Suction turbine switches off
Remedy:
Empty the container.
Insert the main filter element.
Suction turbine does not switch on again after emptying the container
Remedy:
Switch off the device and wait for 5 seconds. Switch on the device.
Clean the electrodes with a brush.
Suction power decreases
Remedy:
Remove any blockages from the suction nozzle, suction pipe, suction hose or main filter element.
Change the filled fleece filter bag.
Dispose of the filled dust bag.
Correctly engage the filter cover.
Change the main filter element.
Escaping dust when vacuuming
Remedy:
Only with flat fold filters: Check that the flat fold filter is correctly fitted and correct if necessary.
Change the main filter element.
The automatic switch-off mechanism (wet vacuum cleaning) does not trigger
Remedy:
Clean the electrodes with a brush.
Continuously monitor the filling level when vacuuming non-conductive liquids.
Horn sounds - intermittent tone
Remedy:
Set the turn switch to the correct hose cross-section.
The fleece filter bag must be replaced when it is full and the air flow drops below the specified minimum flow rate.
The dust bag must be replaced when it is full and the air flow drops below the specified minimum flow rate.
Change the main filter element.
Horn sounds - continuous tone
Remedy:
Allow the device to cool down. Clean/replace the cooling air filter.
Automatic filter dedusting not working
Remedy:
Suction hose not connected.
The automatic filter dedusting function cannot be switched off
Remedy:
Contact Customer Service.
The automatic filter dedusting function cannot be switched on
Remedy:
Contact Customer Service.
At the end of its service life, the device is to be disposed of in accordance with statutory regulations.
The warranty conditions issued by our relevant sales company apply in all countries. We shall remedy possible malfunctions on your appliance within the warranty period free of cost, provided that a material or manufacturing flaw is the cause. In a warranty case, please contact your dealer (with the purchase receipt) or the next authorised customer service site.
Further information can be found at: www.kaercher.com/dealersearch
Further warranty information (if available) can be found in the service area of your local Kärcher website under "Downloads".
Only use original accessories and original spare parts. They ensure that the appliance will run fault-free and safely.
Information on accessories and spare parts can be found at www.kaercher.com.
We hereby declare that the machine described below complies with the relevant basic safety and health requirements in the EU Directives, both in its basic design and construction as well as in the version placed in circulation by us. This declaration is invalidated by any changes made to the machine that are not approved by us.
Product: Wet/dry vacuum cleaner
Type: 1.148-xxx
Currently applicable EU Directives2006/42/EC (+2009/127/EC)
2011/65/EU
2014/30/EU
Harmonised standards usedEN IEC 63000: 2018
EN 55014-1: 2017 + A11: 2020
EN 55014-2: 2015
EN 60335-1
EN 60335-2-69
EN 61000-3-2: 2014
EN 61000-3-3: 2013
EN 62233: 2008
National standards used-
The undersigned act on behalf and under the power of attorney of the company management.

Documentation supervisor:
S. Reiser
Alfred Kärcher SE & Co. KG
Alfred-Kärcher-Str. 28 - 40
71364 Winnenden (Germany)
Ph.: +49 7195 14-0
Fax: +49 7195 14-2212
Winnenden, 2020/10/01
Electrical connection | |
Mains voltage | 220-240 V |
Phase | 1 ~ |
Power frequency | 50-60 Hz |
Degree of protection | IPX4 |
Protection class | I |
Nominal power | 1200 W |
Maximum power | 1380 W |
Power rating of the device socket (EU) | 25-2200 W |
Device performance data | |
Tank content | 31 l |
Fluid filling quantity | 17 l |
Air quantity (max.) with suction hose diameter 35 mm and length 4.0 m | 143 (40) m3/h (l/s) |
Depression (max.) with suction hose diameter 35 mm and length 4.0 m | 23,7 (237) kPa (mbar) |
Air quantity (max., suction motor) | 266 (74) m3/h (l/s) |
Vacuum (max., suction motor) | 27,3 (273) kPa (mbar) |
Dimensions and weights | |
Typical operating weight | 14,2 kg |
Length x width x height | 560 x 370 x 580 mm |
Filter area of the flat fold filter | 0,6 m2 |
Candle filter area | 0,2 m2 |
Diameter of the suction hose | 21 / 27 / 32 / 35 / 40 mm |
Length of the suction hose | 4,0 / 5,0 m |
Determined values in acc. with EN 60335-2-69 | |
Sound pressure level LpA | 69 dB(A) |
Uncertainty KpA | 2 dB(A) |
Hand-arm vibration value | <2,5 m/s2 |
Uncertainty K | 0,2 m/s2 |
Mains cable | |
Power cord type | H07RN-F 3x1,5 mm2 |
Part number (EU) | 6.650-665.0 |
Cable length | 7,5 m |
Filtersysteme / Filter Systems / Système de filtres
| | | | |  |  | |
Flachfaltenfilter (PES) * Flat pleated filter (PES) * Filtre plat à plis (PES) * | Flachfaltenfilter (PTFE) * Flat pleated filter (PTFE) * Filtre plat à plis (PTFE) * | Flachfaltenfilter (PTFE H) ** Flat pleated filter (PTFE H) ** Filtre plat à plis (PTFE H) ** | Kerzenfilter * Candle filter * Filtre à bougie * | Vliesfiltertüte, 3-lagig * Fleece filter bag, triple layered * Sachet filtre en tissu non tissé à 3 épaisseurs * | Entsorgungsbeutel Disposal bag Sachet d’élimination | |
Bestellnummer Order No. Numéro de référence | 6.907-662.0 | 6.907-455.0 | 6.907-671.0 | 2.414-000.0 | 2.889-154.0 | 2.889-231.0 |
Menge Quantity Quantité | 1 | 1 | 1 | 1 | 5 | 10 |
Normalstäube Normal dust Poussières normales | x | x | x | x | x | x |
Feinstäube Fine dust Poussières fines | x | x | x | x | x | x |
Abrasive Stäube Abrasive dust Poussières abrasives | x | x | x | x | x | x |
Flüssigkeiten, nasser Schmutz Liquids, wet dirt Liquides, saletès humides | x | x | x |
* Staubklasse M, Rückhaltevermögen ≥ 99,9 %
* Dust class M, Retention ≥ 99,9 %
* Classe de poussière M, Conservation ≥ 99,9 %
** Staubklasse H, Rückhaltevermögen ≥ 99,995 %
** Dust class H, Retention ≥ 99,995 %
** Classe de poussière H, Conservation ≥ 99,995 %