SC 1 Multi SC 1 Multi Comfort SC 1 Multi & Up
59512620 (05/24)
59512620 (05/24)
 Read these original operating instructions and the enclosed safety instructions before using the device for the first time. Proceed accordingly.
Keep both books for future reference or for future owners.
Read this safety chapter and these original instructions before using the device for the first time. Act in accordance with them. Keep the original instructions for future reference or for future owners.
In addition to the notes in the operating instructions, you also need to take into consideration the general safety regulations and accident prevention guidelines applicable by law.
Warnings and information notices attached to the device provide important information for hazard-free operation.
Indication of an imminent threat of danger that will lead to severe injuries or even death.
Indication of a potentially dangerous situation that may lead to severe injuries or even death.
Indication of a potentially dangerous situation that may lead to minor injuries.
Indication of a potentially dangerous situation that may lead to damage to property.
Risk of asphyxiation. Keep packaging film out of the reach of children.
Only use the device for its proper use. Take into account the local conditions and beware of third parties, in particular children, when working with the device.
Only people who have been instructed on how to use the device, or have proven their ability to operate it, and have been explicitly instructed to use it, must use the device.
Persons with reduced physical, sensory or mental capabilities and persons lacking experience and knowledge may only use the appliance if they are properly supervised, have been instructed on use of the appliance safely by a person responsible for their safety, and understand the resultant hazards involved.
Children must not operate the device.
Children must be supervised to prevent them from playing with the appliance.
Keep the device out of the reach of children when it is connected to the mains or when it is cooling down.
Do not use the device if it has been dropped beforehand, is visibly damaged or if it is leaking.
Safety devices are provided for your own protection. Never modify or bypass safety devices.
Never touch the mains plug and socket with wet hands.
Only connect the device to alternating current. The voltage indicated on the type plate must match the voltage of the power source.
Do not direct the steam jet directly onto equipment containing electrical components, e.g. the interior space of ovens.
Do not fill the devices with removable water reservoir directly via the water connection while they are connected to the mains power. Use a receptacle for filling.
Do not use the device in swimming pools which contain water.
The mains plug and extension cable connection must not be in water.
Do not clean over floor sockets.
Only connect the device to an electrical connection which has been set up by a qualified electrician as per IEC 60364‑1.
Only operate the device in wet rooms, e.g. bathroom, connected to sockets with upstream residual current device.
Check that the mains connection cable with mains plug is undamaged each time before using the device. To avoid any possible danger, a damaged mains connection cable must be immediately replaced by the manufacturer, or the authorised customer service department or a qualified electrician.
Do not damage the power supply and extension cable by running over it, crushing or yanking it or similar. Protect the power supply cable from heat, oil and sharp edges.
Unsuitable electrical extension cables can be dangerous. Only use electrical extension cables with a splash guard and a diameter of at least 3x1 mm2.
Only replace couplings on the power supply or extension cable with those with the same splash guard and the same mechanical strength.
Clean tiled walls with sockets carefully.
Disconnect the device from the mains during longer operating breaks, after use or before performing any maintenance work.
Only carry out servicing work when the mains plug is pulled and the steam cleaner has cooled down.
Operation in explosive atmospheres is prohibited.
When using the device in hazard zones (e.g. service stations), adhere to the respective safety regulations.
Risk of scalding. Never touch the steam jet with your hand from a close distance, and do not direct it at people or animals.
Danger of scalding from high water output if you tilt the device more than 30° to the side during use.
Only affects SC 1 devices
Risk of scalding on the hot steam boiler. Allow the steam boiler to cool down before filling it with water.
Does not apply to SC 1 Upright / KST 1 Upright / SC 2 Upright / KST 2 Upright / SC 3 / SC 3 Upright devices
Risk of scalding. Let the appliance and accessory parts, particularly the floor cleaning cloth and the hand cover cool down before touching them.
Risk of scalding. Do not use the appliance for cleaning pressure tanks as this poses a bursting and explosion hazard.
Risk of scalding from the floor nozzle. Ensure that no part of the body gets under the floor nozzle. Never operated the floor nozzle without wearing shoes.
Risk of scalding. Only operate the appliance once it is fully assembled and functional.
Risk of scalding. Let the appliance cool down fully before putting it away.
Never disconnect accessories from the device while steam is being expelled.
Hot water may drip out when disconnecting accessory parts. Allow the device to cool down first.
Never open the maintenance / safety lock during operation. Allow the device to cool down first.
Do not clamp the steam lever / steam key during operation.
Replace a damaged steam hose immediately with a steam hose as recommended by the manufacturer.
Do not steam any objects which contain harmful substances (e.g. asbestos).
Only operate or store the device in accordance with the description or figure.
Check the device and the accessories, in particular the power supply cable, safety lock and steam hose, to make sure it is in proper safe and reliable condition before operation each time. Do not use the device if it is damaged. Replace damaged components immediately.
Only switch on the device when water is present in the steam boiler. The device may otherwise overheat, see the Troubleshooting chapter of the operating instructions.
Accidents or damage due to the device falling over. Before all actions with or on the device, you must make sure that it is stable.
Do not carry the device when performing cleaning work.
Do not operate the device at temperatures below 0 °C.
Do not fill with any cleaning agents or other supplements.
Do not use vinegar or similar agents.
Never leave the device unsupervised while it is connected to the mains.
Do not use the appliance as a humidifier or heater.
Ensure the room is well ventilated when working with the appliance and afterwards.
Protect the device from rain. Do not store the device outdoors.
Device damage. Never pour solvents, liquids containing solvents or undiluted acids (e.g. detergents, petrol, paint thinner and acetone) into the boiler/water reservoir.
Unsuitable water can block the nozzles or damage the water level indicator. Do not fill with condensate water from a tumble dryer, collected rainwater, detergents or additives (e.g. scents). Fill the water reservoir with a maximum of 0.2 l / 0.4 l / 0.5 / 1 l of tap water.
Only applies to SC 1 Upright / KST 1 Upright / SC 2 Upright / KST 2 Upright / SC 3 Upright / SC 3 devices
Unsuitable water can block the nozzles or damage the water level indicator. Do not fill with pure distilled water, condensation from a dryer, collected rain water, detergents or additives (e.g. fragrances), use a maximum of 50% distilled water mixed with tap water.
Remove the water reservoir for filling
Pull the water reservoir vertically in an upward direction
Fill the water reservoir vertically with tap water or a mixture of tap water and a maximum of 50% distilled water up to the “MAX” marking.
Insert the water reservoir and press down until it clicks into place.
Fill the water reservoir directly at the device
Fill tap water or a mixture of tap water and a maximum of 50% distilled water up to the “MAX” marking in the filling hole for the water reservoir.
Applies only to SC 4 and SC 5 devices
Refilling water
Switch off the device.
Allow the device to cool down.
Unscrew the safety lock.
Drain the water completely out of the steam boiler.
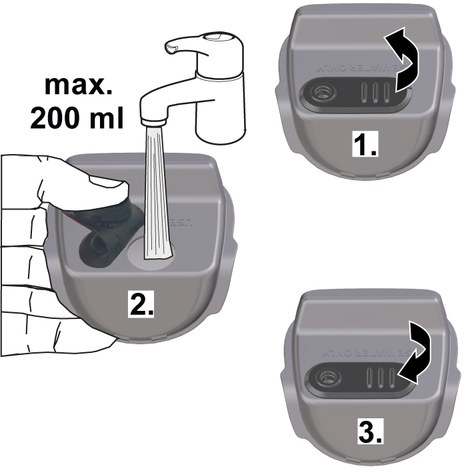
Fill a maximum of 200 ml distilled water or tap water into the steam boiler.
Insert the safety lock.
Applies only to SC 1 devices
Refilling water
Switch off the device.
Allow the device to cool down.
Unscrew the safety lock.
Drain the water completely out of the steam boiler.
Fill a maximum of 1 l distilled water or tap water into the steam boiler.
Insert the safety lock.
Applies only to SC 2 / KST 2 devices
Risk of scalding. Only operate the device on even, horizontal surfaces. Do not lay the device on its side during operation. Do not use the device above head height or horizontally e.g. to clean walls, work surfaces or windows.
Only applies to SC 1 Upright / KST 1 Upright / SC 2 Upright / KST 2 Upright / SC 3 Upright
In order to guarantee stability, place the device on a firm, flat surface.
Have repair work carried out by the authorised customer service only.
Does not apply to SC 1 Upright / KST 1 Upright / SC 2 Upright / KST 2 Upright / SC 3 / SC 3 Upright devices
Never screw the safety lock onto the device while descaling.
Do not use the steam cleaner while there is descaler in the boiler.
The descaler may corrode sensitive surfaces. Work carefully when filling and emptying the steam cleaner with descaler.
Do not use vinegar or similar agents.
(Depending on equipment)
Risk of scalding. Do not direct the steam jet at people or animals.
Risk of burns on hot steam pressure iron and hot steam jet. Alert other people to the hazard.
Do not touch any electrical cables or combustible objects with the hot steam pressure iron.
Have the damaged mains cable replaced immediately by an authorized customer service/qualified electrician.
Children over the age of 8 and persons with reduced physical, sensory or mental capabilities, or those with a lack of experience and knowledge, are only allowed to use the appliance if they are properly supervised, have been instructed with respect to using the appliance safely by a person responsible for their safety, and understand the resultant dangers involved.
Children must not play with the appliance.
Children may only perform cleaning work and user maintenance under supervision.
Do not use the steam pressure iron if it has been dropped, has visible damage or is leaking.
Do not leave the steam pressure iron unattended while it is connected to the mains.
Before the water reservoir (of the steam cleaner) is filled with water, the mains plug must be pulled out of the socket.
You must only operate or set down the steam pressure iron on a stable surface.
When placing the steam pressure iron on its stand, make sure that the stand is stable.
Repair work on the device may only be carried out by authorized customer service.
Longer periods of use of the steam turbo brush may lead to poor blood circulation in the hands due to vibration. In case of symptoms, e.g. tingling in the fingers, cold fingers, take a break. A general period of use cannot be set, because this depends on several influencing factors:
Personal tendency to suffer from poor circulation (frequently cold fingers, tingling sensation in the fingers).
Holding the device too tightly hindering blood circulation.
Continuous operation is more harmful than operation interrupted by work breaks.
You should consult a doctor if using the steam turbo brush regularly and for lengthy periods of time, and in the event of repeated occurrences of symptoms such as tingling in the fingers or cold fingers.
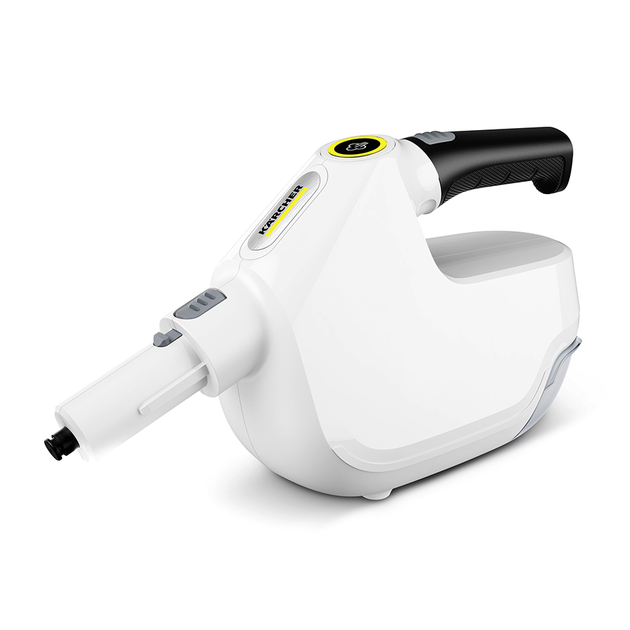
Only use the appliance in private households. The appliance is intended for cleaning with steam and can be used with appropriate accessories as described in these operating instructions. Detergents are not required. Observe the safety instructions.
 The packing materials can be recycled. Please dispose of packaging in accordance with the environmental regulations.
 Electrical and electronic devices contain valuable, recyclable materials and often components such as batteries, rechargeable batteries or oil, which - if handled or disposed of incorrectly - can pose a potential danger to human health and the environment. However, these components are required for the correct operation of the device. Devices marked by this symbol are not allowed to be disposed of together with the household rubbish.
Current information on content materials can be found at: www.kaercher.de/REACH
Only use original accessories and original spare parts. They ensure that the appliance will run fault-free and safely.
Information on accessories and spare parts can be found at www.kaercher.com.
The scope of delivery for the appliance is shown on the packaging. Check the contents for completeness when unpacking. If any accessories are missing or in the event of any shipping damage, please notify your dealer.
The warranty conditions issued by our relevant sales company apply in all countries. We shall remedy possible malfunctions on your appliance within the warranty period free of cost, provided that a material or manufacturing flaw is the cause. In a warranty case, please contact your dealer (with the purchase receipt) or the next authorised customer service site.
Further information can be found at: www.kaercher.com/dealersearch
Further warranty information (if available) can be found in the service area of your local Kärcher website under "Downloads".
Missing or modified safety devices
Safety devices are provided for your own protection.
Never modify or bypass safety devices.
(according to type of appliance)
 | Risk of burns, surface of appliance becomes hot during operation |
 | Risk of scalding from steam |
| Read the operating instructions |
USE WATER ONLY | Only fill water without additives into the water reservoir |
In the case of excessively high pressure in the event of a fault, a safety valve relieves the pressure into the atmosphere.
The fuse prevents the device from overheating. If the device overheats, the fuse disconnects the device from the power supply.
Before re-commissioning the device, contact the responsible KÄRCHER Customer Service.
The maximum amount of equipment is described in these operating instructions. Depending on the model, there are differences in the scope of delivery (see packaging).
** optional
Device damage due to calcification
Without a descaling cartridge, limescale can build up and damage the device, so the device cannot be operated without a descaling cartridge.
Ensure that the descaling cartridge is correctly inserted in the device before operation.
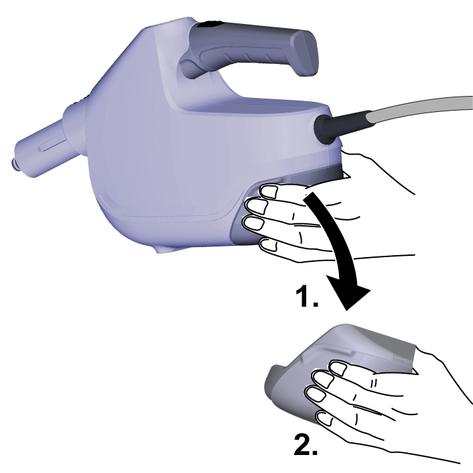
Mount the handle on the device.
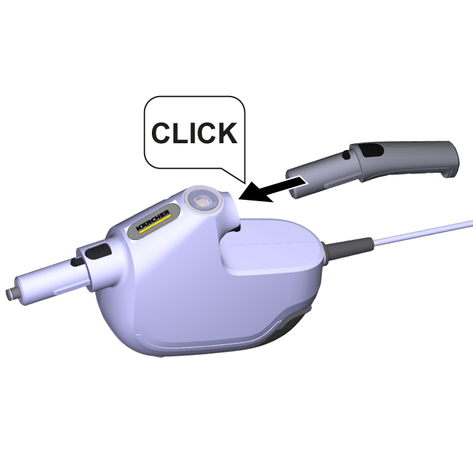
Hold the water reservoir at the side with your hand and pull it downwards.
Remove the descaling cartridge from the packaging.
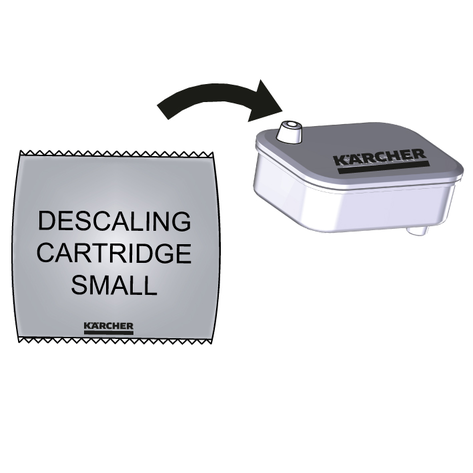
When using the descaling cartridge, make sure that the KÄRCHER lettering can be read correctly in the direction of view.
Inserting the decalcification cartridge:
Place the descaling cartridge at a slight angle under the two upper plastic ribs.
After positioning the descaling cartridge under the plastic ribs, press it down until you hear it click into place.
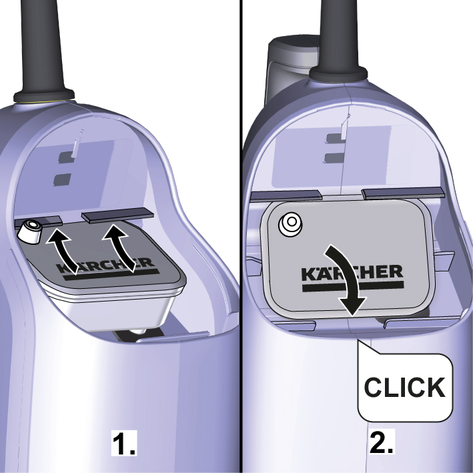
Place the water reservoir on the underside of the device and press upwards until you hear it click into place.

The water reservoir must sit firmly in the device.
For more information on using the descaling cartridge, see chapterReplacing the decalcification cartridge
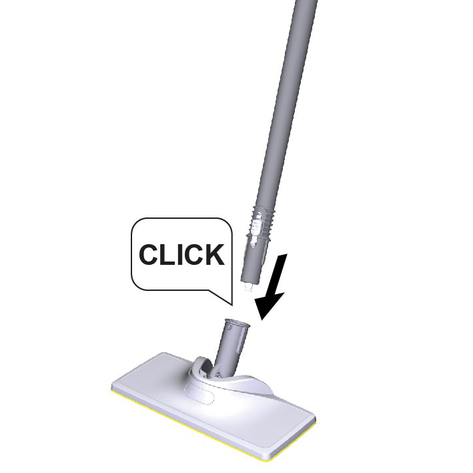
For a secure fit, the accessory parts must engage audibly during installation.
The device must be switched off before changing the accessory parts or the mop positions.
Other KÄRCHER accessory parts (e.g. extension hose, steam trowel) can be used for cleaning work without using the floor nozzle.
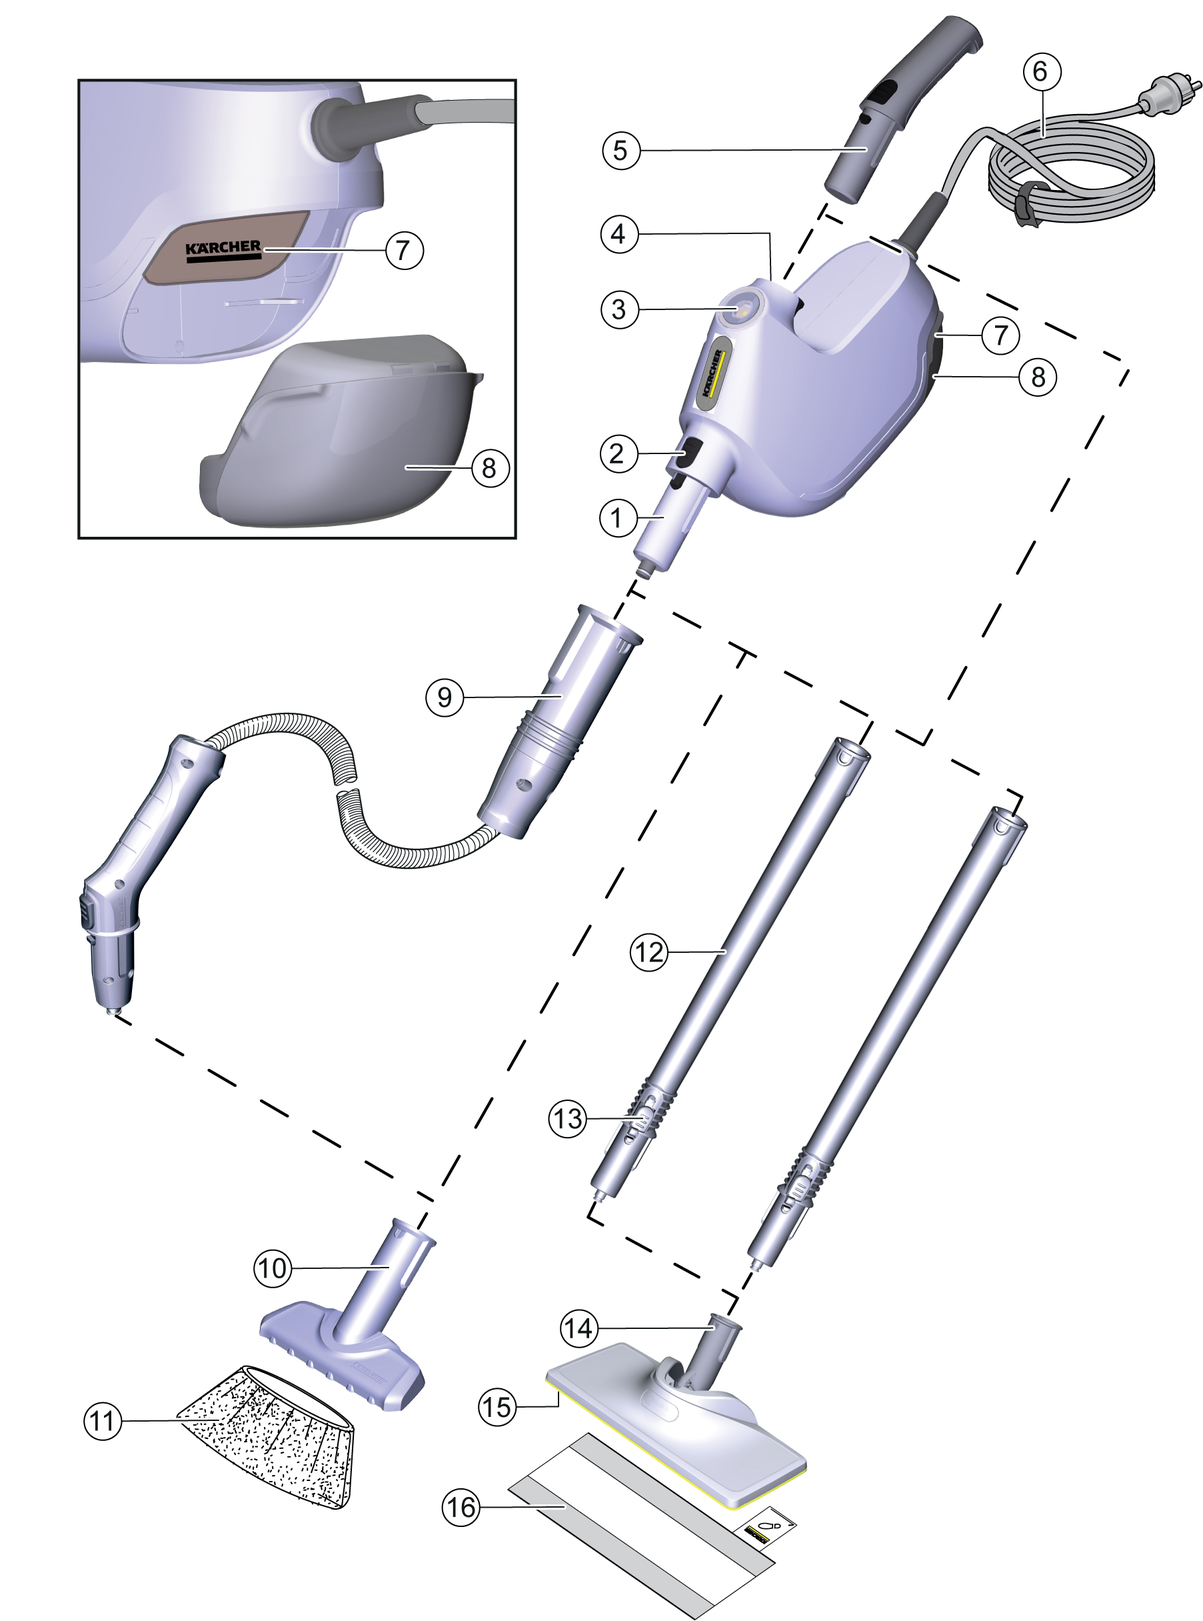
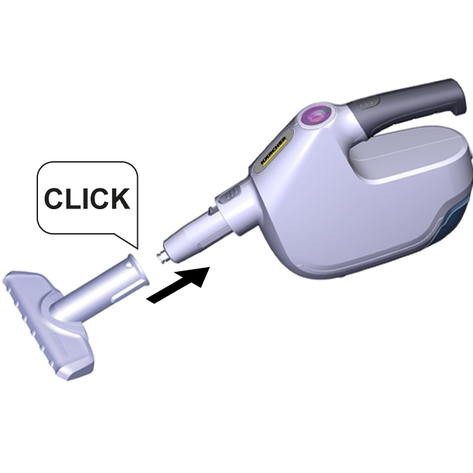
Assembly of manual nozzle / extension hose with steam gun
Push the open end of the manual nozzle onto the steam nozzle or steam gun until the unlocking button of the steam nozzle or steam gun engages.
Mounting extension tubes / floor nozzle / handle
In order for the device to function independently for floor cleaning, the EasyFix Large floor nozzle / EasyFix Large floor cleaning cloth supplied must be used as an accessory for the SC 1 Multi & Up.
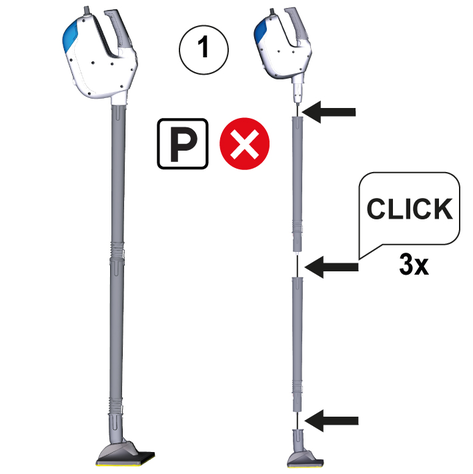
If the extension tubes and the EasyFix Large floor nozzle are included in the scope of delivery, the steam mop can be used in three different mop device positions to customise it to the respective cleaning requirements, see chapter Possible mop device positions.
Mop device position at the top - directly on the handle:
Connect the extension tubes together and attach them to the open end of the floor nozzle.
Connect the steam nozzle from the device to the extension tube
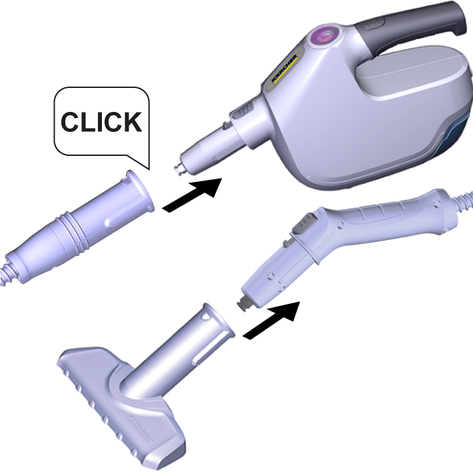
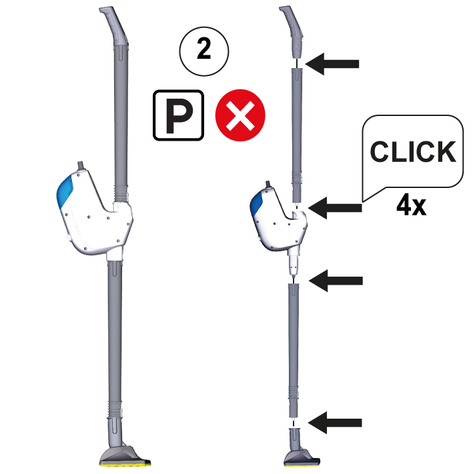
Mop device position centre - between the extension tubes:
Press the unlocking button on the detachable handle and remove the handle from the device.
Attach the handle to the open end of the 1st extension tube.
1. Attach the extension tube to the connection of the handle / extension tube on the device.
Attach the open end of the 2nd extension tube to the steam nozzle of the device.
2. Connect the extension tube to the floor nozzle.
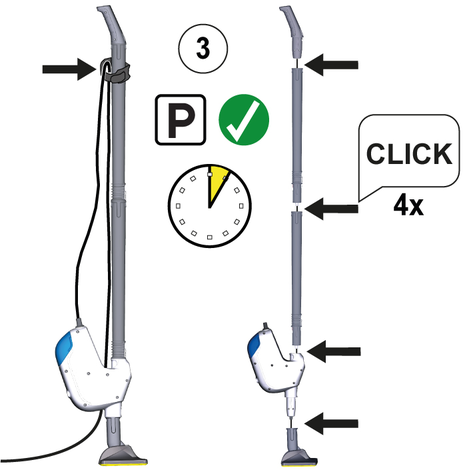
Mop device position at the bottom - directly on the EasyFix Large floor nozzle:
Press the unlocking button on the detachable handle and remove the handle from the device.
Connect the extension tubes together and attach the handle to the open end of the extension tube.
Attach the extension tubes to the connection of the handle / extension tube on the device.
Connect the floor nozzle to the steam nozzle.
Fasten the power cable below the handle with the included hook and loop fastener cable tie so that it is not run over during cleaning work.
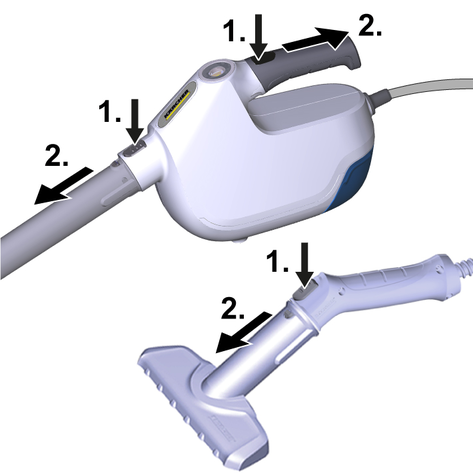
Press the relevant unlocking button (e.g. on the steam nozzle, hand nozzle or extension tubes) and disconnect the connected accessories.
If the extension tubes and the EasyFix Large floor nozzle are included in the scope of delivery, the steam mop can be used in three different mop device positions to customise it to the respective cleaning requirements.
For the installation description of the individual mop device positions, see chapter Installing accessories
The device is only self-standing in mop position 3 at the bottom of the floor nozzle for a short interruption in work. This device position is not designed for longer periods of time, e.g. for storing the device.
Mop device position at the top - directly on the handle:
Good accessibility, e.g. for cleaning under furniture.
Mop device position centre - between the extension tubes:
Combination of good accessibility and comfortable hand weight.
Mop device position at the bottom - directly on the EasyFix Large floor nozzle
Lightweight and self-standing for short work interruptions.
Device and material damage due to tipping over
The device can fall over and be damaged if inadequately secured during work breaks or storage. Liquid can also leak out and damage the floor covering.
Place the device with the floor nozzle on a firm surface. In the non-self-standing mop device position (device at the top and in the centre), the device must also be leaned against a fixed wall in a vertical position to secure it during short interruptions to work.
Damage to the device due to unsuitable water
Unsuitable water can block the nozzles.
Do not use condensation from the clothes dryer for filling.
Do not use collected rain water for filling.
Do not use detergents or other additives (e.g. vinegar, scents) for filling.
The water reservoir can be filled at any time.
Hold the water reservoir at the side with your hand and pull it downwards.
Pull the tank cap upwards.
Bend the front area of the tank cap backwards or downwards and secure it with your thumb so that the water tank filling opening is not covered.
Pour approximately 200 ml of tap water into the water reservoir.
Close the tank cap.
Place the water reservoir on the inside of the bottom edge of the device. Then push the water reservoir upwards and then towards the device until you hear it click into place.
The water reservoir must sit firmly in the device.
Device and material damage due to tipping over or falling
The device can tip over or fall and become damaged if inadequately secured during work breaks or storage.
Liquid can also leak out and damage the floor covering.
For a secure standing position during work interruptions, use the mop device position at the bottom (see chapter Possible mop device positions) and place the device on a firm surface. Devices without floor accessories must be stored on a stable surface (e.g. table).
When steaming for the first time after removing and reinserting the decalcification cartridge, the steam jet may be weak or irregular, and individual drops of water may be expelled. The device requires a short running-in period in which the decalcification cartridge fills with water. The steam volume that is expelled increases constantly until the maximum steam volume has been reached after approx. 30-60 seconds.
The device has a steam switch.
The steam switch has the following functions:
LED display light to indicate the various modes such as heating, ready for use, steam operation and descaling cartridge change.
Switching the steaming function on and off.
Hold the device firmly with the handle or place the device on a solid surface.
Plug the mains plug into a socket.
The steam switch flashes yellow and the device heats up.
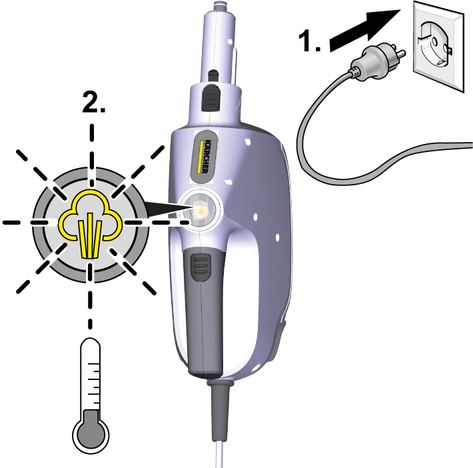
The device is ready for use after approx. 30 seconds and the steam switch lights up green constantly.

To switch on steam operation, press the steam switch lightly once.
Steam leaks out.
During steam operation, the steam switch pulses green.

After 5 minutes of continuous steaming, the steam switches off automatically. This prevents the pump from running dry if it is not noticed that the water reservoir is empty.
If necessary, top up with water and press the steam switch once lightly to continue cleaning.
If there is a lack of water, a loud noise is emitted because the pump draws air and there is no visible steam.
The water level can be seen through the transparent fresh water tank.
Remove the water reservoir and fill with 200 ml tap water, see chapterFilling water
Material damage due to condensate/moisture
To prevent material damage during longer work breaks, see chapter Storing the device
In order to save energy, we recommend that you switch off the device for breaks in operation of longer than 20 minutes, see chapter Switching off the device
To switch off steam operation, press the steam switch lightly once.
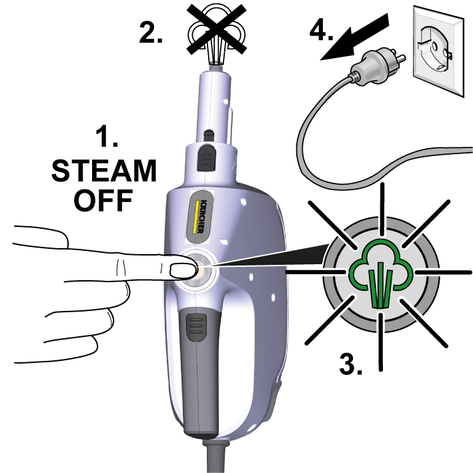
Steam operation is switched off.
To switch off the steam operation when needed, press the steam switch lightly once.
Steam operation is switched off and the steam switch lights up green constantly.
Pull the mains plug out of the socket.
The device is switched off.
Device damage due to water putrefaction
The water in the reservoir may putrefy if the device is not put into operation for more than 2 months.
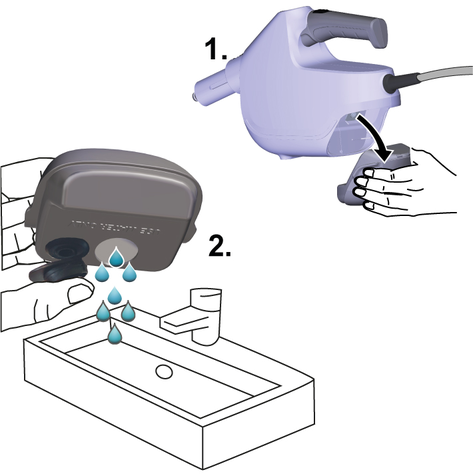
Drain the water reservoir before longer breaks in operation.
Drain the water reservoir.
Material damage due to condensate/moisture
After cleaning, moisture remaining on the accessories (e.g. floor cleaning cloth, floor nozzle, hand nozzle) or on the device itself can damage surfaces or floor coverings.
Remove the accessories after the cleaning work and dry them like the device.
Do not place or store the accessories/device on sensitive storage areas or surfaces.
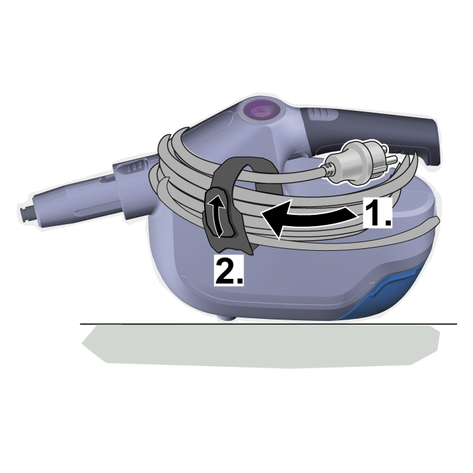
Disconnect the accessories from the device.
Wrap the mains connection cable around the device handle as required.
Allow the accessory to dry.
Store the device in a protected, dry location that is protected from frost.
Damaged surfaces
Steam can loosen wax, furniture polish, plastic coatings or paint and edge band from edges.
Do not direct the steam at glued laminated edges as the edge band may loosen.
Do not use the appliance for cleaning unsealed wood or parquet floors.
Do not use the appliance for cleaning painted or plastic coated surfaces such as kitchen or living room furniture, doors or parquet.
To clean these surfaces, steam a cloth briefly and use it to wipe over the surfaces.
Glass breakages and damaged surfaces
Steam can damage sealed points of the window frame and, at low outside temperatures, lead to tension on the surface of window panes and hence to glass breakages.
Do not direct the steam at sealed points on the window frame.
At low outside temperatures, heat up the window panes by gently steaming the full surface of the glass.
Clean the window area with a manual nozzle and cover. To remove the water, use a squeegee or wipe the surfaces dry.
Prior to using the appliance, always check the compatibility of the textiles at a concealed point: Steam down the textile, allow it to dry and then check it for any change in colour or shape.
The steam nozzle or steam gun can be used for the following application areas without accessories:
For removing slight creases from the hanging clothing items: Steam the clothing item from a distance of 10-20 cm.
For wiping damp dust: Steam a cloth briefly and use it to wipe over the furniture.
The manual nozzle is used for cleaning small areas that can be washed down, shower cubicles and mirrors.
Slide the manual nozzle onto the steam nozzle or steam gun.
Pull the cover over the manual nozzle.
The floor nozzle is used for cleaning washable wall and floor coveringse.g. stone floors, tiles and PVC floors.
Damage due to build-up of steam
Heat and moisture can lead to damage.
Check the heat resistance and steam effect on an inconspicuous area using a minimal volume of steam prior to use.
Detergent residues or care emulsions on the surface to be cleaned can cause streaks during steam cleaning, but these disappear after repeated use.
Beware of burns to your feet
The floor nozzle/floor cleaning cloth heats up during steaming.
Hot water may drip out when pulling off the floor cloth.
Only operate or remove the floor nozzle/floor cleaning cloth with suitable footwear.
We recommend sweeping the floor or vacuum cleaning it before using the device. In this way the floor will be cleared of dirt and loose particles before the wet cleaning commences. Work slowly on surfaces that are heavily soiled so that the steam has longer to take effect.
Connect the extension tubes with the steam gun.
Connect the extension tube to the floor nozzle.
Attach floor cleaning cloth to floor nozzle.
Place the floor cleaning cloth with the hook and loop strips pointing upwards on the floor.
Place the floor nozzle onto the centre of the floor cleaning cloth, applying slight pressure.
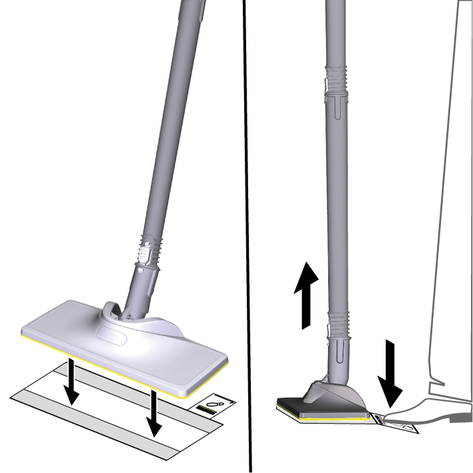
The floor cleaning cloth will stick to the floor nozzle of its own accord due to the hook and loop fastener.
Place one foot on the bottom corner of the floor cleaning cloth and lift the floor nozzle up.
Initially, the floor cleaning cloth's hook and loop fastener strip is very strong and cannot be removed from the floor nozzle easily. After the floor cleaning cloth has been used several times and washed, it is easier to remove from the floor nozzle and it has reached the optimum adhesion.
Device damage and shortened service life
If the replacement intervals (steam switch) for the decalcification cartridge are not observed, there is a risk of device damage and the service life of the device may be shortened.
Observe the replacement interval.
The service life of the descaling cartridge corresponds to a water flow rate of approx. 15 litres.
The required replacement of the descaling cartridge is indicated as follows:
1 hour before the end of the cartridge run time, the LED display light on the steam switch flashes orange for 30 seconds.

Until the descaling cartridge is completely empty, the steam switch flashes orange for 30 seconds each time the device is connected to the socket.
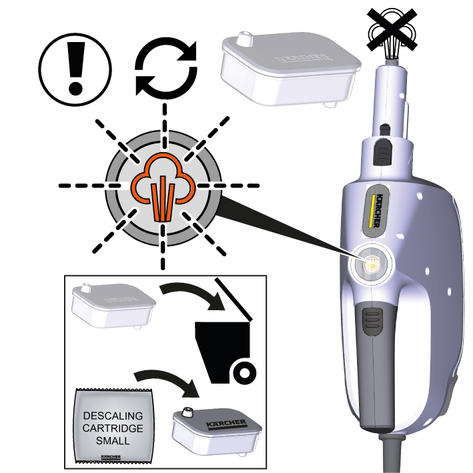
If the run time of the descaling cartridge is exhausted, the steam switch flashes orange quickly and constantly.
The descaling cartridge must be replaced with a new one.
In this mode, to protect against possible damage to the device, steam operation is no longer possible. Steam operation is therefore only possible again after the descaling cartridge has been successfully replaced, see chapter Initial Start-Up
Device damage
There is a risk of damage to the device if the used decalcification cartridge is re-used.
Work carefully in order to prevent mixing up the new and old cartridge.
When steaming for the first time after removing and reinserting the decalcification cartridge, the steam jet may be weak or irregular, and individual drops of water may be expelled. The device requires a short running-in period in which the decalcification cartridge fills with water. The steam volume that is expelled increases constantly until the maximum steam volume has been reached after approx. 30-60 seconds.
The water tank must be removed before changing the descaling cartridge and inserted again after it has been changed, see chapter Initial Start-Up
If the device is in steam mode, lightly press the steam switch once to turn off the steam.
Pull the mains plug out of the socket.
Remove the decalcification cartridge.
Insert the new decalcification cartridge and press it firmly into place.
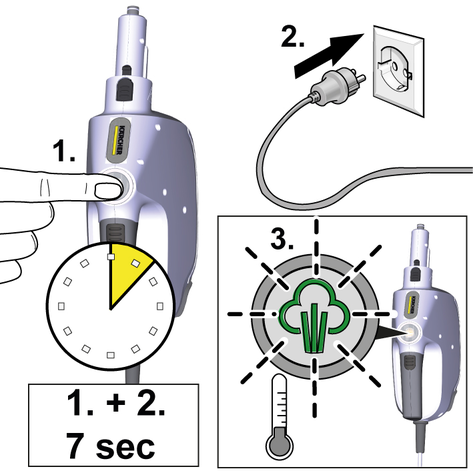
Press the steam switch and insert the mains plug into a socket.
Continue to hold the steam switch for 7 seconds.
After a successful reset, the steam switch flashes green and then switches to heating mode.
The run time of the descaling cartridge starts again.
To bleed the descaling cartridge, press the steam switch once lightly, it will take approx. 30-60 seconds until a steady steam is emitted.
(Accessories - depending on scope of delivery)
The cloths are not suitable for the dryer.
For optimum cleaning performance, we recommend machine washing the cloths once before first use.
When washing, observe the notes on the washing tag. Do not use any liquid softeners as this will affect the ability of the cloths to pick up dirt.
Wash the floor cleaning cloths and covers at a max. temperature of 60 °C in the washing machine.
Malfunctions often have simple causes that you can remedy yourself using the following overview. When in doubt, or in the case of malfunctions not mentioned here, please contact your authorised Customer Service.
Risk of electric shock and burns
Trying to eliminate faults while the appliance is connected to the mains or has not yet cooled down is always dangerous.
Remove the mains plug.
Allow the appliance to cool down.
No steam / little steam although there is sufficient water in the reservoir
Cause:
The decalcification cartridge has not been inserted or has been inserted incorrectly.
Remedy:
Fit the decalcification cartridge and/or check that the decalcification cartridge sits tightly in the device and press in again if necessary.
Cause:
The decalcification cartridge has been removed when filling with water and/or a new decalcification cartridge has been fitted
Remedy:
Always leave the decalcification cartridge in the device when topping up.
Remedy:
Lightly press the steam switch once.
The full steam output is reached after approximately 30-60 seconds.
Cause:
Run time of the decalcification cartridge ends soon.
Remedy:
Insert a new decalcification cartridge, see chapter Replacing the decalcification cartridge.
Cause:
Run time for the decalcification cartridge has expired
Remedy:
Insert a new decalcification cartridge, see chapter Replacing the decalcification cartridge.
Remedy:
If a new descaling cartridge has already been inserted and the error still occurs, it's likely that the RESET function was not performed after restarting the device.
After inserting the descaling cartridge, press the steam switch, insert the mains plug and hold the steam switch for 7 seconds, see chapter Inserting the decalcification cartridge
Cause:
The switch off prevents the pump from running dry if it is not noticed that the water reservoir is empty.
Remedy:
Check whether there is still enough water in the water reservoir. Top up water if necessary.
Remedy:
To start the steam operation, press the steam switch lightly once.
Electrical connection | |
Voltage | 220-240 V |
Phase | 1 ~ |
Frequency | 50-60 Hz |
Degree of protection | IPX4 |
Protection class | I |
Device performance data | |
Heating capacity | 1300 W |
Heating-up time | 30 Seconds |
Continuous steaming | 33 g/min |
Filling quantity | |
Maximum filling quantity | 200 ml |
Dimensions and weights | |
Weight without accessories | 1,2 kg |
Length | 341 mm |
Width | 110 mm |
Height | 181 mm |