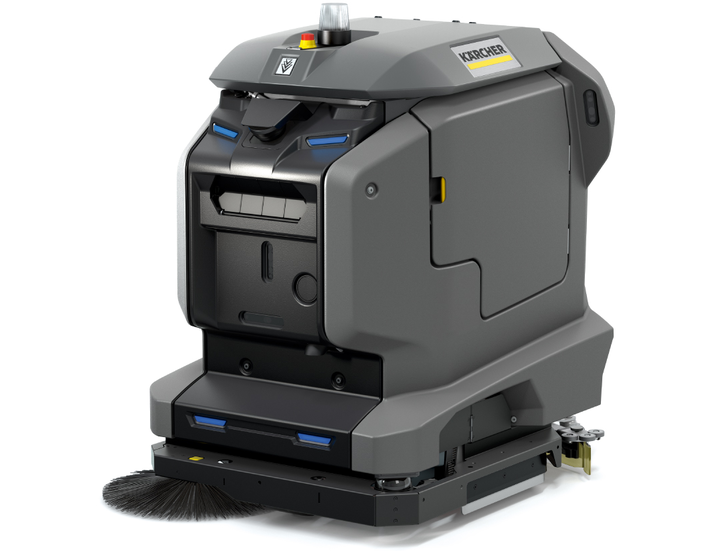
KIRA B 50
59800960 (01/24)
59800960 (01/24)
READ ALL INSTRUCTIONS BEFORE USING THIS APPLIANCE
To reduce the risk of fire, electric shock, or injury:
DO NOT LEAVE appliance unattended when plugged in. Unplugfrom outlet when not in use and before servicing.
TO REDUCE THE RISK OF ELECTRIC SHOCK-USE INDOORS ONLY
DO NOT USE FOR CLEANING PURPOSES ON SURFACES HAVING A GRADIENT EXCEEDING THAT MARKED ON THE MACHINE
THE MACHINE SHALL BE PARKED SAFELY
Do not allow to be used as a toy. Close attention is necessary when used by or near children.
Use only as described in this manual. Use only manufacturer’s recommended attachments.
Do not use with damaged cord or plug. If the unit is not working as it should, has been dropped, damaged, left outdoors, or dropped into water, return it to a service center.
Do not pull or carry by the cord, do not use cord as a handle, do not close a door on the cord, or pull cord around sharp edges or corners. Do not run appliance over cord. Keep cord away from heated surfaces.
DO NOT UNPLUG BY PULLING CORD. To unplug, grasp plug, not cord.
Do not handle plug or appliance with wet hands.
Do not put any objects into openings. Do not use if openings are blocked; keep free of dust, lint, hair, and anything that may reduce air flow.
KEEP HAIR, CLOTHING, LOOSE JEWELRY, FINGERS and all parts of the body away from openings and moving parts.
Turn off all controls before unplugging.
Use extra care when cleaning on stairs.
Do not use to pick up flammable or combustible liquids, such as gasoline, or use in areas where they may be present.
Connect to a properly grounded outlet only. See Grounding Instructions.
Always disconnect cord from electrical outlet before servicing appliance.
Never sweep off explosive liquids, combustible gases or undiluted acids and solvents. This includes petrol, paint thinner or heating oil which can generate explosive fumes or mixtures upon contact with the air. Acetone, undiluted acids and solvents must also be avoided as they can harm the materials on the machine.
Do not vacuum up burning or smouldering objects!
This device must be grounded. If it should malfunction or break down, grounding provides a path of least resistance for electric current to reduce the risk of electric shock.
This device is equipped with a cord having an equipment grounding conductor and ground plug.
The plug must be plugged into an appropriate outlet that is properly installed and grounded in accordance with all local codes and ordinances.
Improper connection of the equipment grounding conductor can result in a risk of electrocution.
Check with a qualified electrician or service personnel if you are in doubt as to whether the outlet is properly grounded.
Do not modify the plug provided with the product - if it will not fit the outlet, have a proper outlet installed by a qualified electrician.
Do not use any type of adapter with this product.
This appliance is for use on a nominal 120-volt circuit and has a grounding attachment plug that looks like the plug illustrated in Figure A.
Make sure that the appliance is connected to an outlet having the same configuration as the plug.
No adaptor should be used with this appliance.
CONNECT TO A PROPERLY GROUNDED OUTLET ONLY

The owner and/or user must have an understanding of the manufacturer’s operating instructions and warnings before using this device.
Warning information should be emphasized and understood.
If the operator is not fluent in English, the manufacturer’s instructions and warnings shall be read to and discussed with the operator in the operator’s native language by the purchaser/ owner, making sure that the operator comprehends its contents.
Owner and/or user must study and maintain for future reference the manufacturers’ instructions.
Before starting operation, the device must be in the operating position.
Do not start or operate the device, any of its functions or attachments, from any place other than from the designated operator's position.
Before leaving the operator’s position:
bring the device to a complete stop;
if the device must be on an incline, block the wheels.
Maintain a safe distance from the edge of ramps, platforms, and other similar working surfaces.
Do not add to, or modify the device.
Do not block access to fire aisles, stairways or fire equipment.
Yield the right of way to pedestrians and emergency vehicles such as ambulances and fire trucks.
Cross railroad tracks at an angle wherever possible. Do not park closer than 6 ft (1800 mm) to the nearest rail of a railroad track.
Keep a clear view of the path of travel and observe for other traffic, personnel, and safe clearances.
Under all travel conditions, operate the device at a speed that will permit it to be brought to a stop in a safe manner.
Do not indulge in stunt driving or horseplay.
Slow down for wet and slippery floors. Before driving over a dockboard or bridge plate, be sure that it is properly secured. Drive carefully and slowly across the dockboard or bridge plate, and never exceed its rated capacity.
When negotiating turns, reduce speed to a safe level consistent with the operating environment. Make the turns smoothly.
If the device is found to be in need of repair or in any way unsafe, or contributes to an unsafe condition, the matter shall be reported immediately to the user’s designated authority, and the device shall not be operated until it has been restored to safe operating condition.
If during operation the device becomes unsafe in any way, the matter shall be reported immediately to the user’s designated authority, and the device shall not be operated until it has been restored to safe operating condition.
Do not make repairs or adjustments unless specifically authorized to do so.
Operation of the device may be hazardous if maintenance is neglected or repairs, rebuilds, or adjustments are not performed in accordance with the manufacturer’s design criteria. Therefore, maintenance facilities (on or off premises), trained personnel, and detailed procedures shall be provided.
Maintenance and inspection of the device shall be performed in conformance with the following practices:
a scheduled planned maintenance, lubrication, and inspection system shall be followed; consult the manufacturer’s recommendations.
Only trained and authorized persons shall be permitted to operate a powered floor scrubber. Operators of powered floor scrubbers shall be qualified as to visual, auditory, physical, and mental ability to operate the equipment safely.
Avoid fire hazards and have fire protection equipment present in the work area. Do not use open pans of fuel or flammable cleaning fluids for cleaning parts.
Any device not in safe operating condition shall be removed from service.
Repairs shall not be made in Class I, Class II, and Class III locations.
Fire Prevention.The device shall be kept in a clean condition and reasonably free of lint, excess oil, and grease.
Noncombustible agents are preferred for cleaning the device. Flammable liquids [those having flash points at or above 100°F (37,8°C)] are not allowed. Precautions regarding toxicity, ventilation, and fire hazard shall be appropriate for the agent or solvent used.
Nameplate Visibility. The device type designations as shown on the nameplate and the type markers shall not be covered over with paint so that their identification information is obscured.
 Read theses original instructions before using the device for the first time and act in accordance with them.
Keep these operating instructions for future reference or for future owners.
Before using the device for the first time, also read the complete operating instructions, which can be accessed on the device display or downloaded to a smartphone.
This device may contain components licensed under an open source licence and/or developed by third parties. A list of the open source software components present in the device (including copyright holders and licence conditions) can be displayed on the touch screen of the device. To view, open the main menu, go to Settings and open System Info.
These instructions are intended for the user groups Users and Administrator.
Each user can be granted or denied permissions for various device functions via the touch screen of the device.
All descriptions in this manual refer to the standard settings suggested in the device for the respective user group.
This device is suitable for commercial and industrial use, e.g. in hotels, schools, hospitals, factories, shops, offices, and rental companies. Use the device only in accordance with the information in these operating instructions.
The device may only be used for cleaning smooth surfaces that are insensitive to water and polishing.
The device is designed for indoor use.
This device is only suitable for use in dry areas.
The operational temperature range is between +5 °C and +40 °C.
The device is not suitable for cleaning frozen floors (e.g. in cold stores).
The device is suitable for a maximum water height of 1 cm. Do not drive into an area if there is a danger of exceeding the maximum water height.
When using chargers or batteries, only the components approved in the operating instructions may be used. A different combination must be confirmed by the responsible charger and/or battery supplier.
The device is not intended for cleaning public traffic routes.
The device must not be used on pressure-sensitive floors. Take into account the permissible load per unit area of the floor. The load per unit area caused by the device is specified in the technical data.
The device is not suitable for use in potentially explosive environments.
The device is approved for operation on surfaces with a maximum slope (see chapter "Technical Data").
Before using the device for the first time, read and observe these operating instructions and the complete operating instructions (in the device display).
Operate the device only when the hood and all covers are closed.
Press the emergency-off button for immediate shutting down in an emergency.
Only operate the device on surfaces that do not exceed the maximum permitted slope (see the "Technical data" section).
Do not place any part of your body between the docking station and the device during the docking process.
Indication of an imminent threat of danger that will lead to severe injuries or even death.
Indication of a potentially dangerous situation that may lead to severe injuries or even death.
Indication of a potentially dangerous situation that may lead to minor injuries.
Indication of a potentially dangerous situation that may lead to damage to property.
Wear suitable gloves when working with the device.
Risk of asphyxiation. Keep packaging film out of the reach of children.
Only use the device for its proper use. Take into account the local conditions and beware of third parties, in particular children, when working with the device.
The device is not intended for use by persons with restricted physical, sensory or mental abilities or those lacking in experience and / or lacking in knowledge.
Only people who have been instructed on how to use the device, or have proven their ability to operate it, and have been explicitly instructed to use it, must use the device.
Children must not operate the device.
Children must be supervised to prevent them from playing with the appliance.
Keep children and unauthorised persons away from the device.
Safety devices are provided for your own protection. Never modify or bypass safety devices.
Risk of injury from petrol cap!
Risk of crushing limbs due to unexpected closing of the petrol cap.
Open the petrol cap as far as it will go to avoid accidental closing.
Close the petrol cap only when there are no limbs between the tank and the petrol cap.
The voltage indicated on the type plate must match the voltage of the power source.
Never touch the mains plug and socket with wet hands.
Only connect protection class I devices to properly earthed power sources.
Only connect the device to an electrical connection which has been set up by a qualified electrician as per IEC 60364‑1.
Switch off the device immediately in the event of leaks.
In the case of any foam formation or escaping liquids, switch off the device immediately and remove the mains plug from the docking station or the charger.
Check that the mains connection cable with mains plug is undamaged each time before using the device. To avoid any possible danger, a damaged mains connection cable must be immediately replaced by the manufacturer, or the authorised customer service department or a qualified electrician.
Do not damage the power supply and extension cable by running over it, crushing or yanking it or similar. Protect the power supply cable from heat, oil and sharp edges.
Only use the mains connection cable prescribed by the manufacturer, including when replacing the cable. For order no. and type see operating instructions.
Only replace couplings on the power supply or extension cable with those with the same splash guard and the same mechanical strength.
Before startup, check the device as described in the chapter "Checking the device".
Observe the rules for autonomous operation as described in the chapter "Rules for autonomous operation".
When using the device in hazard zones (e.g. service stations), adhere to the respective safety regulations.
Operation in explosive atmospheres is prohibited.
Never spray or vacuum fluids, flammable gases, explosive dusts as well as undiluted acids and solvents. These include petrol, paint thinners or heating oil, which can form explosive vapours or mixtures through suction air turbulence, also acetone, undiluted acids and solvents because these attack the materials used in the machine.
Never use the device to extract any burning or smouldering objects.
Never use the device to vacuum up people or animals.
Do not use the device on slippery floors.
On inclined surfaces, do not exceed the value for the angle of inclination to the side and in the travel direction in the operating instructions.
Wear tight-fitting clothing to avoid being caught by rotating parts (no tie, no long, wide skirt, etc.).
Check the device and the accessories each time before operation, in particular the mains connection and extension cable, to make sure it is safe and working correctly. Pull out the mains plug in case of any damage and do not use the device.
Do not transport passengers with the device.
Never open the cover while the motor is running.
The device is not suitable for sucking dust that is harmful to health.
Do not operate the device at temperatures below 0 °C.
The device is not a vacuum cleaner. Do not extract more liquid than you sprayed. Never use the device for extracting dry dirt.
The device is only suitable for use on the coats listed in the operating instructions.
The device is suitable for damp to wet soil up to 1 cm water height. Do not drive into areas where the water height is more than 1 cm.
Observe the legal regulations when disposing of waste water and brine.
Do not use the device outdoors.
Keep the detergent out of the reach of children.
Never use the recommended detergents undiluted. These products are operationally safe since they do not contain any acids, alkali or substances that are harmful to the environment. Should detergents come into contact with eyes, rinse these out immediately and thoroughly using water and seek medical attention immediately. The same applies if detergents are swallowed.
Only use the detergents recommended by the manufacturer and observe the application, disposal and warning instructions of the detergent manufacturers.
Lithium-ion batteries are built into this device. These are subject to special criteria. Removal and installation as well as testing of defective batteries may only be carried out by Kärcher customer service or a qualified specialist.
For storage and transport instructions, please contact your Kärcher Customer Service.
Modifications and alterations to the device are not permitted.
You must not open the battery, there is a danger of a short circuit. Irritating vapours or corrosive liquids can also escape.
Do not expose the battery to strong sunlight, heat or fire. There is a danger of explosion.
Do not operate the charger in an explosion-hazard environment.
Do not use a dirty or wet charger.
Ensure sufficient ventilation during the charging process.
Danger of explosion. Keep naked flames away from the battery or the battery charging room, and do not generate sparks or smoke in the vicinity of a battery of a battery charging room.
Danger of explosion. Do not place any tools or objects on the battery, i.e. on the end poles and cell connectors.
Check the device and the mains cable for damage before each use. Do not use damaged devices and have damaged parts repaired by qualified personnel only.
Keep children away from batteries and charger.
Do not charge damaged batteries. Have damaged batteries replaced by Kärcher customer service.
Do not throw a defective battery in the household rubbish. Inform Kärcher Customer Service.
Avoid contact with fluid leaking from defective batteries. In case of accidental contact, rinse the liquid with water. In case of contact with the eyes, consult a doctor as well.
Be sure to observe these operating instructions. Adhere to the recommendations of the legislature regarding the handling of batteries.
The mains voltage must match the voltage indicated on the type plate of the device.
Operate the battery only with this device. It is forbidden and dangerous to use it for other purposes.
Unsuitable brushes endanger your safety. Only use the brushes supplied with the device or brushes recommended in the operating instructions.
Before cleaning, service, replacing parts and switching over to another function, you must switch off the device and remove the ignition key. Disconnect the mains plug on mains-operated devices. On battery-operated devices, pull the battery plug or disconnect the battery.
Have repair work, installation of spare parts and work on electrical components carried out by the authorised customer service only.
Repairs may only be carried out by approved customer service sites or staff qualified in this area who are familiar with all relevant safety instructions.
Clean the water lever limit facility regularly, checking for any signs of damage.
Pay attention to the safety inspection for mobile devices for industrial use in accordance with the locally applicable regulations
Short-circuits or other damage. Do not clean the device with a hose or high-pressure water jet.
Only use accessories and spare parts which are approved by the manufacturer. Only original accessories and original spare parts ensure that the appliance will run fault-free and safely.
Shut the motor down prior to transportation. Secure the device, taking into account its weight. See chapter Technical data in the operating instructions.
Missing or modified safety devices
Safety devices are provided for your own protection.
Never modify or bypass safety devices.
The safety functions of the device are not affected in the absence of a network connection.
If the emergency off button is pressed, all cleaning and driving functions are stopped immediately.
The device stops if both safety switches are released during manual operation.
In autonomous operation, actuation of a safety switch triggers an operating pause of 10 seconds.
The distance sensors detect obstacles and cause the device to circumnavigate the obstacles. The distance sensors comply with laser protection class 1 according to IEC 60825-1:2014.
The optical sensors detect obstacles and cause the device to circumnavigate the obstacles. The optical sensors comply with laser protection class 1 according to IEC 60825-1:2014.
This device is suitable for commercial and industrial use, e.g. in hotels, schools, hospitals, factories, shops, offices, and rental companies.
Users must be adequately instructed in the use of the docking station.
Use the docking station in dry areas only.
Unplug the docking station mains plug from the mains socket before carrying out any maintenance work.
Prevent the mains cable of the docking station from coming into contact with the rotating brushes of the floor cleaner.
Use the docking station indoors only
Store the docking station indoors only.
Observe the following warnings when handling the batteries:
 | Observe notes in the instructions for the battery, on the battery and in these operating instructions. |
 | Wear eye protection. |
 | Keep acids and batteries away from children. |
 | Risk of explosion |
 | Fire, sparks, open flames and smoking are prohibited. |
 | Risk of acid burns |
 | First aid. |
 | Warning |
 | Disposal |
 | Do not throw batteries in the bin. |
The packing materials can be recycled. Please dispose of packaging in accordance with the environmental regulations.
Electrical and electronic devices contain valuable, recyclable materials and often components such as batteries, rechargeable batteries or oil, which - if handled or disposed of incorrectly - can pose a potential danger to human health and the environment. However, these components are required for the correct operation of the device. Devices marked by this symbol are not allowed to be disposed of together with the household rubbish.
Current information on content materials can be found at: www.kaercher.de/REACH
Only use original accessories and original spare parts. They ensure that the appliance will run fault-free and safely.
Information on accessories and spare parts can be found at www.kaercher.com.
Check the contents for completeness when unpacking. If any accessories are missing or in the event of any shipping damage, please notify your dealer.
The warranty conditions issued by our sales company responsible apply in all countries. We shall remedy possible malfunctions on your device within the warranty period free of cost, provided that a material or manufacturing defect is the cause. In a warranty case, please contact your dealer (with the purchase receipt) or the next authorised customer service site.
(See overleaf for the address)
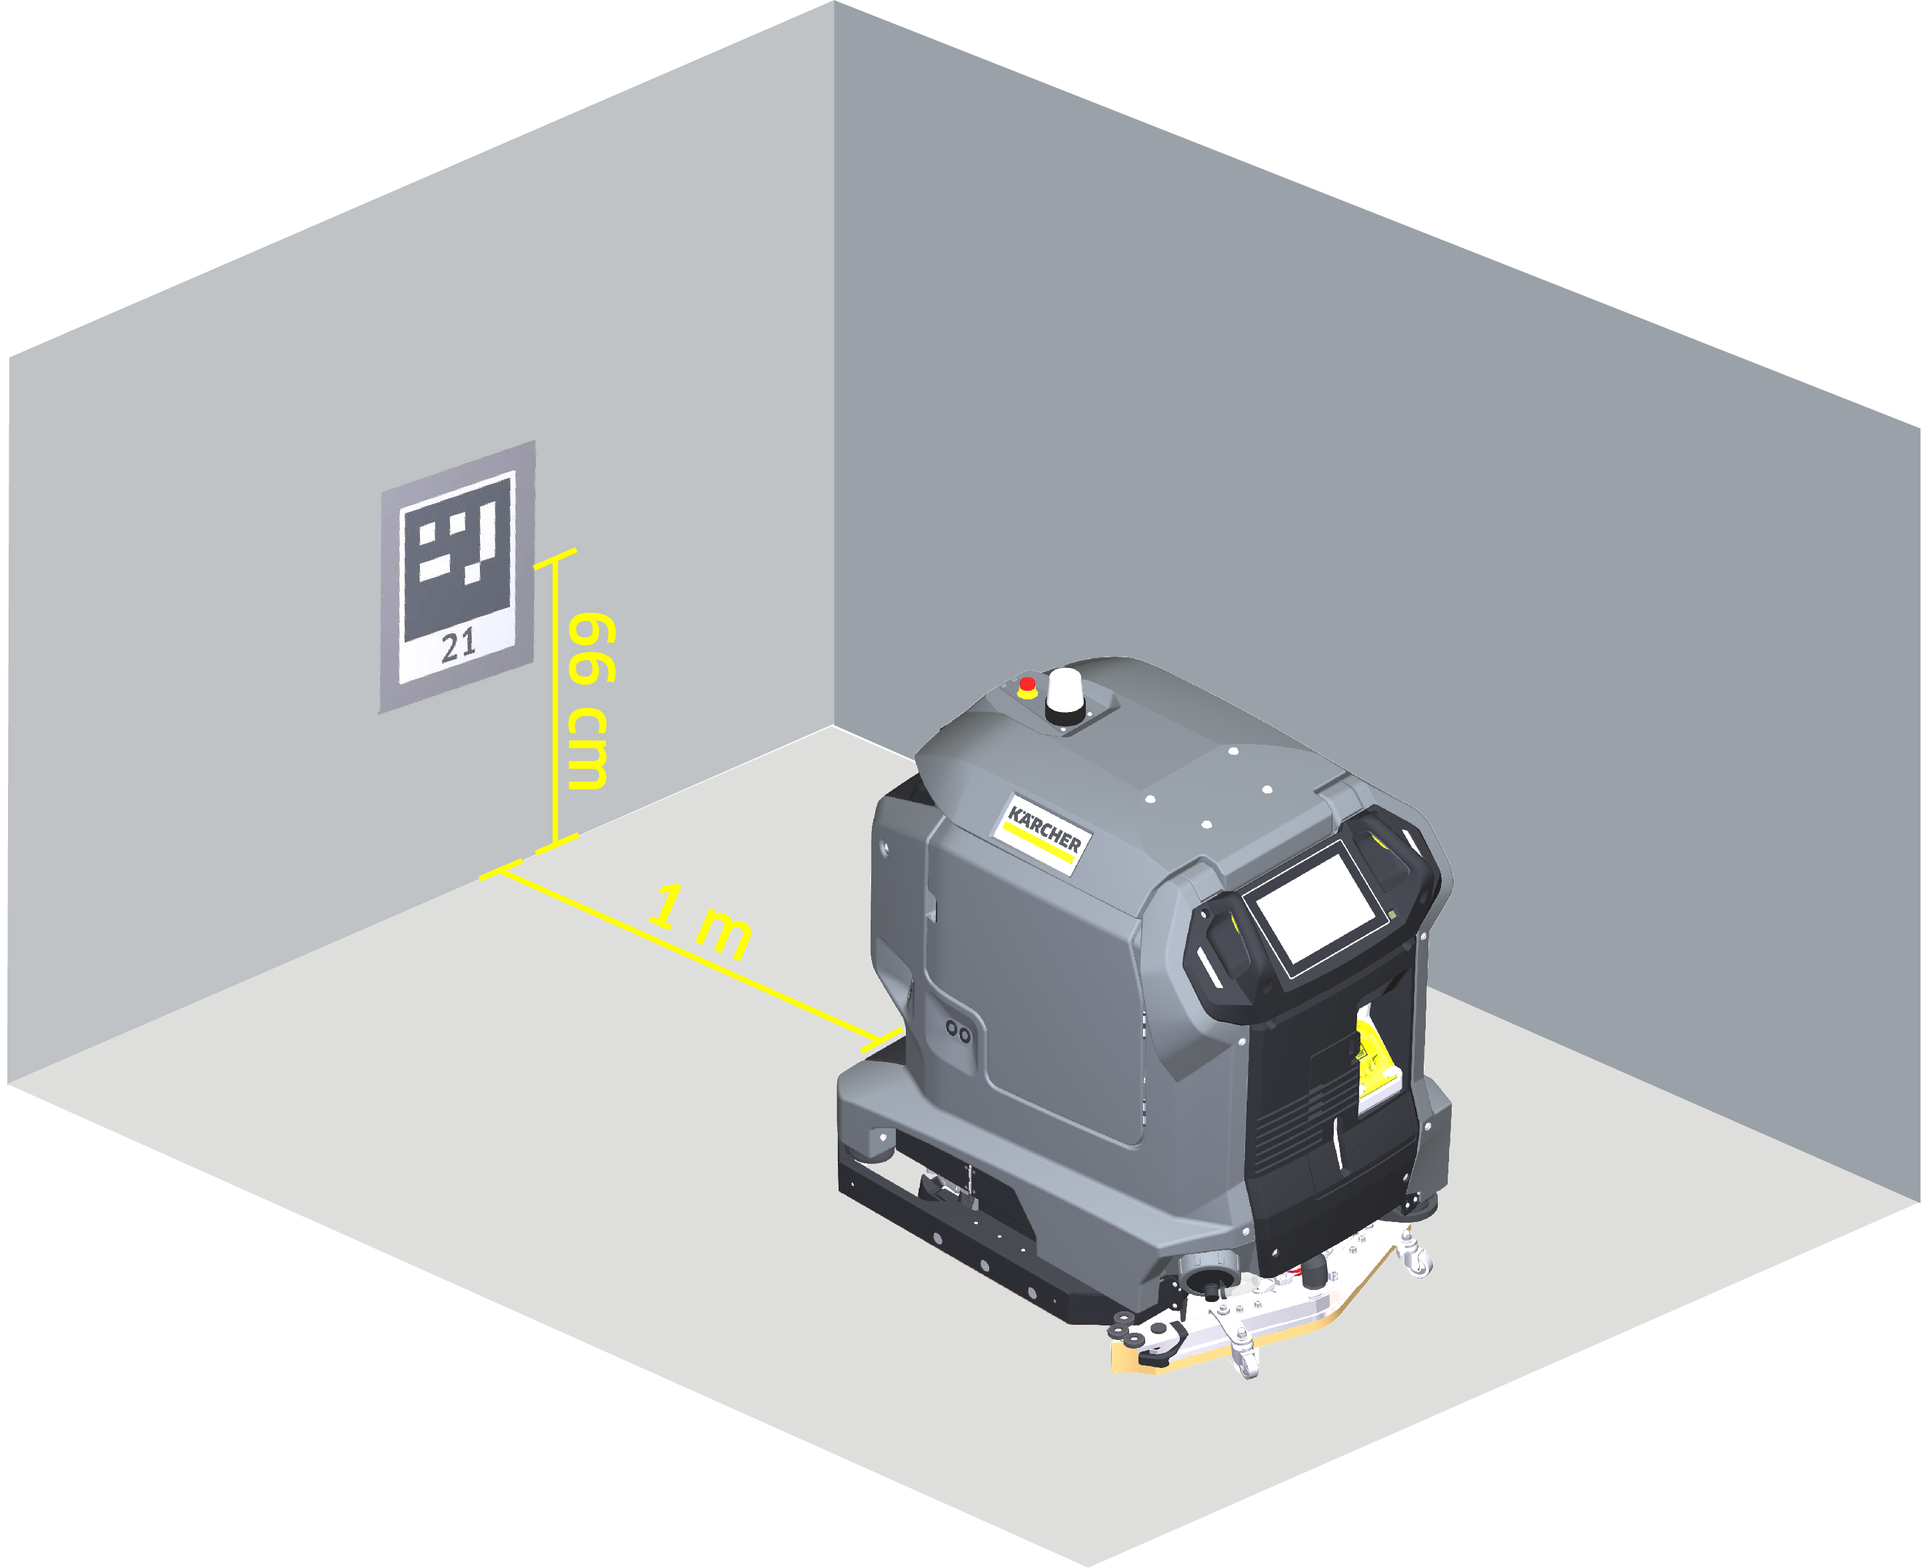
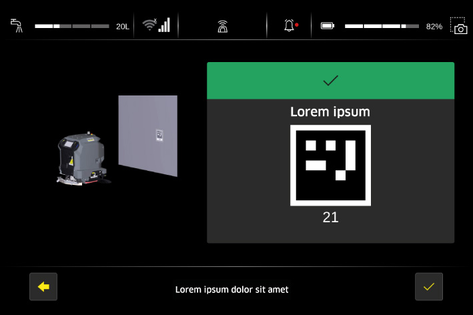
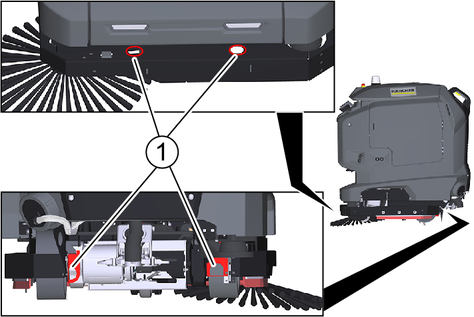
Position codes are required for autonomous cleaning. The device must be positioned in front of a position code to start a cleaning route. These should therefore be placed at strategic points in the building. The position codes consist of a code readable by the device and a position code ID readable by humans.
Place the position code at a height of 66 cm.
Multiple position codes with an identical ID may not be used per device.
Any number of routes can be stored at each position code.
The device must be positioned in front of the associated position code to start a route.
Do not laminate the position code. Due to the lamination, the device may not recognise the position code correctly.
Routes can also be terminated without a position code.
For practical subdivision, the environment can be divided into areas with a permanently same structure and areas whose environment changes frequently (e.g. due to seasonal offers).
The interlinking function explained later provides a high degree of flexibility for separately taught cleaning areas. About 30-60 minutes have proven to be a good section duration, also with regard to resource utilisation and availability.
In addition, individual frequented areas can be cleaned more frequently or, in case of major changes in the environment, only the affected route needs to be taught again.
Ideally, position the position code close to the surface to be cleaned to avoid long transport distances. Multiple position codes can be placed in strategic locations in an environment.
Think about the route and divide the area to be cleaned into sensible sections before starting the teach-in.
Remove any dirt (e.g. tape, splinters from pallets and cling film) that the device cannot collect, as this may damage it.
Make sure that the route is clear of seasonal display cabinets as well as other non-permanent obstructions.
Learn new routes when the workload in the area to be cleaned is lowest. Ideally outside regular business and working hours.
Please note that security systems in the building may be active and triggered by the device outside business hours.
Avoid travelling between areas with sudden changes in temperature and humidity as this can cause moisture to build up on the exterior and electronics and/or sensors and affect the device's capabilities.
Dust can settle on the sensors and affect the reliable and efficient operation of the device in autonomous mode. Clean the sensors regularly.
With the teach-in function, the user cleans the surface in the same manner as with a conventional hand-guided device. During this, the device records the route and additional sensor information. The user can set various parameters during the teach-in. Saved routes are then available for autonomous execution.
Positioning the device
The device must be positioned in front of a position code to start a teach-in. If the position code is recognised by the device, it appears on the device's screen. The teach-in then starts.
Recording during the teach-in
During the teach-in, the following is recorded:
The route taught by the user.
The points at which cleaning modules were switched on or off.
The parameter settings for water output, detergent dosing, suction power and brush speed.
Honking the horn (e.g. at a crossing)
The following is not recorded during the teach-in
If the user takes a short break, the stop is not recorded (maximum 5 minutes).
The device does not save the speed at which the route was taught.
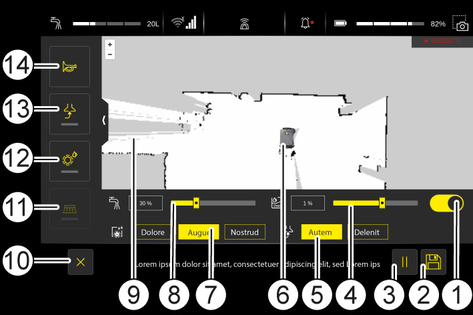
Functions on the screen during the teach-in
During teach-in, the user can switch the cleaning units on and off, adjust individual cleaning parameters and activate Smart Fill.
To record new routes, click on "New Route" in the autonomous menu. After the device has scanned the position code, the teach-in menu is displayed on the screen.
Optimum distance between the wall and the right side of the device | 10 cm |
Minimum aisle width for one-way operation | 1.05 m |
Minimum aisle width for U-turns | 1.7 m |
Minimum distance to the drop edge (parallel travel) | 1.5 m |
The device does not detect obstacles that are less than 15 cm above the floor (plinths, carpets, forks, cables, sockets, pallets). Obstacles of this kind in the cleaning surface must be excluded.
In order for the device to perform the taught routes in autonomous mode, the specified limit values must be adhered to. The side brush insert can be used to maintain the edge distance.
Note the following during the teach-in:
Teach-in of the surface to be cleaned
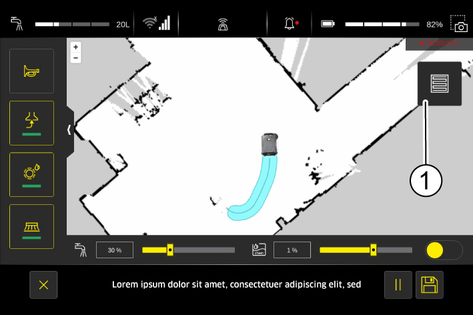
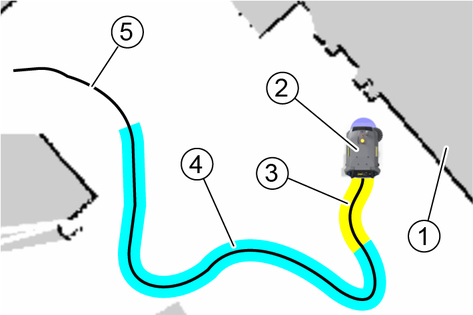
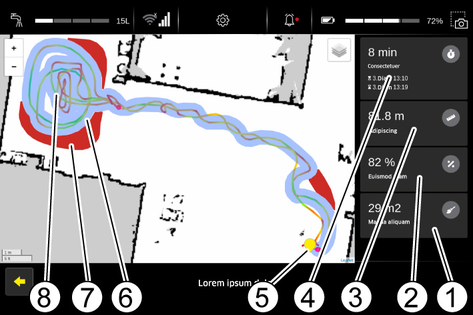
Clean the surface as you would with a conventional hand-held device. Use the live map on the screen to place the lanes close together or overlap them slightly. Areas that have already been cleaned are shown in blue to avoid missing parts of the area to be cleaned.
In order for the side brush to reach the edge of the surface to be cleaned, it must be driven off in an anti-clockwise direction.
Switching on the cleaning units
The cleaning units should always be switched on in the following order:
Suction system
Brush head
Side brush
Switching off the cleaning units
The cleaning units should always be switched off in the following order on transit routes or before finishing the route:
Side brush
Brush head
Suction system
Drive a few metres with the device and the suction switched on to suck up the residual water on the surface.
To avoid residual water, it is advisable to switch off the cleaning a sufficient distance before finishing the route.
The Smart Fill function is intended for large, free-standing areas. This function can be activated during normal teach-in.
The Smart Fill button only appears on the touch screen when one or more cleaning functions are activated.
The area to be cleaned then only needs to be circumnavigated once. The device then cleans the circumnavigated area in autonomous operation. The path travelled within the area is a spiral by default.
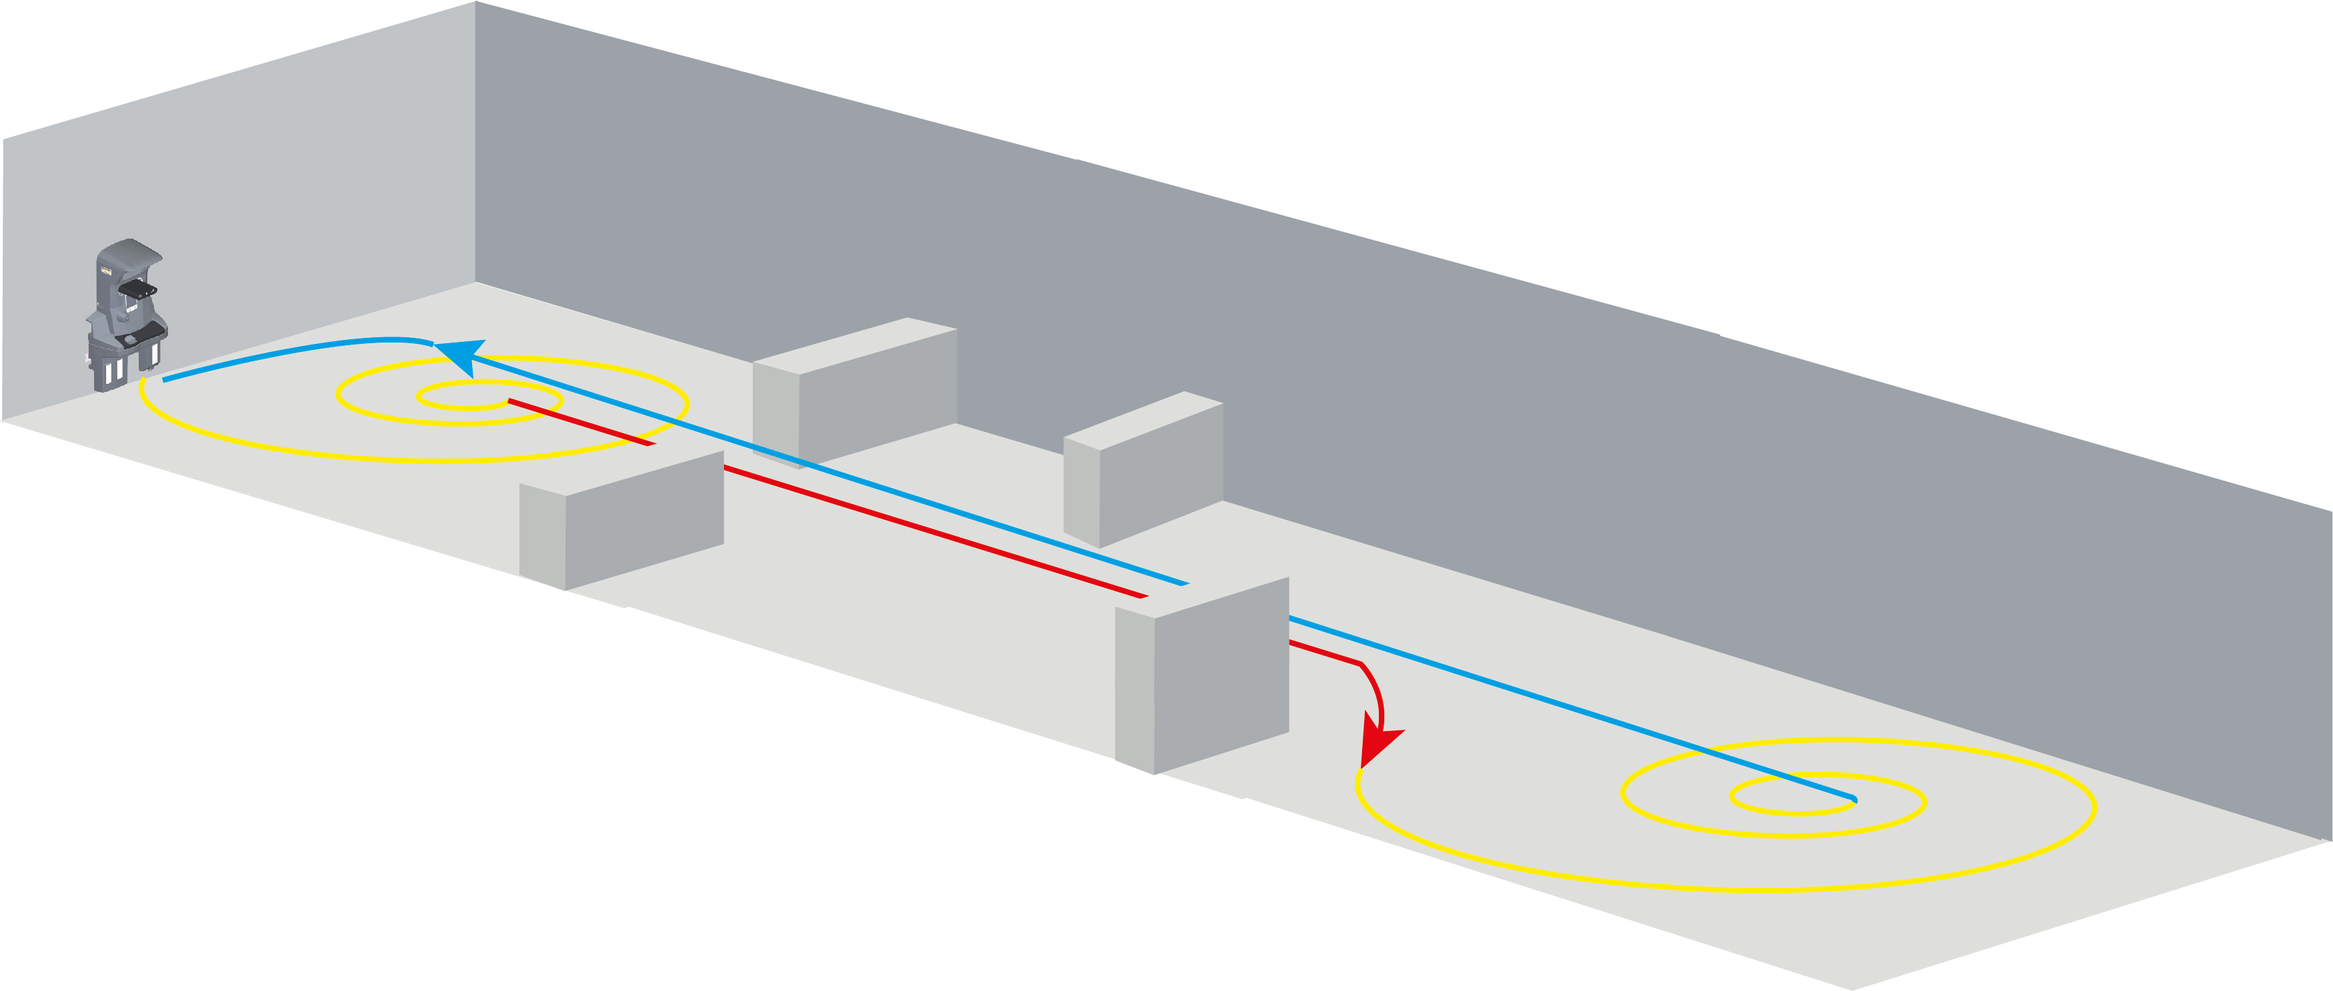
Note that the start and end points must be identical for the Smart Fill function. Use the screen for this. The starting point of a route is marked here by a circle.
Divide the areas into regions without obstacles. Otherwise, this can lead to the surface not being able to be cleaned.
Multiple Smart Fills are allowed during a route.
Avoid carpets.
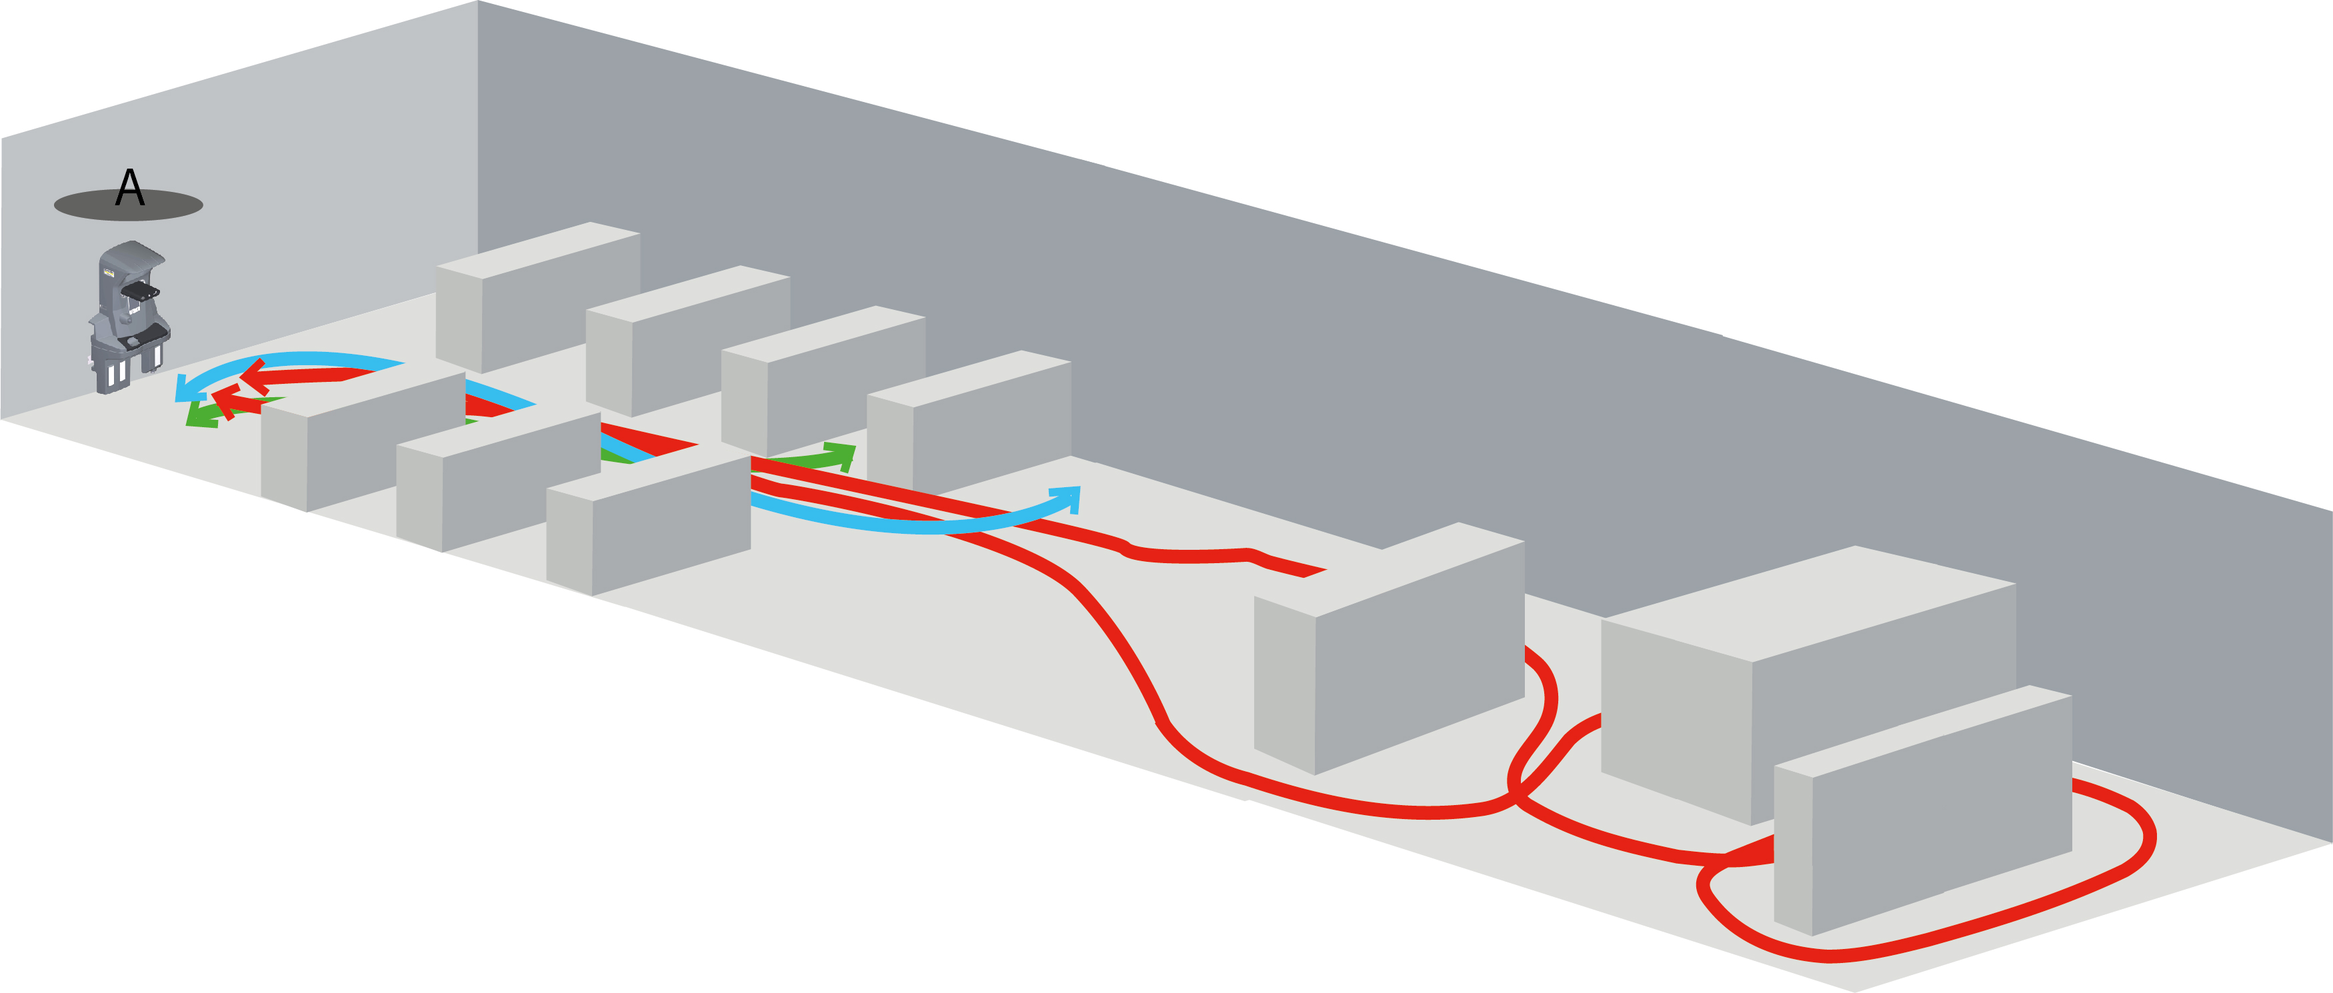
Creating cleaning routes in complex environments using Smart Fill
The Smart Fill function can also be used in environments with complex areas. For this purpose, the Smart Fill function can be used several times during a teach-in route for different open areas. Between the Smart Fill areas, either a transit section (cleaning units switched off) or a cleaning section (cleaning units switched on) can then be taught in.
If docking of the device at the end of the route is desired, the route must be terminated in front of a docking station during the teaching process. To do this, press the "End route with docking" button.
Before playing routes in autonomous mode, pay attention to the following:
Is the workload low enough to carry out cleaning or should it be done outside regular business hours?
Is the fresh water tank full?
Is the waste water tank empty?
Is the battery of the device charged?
Has the coarse dirt been removed from the surface to be cleaned?
Is the environment in a tidy state?
Is the area free of new large obstacles?
Is the device positioned in front of the correct position code?
After a route has been recorded, it is available for selection in the "Existing routes" menu.
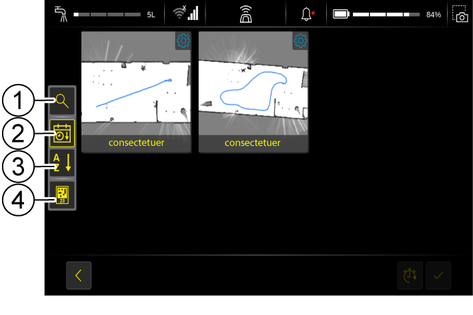
By activating the respective button, the device arranges the existing routes according to their corresponding position code. The input field in the quick text search can be used for further filtering.

The device can also be positioned in front of a position code while the main menu is open. Once a position code is detected, the "Routes to position code available" message appears on the screen. Clicking on the message displays associated routes.
Different routes that have start and end points at a docking station can be chained together.
Example:
A user has a large warehouse area. Here he has set up a docking station for the device. After a logical subdivision of the warehouse, several routes can be taught for the individual cleaning areas. These start and end at the docking station in the warehouse. It is possible to chain several routes together in order to clean the entire warehouse or several areas autonomously. These are then travelled in sequence, with a docking process after each route. If necessary, the resources of the device are exchanged.
Daily maintenance includes:
Cleaning of the sensors.
Inspection of the overall appearance of the device.
Checking the autonomous travel after switching on the device.
Furthermore, the operator should remain on site during operation. Check the progress of the cleaning regularly, especially for very long cleaning processes.
Keep a generous distance away from the following danger points:
Fall edges
Glass railings
Escalators
Water basins/wells at ground level
Carpets
Sills > 5 mm
Cables and pipes
Lifts
Roller doors
Emergency exits
Large reflective surfaces
Avoid areas and environments that are extremely dusty. The dust could settle on the sensors and affect the reliable navigation of the device in autonomous mode.
Only use the device indoors.
This example shows possible cleaning areas in a supermarket.
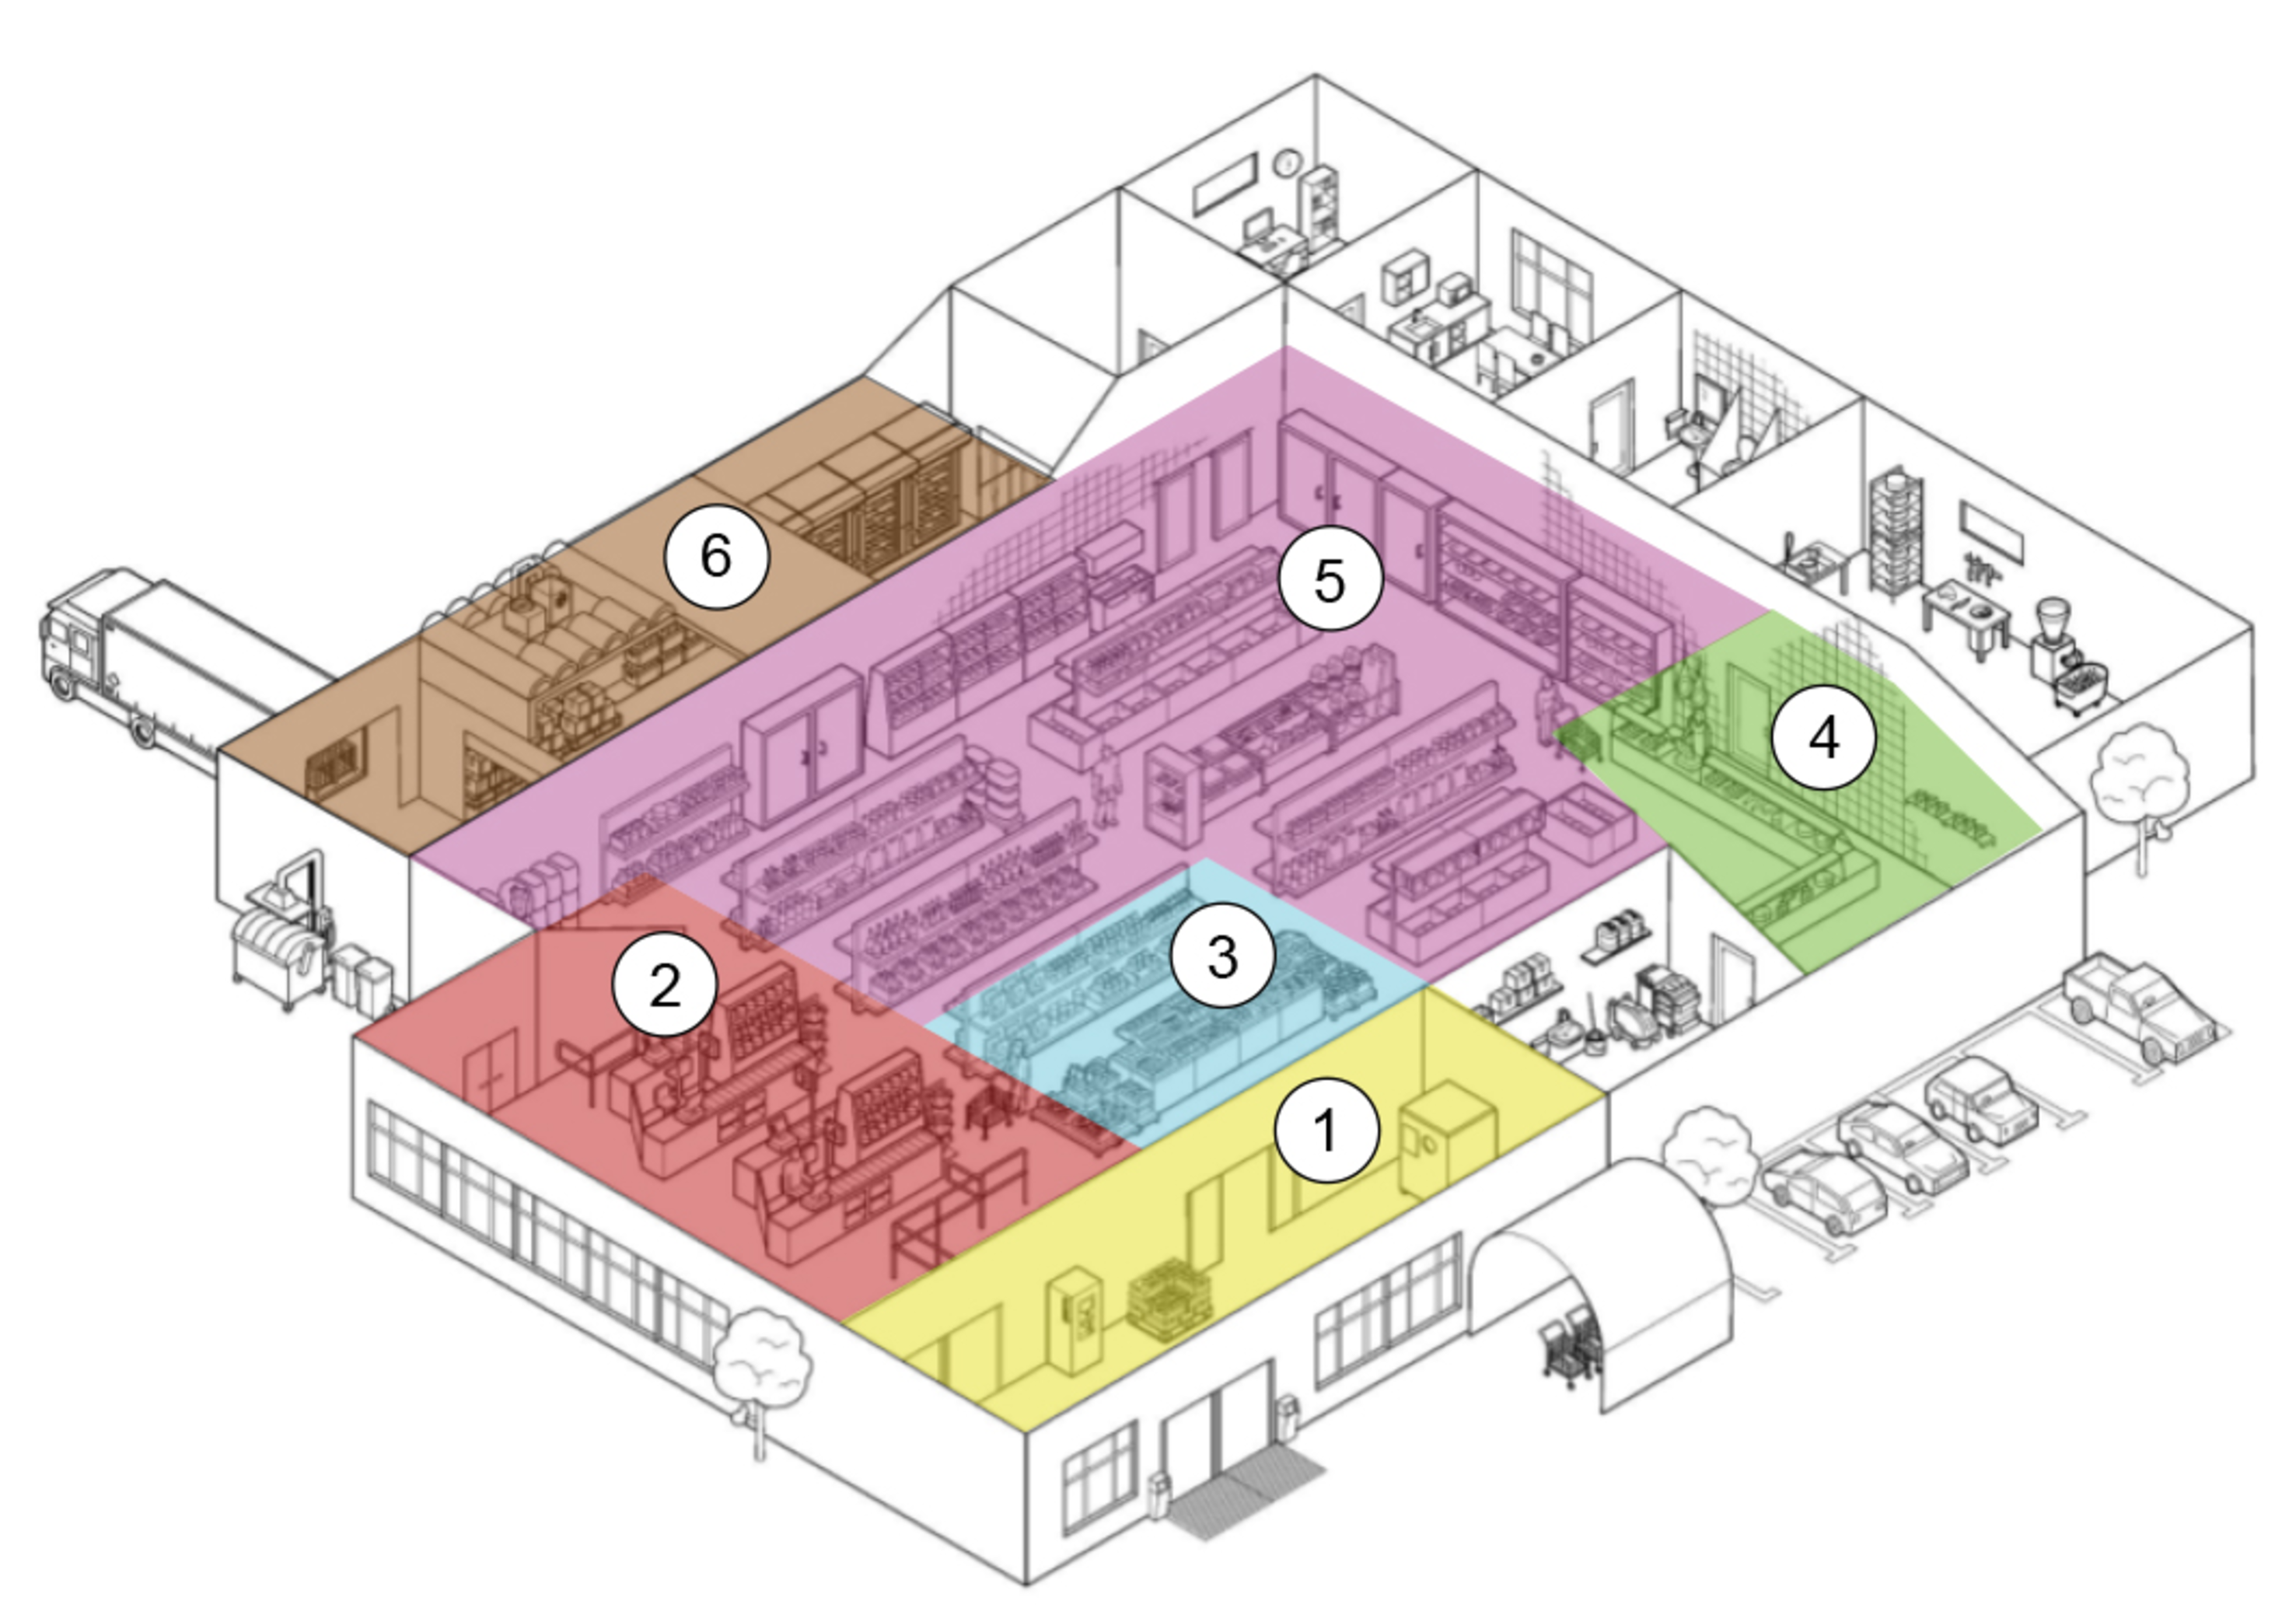
Entrance and exit area
The entrance and exit areas need to be cleaned more frequently due to the higher frequency of use.
In bad weather, the entrance and exit areas may need to be cleaned several times a day.
Checkout area
Due to higher occupancy, the checkout area needs to be cleaned more frequently.
Fruit and vegetable area
The fruit and vegetable area can be dirtier and needs to be cleaned more often. A further division for areas with seasonal display cabinets and obstacles can be useful.
Meat counter
This area needs to be cleaned more frequently as hygiene standards are even higher here and a clean environment is extremely important. A further division for areas with seasonal display cabinets and obstacles can be useful.
Retail space
Consider separate pathways for areas with seasonal displays.
If there is a moderate amount of dirt, it is usually sufficient to clean the surface only once a day.
Warehouse
Make sure that paths are not blocked by moving objects such as boxes or pallets.
Consider cleaning the warehouse after regular business hours to avoid interrupting normal workflow.
Place position codes in easily accessible areas and make sure that they are not blocked.
Pay attention to how busy certain areas are and create separate routes for very busy areas.
Create independent routes for areas with seasonal or changing display cabinets and obstacles. By using one or more docking stations, you can then re-link these routes with other routes.
Conduct the teach-in outside regular business hours or block off partial areas.
Remove temporary or movable objects from the surface to be cleaned before the teach-in.
Make sure that there are no flat objects (with a height of less than 15 cm) or permanent obstacles inside a Smart Fill area so that the device can traverse the entire area inside.
For aisles where turning is required, take into account the minimum aisle width of 1.7 m.
Avoid filigree protruding objects, basins with water, stairs and overhangs of shelves.
Keep the area to be cleaned free of larger contamination such as broken glass, larger plant parts and smearing liquids.
Do not place cleaning routes through or next to escalators, lift doors and especially emergency exits. Clean these areas manually.
Some shopping centres have ground-level water areas or water-covered areas. When setting up routes, avoid these areas and ensure that the device cannot accidentally enter them.
Make sure that there are no flat objects (with a height of less than 15 cm) inside a Smart Fill area so that the device can cover the entire inside area.
Conduct the teach-in outside regular business hours or block off partial areas.
Avoid areas with many chairs and tables (e.g. food courts) and clean them manually.
Adhere to the limit of 1.5 m away from windows and railings close to the ground if there is a fall edge behind them.
Make sure that the cleaning paths do not run through or next to escalators, lift doors and especially emergency exits. Clean these areas manually.
Avoid carpets.
Avoid cleaning next to roller doors.
Make sure that there are no flat objects (with a height of less than 15 cm) inside a Smart Fill area so that the device can cover the entire inside area.
Direct sunlight can cause problems with the sensors and navigation.
Adhere to the limit of 1.5 m away from windows and railings close to the ground if there is a fall edge behind them.
Perform the teach-in when the occupancy is lowest or block off partial areas.
Remove movable objects as far as possible.
Avoid areas with queue management systems (e.g. barriers) as the device may not reliably detect these objects.
Check that free-standing signs are detected when the device approaches from the side.
Avoid areas with many chairs and tables (e.g. food courts) and clean them manually.
Do not place cleaning routes through or next to escalators, lift doors and especially emergency exits. Clean these areas manually
Remove tape, splinters from pallets and cling film and make sure that the cleaning paths are free of debris and objects (e.g. cables, packing tape, etc.). These can get caught in the brushes.
No flat objects (with a height below 15 cm such as forklift forks) may be in the vicinity of the device during autonomous operation.
Create routes according to the "traffic rules" of your facility.
Use the horn during teach-in so that the device can make itself known at critical and unclear points in the warehouse.
Do not use the device in areas used for emergency transport as these routes may be blocked by the device.
Adhere to the limit of 1.5 m away from windows and railings close to the ground if there is a fall edge behind them.
Make sure that there are no flat objects (with a height of less than 15 cm) inside a Smart Fill area so that the device can cover the entire area inside.
The device is equipped with laser, 3D and ultrasonic sensors.
The device follows the route taught by the user. However, it can also detect new obstacles and adjusts the route to avoid them.
The device can approach walls and obstacles up to 10 cm. A side brush enables cleaning close to the edge.
The device stops immediately and the cleaning units are switched off. The screen still works. The emergency-off button must be turned and pulled to resume operation. The device then starts cleaning of the current route.
No, the map is not self-learning. Minor changes to the original layout are no problem. The greater the changes to the layout, the more inefficient the device will be. If there are major changes to the layout, the route must be taught again.
Yes, the sensors detect glass and thus recognise sliding glass doors or glass partitions, for example.
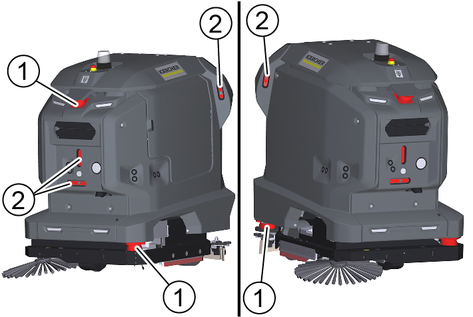
Multi-coloured LED lights indicate the status of the robot and the direction in which it is moving.
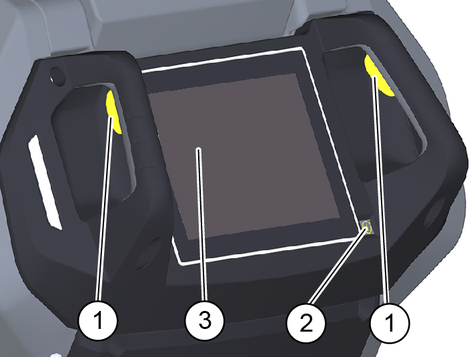
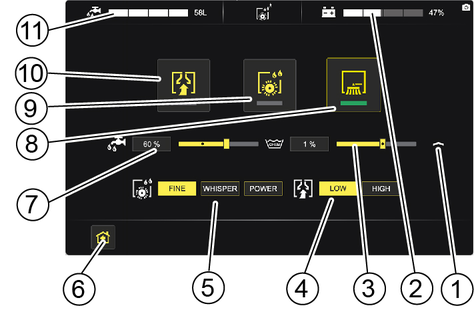
Control elements for the cleaning process are yellow.
Control elements for maintenance and servicing are light grey.
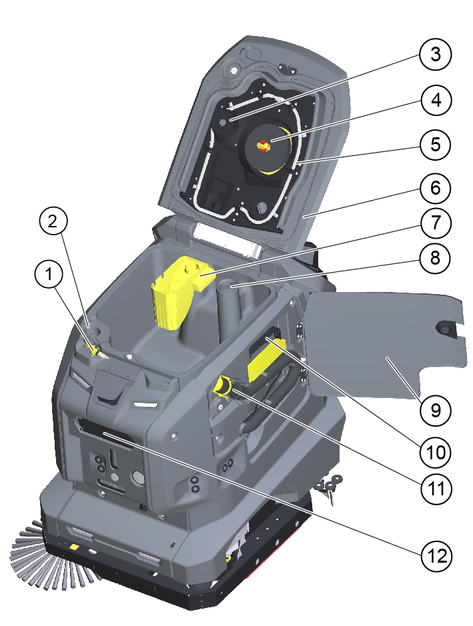
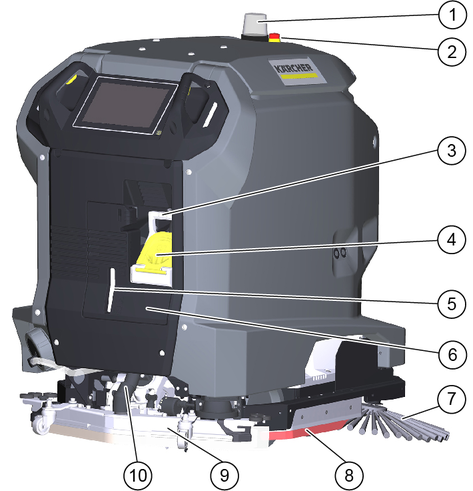
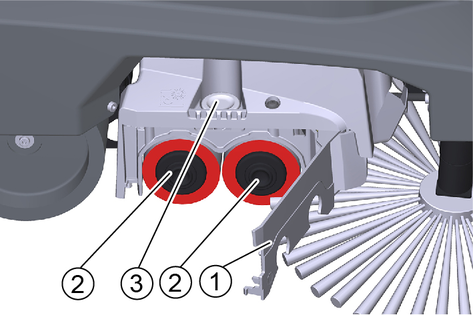
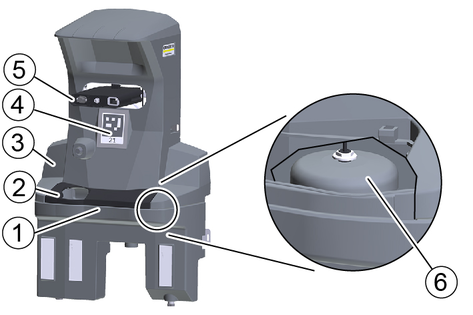
 | Detergent tank filling level 100% |
 | Detergent tank filling level 50% |
 | Detergent tank filling level 25% |
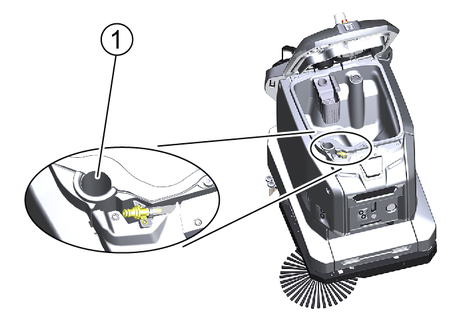
 | Filling opening for detergent |
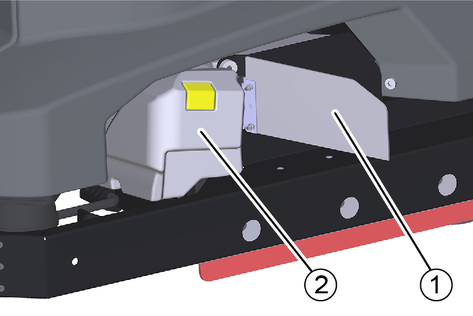
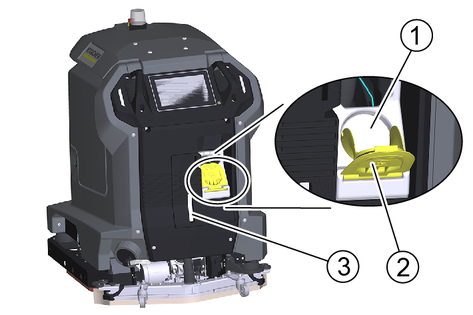
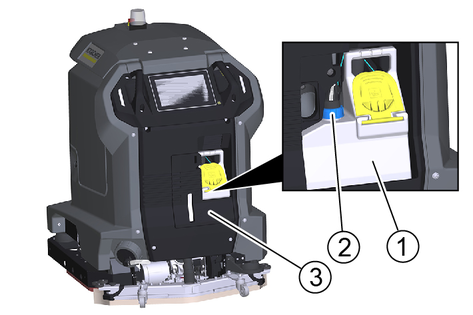
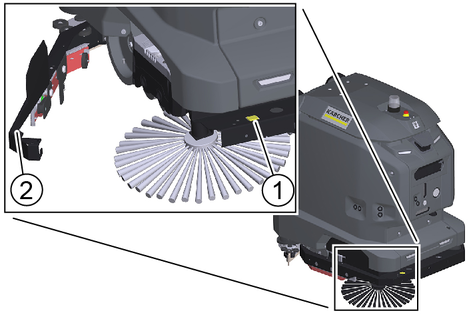
 | Unlocking button for brush replacement |
 | First lift the coarse dirt container, then pull it out |
 | Waste water drain hose |
 | Water inlet |
 | Drain for fresh water |
 | Mains plug for charging the battery |
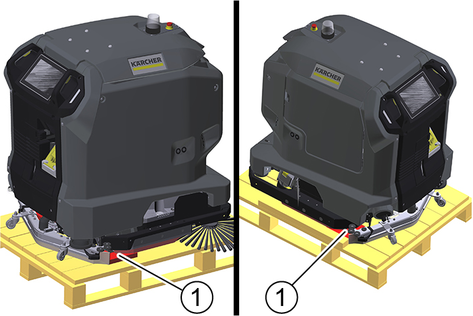
 | Lashing point for transport |
 | Fresh water inlet |
Remove the cardboard box together with the wooden reinforcing timbers from the wooden base.
Remove the strap.
Unscrew the two blocks.
Unscrew the boards and the squared timber from the wooden base.
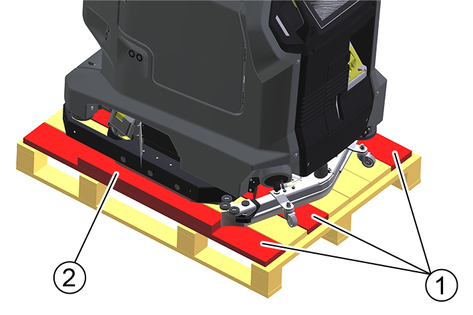
Use the unscrewed boards and the squared timber to lay a ramp behind the wooden base.
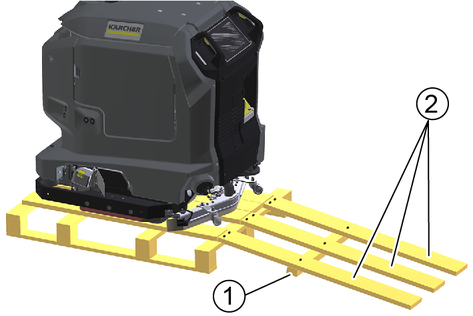
Fix the boards and the squared timber with the previously removed screws.
Pull the device backwards off the wooden base.
The battery is automatically charged when operating with a docking station.
Without docking station:
Open the door of the device compartment.
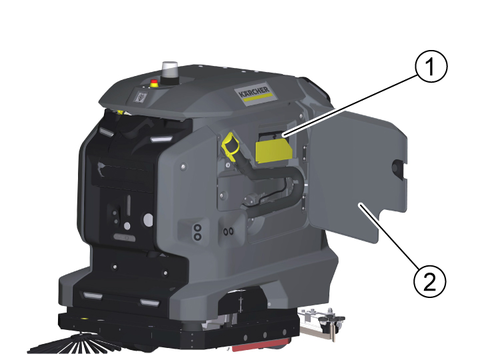
Pull out the charging cable.
If the device does not have a charging cable, plug a mains cable with an IEC plug into the mains socket on the docking port.
Plug the mains plug of the charging cable into a mains socket.
The charging process begins automatically.
The charging state is displayed on the touch screen.
The device cannot be used during the charging process.
The charging process takes about 8 hours when the battery is fully discharged.
Unplug the mains plug from the socket after the charging process has finished.
Stow the mains cable in the device compartment or unplug the power cable from the docking port.
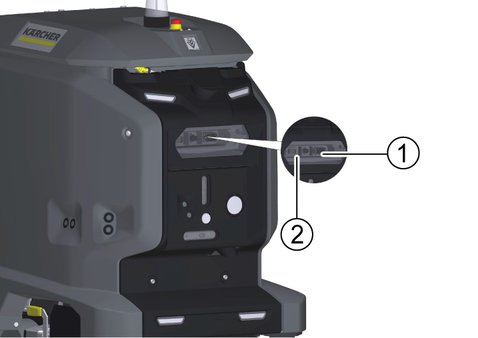
If it is no longer possible to restart the system properly, the RESET button can be used to completely disconnect the system from the power supply and restart it.
Remove the cover.
Remove the detergent tank.
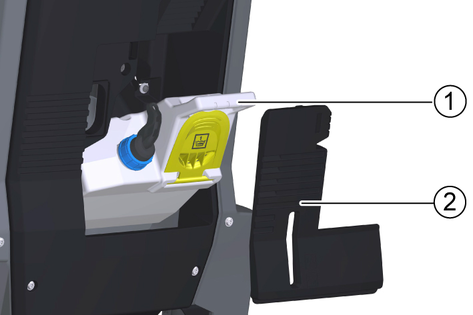
Press and hold the RESET button for approx. 10 seconds.
The system is now completely disconnected from the power supply.
Press the Power-On button to start up the device.
The system now boots up.
Insert the detergent tank again.
Attach the cover again.
After startup, the operating instructions of the device can be displayed on the touch screen. If the operating instructions are also downloaded to a smartphone, the operating steps can be read in parallel with the operation.
Scan the following code on the smartphone and follow the instructions to download the operating instructions.

The fresh water tank is automatically charged when operating with a docking station.
Risk of injury from petrol cap!
Risk of crushing limbs due to unexpected closing of the petrol cap.
Open the petrol cap as far as it will go to avoid accidental closing.
Close the petrol cap only when there are no limbs between the tank and the petrol cap.
Pivot the waste water tank lid upwards.
Connect the water supply hose to the hose coupling on the device. Observe the maximum water temperature of 50 °C!

Close the waste water tank cover.
Open the water inlet.
Filling stops automatically when the fresh water tank is full.
Risk of injury from petrol cap!
Risk of crushing limbs due to unexpected closing of the petrol cap.
Open the petrol cap as far as it will go to avoid accidental closing.
Close the petrol cap only when there are no limbs between the tank and the petrol cap.
Pivot the waste water tank lid upwards.
Insert the water supply hose into the filling opening. Observe the maximum water temperature of 50 °C!
Open the water inlet.
Observe the filling level and turn off the water supply when the tank is full.
Risk of damage
Use only recommended detergents. With other detergents, you are liable for the increased risk in terms of operational safety, risk of accident and reduced service life of the device. Use only detergents free of solvents, salt and hydrofluoric acid. Adhere to the safety instructions stated on the detergent packaging.
Do not use strong foaming detergents.
Observe dosing instructions.
Recommended detergents:
Application | Detergent |
|---|---|
Maintenance cleaning of all water-resistant floors | APPROX 50 C RM 756 |
Maintenance cleaning with care components | RM 746 RM 780 |
Maintenance cleaning and basic cleaning of industrial floors | RM 69 |
Maintenance cleaning of glossy coverings | RM 755 |
Maintenance cleaning and basic cleaning of fine stone tiles | RM 753 |
Maintenance cleaning and basic cleaning of acid-resistant coverings | RM 751 |
Cleaning and disinfection | RM 732 |
Basic cleaning of all alkali-resistant floor coverings | RM 752 |
Basic cleaning and de-coating of alkali-sensitive floors | RM 754 |
Open the lid of the detergent filling opening.
Fill with detergent.
Note:
For quick detergent change, the detergent tank can be removed and exchanged with another detergent tank.
Remove the detergent tank lid.
Unscrew the detergent tank cap.
Pull the detergent suction hose with filter out of the detergent tank.
Remove the detergent tank from the device.
Fit the new detergent tank into the device.
Insert the detergent suction hose with filter into the detergent tank.
Screw on the cap.
Replace the detergent tank lid.
Push the suction bar in the suction bar mount.
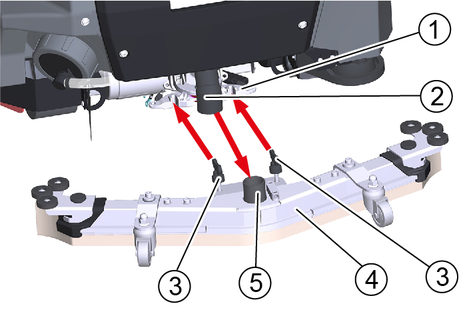
Tighten the wing screws.
Fit the suction hose onto the hose union.
The inclination of the suction bar is set at the factory. It only needs to be readjusted if the air bubble in the level indicator is not between the two marks when the suction bar is lowered on level ground.
Unscrew the nut.
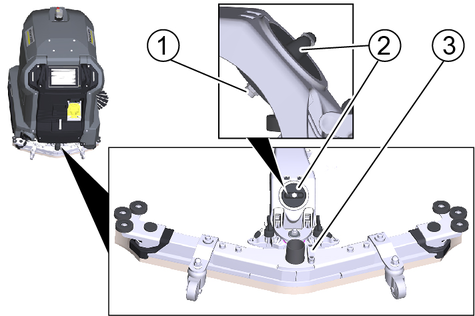
Adjust the twist grip so that the air bubble of the spirit level is between the two lines when the suction bar is lowered.
Tighten the nut again.
The height adjustment affects the bending of the suction lips on contact with the floor.
Standard setting: 3 washers above, 3 washers below the suction bar.
Uneven floor: 5 washers above, 1 washer below the suction bar.
Very smooth floor: 1 washer above, 5 washers below the suction bar.
Unscrew the screw.
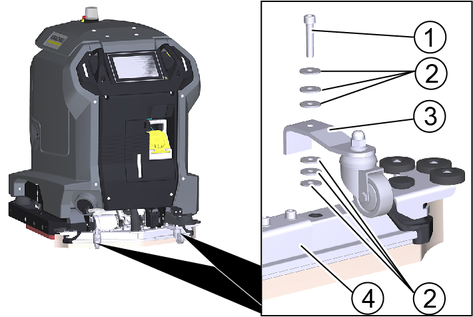
Thread the desired number of washers onto the screw above the suction bar.
Insert the screw through the spacer roller holder.
Thread the remaining washers onto the screw below the spacer roller.
Screw the screw into the suction bar and tighten.
Repeat the entire procedure at the second spacer roller.
Set both spacer rollers to the same height.
Danger of accident
A damaged or defective device can lead to accidents during operation.
Check the device before use and report any damage or malfunctions to the person responsible.
Do not use the device if it is damaged or malfunctions.
Check the device for leaks.
Check the functionality of the emergency-off button.
Check both safety switches for function (does the device brake when both safety switches are released in manual operation?).
Danger of accident due to defective safety switches
Shut the device down immediately if one or both safety switches do not reliably return to the non-actuated position.
Check the sensors for soiling, clean if necessary.
Restart the device.
Check the function of the sensors (does the device detect obstacles?).
Unlock the Emergency-Off button by turning it.
Press the start button.
The device starts up.
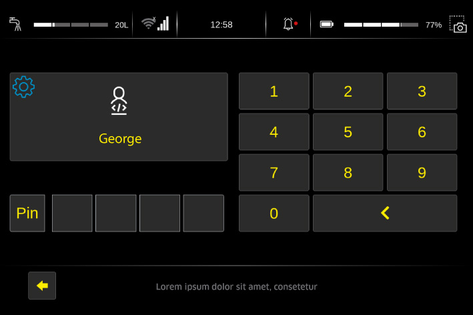
Wait until the log-in screen is displayed on the touch screen.
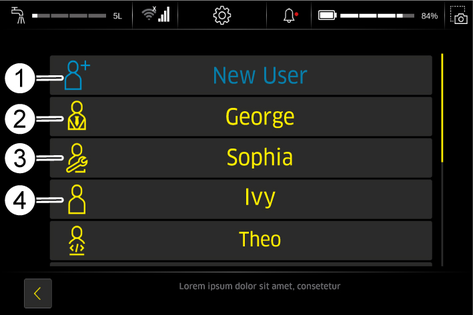
Administrator: Can use the full range of functions of the device and has all user permissions.
Service: Only available for customer service.
Users: Can use the range of functions defined by the permissions granted by Administrator.
Create a new user profile.
Assign a password.
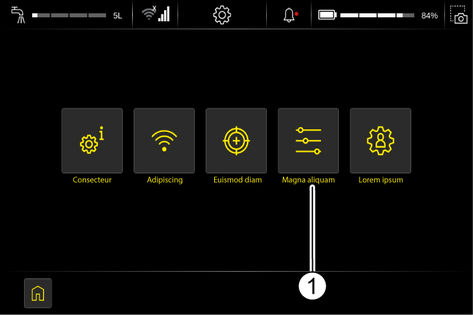
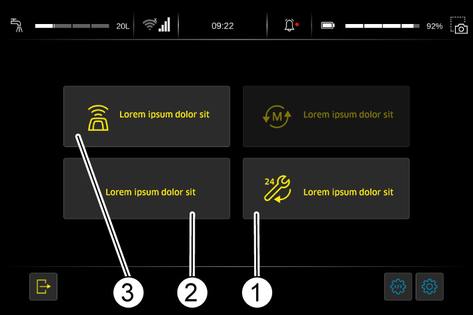
The executable functions are displayed in the main menu.

The operating instructions enclosed with the device only cover the activities for startup and a troubleshooting guide in case of a defective touch screen.
The complete operating instructions can be called up and displayed on the touch screen after the device has been started up.
Press the "Service" button in the main menu.
Press the "Operating manual" button
The operating instructions are displayed on the touch screen.
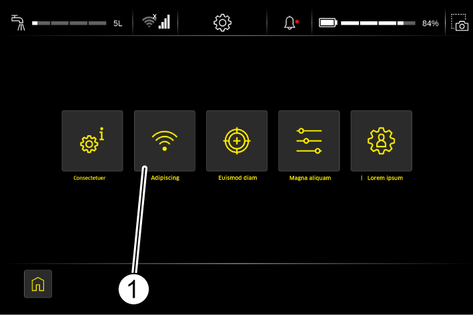
Press the Settings button in the main menu.
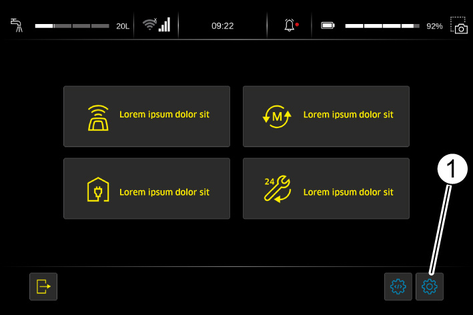
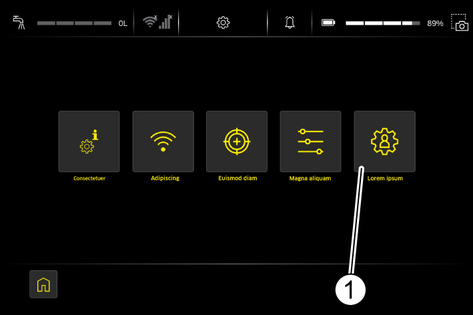
The Settings menu is displayed.

Press the "User administration" button in the Settings menu.
Press the "New user" button.
Select the desired language.
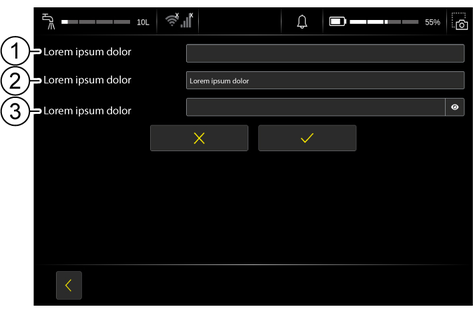
Touch the Username input field.
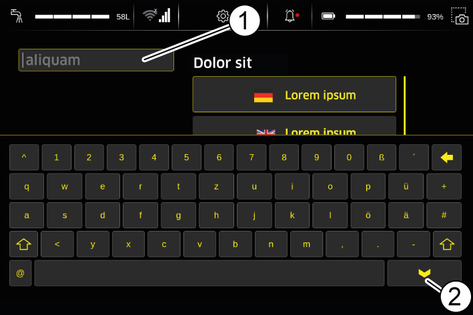
Enter the user name with the on-screen keyboard and finish with the Enter key.
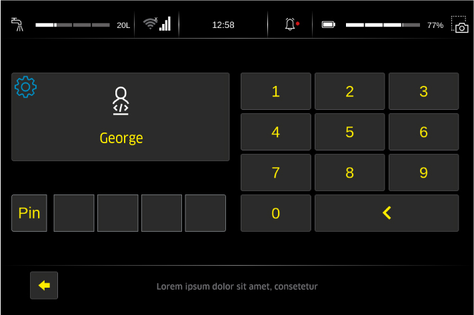
Press the "PIN" button.
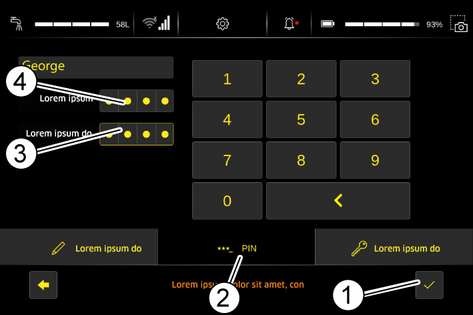
Touch the Enter Password input field.
Enter the password using the on-screen keyboard.
Re-enter the password for confirmation in the Confirm Password input field.
Press the Confirm button.
Press the "Authorisations" button
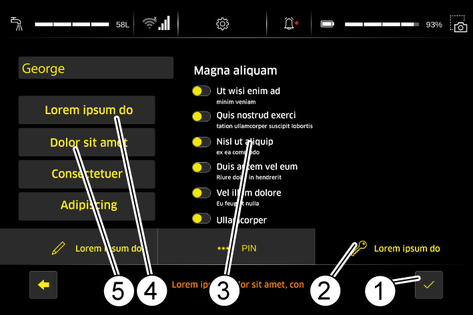
Press the button for the factory setting of the desired user group Users or Administrator.
If necessary, change individual permissions in the list.
Press the Confirm button.
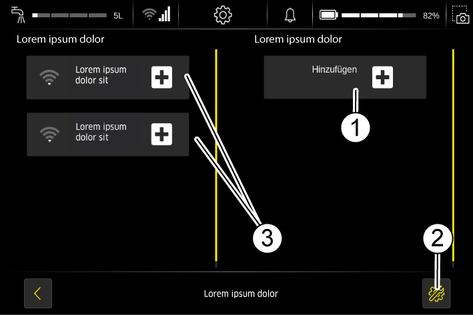
Press the "Internet" button in the "Settings" menu.
The "Visible Networks" and the "Known Networks" are displayed.
Press the "Settings" button.
The current network settings are displayed.
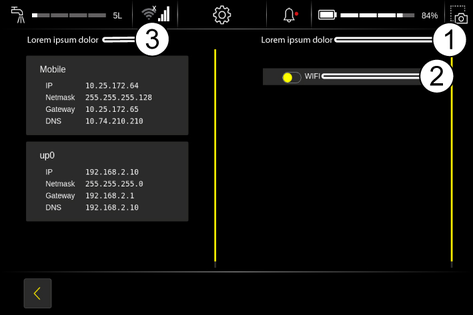
When activating "WIFI", the "Visible Networks" as well as the "Known Networks" are now displayed.
Press the "Internet" button in the "Settings" menu.
Press the "Add" button.
Enter the SSID of the wireless access point/router.
Select the encryption.
Enter the password.
Click on the tick.
The network is added.
Press the "General Settings" button in the "Settings" menu.
Press the "General Settings" button.
The current general settings are displayed.
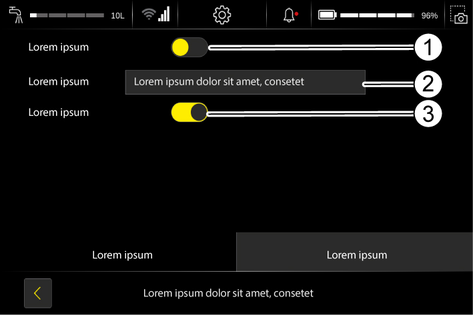
When "" is activated, the is activated.
The corresponding time zone can be set under "".
When "" is activated, the is activated.
Fastmode activated | |
Fastmode deactivated |
Docking involves connecting the device to an optional docking station. After successful docking, the following actions are performed:
The waste water tank is emptied and flushed.
The fresh water tank is filled.
The battery is charged.
Press the "Docking" button in the main menu.
The device prepares for the docking procedure and searches for a Position code.
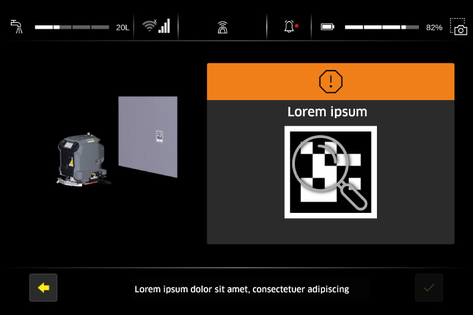
Operate a safety switch and push the device in front of the docking station.
Align the docking port with the docking station.
Keep a distance of about 2 m from the docking station.
Wait until the device has detected the Position code on the docking station.
Confirm the Position code.
When the device is connected to the docking station, the following functions can be performed:
In manual operation, the device is guided by the operator over the surface to be cleaned.
Select the "Manual cleaning" function on the touch screen.
Operate and hold a safety switch.
Push the device to the operating location.
Let go of the safety switch.
Select the desired settings for water quantity, detergent dosage, brush power and suction power.
Activate the required functions (suction, cleaning head, side brush).
The activated functions are highlighted in green.
The side brush can only be activated when the cleaning head is switched on.
Operate and hold a safety switch.
Push the device over the surface to be cleaned.
Deactivate the cleaning head and the side brush.
Continue a short distance to suck out residual water.
Deactivate the suction.
In autonomous operation, the device cleans one or more previously taught-in areas independently. Teaching is carried out by travelling and saving a route.
A Position code must be applied to the starting point. If the end of a route is to serve as the starting point for another route, there must also be a Position code at the end of the route.Position codes are used for orientation.
Position codes are supplied with the device.
Position codes must not be laminated, as laminating deteriorates the recognisability.
All Position codes in an object to be cleaned must have a different code.
The same Position code can be included in different routes.
Each Position code must be attached to a vertical surface at a height of 66 cm cm.
The strategic layout of Position codes is explained in detail in the Setup Guide.
For the reliable and safe execution of autonomous operation, the following rules must be observed.
Limit the cleaning area with barriers at the following points:
Steps
Stairs
Escalators, moving walkways
Lifting platforms
Do not place ladders, scaffolding or other temporary obstacles in the cleaning area.
Do not leave electric cables or other low obstacles (up to 15 cm high) in the cleaning area.
Routes for autonomous operation must not pass through lifts or automatically opening doors. Use lifts and automatic doors only in manual operation.
Keep a sufficient distance away from water basins and glass surfaces.
Avoid direct, strong light incidence (e.g. low sun) on the sensors.
Avoid crossing strong light/shadow boundaries.
In autonomous routes, do not approach roller doors head-on but parallel to the door.
Mark the cleaning area with warning signs and provide notice of wet floors.
The teaching procedure is described here. Notes on how to optimally design a route are provided in the Setup Guide.
During teaching, the following information about the route is saved:
The travel path of the device.
The points at which cleaning function were switched on or off.
Parameter settings for water application, detergent dosage, brush speed and suction power.
The operation of the horn (e.g. at an intersection).
Not recorded are:
Short pauses during teaching (less than 5 minutes).
The travel speed during teaching.
Login as "Administrator".
Select the function "Autonomous".
Select the function "New route".
Confirm that
the battery is fully charged
the fresh water tank is full
the waste water tank is empty.
or exit the menu and establish the required prerequisites.
Operate a safety switch and push the device in front of the Position code of the starting point.
Align the docking port with Position code.
Keep a distance of about 2 m from the Position code.
Wait until the device has recognised the Position code.
Confirm the Position code.
Select the desired settings for water quantity, detergent dosage, brush power and suction power.
Activate the required functions (suction, cleaning head, side brush).
The activated functions are highlighted in green.
The side brush can only be activated when the cleaning head is switched on.
Activate a safety switch and drive over the area to be cleaned. Keep the following distances.
Between the right side of the device and the wall | 10 cm |
Minimum aisle width | 1.05 m |
Minimum aisle width when turning in the aisle | 1.7 m |
Minimum side distance to drop edges | 1.5 m |
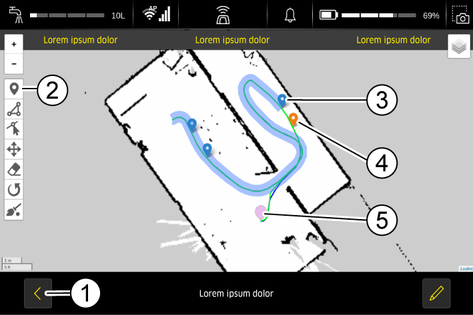
The area that has already been worked on is displayed on the Live map:
Deactivate the side brush and cleaning head before finishing the route.
Drive a short distance with active suction to suck up residual water.
Deactivate the suction.
If the route is to be terminated at a docking station, position the device approximately 2 metres in front of the docking station.
If the end of the route is to serve as a starting point for further routes, position the device in front of a Position code.
Press the Save Route button.
-Press the button "Finish route" or "Finalise route with position code".
If necessary, wait until the device has recognised the Position code.
If necessary, confirm the Position code.
Touch the input field for the name of the route.
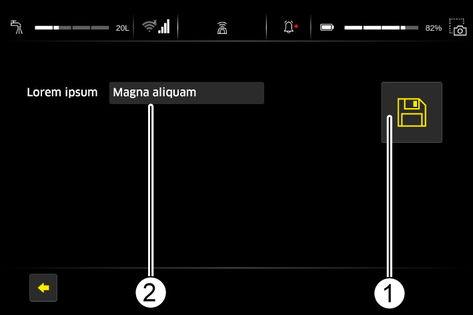
Enter the name of the route.
Press the Save Route button.
The route is saved under the name entered.
With the Smart Fill function, a surface can be taught by only driving around the edge of the surface. The device then cleans the entire area in autonomous operation. The travel path within the area is determined automatically by the device.
The area defined with this function must be free of obstacles.
For effective cleaning, it is useful to plan the area suitable for Smart Fill and the cleaning sequence of the remaining area before teaching a route.
Start teaching a route and work up to the starting point for the area outline.
Press the button Smart Fill.
The Smart Fill button only appears on the touch screen when one or more cleaning functions are activated.
Drive around the surface to be cleaned.
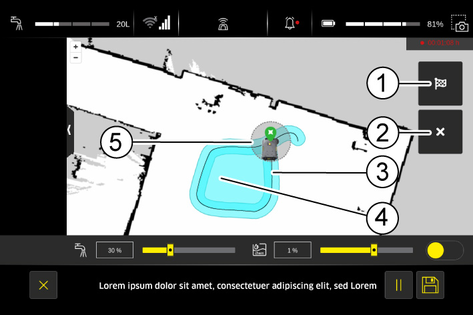
The area must be circumnavigated until the device is in the target circle on the Live map.
The Smart Fill function can be cancelled by pressing the Smart Fill button.
When the device is in the target circle on the Live map, press the save button Smart Fill.
Continue teaching the route.
Several areas can be defined in a route via the Smart Fill function.
Select the function "Autonomous".
Select the function "Existing routes".
This function orders routes according to the Position code of the starting point.
Click on the "Position code” switch.
The available routes are now sorted according to the "Position code".
Open the folder with the desired Position code by touching it.
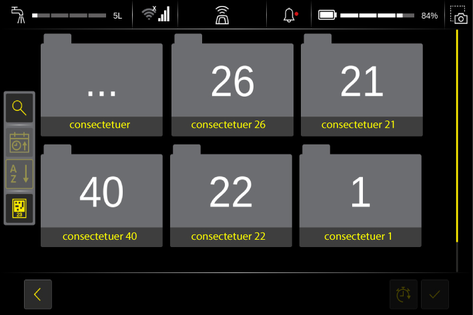
Start the route as described in chapter “Execute route”.
Press the magnifying glass button.
Touch the input field.
Enter the name of the route you are looking for or the number of the startPosition code in the input field.
Press the Search button.
The routes found are displayed.
Start the desired route as described in the section "Execute route directly".
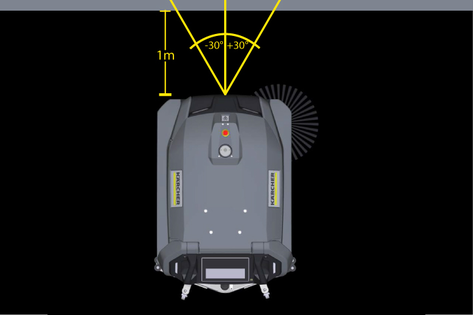
Place the device in front of the position code.
The device must be positioned at an angle of + / - 30 ° and at a distance of 1 m in front of the position code
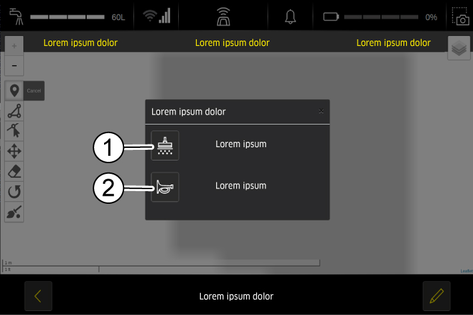
Press the button of the route to be executed on the touch screen.
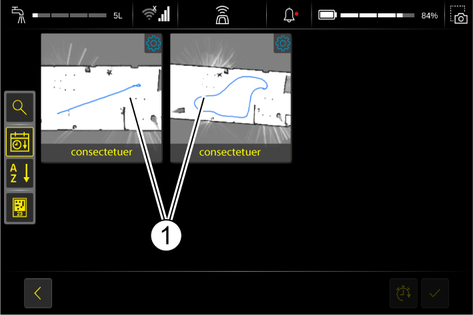
If several routes are to be executed in succession, select the next route.
After selecting the first route, only routes whose starting point matches the end point of the previous route are displayed.
The start and end point must be a docking station.
The routes are numbered in the order of selection.
A route selected by mistake can be deselected by touching it again.
When all routes are selected, press the Confirm button.
Push the device in front of the Position code requested in the touch screen.
Wait until the device has recognised the Position code.
Confirm the Position code.
The route is executed
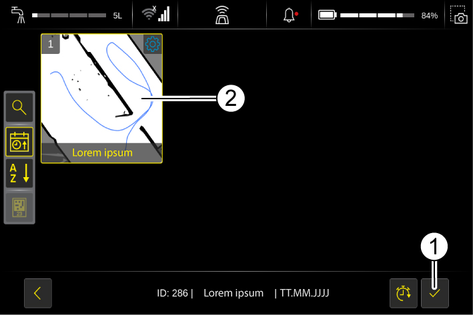
The selected route can be started without a position code.
This function can be used if the landmarks are not intended to be permanently attached. This way you can attach the landmarks for teach-in and then take them down again.
Select the route.
Place the device at the former starting point of the route.
Click on the "Start without Landmark" button.
The device starts cleaning the selected route.
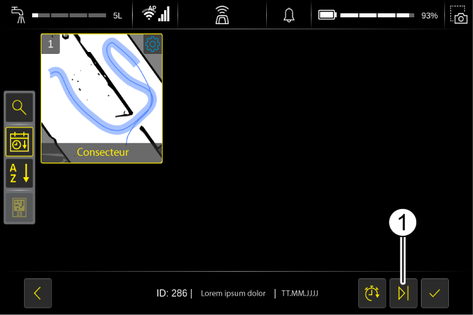
The selected route can also be started with a delay of up to one week.
Select the route.
Click on the timer.
Select the desired start time of the route.
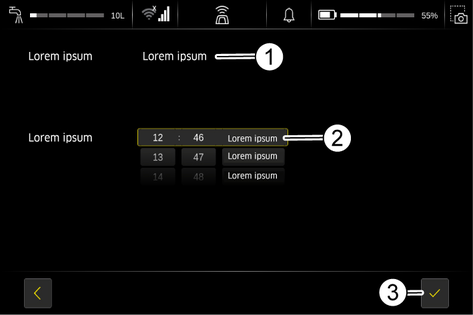
The unit starts cleaning the selected route at the specified time.
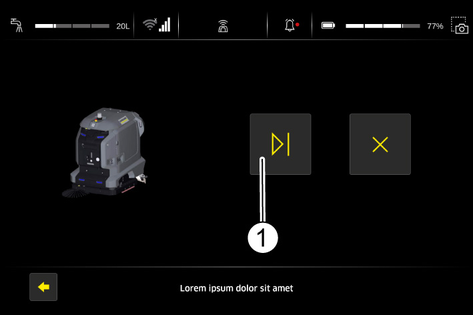
Press the Pause button.
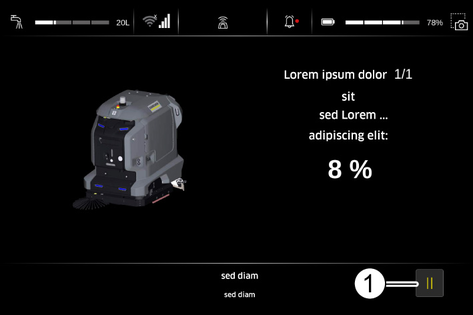
Press the Pause button again.
Enter the password.
Press the Pause button.
Press the Pause button again.
Enter the password.
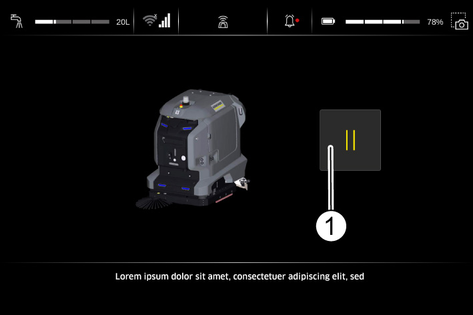
Press the Continue button
Press the Pause button.
Press the Pause button again.
Enter the password.
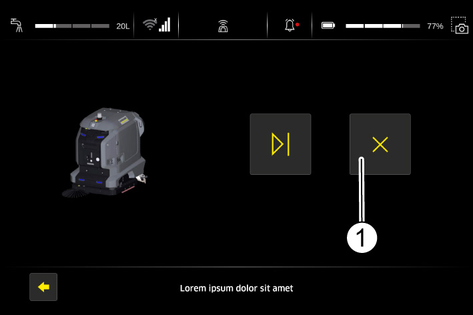
Press the Finish button
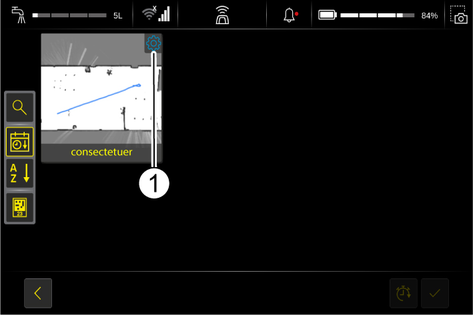
Press the button of the route to be executed on the touch screen.
Press the Settings symbol.
Use the buttons on the left edge of the display to edit the route.
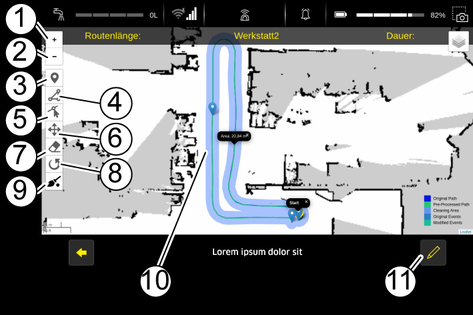
Use the Edit button to call up further change options.
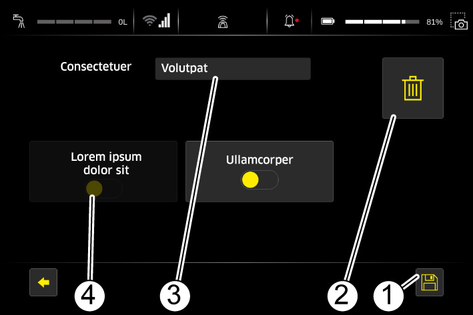
The creation of an event can only be configured by users with the "Change routes" authorisation.
Press the "Place New Event" button.
Click and place the marker for the event along the route.
The markers can be distinguished by their colour:
“Cleaning” marker = blue
“Horn” marker = orange
Events that have already been created or newly created events can be moved afterwards. To do this, the marker must be pressed and moved.
Define the cleaning parameters when setting the "Cleaning" marker.
Click on Back.
The cleaning parameters for this event are now saved.
The result of completed cleaning tasks can be checked in the Cleaning report.
Press the "Cleaning report" button.
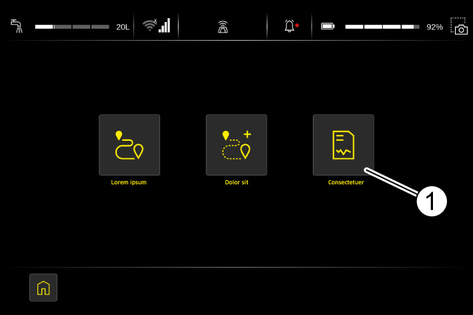
The last completed cleaning tasks are displayed.
Touch the desired cleaning task to view details.
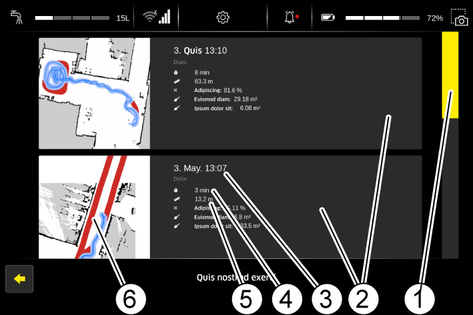
The details of the selected cleaning task are displayed.
The waste water tank is automatically charged when operating with a docking station.
Without docking station:
Dirt and detergents in the waste water can potentially harm your health or pollute the environment.
Observe the locally applicable regulations on the handling of waste water.
Open the door of the device compartment.
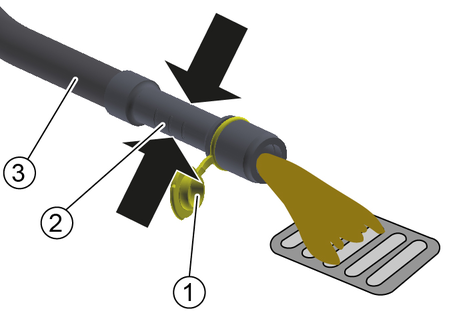
Remove the drain hose from the support.
Lower the drain hose over a suitable collection device.
Press the dosing unit together or kink the hose.
Open the cover.
Control the flow of waste water by applying pressure or kinking the dosing device hose.
Rinse the waste water tank.
Close the cover.
Press the drain hose into the holder on the device.
Open the door of the equipment compartment.
Position the device over a water drain.
Unscrew the fresh water tank cap.
Allow the water to drain.
If necessary, remove and clean the sieve.
Install the sieve again.
Unscrew the fresh water tank cap.
Align the cap so that the hose connection is at the bottom.
Failure to observe the weight
Risk of injury and damage
Be aware of the weight of the device during transport and storage.
Do not drive on slippery floors or ramps.
Empty the waste water tank and the fresh water tank.
When transporting in vehicles, secure the device against slipping and tipping over according to the applicable guidelines.
Failure to observe the weight
Risk of injury and damage
Be aware of the weight of the device during transport and storage.
Store the device indoors only.
Inadvertently starting up of the unit, touching live components
Risk of injury, electric shock
Before carrying out any work, disconnect the unit from the docking station or unplug the mains plug.
Risk of damage
Do not spray the device with water. Do not use aggressive detergents.
Note: Maintenance work marked with "##" is carried out automatically if a docking station is present.
## Drain the waste water.
## Rinse the waste water tank.
Clean the turbine screen.
Remove the coarse dirt filter from the waste water tank and clean it.
Clean the outside of the device with a cloth and mild washing lye.
Check the fluff filter and clean if necessary.
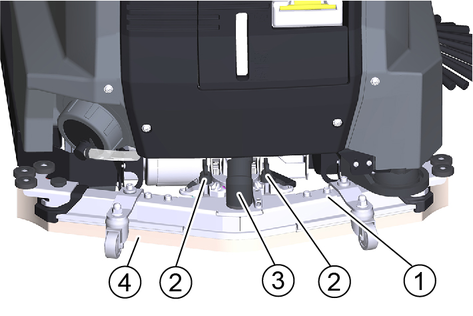
Remove and clean the coarse dirt container on the cleaning head.
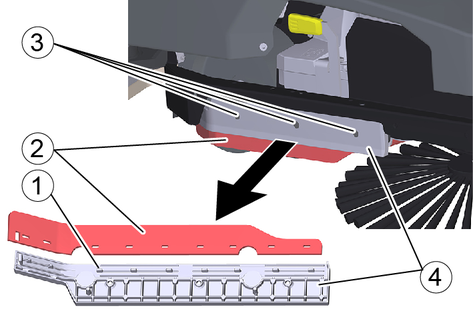
Clean the water distribution strip on the cleaning head.
Clean the suction lips in the suction bar and check for wear. Turn or replace the worn suction lips.
Check the correct fit of the suction lips in the suction bar. If necessary, reinsert the suction lips correctly into the grooves of the suction bar.
Clean the squeegee blades on both sides of the cleaning head and check for wear. Replace worn squeegee blades.
Check the brushes for wear and tear. Replace worn brushes.
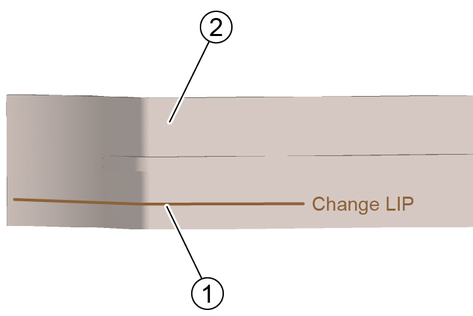
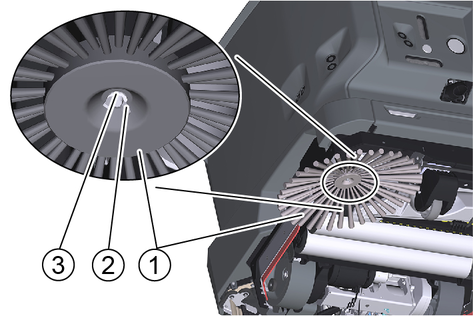
Note: The roller brushes are worn out if the yellow indicator bristles are the same length as the other bristles.
## Charge the battery.
Clean the sensors with a moist microfibre cloth. If necessary, use additional glass cleaner.
## When used regularly, charge the batteries fully and without interruption at least once a week.
Clean the seals between the waste water tank and the cover.
Check the sealing between the waste water tank and the cover, replace the seal if necessary.
Clean the brush tunnel.
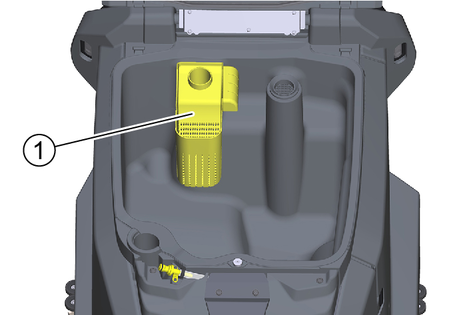
Clean the fresh water filter.
For long periods of disuse, only park and store the device when the batteries are fully charged. Fully charge the batteries at least once a month.
Have the prescribed inspection performed by Customer Service.
Various maintenance work is stored as animations in the device and can be called up on the touch screen.
Press the "Service" button in the main menu.
Press the "Maintenance instructions" button.
Touch the maintenance work you are looking for.
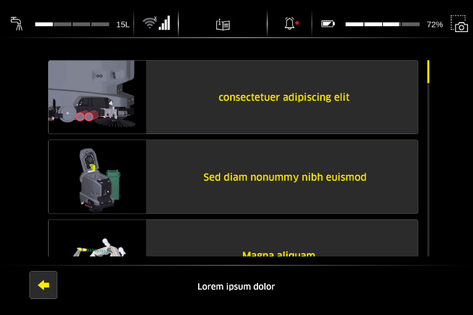
Call up the individual steps of the animation with the arrow keys.
Open the waste water tank cover.
Press the locking hooks together.

Pull off the retaining ring.
Pull off the float.
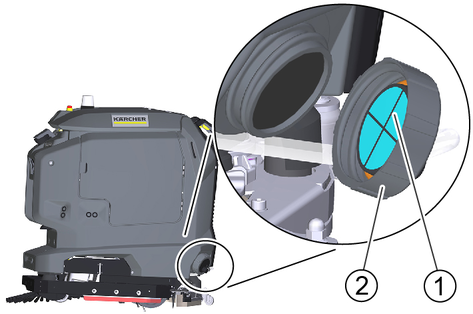
Turn the turbine screen anticlockwise.
Remove the turbine screen.
Clean the turbine screen under running water.
Reinstall the turbine screen.
Attach the float.
Push on the retaining ring and then pull it back to the locking hooks.
In the case of light soiling, it is sufficient to clean the turbine screen when it is installed.
Open the waste water tank cover.
Pull the coarse dirt filter upwards and off.
Rinse off the coarse dirt filter under running water.
Reinsert the coarse dirt filter into the waste water tank.
Drain the fresh water (see chapter "Draining fresh water").
Unscrew the fresh water tank cap.
Pull out the fresh water filter and rinse with clean water.
Insert the fresh water filter.
Fit the fresh water tank lock.
Note: Take care to ensure that the hose connection in the fresh water tank cap is positioned at the lowest point in the tank after screwing the cap in place.
Loosen the two wing screws
Remove the suction bar from the device.
Pull the suction hose off the suction bar.
Rinse the underside of the suction bar with water.
Wipe the suction lips clean with a cloth.
Fit the suction bar on the device.
Tighten the two wing screws.
Connect the suction hose to the suction bar.
The suction lips are turned or replaced when they are worn down to the wear mark.
Remove the suction bar from the device.
Unscrew the star grips.
Remove the sleeves and the deflection rollers.
Pull off the end pieces.
Pull off the suction lips in the longitudinal direction.
Push new or turned suction lips into the suction bar.
Push on the end pieces.
Fit the deflection rollers and the sleeves.
Screw in and tighten the star grips.
Open the coarse dirt container door.
Lift the coarse dirt container and pull it out.
Empty the coarse dirt container and clean it if necessary.
Reinstall the coarse dirt container.
Empty the waste water tank. Leave the drain hose with the lid open over the water drain.
Open the "Service" menu on the touch screen.
Start the "Tank rinsing" function.
Risk of injury from petrol cap!
Risk of crushing limbs due to unexpected closing of the petrol cap.
Open the petrol cap as far as it will go to avoid accidental closing.
Close the petrol cap only when there are no limbs between the tank and the petrol cap.
Open the waste water tank cover.
Connect a water supply hose to the hose coupling on the device.
Close the cover of the waste water tank.
Open the water inlet.
Carry out the rinsing process for approx. 30 seconds.
Close the water inlet.
Exit the "Tank rinsing" function.
Unscrew the water supply hose from the device.
Close the waste water drain hose and press it into the support.
Open the door of the equipment compartment.
Empty the waste water tank. Leave the drain hose with the lid open over the water drain.
Risk of injury from petrol cap!
Risk of crushing limbs due to unexpected closing of the petrol cap.
Open the petrol cap as far as it will go to avoid accidental closing.
Close the petrol cap only when there are no limbs between the tank and the petrol cap.
Open the waste water tank cover.
Manually rinse the waste water tank using a water hose.
Close the waste water drain hose and press it into the support.
Open the door of the equipment compartment.
Open the coarse dirt container door.
Lift the coarse dirt container and pull it out.
Lift up the water distribution strip and pull it out.
Clean the water distribution strip.
Fit the water distribution strip again.
Fit the coarse dirt container.
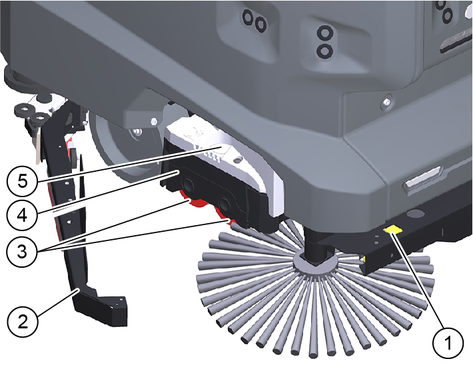
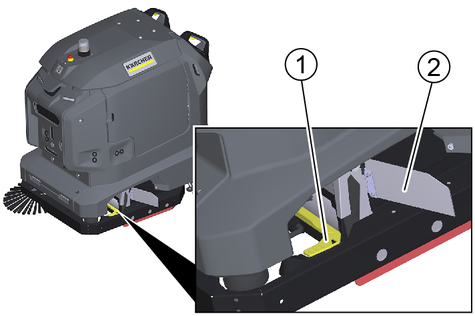
Press the push button and pivot the collision guard bar to the side.
Press the unlocking button.
Swing out the bearing cover.
Pull out the roller brushes.
Note: The roller brushes are worn out if the yellow indicator bristles are the same length as the other bristles.
Fit new roller brushes and centre them on the drivers by turning them back and forth.
Pivot back the bearing cover and latch the end caps of the roller brushes in the bearing cover.
Lift the squeegee blade then pivot back the collision guard and latch it in place.
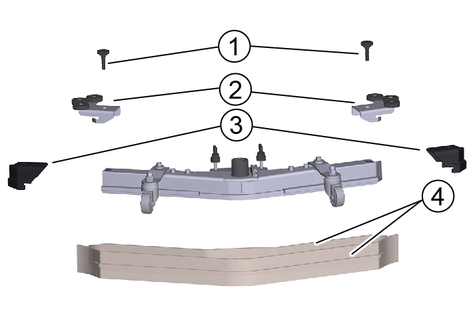
Unscrew the 3 screws.
Remove the squeegee blade together with the holder.
Remove the worn squeegee blade from the holder.
Thread the new squeegee blade onto the pins of the holder.
Reattach the holder together with the squeegee blade to the device.
Repeat the entire procedure at the other side.
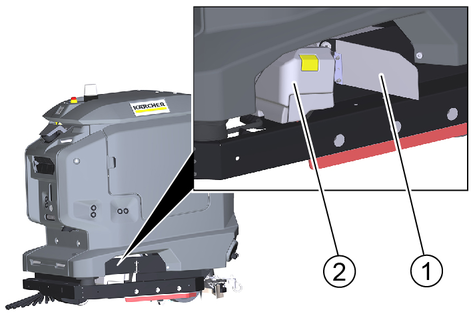
Unscrew the wing screw.
Remove the side brush.
Fit the new side brush.
Screw in and tighten the wing screw and washer.
Danger from electric shock.
Unplug the mains plug from the mains socket before working on the docking station.
Remove the cover.
Check the float switch and float, clean if necessary.
Clean the waste water collection tray and rinse it with water.
Attach the cover.
Clean the Position code with a moist cloth.
Check the male docking port for ease of movement.
A space of 2x2 m2 is to be available in front of the docking station to ensure suitable use of the docking station.
Clean all sensors shown in the illustration with a damp microfibre cloth. If necessary, use additional glass cleaner.
After cleaning, restart the device.
Internal error
Cause:
Remedy:
Internal error occurred. Restart robot. If error persists, call the Service.
Emergency stop button activated
Cause:
Remedy:
Robot stopped driving and cleaning. Check robot and surrounding. Release emergency stop button if no hazard is present.
Emergency stop button released
Cause:
Remedy:
Emergency stop button released. Robot continues normal operation.
Open waste water tank lid or clogging
Cause:
Waste water outlet has been opened but the waste water level in the robot does not change. Possibly the tank lid is opened or the waste water outlet is clogged.
Remedy:
Close waste water tank lid. Check waste water outlet and waste water tank for damages and clogging.
Docking station without power supply
Cause:
On-board charger of the robot is not provided with power.
Remedy:
Check if docking station is connected to power socket correctly. Check if power cable of docking station is damaged. Check if there is voltage at the power socket. Check if power connector of the docking port is damaged.
Docking station without water supply
Cause:
Float switch in the tub of the docking station is activated.
Remedy:
Water in docking station tub is not draining. Check docking station for damages and clogging. Check if float switch in the tub of the docking station can move freely and is in good condition.
Docking station clogged
Cause:
Unable to dock in docking station.
Remedy:
Check robot, docking station and surrounding. Remove obstacles.
Docking failed
Cause:
The robot lost its localization.
Remedy:
Drive robot to a position code and start a cleaning task. If the error persists, re-teach the route.
Localization problem
Cause:
Remedy:
An operator cancelled the running autonomous task.
Autonomous task cancelled
Cause:
Teached Smart-Fill area can't be processed.
Remedy:
Teach the route again and avoid complex Smart-Fill shapes (e.g. avoid crossing paths during Smart-Fill).
Smart-Fill failed
Cause:
Remedy:
Bring robot back on designated path.
Robot left designated path
Cause:
Remedy:
Robot finished cleaning task successfully.
Cleaning task finished
Cause:
The robot stopped because its path is blocked.
Remedy:
Check the surrounding of the robot. Remove obstacles on the path.
Blocked path
Cause:
The cliff laser scanner detected dirt and isn't working properly anymore.
Remedy:
Clean cliff laser scanner and check it for damages. If error persists after robot restart, call the Service.
Cliff laser scanner dirty
Cause:
The rear laser scanner detected dirt and isn't working properly anymore.
Remedy:
Clean the rear laser scanner and check it for damages. If error persists after robot restart, call the Service.
Rear laser scanner dirty
Cause:
The rear laser scanner detected dirt and isn't working properly anymore.
Remedy:
Clean the rear laser scanner and check it for damages. If error persists after robot restart, call the Service.
Front laser scanner dirty
Cause:
The front laser scanner detected dirt and isn't working properly anymore.
Remedy:
Clean the front laser scanner and check it for damages. If error persists after robot restart, call the Service.
Software update failed
Cause:
Software update couldn't be installed correctly.
Remedy:
System was reset to previous software status.
Software update successful
Cause:
Remedy:
Software update successfully installed.
Software update started
Cause:
Software update is being installed.
Remedy:
Don't switch off robot.
Software update available
Cause:
Software update was downloaded successfully and is ready for installation.
Remedy:
Start software update in settings menu.
Battery fully charged
Cause:
Remedy:
Battery is fully charged and robot is ready for operation.
Empty battery
Cause:
Remedy:
Charge battery immediately.
Low battery level
Cause:
Remedy:
Charge battery soon.
Brake test failed. Check manual brake release
Cause:
Motion was detected while the robot was testing the engaged brakes.
Remedy:
The brakes are most likely not engaged. Push the red lever between the wheels to the right to engage them.
Brake test necessary. Keep handle switches activated
Cause:
Handle switches were activated and a brake test is necessary.
Remedy:
Keep handle switches activated until the brake test is finished, the brakes are released and the robot can be moved again.
No motor support while logged out
Cause:
The cliff laser scanner detected a cliff and triggered a safety stop. Manual operation of the robot near cliffs is only permitted when the user is logged in.
Remedy:
Log in with user profile while operating robot near a cliff.
User is not logged in while cliff is detected
Cause:
The cliff laser scanner detected a cliff and triggered a safety stop. Manual operation of the robot near cliffs is only permitted when the user is logged in.
Remedy:
Log in with user profile while operating robot near a cliff.
Cleaning modules check
Cause:
Cleaning modules are checked for proper functioning.
Remedy:
Wait until the robot has finished checking the cleaning modules. This can take up to 30s
Severe vacuum drop
Cause:
Remedy:
Check if vacuum hose is tightly connected to recovery tank and squeegee. Check vacuum hose, squeegee and squeegee blades for damages. Check if water is picked up correctly.
Vacuum system error
Cause:
Remedy:
Check vacuum hose and squeegee for clogging and damages.
Brush motor overload
Cause:
Remedy:
Check if brushes are in good condition and can rotate freely.
Dirt water tank full
Cause:
Float switch in the waste water tank is activated because of open tank lid or full waste water tank.
Remedy:
Drain dirt water tank.
No fresh water flow
Cause:
Remedy:
No fresh water is applied on the floor. Clean fresh water filter and water distribution channel of brush deck. If error persists after restart of the robot, call the Service.
General | |
Autonomous travel speed (max.) | 3.6 km/h |
Manual travel speed manual (max.) | 5.5 km/h |
Autonomous theoretical surface coverage | 21312.5 (2365) ft2/h (m2/h) |
Manual theoretical surface coverage | 32560.8 (3025) ft2/h (m2/h) |
Surface coverage per tank filling | 19730.3 (1833) ft2/h (m2/h) |
Fresh/waste water tank volume | 14.5 (55) gal (l) |
Coarse dirt container capacity | 0.5 (2) gal (l) |
Volume of detergent tank ("Dose" option) | 1.3 (5) gal (l) |
Detergent dosing | 0...3 % |
Water dosage | 0...2.7 l/min |
Dimensions | |
Length | 41.8 (1062) in (mm) |
Width without suction bar | 29.5 (750) in (mm) |
Wide suction bar | 31.1 (790) in (mm) |
Height | 45.71 (1161) in (mm) |
Working width | 21.7 (550) in (mm) |
Working width with side brushes | 30.2 (768) in (mm) |
Autonomous passage width (min.) | 39.4 (1000= in (mm) |
Autonomous edge clearance (min.) | 3.9 (100) in (mm) |
Packaging dimensions lxwxh | 45.9x34.6x54.9 (1165x880x1395) in (mm) |
Tyres | |
Front wheel, width | 1.3 (32) in (mm) |
Front wheel, diameter | 3.9 (100) in (mm) |
Rear wheel, width | 3.1 (80) in (mm) |
Rear wheel, diameter | 7.9 (200) in (mm) |
Weight | |
Approved total weight | 628.3 (285) lbs (kg) |
Net weight (transport weight) | 502.7 (228) lbs (kg) |
Brush contact force, max. | 4.1 (181) lbf (N) |
Brush contact pressure, max. | 7858 (80.1) N / m2 (g / cm2) |
Surface pressure | |
Steering roller | 0.61 N/cm2 |
Rear wheel | 0.53 N/cm2 |
Device performance data | |
Number of batteries | 2 |
Nominal voltage, Li-Ion | 25.6 V |
Battery capacity, Li-Ion | 160 Ah (5 h) |
Mean power input | 1600 W |
Driving motor power | 2x280 W |
Suction turbine power | 630 W |
Brush drive power | 600 W |
Running time with full battery | 3.5 h |
Degree of protection | IPX3 |
Vacuuming | |
Suction performance, air quantity | 16.8...22.2 l/s |
Vacuum (max.) | 1.5...1.9 (0.101...0.132) psi (bar) |
Cleaning brushes | |
Brush length | 550 in (mm) |
Brush speed | 1350 1/min |
Internal charger | |
Nominal voltage | 100...240 V |
Current consumption | 9.9-4.7 A |
Power input | 0.9-1.1 kW |
Frequency | 50-60 Hz |
Power | 960 W |
Charging current | 40 A |
Battery charging time | 5.25 h |
Ambient conditions | |
Permissible temperature range | 41...104 (5...40) °F (°C) |
Water temperature max. | 122 (50) °F (°C) |
Waste water tank flushing system water pressure | 145 (10) psi (bar) |
Relative humidity | 20...90 % |
Incline | |
Max. working area slope | 6 % |
Determined values in acc. with EN 60335-2-72 | |
Hand-arm vibration value | 0.3 m/s2 |
Uncertainty K | 0.2 dB(A) |
Sound pressure level LpA | 69 dB(A) |
Uncertainty KpA | 2 dB(A) |
Sound power level LWA + uncertainty KWA | 84 dB(A) |