DS 4 BKM BT S
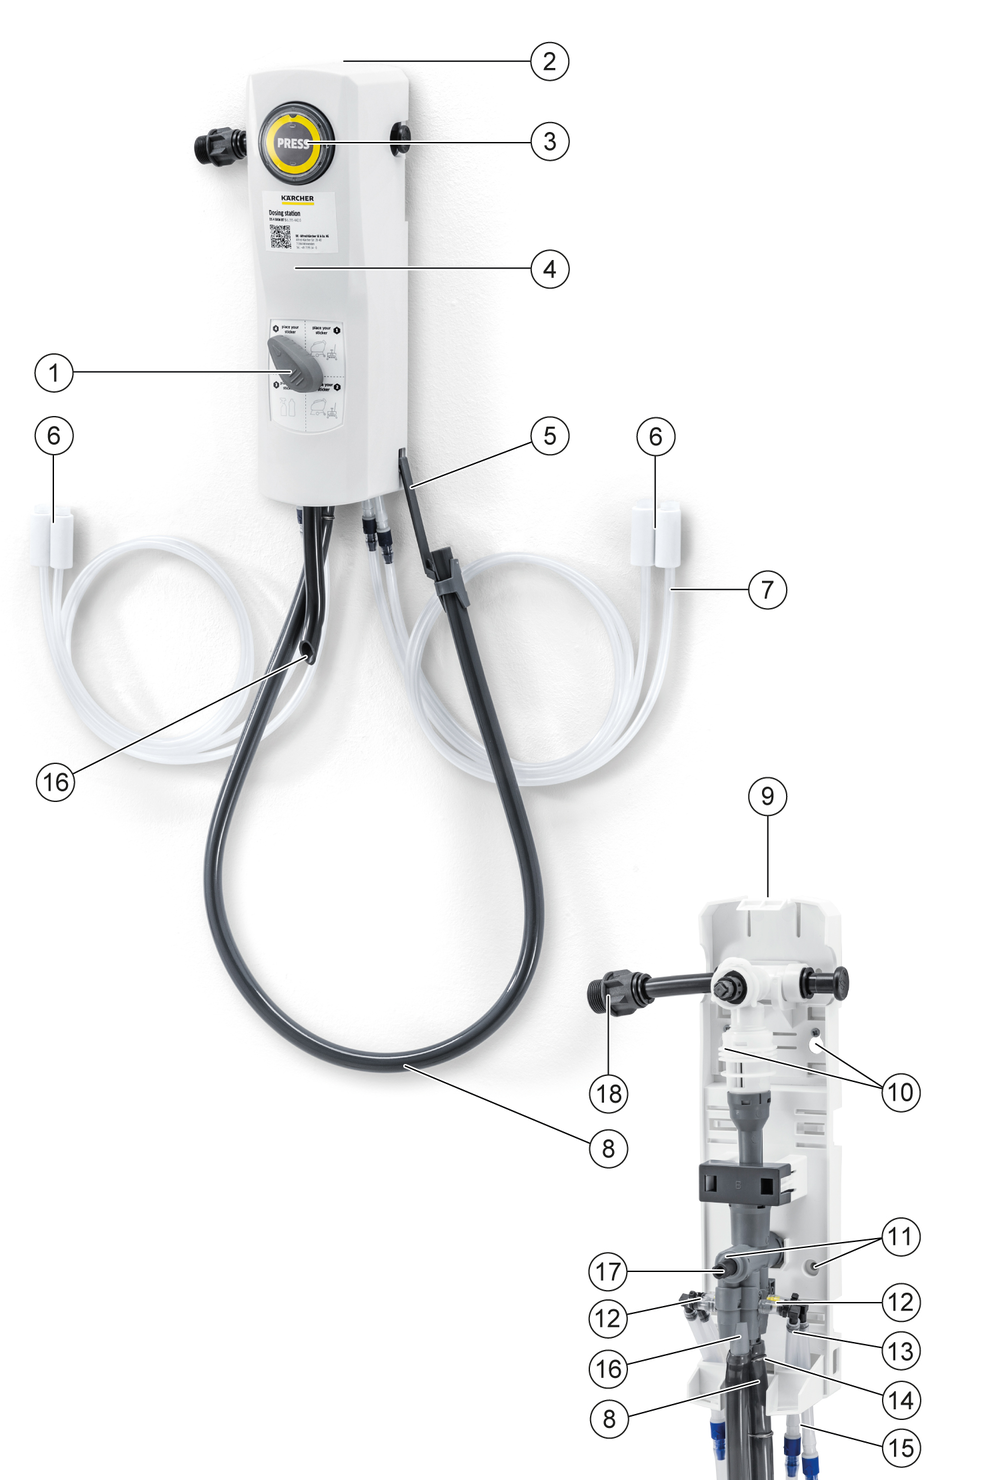
5.991-141.0 (03/25)
5.991-141.0 (03/25)
 Read these original operating instructions and the enclosed safety instructions before using the device for the first time. Proceed accordingly.
Keep both books for future reference or for future owners.
Indication of an imminent threat of danger that will lead to severe injuries or even death.
Indication of a potentially dangerous situation that may lead to severe injuries or even death.
Indication of a potentially dangerous situation that may lead to minor injuries.
Indication of a potentially dangerous situation that may lead to damage to property.
Risk of asphyxiation. Keep packaging film out of the reach of children.
Risk of burns, poisoning and explosion. Do not mix chemical cleaning products. Observe the manufacturer's safety data sheet for the cleaning agent when using cleaning agents.
Only use the device for its proper use. Take into account the local conditions and beware of third parties, in particular children, when working with the device.
Risk of injury from the cleaning agent. Follow the safety instructions for the cleaning agent and wear safety goggles and protective gloves when handling cleaning agents.
Only dispense cleaning agents into suitable containers.
Safety devices are provided for your own protection. Never modify or bypass safety devices.
Always assemble the device according to these instructions.
Ensure that all the components are screwed tight or locked
Only use the detergents recommended by the manufacturer and observe the application, disposal and warning instructions of the detergent manufacturers.
Keep the device clean to ensure proper operation.
The built-in backflow preventer prevents detergent from being sucked back into the water pipe network
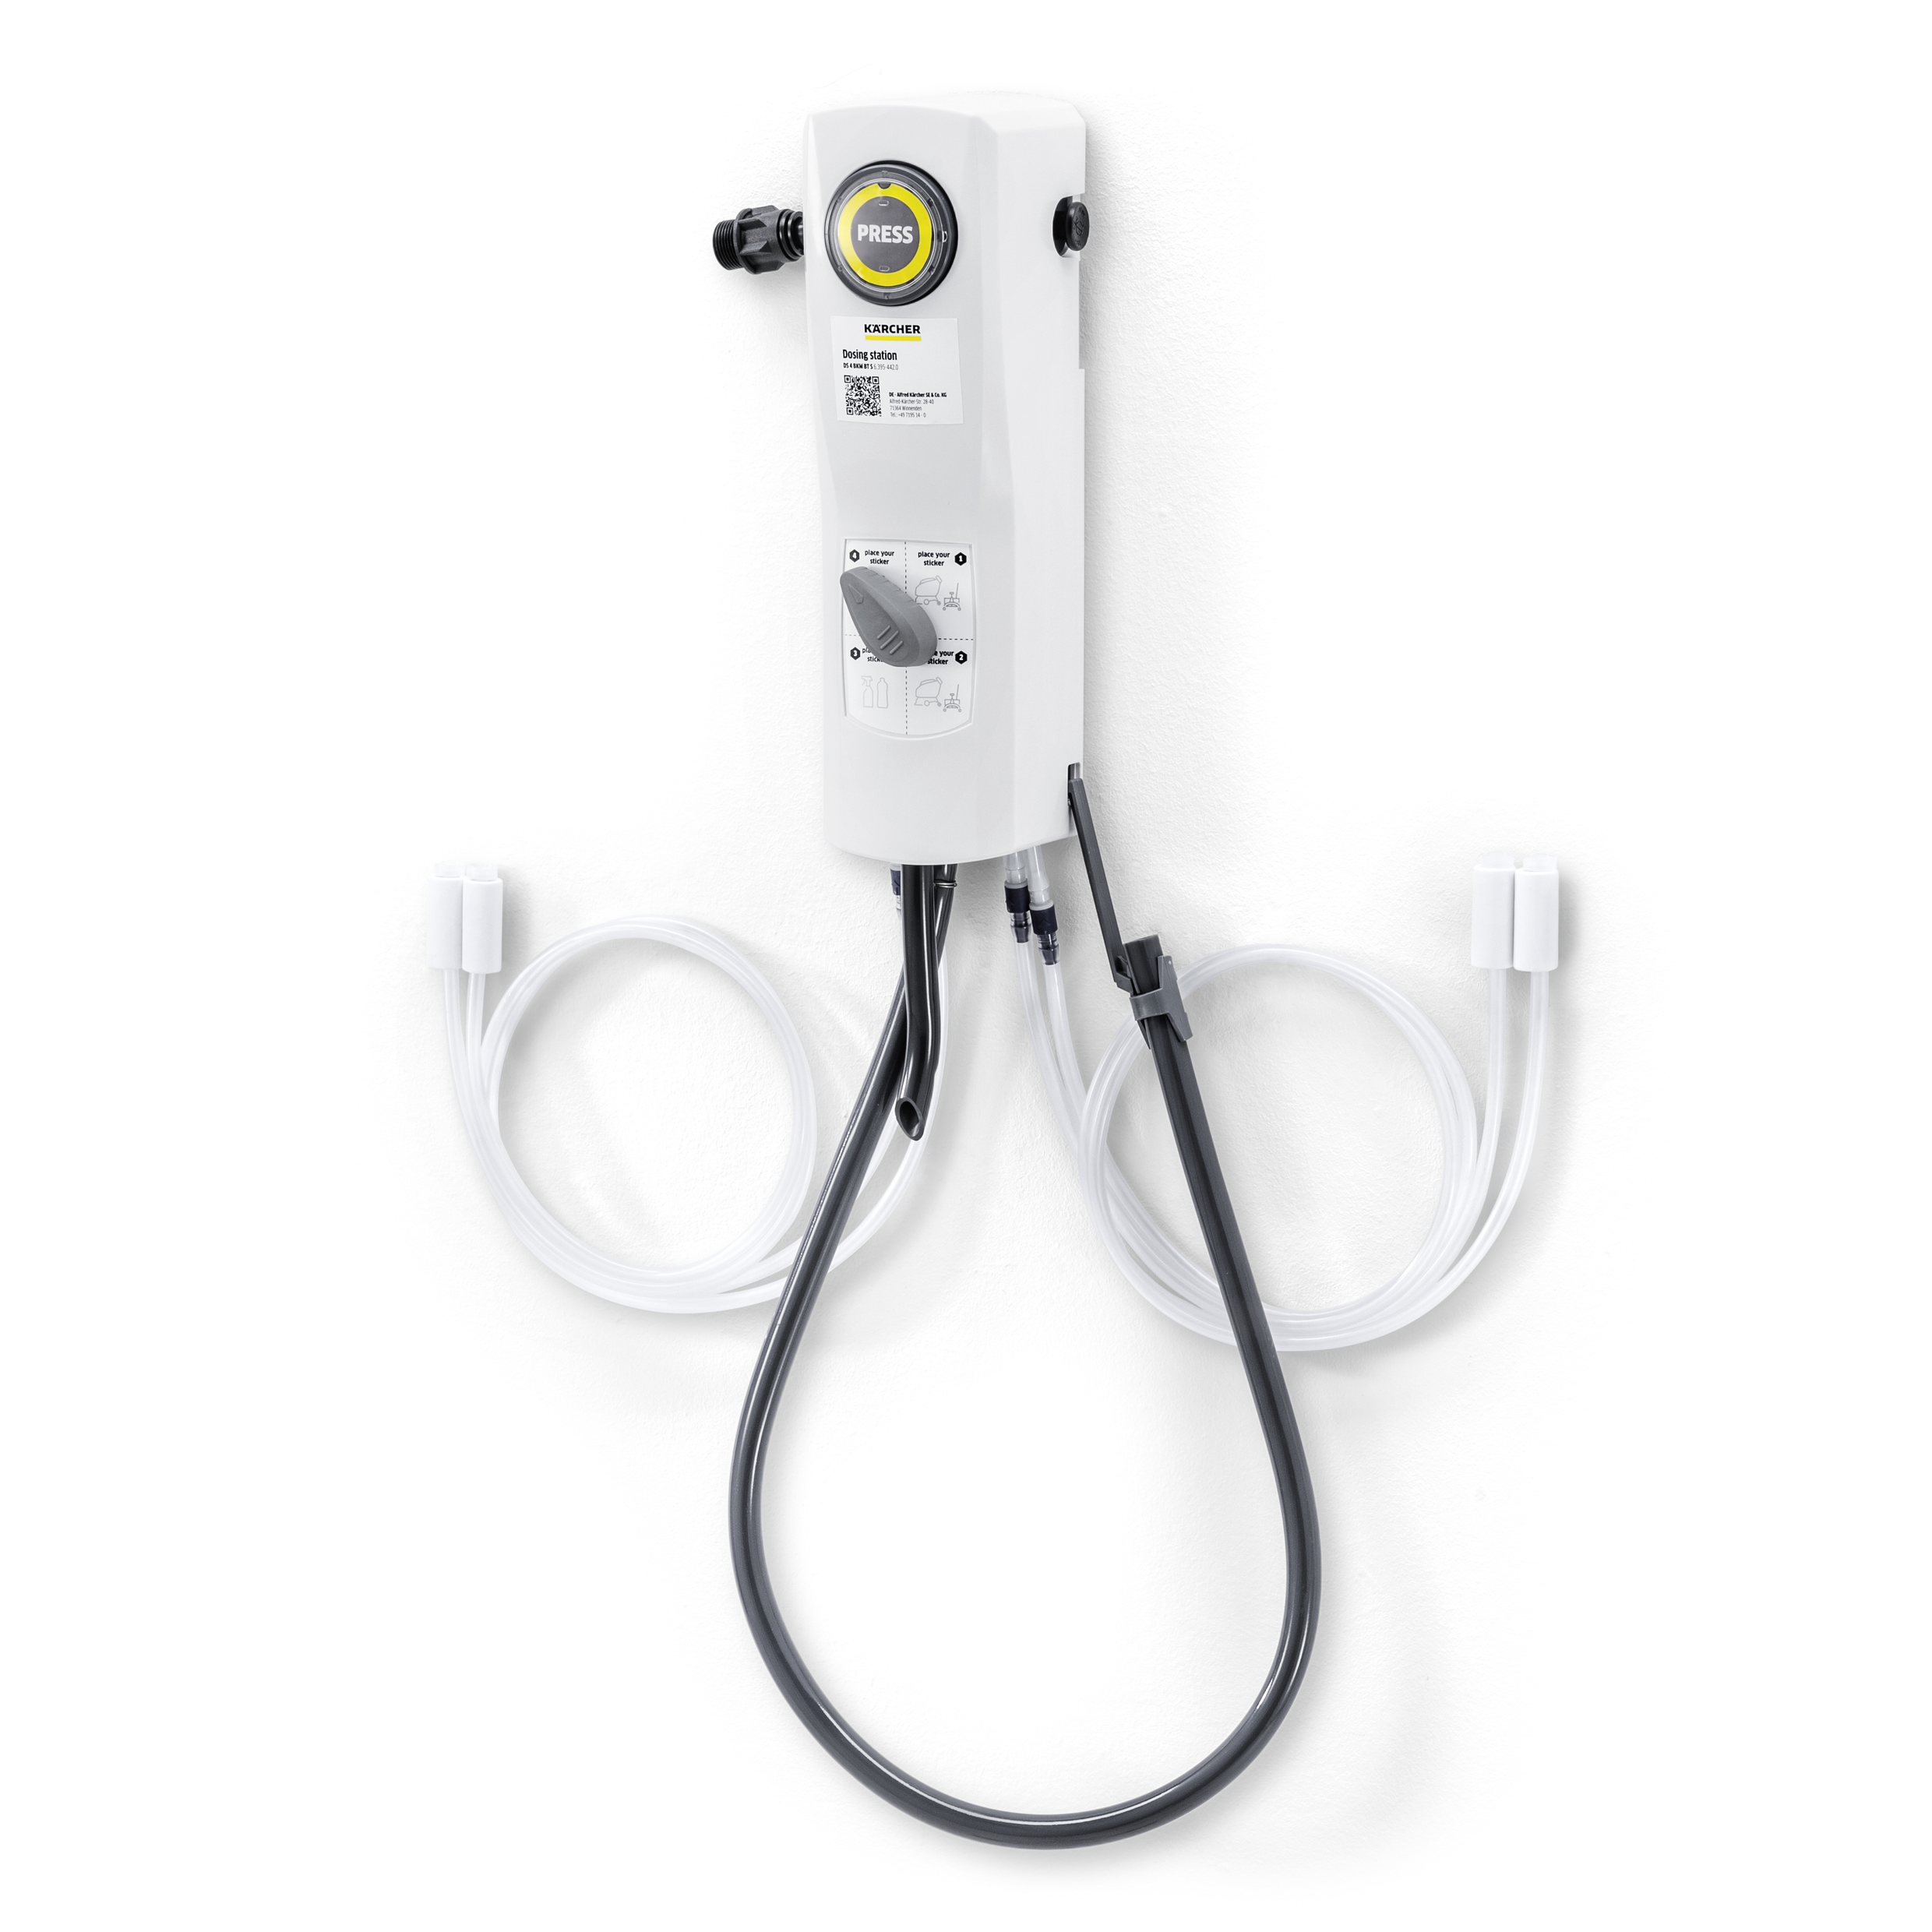
The device mixes water and detergent to create a cleaning solution.
The mixing ratio is selected using interchangeable nozzle inserts.
The device is designed to be mounted on a wall above the detergent container.
 The packing materials can be recycled. Please dispose of packaging in accordance with the environmental regulations.
 Electrical and electronic devices contain valuable, recyclable materials and often components such as batteries, rechargeable batteries or oil, which - if handled or disposed of incorrectly - can pose a potential danger to human health and the environment. However, these components are required for the correct operation of the device. Devices marked by this symbol are not allowed to be disposed of together with the household rubbish.
Current information on content materials can be found at: www.kaercher.de/REACH
Only use original accessories and original spare parts. They ensure that the appliance will run fault-free and safely.
Information on accessories and spare parts can be found at www.kaercher.com.
Check the contents for completeness when unpacking. If any accessories are missing or in the event of any shipping damage, please notify your dealer.
Bucket / machine filling | Bottle filling | |||
|---|---|---|---|---|
Nozzle colour | Water / detergent | Detergent in water | Water / detergent | Detergent in water |
No nozzle | 4 | 20% | 5 | 16,7% |
Grey | 18:1 | 5,3% | 6:1 | 14,3% |
Black | 18:1 | 5,3% | 7:1 | 12,5% |
Beige | 20:1 | 4,8% | 7:1 | 12,5% |
Red | 24:1 | 4% | 9:1 | 10,0% |
White | 29:1 | 3,3% | 10:1 | 9,1% |
Blue | 30:1 | 3,2% | 11:1 | 8,3% |
Light brown | 76:1 | 1,3% | 13:1 | 7,1% |
Green | 76:1 | 1,3% | 21:1 | 4,5% |
Orange | 80:1 | 1,2% | 22:1 | 4,3% |
Brown | 94:1 | 1,1% | 28:1 | 3,4% |
Yellow | 132:1 | 0,8% | 39:1 | 2,5% |
Turquoise | 152:1 | 0,7% | 45:1 | 2,2% |
Violet | 249:1 | 0,4% | 63:1 | 1,6% |
Pink | 722:1 | 0,1% | 144:1 | 0,7% |
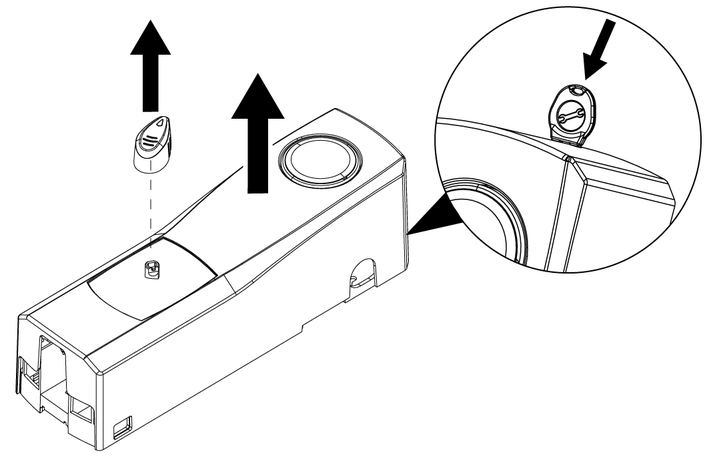
Pull off the selector lever.
Insert the maintenance key, unlock and remove the cover.
Mark the fixing holes for the mounting plate on the wall.
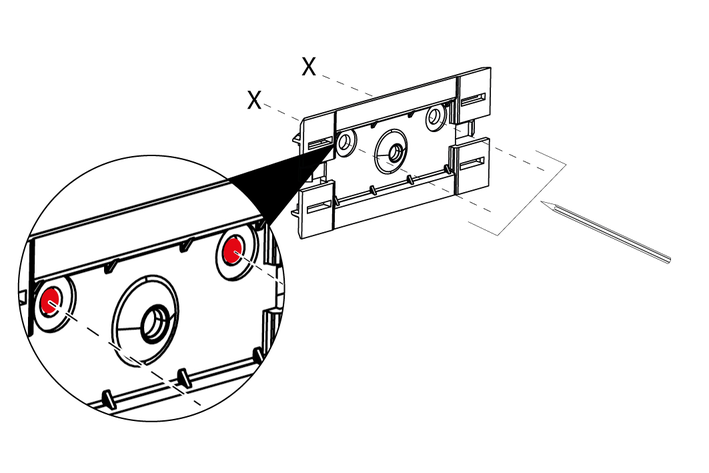
Drill holes and insert dowels as far as they will go.
Tighten the mounting plate.
Slide the dosing station onto the mounting plate.
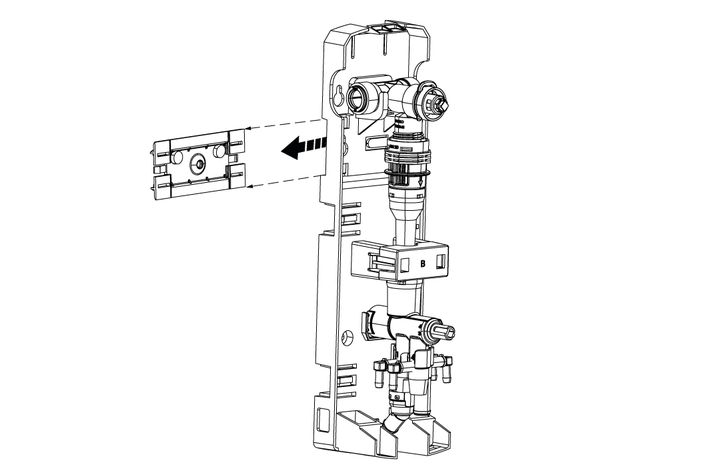
Mark the lower mounting holes through the back of the housing.
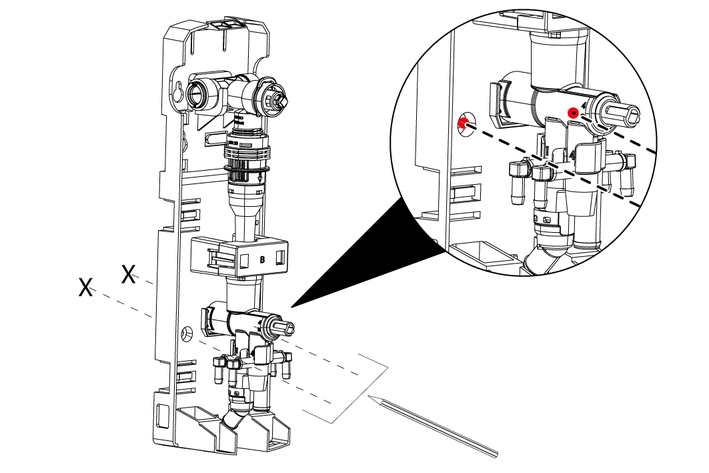
Remove the dosing station from the mounting plate.
Drill holes and insert dowels as far as they will go.
Slide the dosing station back onto the mounting plate and screw in the lower screws.
Insert the nozzle insert.
Hang the detergent suction hose with the foot valve into the detergent container.
Connect the other end of the detergent suction hose to the detergent inlet.
Shorten the detergent suction hose if necessary.
Install the cover.
install the selector lever.
Attach the hose for the cleaning solution to the cleaning solution outlet with the lock ring facing upwards.
Do not move the lock ring in the hose!
Attach the hook to the lower end of the hose for the cleaning solution.
Connect the detergent bottle filling hose to the cleaning solution output.
Connect the water supply hose to the water inlet.
Hose inner diameter at least 13 mm, threaded connection 3/4" and water pressure at least 0.175 MPa (1.75 bar).
A hose clip (not included in the scope of delivery) is recommended when connecting hose lines with freely suspended line lengths greater than 50 cm.
Hook the front part of the casing into the back of the casing at the bottom and snap it into place at the top.
Open water inlet.
Vent the device by briefly pressing the button.
Insert the cleaning solution hose into the tank of the cleaning device or into a container.
Set the selector lever to the desired detergent.
Press the dosing button.
Detergent is dispensed.
Press the dosing button.
The dispensing of the detergent stops.
Remove dust and dirt.
Remove limescale and other deposits.
Clean the outside of the dosing station with a damp cloth.
Clean the filters (push button and chemical container) and the hose valve every six months.
Malfunctions often have simple causes that you can remedy yourself using the following overview. When in doubt, or in the case of malfunctions not mentioned here, please contact your authorised Customer Service.
No cleaning solution is dispensed.
Cause:
Water inlet closed.
Remedy:
Open water inlet.
Cause:
The sieve in the water connection is contaminated.
Remedy:
Clean the sieve in the water connection.
Cause:
Water pressure too high.
Remedy:
Install pressure limiter in the water inlet. (max. 0.6 MPa (6.0 bar))
Cause:
Device clogged.
Remedy:
Clean and descale the device.
Too much detergent is added.
Cause:
No or incorrect nozzle insert used.
Remedy:
Replace the nozzle insert.
No or too little detergent is added.
Cause:
Detergent container empty.
Remedy:
Top up detergent or replace detergent container.
Cause:
Sieve on the foot valve is dirty.
Remedy:
Clean the foot valve.
Cause:
Lime deposits in the device.
Remedy:
Descale the device.
Cause:
Water pressure too low.
Remedy:
Check the water pressure (min. 0.175 MPa (1.75 bar)).
Cause:
Cleaning solution hose is loose.
Remedy:
Push the cleaning solution hose further onto the intake.
Cause:
The sieve in the water connection is contaminated.
Remedy:
Clean the sieve in the water connection.
Cause:
The detergent suction hose is leaking.
Remedy:
Check the detergent suction hose for damage and tight fit.
Cause:
Colourless nozzle insert used.
Remedy:
Replace the nozzle insert.
Dispensing of cleaning solution does not stop.
Cause:
Water pressure too high.
Remedy:
Install pressure limiter in the water inlet. (max. 0.42 MPa (4.2 bar))
Cause:
Valve on the device is dirty or defective.
Remedy:
Clean or replace the valve.
Foam in Cleaning solution.
Cause:
The detergent suction hose is leaking.
Remedy:
Check the detergent suction hose for damage and tight fit.
The warranty conditions issued by our relevant sales company apply in all countries. We shall remedy possible malfunctions on your appliance within the warranty period free of cost, provided that a material or manufacturing flaw is the cause. In a warranty case, please contact your dealer (with the purchase receipt) or the next authorised customer service site.
Further information can be found at: www.kaercher.com/dealersearch
Further warranty information (if available) can be found in the service area of your local Kärcher website under "Downloads".
John-Guest connector 15 mm and 3/4" external thread
Technical data
Temperature ranges | |
|---|---|
Operating temperature (water) | 1 - 23°C |
Storage temperature | 1 - 40°C |
#-#-#-A5-#-aw12579