SC 3 Deluxe
97699910 (08/24)
97699910 (08/24)
 The packing materials can be recycled. Please dispose of packaging in accordance with the environmental regulations.
 Electrical and electronic devices contain valuable, recyclable materials and often components such as batteries, rechargeable batteries or oil, which - if handled or disposed of incorrectly - can pose a potential danger to human health and the environment. However, these components are required for the correct operation of the device. Devices marked by this symbol are not allowed to be disposed of together with the household rubbish.
Current information on content materials can be found at: www.kaercher.de/REACH
Only use original accessories and original spare parts. They ensure that the appliance will run fault-free and safely.
Information on accessories and spare parts can be found at www.kaercher.com.
The scope of delivery for the appliance is shown on the packaging. Check the contents for completeness when unpacking. If any accessories are missing or in the event of any shipping damage, please notify your dealer.
The warranty conditions issued by our relevant sales company apply in all countries. We shall remedy possible malfunctions on your appliance within the warranty period free of cost, provided that a material or manufacturing flaw is the cause. In a warranty case, please contact your dealer (with the purchase receipt) or the next authorised customer service site.
Further information can be found at: www.kaercher.com/dealersearch
Further warranty information (if available) can be found in the service area of your local Kärcher website under "Downloads".
Missing or modified safety devices
Safety devices are provided for your own protection.
Never modify or bypass safety devices.(according to type of appliance)
 | Risk of burns, surface of appliance becomes hot during operation |
 | Risk of scalding from steam |
 | Read the operating instructions |
USE WATER ONLY | Only fill water without additives into the water reservoir |
In case of inadmissibly high pressure in the event of a fault, a safety valve relieves the pressure into the atmosphere.
The fuse prevents the device from overheating. If the device overheats, the fuse disconnects the device from the power supply.
Before re-commissioning the device, contact the responsible KÄRCHER Customer Service.
The maximum amount of equipment is described in these operating instructions. Depending on the model used, there are differences in the scope of delivery (see packaging).

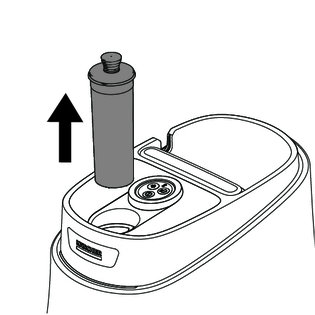
Device damage due to calcification
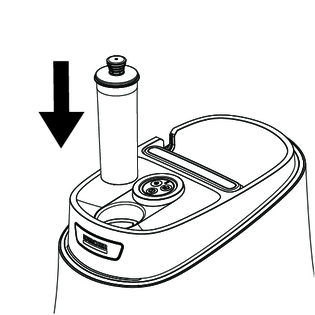
The decalcification cartridge only works properly if you adjust the device to the local water hardness before operating it for the first time.
Set the device to the local water hardness.Set the device to the current water hardness before using it in an area with a different water hardness (e.g. after a move)Insert the decalcification cartridge into the opening and push it so that it is firmly in place.
Set the water hardness, see chapter Setting the water hardness.
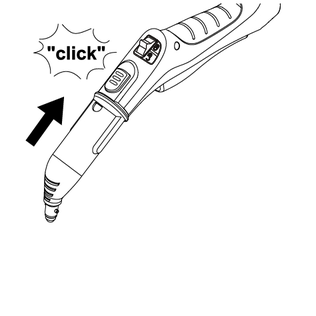
Push the open end of the accessory onto the steam gun so that the unlocking button on the steam gun engages.
Push the open end of the accessory onto the spotlight nozzle.
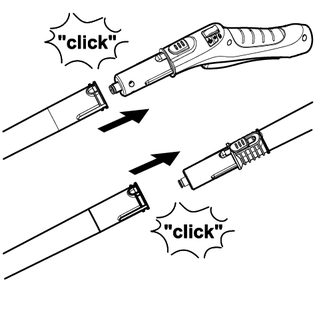
Connect the extension tubes to the steam gun.
Push the 1st extension tube onto the steam gun so that the unlocking button on the steam gun engages.
The connection pipe is connected.
Push the 2nd extension tube onto the 1st extension tube.
The connection pipes are connected.
Push the accessory and / or the floor nozzle onto the free end of the extension tube.
The accessory is connected.
Move the child lock back.
The steam lever is locked.
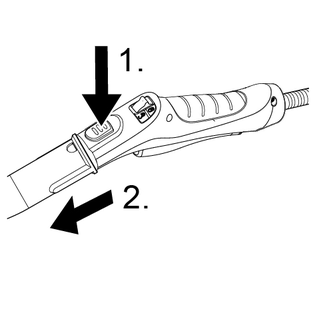
Push the unlocking button and pull the parts apart.
The water reservoir can be filled at any time.
Damage to the device
Unsuitable water can block the nozzles or damage the water level indicator.
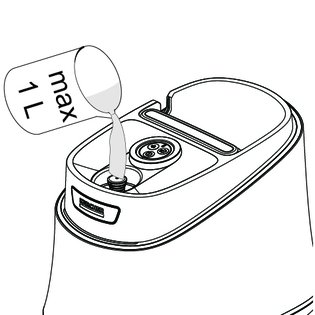
Do not use condensation from the clothes dryer for filling.Do not use collected rain water for filling.Do not use cleaning agents or other additives (e.g. scents) for filling.Fill the water reservoir with a maximum of 1 l of tap water.
Device damage due to incorrectly set water hardness
The decalcification cartridge only works properly if the device is adjusted to the local water hardness. The device may calcify if the water hardness is set incorrectly.
Adjust the device to the local water hardness before first operation, see chapter Setting the water hardness.When steaming for the first time after removing and reinserting the decalcification cartridge, the steam jet may be weak or irregular, and individual drops of water may be expelled. The device requires a short running-in period in which the decalcification cartridge fills with water. The steam volume that is expelled increases constantly until the maximum steam volume has been reached after approx. 30 seconds.
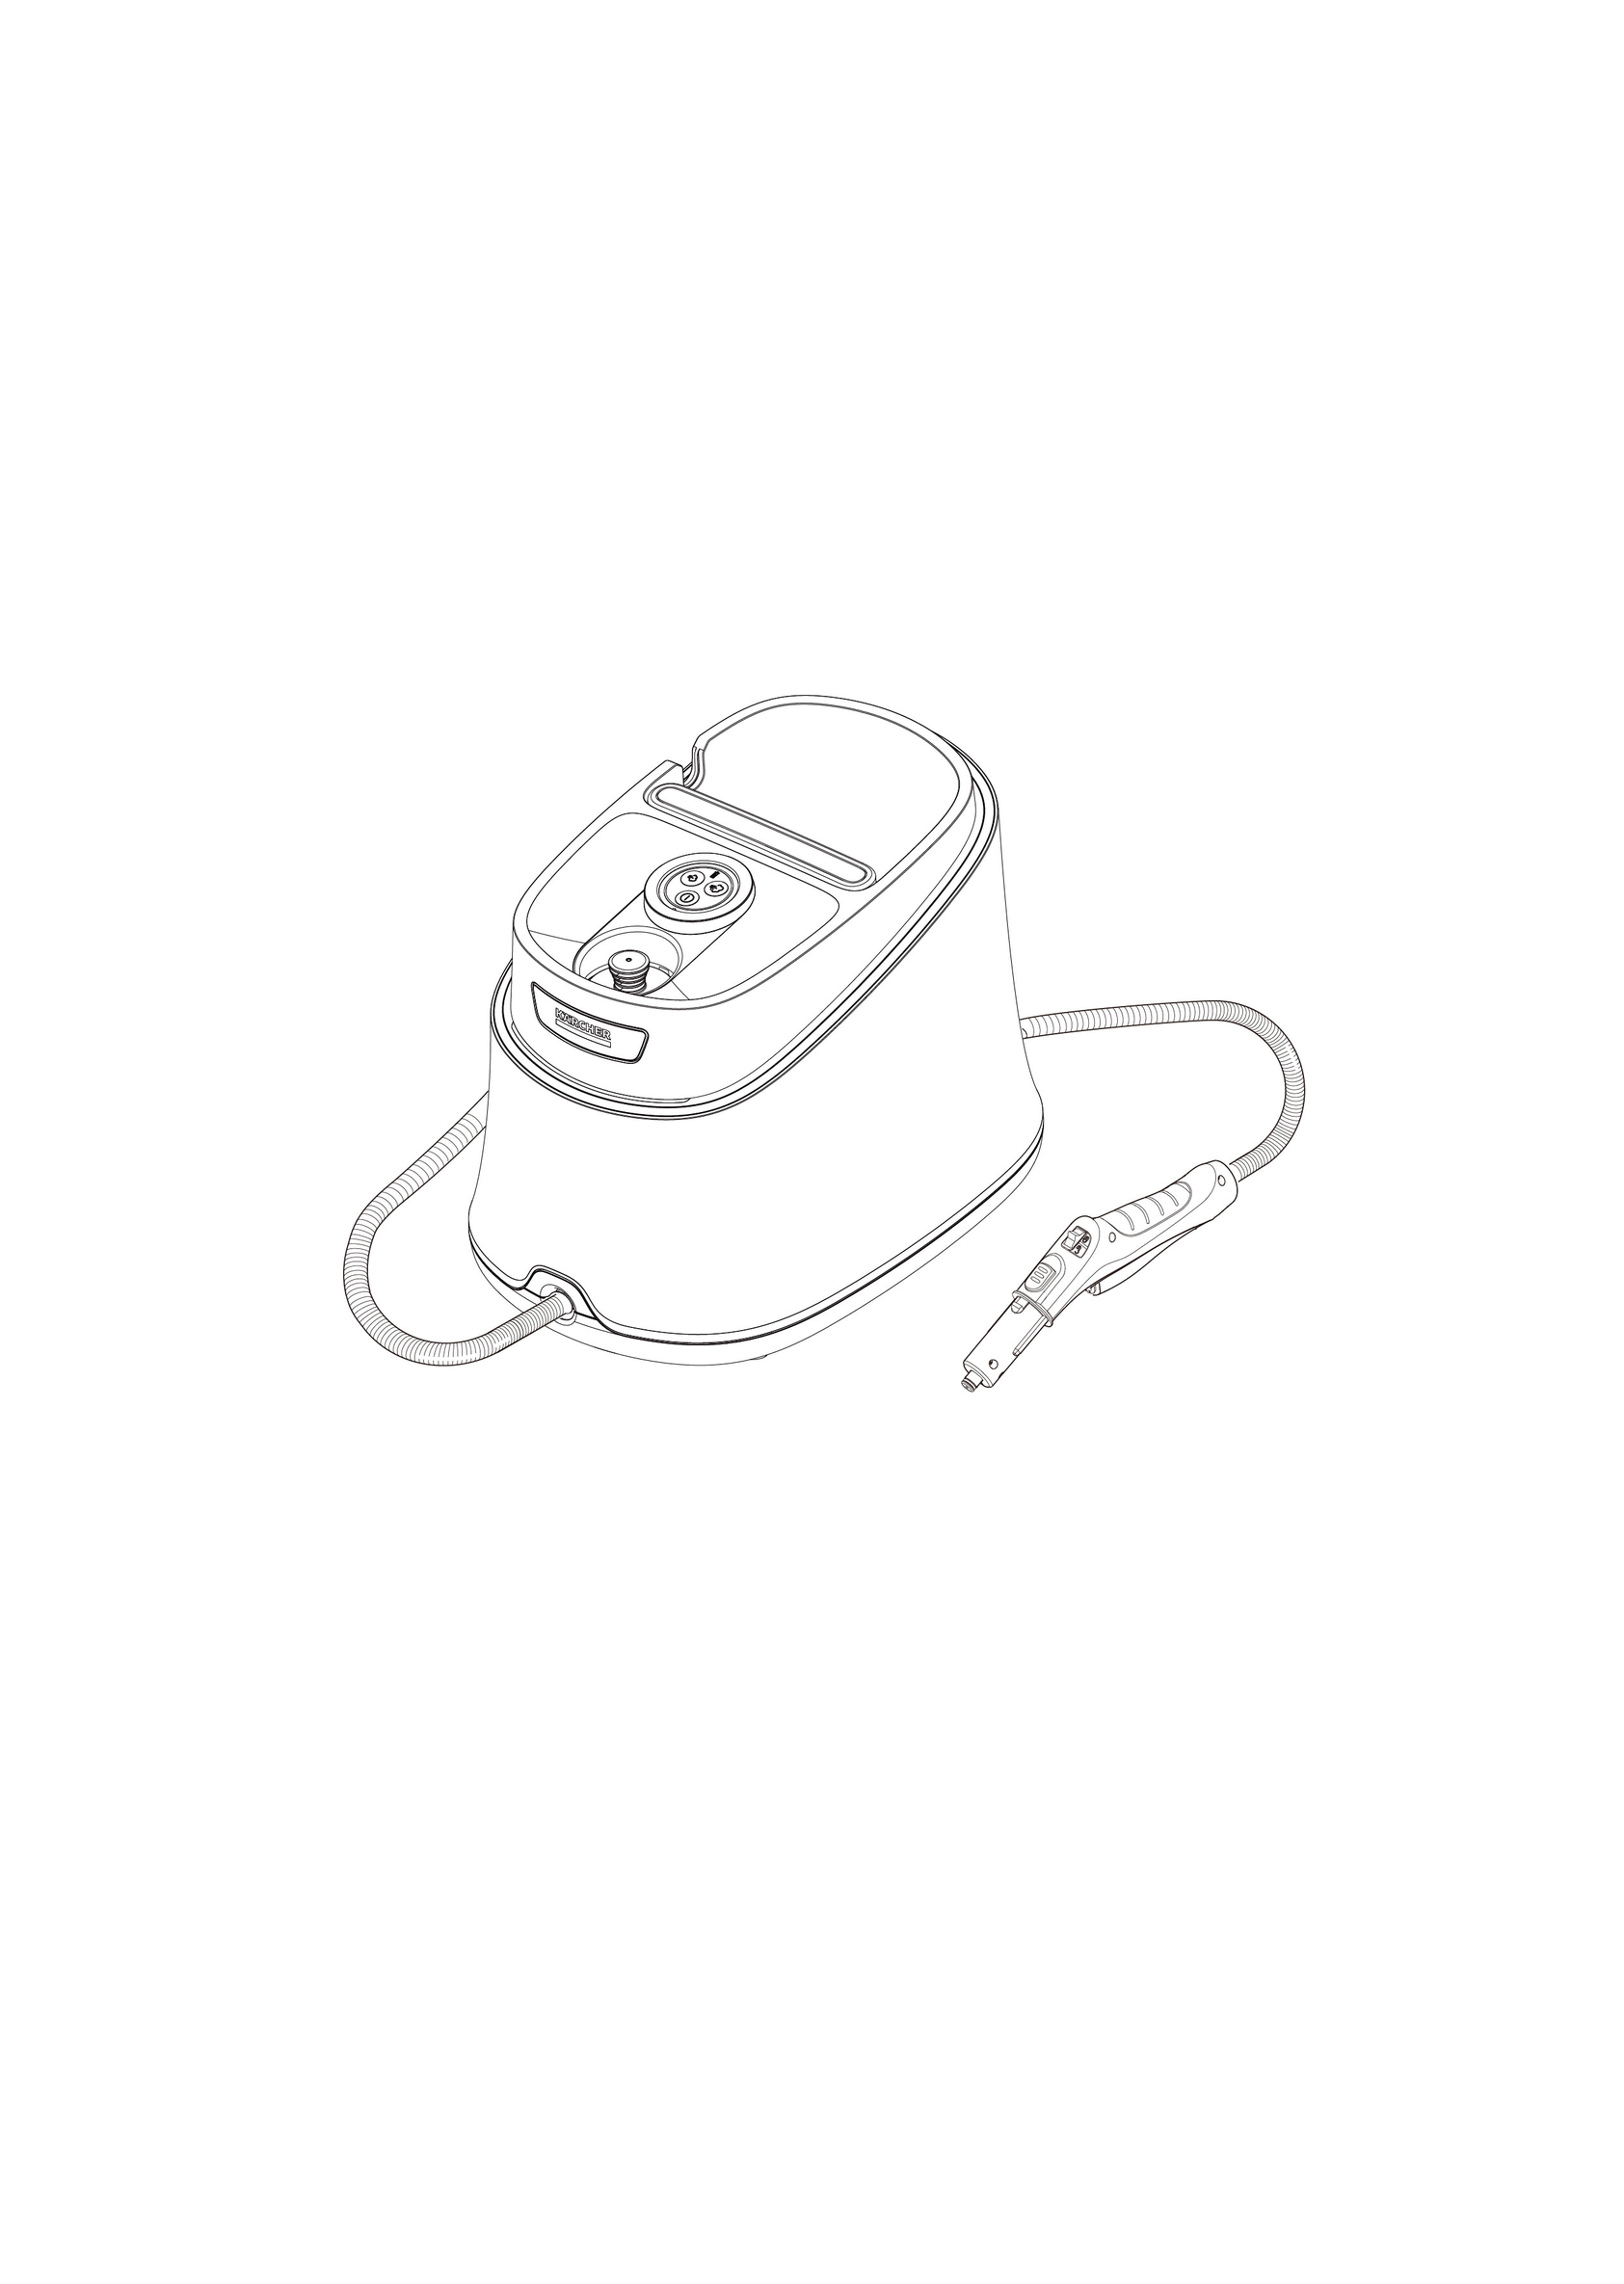
Place the device on a firm surface.
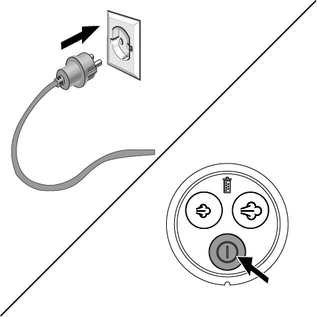
Connect the mains plug into a socket.
Press the On/Off switch.
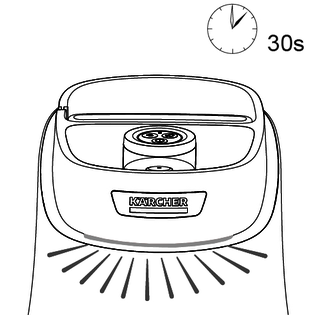
The LED strip is in fading red.
The LED strip lights up in a constant green after approx.30 seconds.The device is ready for use.
The expelled steam volume is regulated by pressing the steam volume button. Two different steam volume buttons are available:
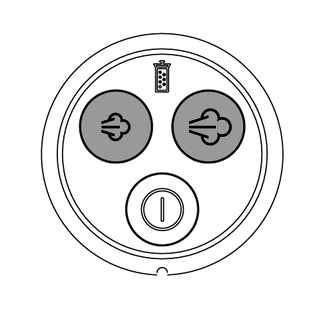
 | Maximum steam volume |
 | Reduced steam volume |
 | No steam - child lock NoteIn this position, the steam lever cannot be operated. |
The maximum steam volume is always selected when the device is switched on.
Press the steam lever after setting the steam volume.
Before starting cleaning, point the steam gun at a cloth until steam is expelled evenly.
If there is a water shortage, the LED strip rapidly flashes red.
For constant steam output, the water has to be topped up through the cover of the decalcification cartridge. When topping up the water, the decalcification cartridge remains secured in the device.
The device is equipped with dry-run protection for the pump. If the pump runs dry for a longer period, e.g. because the decalcification cartridge is not correctly inserted, the pump switches off and the red water shortage indicator light flashes.
To be able to operate the device again, the device has to be switched off and back on again. In the process, you must make sure that the cartridge has been inserted correctly and there is enough water in the water reservoir.
Fill the water reservoir with a maximum of 1 l of tap water through the cover of the decalcification cartridge.
The LED strip lights up in a constant green.
In order to save energy, we recommend that you switch off the device for breaks in operation of longer than 20 minutes.
Press the On/Off switch.
Press the On/Off switch.
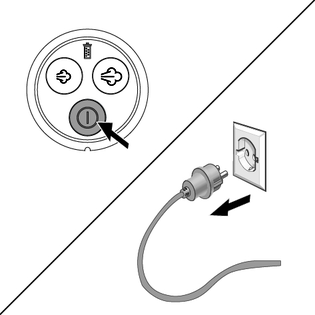
The device has been switched off.
Press the steam lever until no more steam flows out.
The steam boiler is depressurised.
Move the child lock back.
The steam lever is locked.
Remove the mains plug from the socket.
Device damage due to water putrefaction
If the device is not put into operation for more than 2 months, the water in the reservoir may putrefy.
Drain the water reservoir before breaks in operation.Remove the decalcification cartridge from the device.
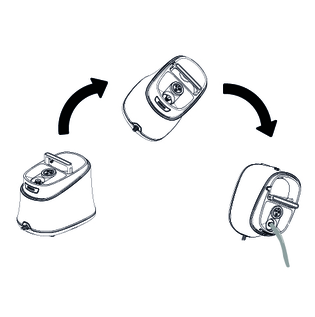
Hang the floor nozzle in the park bracket.
Connect the extension tubes to the large mounts for accessories.
Connect a flexible hand nozzle and spotlight nozzle to each extension tube.
Wrap the cable and place it in the accessory storage area.
Place the small round brush and power nozzle in the accessory storage area.
Put the steam hose in the accessory storage area.

Store the device in a dry location that is protected from frost.
We recommend sweeping the floor or vacuum cleaning it before using the appliance. In this way the floor will be cleared of dirt and loose particles before the wet cleaning.
Prior to using the appliance, always check the compatibility of the textiles at a concealed point: Steam down the textile, allow it to dry and then check it for any change in colour or shape.
Damaged surfaces
Steam can loosen wax, furniture polish, plastic coatings or paint and edge band from edges.
Do not direct the steam at glued laminated edges as the edge band may loosen. Do not use the appliance for cleaning unsealed wood or parquet floors.Do not use the appliance for cleaning painted or plastic coated surfaces such as kitchen or living room furniture, doors or parquet.To clean these surfaces, steam a cloth briefly and use it to wipe over the surfaces.
Glass breakages and damaged surfaces
Steam can damage sealed points of the window frame and, at low outside temperatures, lead to tension on the surface of window panes and hence to glass breakages.
Do not direct the steam at sealed points on the window frame.At low outside temperatures, heat up the window panes by gently steaming the full surface of the glass.Clean the window area with a flexible hand nozzle and cloth. To remove the water, use a squeegee or wipe the surfaces dry.
The steam gun can be used for the following applications without accessories:
For removing slight creases from the hanging clothing items: Steam the clothing item from a distance of 10-20 cm.
For wiping damp dust: Steam a cloth briefly and use it to wipe over the furniture.
The spotlight nozzle is suitable for cleaning areas, joins, fittings, drains, sinks, WCs, blinds or radiators that are difficult to access. The closer the spotlight nozzle is to the soiled area, the greater the cleaning efficiency will be as the temperature and steam volume are at their highest at the nozzle opening. Larger lime deposits can be treated before steam cleaning with a suitable detergent. Allow the detergent to soak in for approx. 5 minutes and then steam it off.
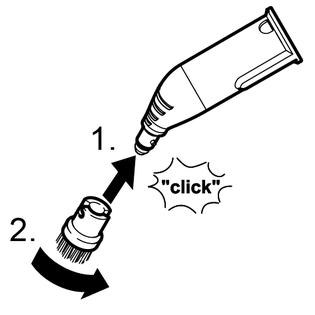
Slide the spotlight nozzle onto the steam gun.
The small round brush is used for cleaning stubborn dirt. Stubborn dirt can be removed more easily by brushing.
Damaged surfaces
The brush may scratch sensitive surfaces.
It is not suitable for cleaning sensitive surfaces.Fit the round brush to the spotlight nozzle.
The crevice brush is used for cleaning narrow gaps e.g. window recess and cranks in the walls.
The flexible hand nozzle is used for cleaning small areas that can be washed down, shower cubicles and mirrors.
Push the flexible hand nozzle onto the steam gun according to the spotlight nozzle.
Pull the cover over the flexible hand nozzle.
The floor nozzle is used for cleaning washable wall and floor coverings e.g. stone floors, tiles and PVC floors.
Damage due to build-up of steam
Heat and moisture can lead to damage.
Check the heat resistance and steam effect on an inconspicuous area using a minimal volume of steam prior to use.Detergent residue or care emulsions on the surface to be cleaned can lead to streaks during steam cleaning, which will disappear however once these have been used several times.
We recommend sweeping the floor or vacuum cleaning it before using the device. In this way the floor will be cleared of dirt and loose particles before the wet cleaning commences. Work slowly on surfaces that are heavily soiled so that the steam has longer to take effect.
Connect the extension tubes with the steam gun.
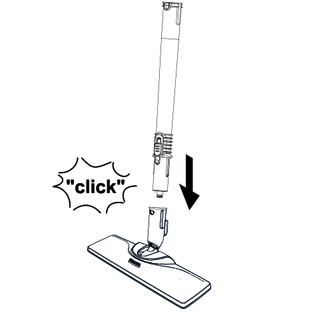
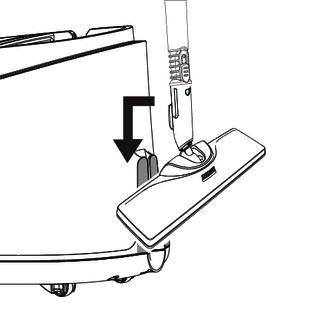
Push the floor nozzle onto the extension tube.
Fasten the floor cleaning cloth to the floor nozzle.
Place the floor cleaning cloth with the hook and loop fastener strips pointing upwards on the floor.
Place the floor nozzle onto the floor cleaning cloth, applying slight pressure.
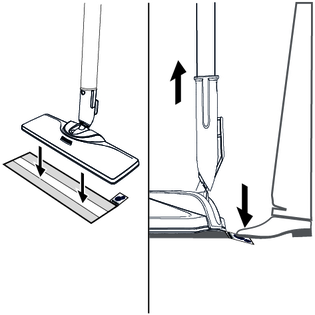
The floor cleaning cloth will stick to the floor nozzle of its own accord due to the hook and loop fastener.
Place one foot on the bottom corner of the floor cleaning cloth and lift the floor nozzle up.
Initially, the floor cleaning cloth's hook and loop fastener strip is very strong and cannot be removed from the floor nozzle easily. After the floor cleaning cloth has been used several times and washed, it is easier to remove from the floor nozzle and it has reached the optimum adhesion.
Hang the floor nozzle in the park bracket during breaks in work.
Device damage due to water putrefaction
If the device is not put into operation for more than 2 months, the water in the reservoir may putrefy.
Drain the water reservoir before breaks in operation.Press the On/Off switch.
The device has been switched off.
Pull the mains plug out of the socket.
Remove the accessories from the accessory holders.
Remove the decalcification cartridge from the device.
Drain the water reservoir.
Device damage and shortened service life
If the replacement intervals (indicator light) for the decalcification cartridge are not observed, there is a risk of device damage and the service life of the device may be shortened.
Observe the replacement intervals (indicator light).The replacement intervals depends on the local water hardness. Areas with hard water (e.g. III/IV) have a higher replacement interval than areas with soft water (e.g. I/II).
The "decalcification cartridge indicator light " indicates when the decalcification cartridge has to be replaced:
The indicator light flashes 2 hours before the run time expires.
The indicator light flashes more quickly 1 hour before the run time expires.
Once the run time for the decalcification cartridge has expired, the indicator light and the LED strip light lights up in continuously red and the pump switches off automatically in order to prevent device damage.
Device damage
There is a risk of damage to the device if the used decalcification cartridge is re-used.
Work carefully in order to prevent mixing up the cartridges.When steaming for the first time after removing and reinserting the decalcification cartridge, the steam jet may be weak or irregular, and individual drops of water may be expelled. The device requires a short running-in period in which the decalcification cartridge fills with water. The steam volume that is expelled increases constantly until the maximum steam volume has been reached after approx. 30 seconds.
Press the Off switch.
The device has been switched off.
Remove the decalcification cartridge.
Insert the new decalcification cartridge.
Press the On switch.
The device is switched on.
Press and hold the Maximum steam volume and Reduced steam volume buttons at the same time until the "Replace decalcification cartridge" goes out. This means that the reset is complete.
Allow the device to heat up.
Press and hold the steam lever for approx. 30 seconds to vent the decalcification cartridge.
Device damage due to calcification
Without a decalcification cartridge, the device may calcify if the water hardness is set incorrectly.
Always work with a decalcification cartridge.Set the device to the local water hardness.Set the device to the current water hardness before using it in an area with a different water hardness (e.g. after a move).Your water board or municipal utilities authority can provide information on hardness of tap water.
The water hardness setting is stored until a new setting (e.g. after a move) is made. The device is set to the highest water hardness (level IV) in the factory. The device indicates the set water hardness with flash pulses.
Hardness range | °dH | mmol/l | Number of flash pulses | Interval between flash pulses | |
|---|---|---|---|---|---|
I | Soft | 0-7 | 0-1.3 | 1x | 4 seconds |
II | Medium | 7-14 | 1.3-2.5 | 2x | |
III | Hard | 14-21 | 2.5-3.8 | 3x | |
IV | Very hard | >21 | >3.8 | 4x | |
The anti-calcification effect of the decalcification cartridge is activated as soon as the device is filled with water and put into operation. Lime in the water is absorbed by the granulate in the decalcification cartridge. Additional descaling is not required.
The granulate in the cartridge can discolour on contact with water due to the mineral content in the water, which is no cause for concern and has no negative effects on the device, cleaning work or the functionality of the cartridge.
Do not pause for longer than 15 seconds when setting as the device will otherwise be set automatically to the last selected water hardness or the highest water hardness set during initial start-up.
Make sure that the device is switched off.
Press the ON/OFF button and hold it for 6 seconds.
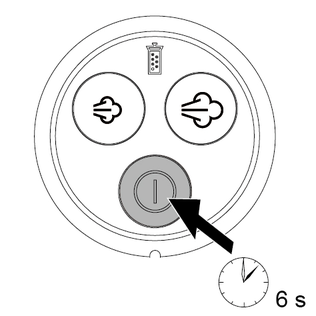
The decalcification cartridge indicator light flashes and signals the current water hardness setting with the number of pulses.
Press the Reduced steam volume button repeatedly to set the lower water hardness level.
Press the Maximum steam volume button repeatedly to set the higher water hardness level.
Release the Reduced/Maximum steam volume button.
The flash pulse for the set water hardness is indicated.
Repeat the process as necessary until the desired water hardness level has been achieved.
When the steam volume is pressed, the flash pulse for the water hardness level is not indicated.
Press and hold the ON/OFF button for 4 seconds to save the setting for the water hardness level. The decalcification cartridge indicator light lights up.
(Accessories - depending on scope of delivery)
The cloths are not suitable for dryer.
For optimum cleaning performance, we recommend machine washing the cloths once before first use.
When washing, observe the notes on the washing tag. Do not use any liquid softeners as this will affect the ability of the cloths to pick up dirt.
Wash the floor cleaning cloths and covers at a max. temperature of 60 °C in the washing machine.
Malfunctions often have simple causes that you can remedy yourself using the following overview. When in doubt, or in the case of malfunctions not mentioned here, please contact your authorised Customer Service.
Risk of electric shock and burns
Trying to eliminate faults while the appliance is connected to the mains or has not yet cooled down is always dangerous.
Remove the mains plug.Allow the appliance to cool down.The LED strip flashes red
Cause:
The dry-run protection for the pump is activated.
Remedy:
Switch the device off and back on again.
Make sure that the decalcification cartridge has been inserted correctly and there is sufficient water in the reservoir.
Cause:
No water in the water reservoir.
Remedy:
Top up the water reservoir, see chapter Topping up the water.
The steam lever cannot be pressed
Cause:
The steam lever is locked with the child lock.
Remedy:
Move the child lock forward.
The steam lever is released.
No / little steam although there is water in the reservoir
Cause:
The decalcification cartridge has not been inserted or has been inserted incorrectly.
Remedy:
Insert the decalcification cartridge or insert it correctly.
Cause:
The decalcification cartridge has been removed while topping up the water.
Remedy:
Leave the decalcification cartridge in the device when topping up.
Cause:
New decalcification cartridge has been inserted.
Remedy:
Press and hold the steam lever continuously.
The full steam output is reached after approximately 30 seconds.
Cause:
The run time of the decalcification cartridge ends early.
Remedy:
Insert the new decalcification cartridge and reset the maintenance indicator, see chapter Replacing the decalcification cartridge.
Cause:
The maintenance indicator was not reset after replacement of the decalcification cartridge.
Remedy:
Press and hold the Maximum steam volume and Reduced steam volume buttons at the same time until the “Replace decalcification cartridge” indicator light goes out after inserting the decalcification cartridge, see chapter Replacing the decalcification cartridge.
The LED strip is in constantly red and no steam although there is water in the reservoir
Cause:
Run time for the decalcification cartridge has expired
Remedy:
Insert the new decalcification cartridge and reset the maintenance indicator, see chapterReplacing the decalcification cartridge.
Cause:
The maintenance indicator is not reset after replacement of the decalcification cartridge.
Remedy:
Press and hold the Maximum steam volume and Reduced steam volume buttons at the same time until the indicator light of "Replace decalcification cartridge" goes out after inserting the decalcification cartridge, see chapterReplacing the decalcification cartridge.
Electrical connection | |
Voltage | 220 - 240 V |
Phase | 1 ~ |
Frequency | 50 - 60 Hz |
Degree of protection | IPX4 |
Protection class | I |
Device performance data | |
Heating capacity | 1900 W |
Maximum operating pressure | 0.35 MPa |
Heating-up time | 30 s |
Continuous steaming | 40 g/min |
Maximum steam blast | 100 g/min |
Filling quantity | |
Water reservoir | 1.0 l |
Dimensions and weights | |
Weight (without accessories) | 3.3 kg |
Length | 361 mm |
Width | 250 mm |
Height | 282 mm |