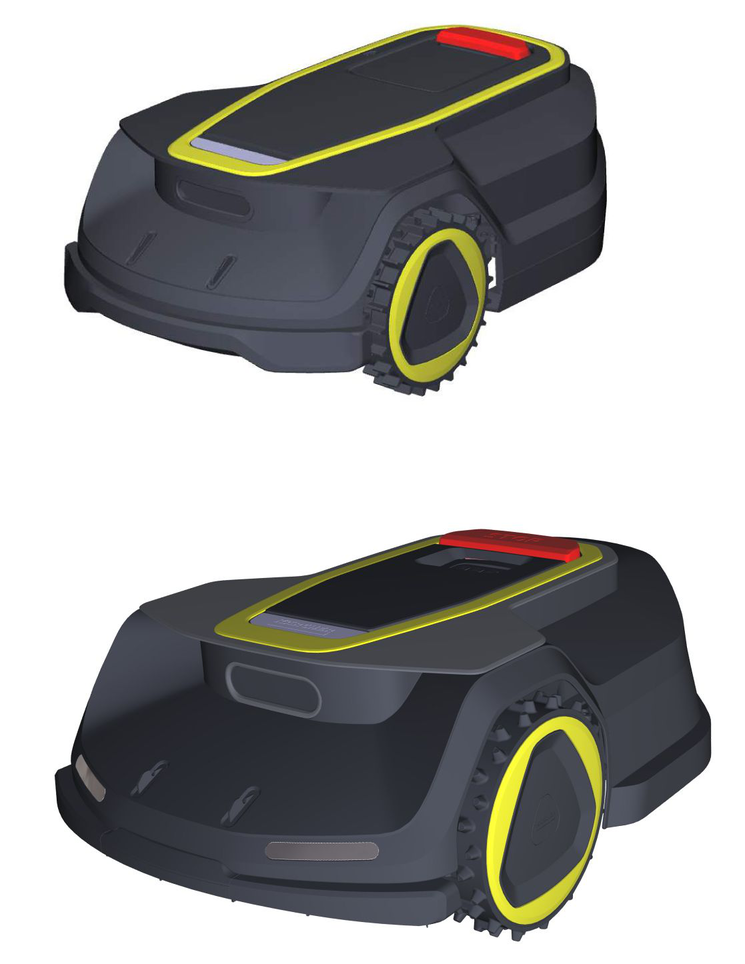
RCX 4RCX 6
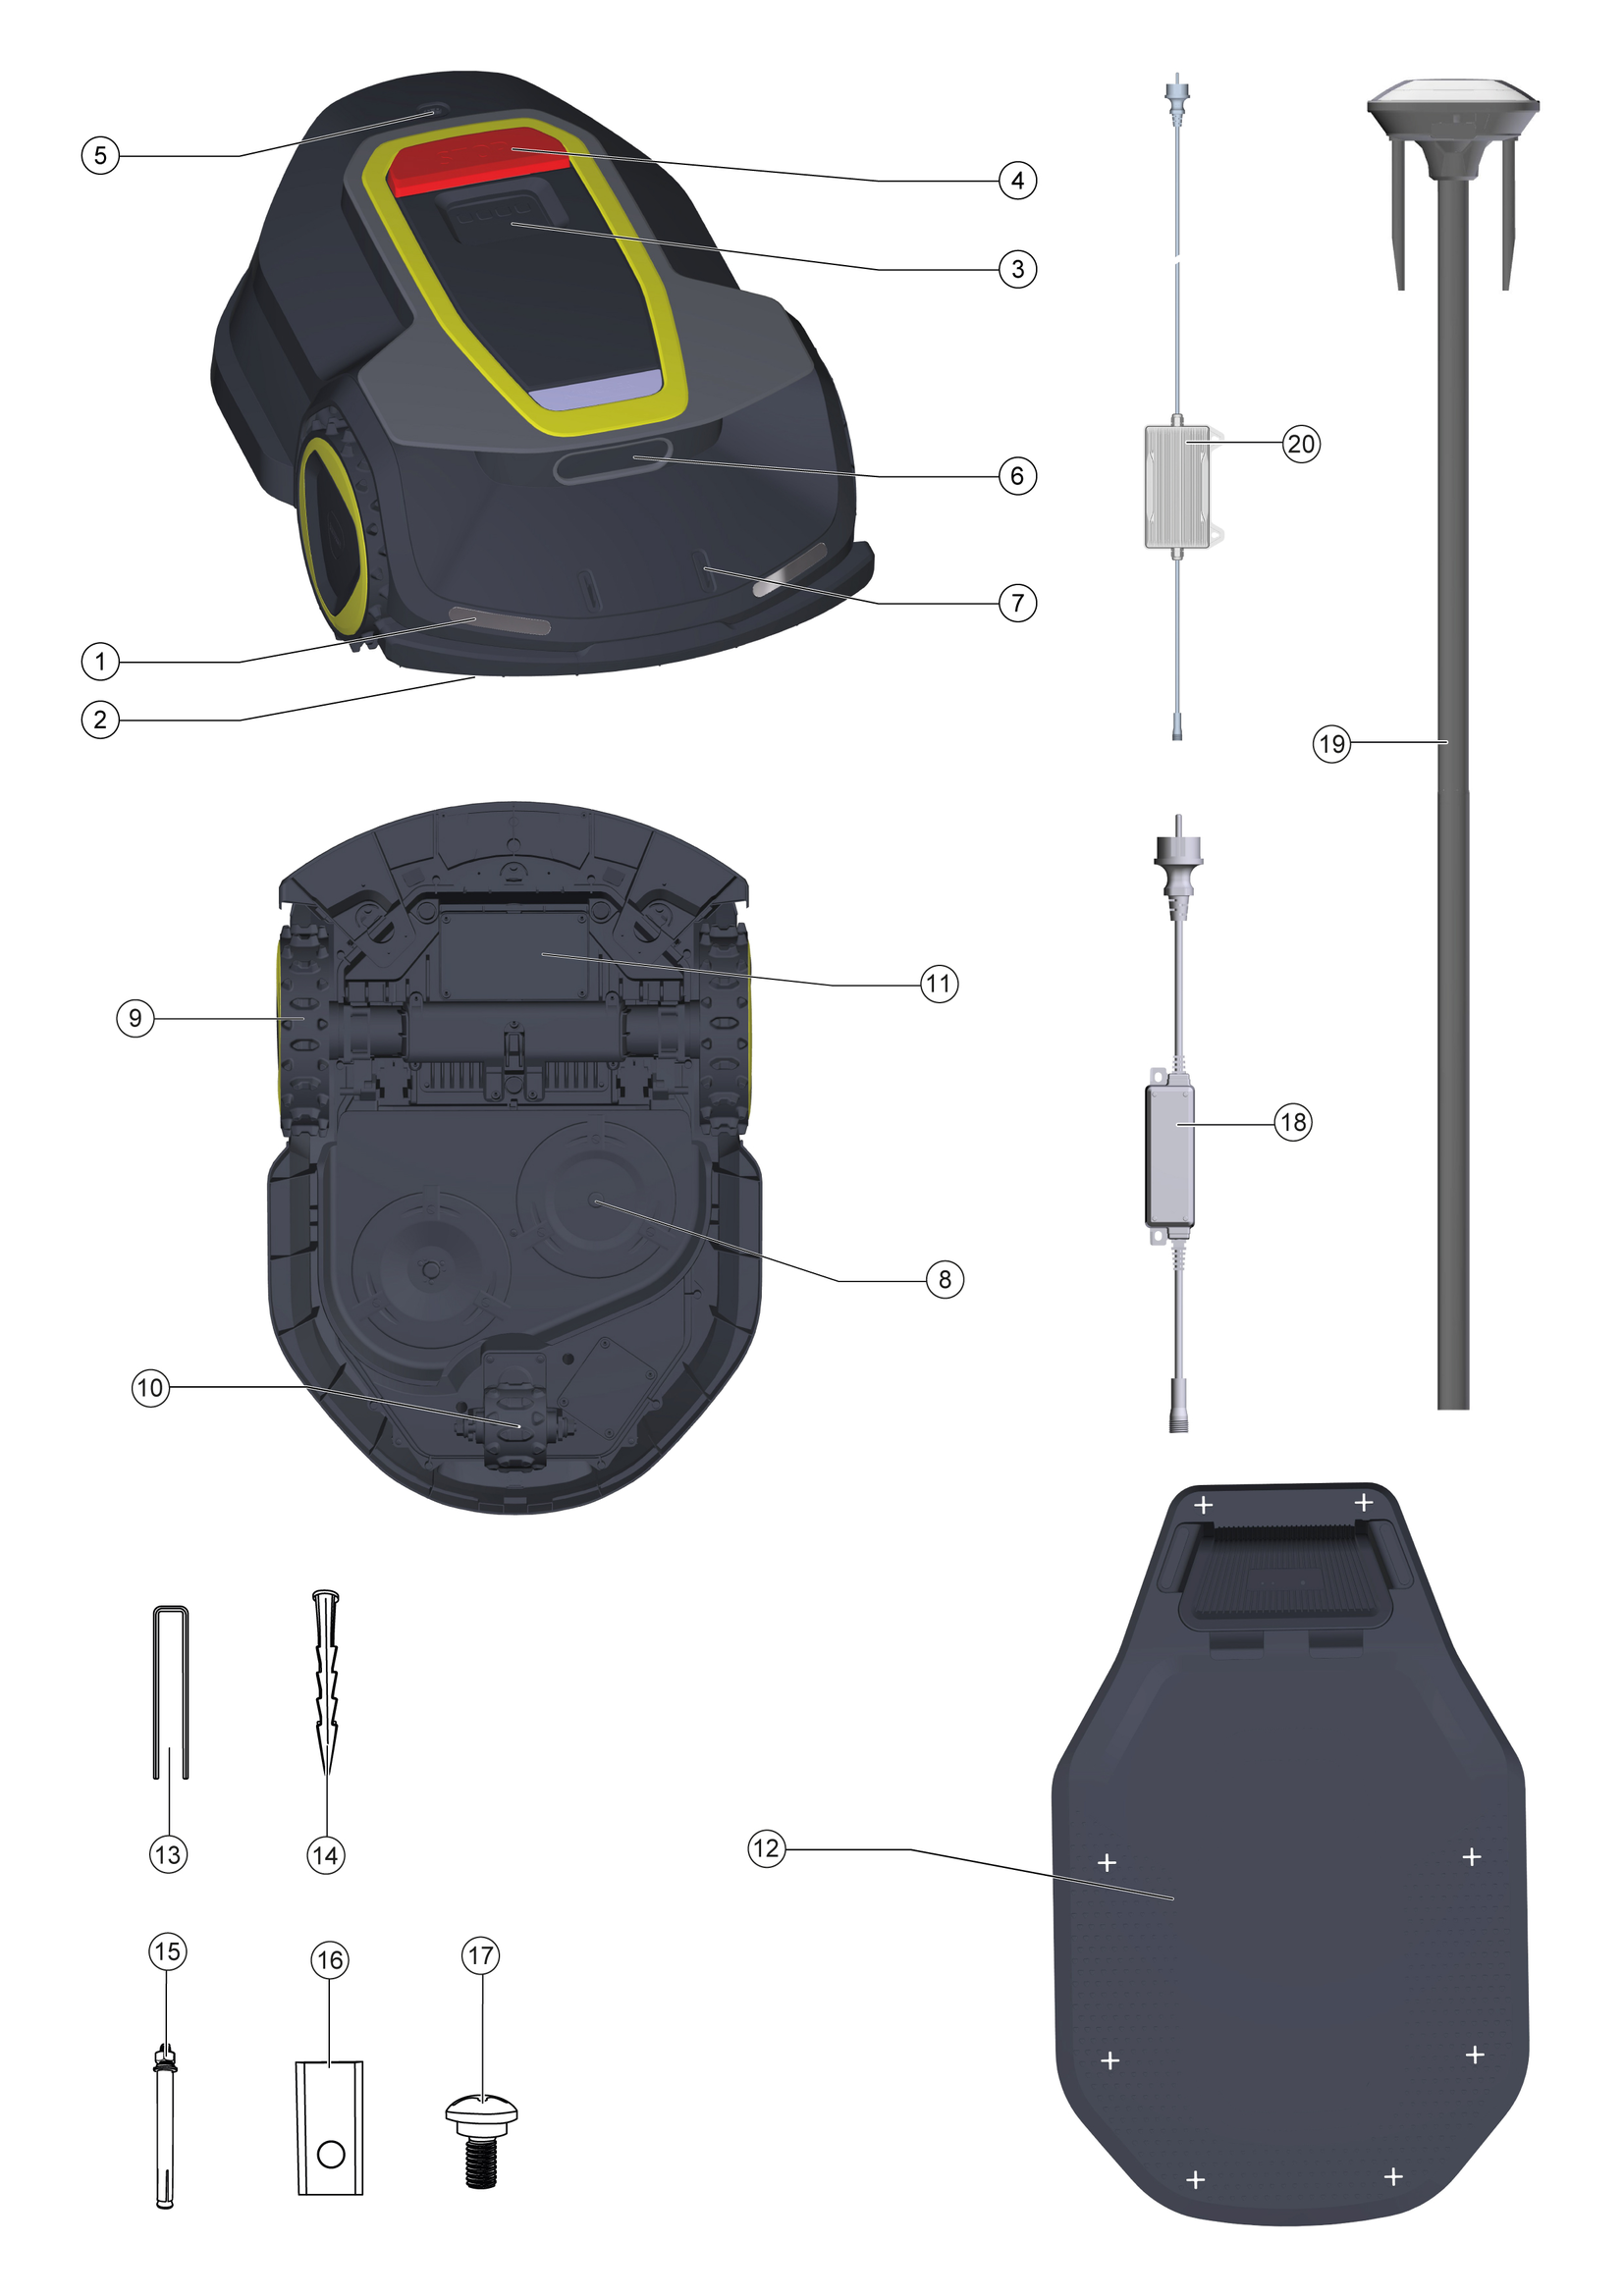
59796820 (09/24)
59796820 (09/24)
 Read these safety instructions, these original instructions, the safety instructions provided with the battery pack and the operating instructions supplied with the battery pack/standard charger before using the device for the first time. Proceed accordingly. Keep the booklets for future reference or for future owners.
In addition to the notes in the operating instructions, you also need to take into consideration the general safety regulations and accident prevention guidelines applicable by law.
Indication of an imminent threat of danger that will lead to severe injuries or even death.
Indication of a potentially dangerous situation that may lead to severe injuries or even death.
Indication of a potentially dangerous situation that may lead to minor injuries.
Indication of a potentially dangerous situation that may lead to damage to property.
Read all safety warnings, instructions, illustrations and specifications provided with this product.
Failure to follow all instructions listed below may result in electric shock, fire and/or serious injury.
This product is not intended for use by children or persons with reduced physical, sensory or mental capabilities (that could affect a safe handling of the product), or lack of experience and knowledge, unless they have been given supervision or instructionconcerning the use of the product by a person responsible for their safety.
Automatic lawn mower! Keep away from the machine! Supervise children!
Save all warnings and instructions for future reference.
Work area safety
Do not operate machine in explosive atmospheres, such as in the presence of flammable liquids, gases or dust. Machines create sparks which may ignite the dust or fumes.
Read the instructions carefully. Be familiar with the controls and the proper use of the machine.
Never allow people unfamiliar with these instructions or children to use the machine. Local regulations may restrict the age of the operator and some functions of the machine.
The operator or user is responsible for accidents or hazards occurring to other people or their property.
If the mowing area contains any drops, such as steps, pools, or steep slopes where the robot could fall, the hazardous area must be physically separated to prevent the robot from crossing over.
Electrical safety
Mains plugs must match the outlet. Never modify the plug in any way. Do not use any charger plugs with earthed (grounded) devices. Unmodified plugs and matching outlets will reduce risk of electric shock.
Avoid body contact with earthed or grounded surfaces such as pipes, radiators, ranges and refrigerators. There is an increased risk of electric shock if your body is earthed or grounded.
Do not abuse the cord. Never use the cord for carrying, pulling or unplugging a device. Damaged or entangled cords increase the risk of electric shock.
If operating a mains-powered device outdoors or in a damp location, use a residual current device (RCD) protected supply. Use of an RCD reduces the risk of electric shock.
Ensure the correct installation of the automatic perimeter delineation system as instructed.
Periodically inspect the area where the machine is to be used and remove all stones, sticks, wires, bones, and other foreign objects.
Periodically visually inspect to see that the blades, blade bolts and cutter assembly are not worn or damaged. Replace worn or damaged blades and bolts in sets to preserve balance.
On multi-spindle machines, take care as rotating one blade can cause other blades to rotate.
Personal safety
Do not allow persons unfamiliar with the machine or these instructions to operate the machine. Machines are dangerous in the hands of untrained users.
Stay alert, watch what you are doing and use common sense when operating a device. Do not use a device while you are tired or under the influence of drugs, alcohol or medication.
Remove any adjusting key or wrench before operating the machine. A wrench or a key left attached to a rotating part of the machine may result in personal injury.
When controlling the machine manually, keep proper footing and balance at all times. This enables better control of the machine in unexpected situations.
Do not let familiarity gained from frequent use of machines allow you to become complacent and ignore tool safety principles.
Machine use and care
Disconnect the plug from the power source and turn off the device before making any adjustments, changing accessories, or storing. Such preventive safety measures reduce the risk of unintended starting.
Maintain machines and accessories. Check for misalignment or binding of moving parts, breakage of parts and any other condition that may affect the machine's operation. lf damaged, have the machine repaired before use.
Use the machine and accessories in accordance with these instructions, taking into account the working conditions and the work to be performed.Use of the machine for operations different from those intended could result in a hazardous situation.
Never operate the machine with defective guards, or without safety devices. For example defectors and/or grass catchers, in place.
Do not put hands or feet near or under rotating parts. Keep clear of the discharge opening at all times.
Never pick up or carry an machine while the motor is running.
Turn off the device- before clearing a blockage;- before checking, cleaning or working on the machine.
Do not leave the machine to operate unattended if you know that there are pets, children or people in the vicinity.
Service
Have your machine serviced by a qualified repair person using only original replacement parts. This will ensure that the safety of the machine is maintained.
Keep all nuts, bolts, and screws tight to be sure the machine is in safe working condition.
Check the grass catcher frequently for wear or deterioration.
Replace worn or damaged parts for safety.
Ensure that only original spare parts, that match the product, are used.
Ensure that batteries are charged using the correct charger recommended by the manufacturer. lncorrect use may result in electric shock, overheating or leakage of corrosive liquid from the battery.
In the event of leakage of electrolyte flush with water/neutralizing agent, seek medical help if it comes into contact with the eyes, etc.
Servicing of the machine should be according to manufacturers' instructions.
Battery use and care
Recharge only with the charger specified by the manufacturer. A charger that is suitable for one type of battery pack may create a risk of fire when used with another battery pack.
Use the device only with specifically designated battery packs. Use of any other battery packs may create a risk of injury and fire.
When battery pack is not in use, keep it away from other metal objects, like paper clips, coins, keys, nails, screws or other small metal objects, that can make a connection from one terminal to another. Shorting the battery terminals together may cause burns or a fire.
Under abusive conditions, liquid may be ejected from the battery; avoid contact. If contact accidentally occurs, flush with water. If liquid contacts eyes, additionally seek medical help. Liquid ejected from the battery may cause irritation or burns.
Do not use a battery pack or tool that is damaged or modified. Damaged or modified batteries may exhibit unpredictable behaviour resulting in fire, explosion or risk of injury.
Do not expose a battery pack or tool to fire or excessive temperature. Exposure to fire or temperature above 130 °C may cause explosion.
Follow all charging instructions and do not charge the battery pack or tool outside the temperature range specified in the instructions. Charging improperly or at temperatures outside the specified range may damage the battery and increase the risk of fire.
Do not install the charging station, including any accessory, at a location that is below, or within 50 cm. from, any combustible material. In case of malfunction, heating of the charging station and the power supply mayoccur and create a potential risk of fire.
Do not put the power supply at a height where there is a risk it can be put in water. Do not put the power supply on the ground.
Do not encapsulate the power supply. Condensed water can harm the power supply and increase the risk ofelectrical shock.
Do not install the charging station where there is a risk of standing water.
Keep your hands and feet away from the rotating blades. Do not put your hands or feet near or below the product when it is set to ON.
Use the park mode or set the product to OFF when persons, especially children or animals are in the work area.
Make sure that there are no objects such as stones, branches, tools or toys on the lawn. The blades can be damaged if it hits an object.
Do not lift the product or move it when it is set to ON.
Do not to let the product collide with persons or animals. lf a person or animal comes in the way of the product, stop the product immediately.
Do not put objects on top of the product, the charging station or the RTK reference station.
Do not use the product if the STOP button does not work.
Always set the product to OFF when it is not in operation.
Do not use the product at the same time as a pop-up sprinkler. Use the Schedule function so the product and pop-up sprinkler do not operate at the same time.
Do not let the product operate when there is standing water in the work area. For example, when heavy rain forms pools of water.
Do not expose the device to high pressure water.
In areas accessible to the public, affix warning information with the following content around the mowing area:
Automatic lawn mower in operation! Do not approach the appliance! Supervise children.
Only use the appliance under the following conditions:
The appliance is not soiled.
The appliance shows no damage or wear.
The charging station and power supply as well as their electrical supply cables are undamaged and function properly.
This device has been tested and found to comply with the limits for a class B digital device, pursuant to part 15 of the FCC rules.
These limit values are designed to provide adequate protection against harmful interference in residential areas.
This equipment generates, uses and can radiate radio frequency electricity. If it is not installed and used in accordance with the instructions, this can cause harmful interference to radio communications.
However, there is no guarantee that interference will not occur in a particular application.
If the device causes interference to radio or television reception, which can be determined by turning the device off and on, we recommend that you eliminate the interference by one or more of the following measures:
Change the orientation or location of the receiving antenna.
Increase the separation between the device and the receiver.
Connect the device to a power socket on a circuit different from that to which the receiver is connected.
Contact a dealer or an experienced radio / television technician.
The device must not be set up or operated together with another receiving antenna or another transmitter.
To comply with FCC regulations, the device must be installed at a minimum distance of 20 cm from people in the vicinity.
This device complies with Part 15 of the FCC Rules and Industry of Canada licence-exempt RSS standard(s).
Operation is subject to the following two conditions:
This device must not cause harmful interference, and
This device must accept any interference received, including interference that may cause undesired operation.
Note
Changes or modifications to this equipment not expressly approved by Kärcher could void the FCC authorisation to operate this equipment.
Improper use
Danger of death from incision injuries
Only use the device for its proper use.Use the battery lawnmower in private households only.
The device is intended for outdoor use only.
The device is designed for mowing private lawns.
Riding on the device is prohibited.
The transport of persons and animals is not permitted.
Other uses of the device are prohibited. The user is liable for any damage caused by improper use.
 The packing materials can be recycled. Please dispose of packaging in accordance with the environmental regulations.
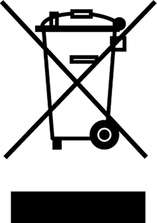 Electrical and electronic devices contain valuable, recyclable materials and often components such as batteries, rechargeable batteries or oil, which - if handled or disposed of incorrectly - can pose a potential danger to human health and the environment. However, these components are required for the correct operation of the device. Devices marked by this symbol are not allowed to be disposed of together with the household rubbish.
Current information on content materials can be found at: www.kaercher.de/REACH
Only use original accessories and original spare parts. They ensure that the appliance will run fault-free and safely.
Information on accessories and spare parts can be found at www.kaercher.com.
The scope of delivery for the appliance is shown on the packaging. Check the contents for completeness when unpacking. If any accessories are missing or in the event of any shipping damage, please notify your dealer.
| Follow all warning notices and safety instructions. Read and comprehend all instructions before using the product. |
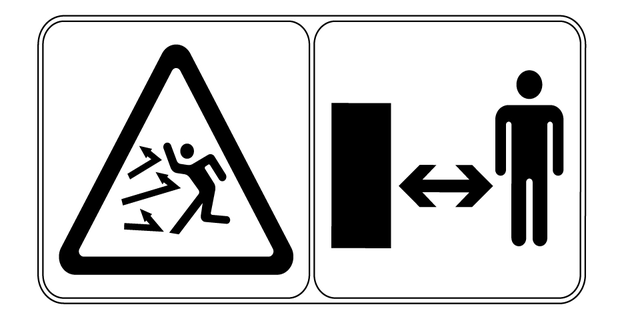 | Watch out for flung or flying objects. Keep all spectators, especially children and pets, at least 15 m away from the work area. |
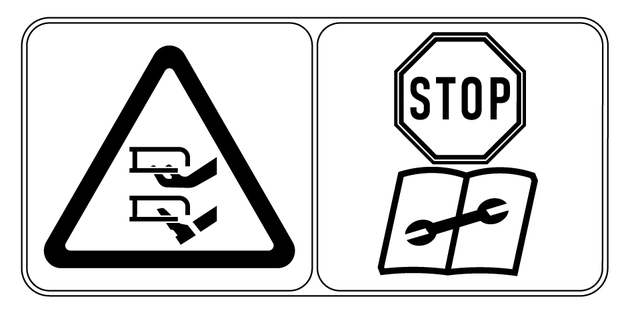 | Watch out for the sharp blade. The blades continue rotating after the motor has been switched off. |
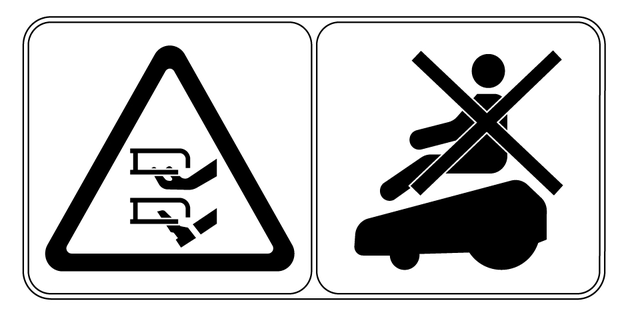 | Watch out for the sharp blade. Do not ride on the machine. |
| Do not dispose of the device with household rubbish. |
The maximum amount of equipment is described in these operating instructions. Depending on the model used, there are differences in the scope of delivery (see packaging).
* optional
Symbol | Meaning |
|---|---|
 | Password settings |
 | Time settings |
 | Bluetooth |
 | WLAN |
Symbol | Meaning |
|---|---|
 | ON/OFF button |
 | START button / Work start / Menu navigation "top" |
 | HOME button / Back to charging station / Menu navigation "down" |
 | OK button / Confirm |
Risk of damage
Cables and lines lying unprotected in the mowing area can be damaged!
Do not leave any unsecured cables and lines in the mowing area.Danger of burns
Do not charge the lawnmower if the lawnmower itself, the charger or the socket is damaged.Do not charge the lawnmower if the temperature is above 40 °C (104 °F) or below 5 °C (41 °F).Interrupt the charging process if an abnormal odour, noise or light appears.Avoid charging in the vicinity of flammable or explosive materials.Remove all protective films before the initial startup.
Risk of injury from sharp blades.
The blades of the mower can cause serious cuts.
Make sure that children and pets are not in the mowing area.Remove branches, leaves, toys, cables, stones or other obstacles from the lawn
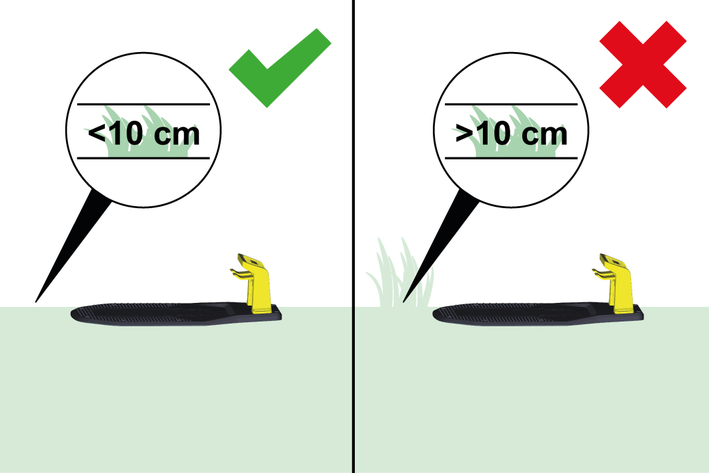
Before installing the robotic mower, the lawn should be cut to a maximum height of 10 cm and the clippings collected in order to guarantee optimum mowing results and lawn health.
The size of the mowing area must not exceed 1500m² for the RCX 4 model and 3000m² for the RCX 6.
High walls or trees should not cover more than 30 % of the lawn area.
Narrow areas that are narrower than 3 metres and longer than 5 metres should not take up more than 30% of the lawn area. This ensures sufficient coverage of the satellite position signal.
Risk of injury
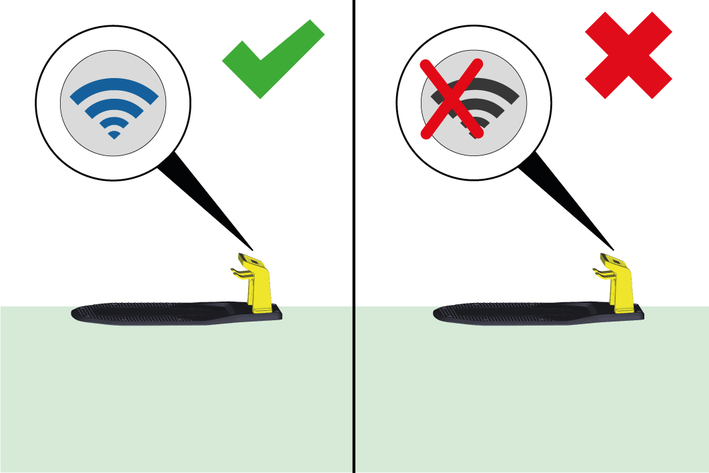
Do not use damaged cables or plugs. Check the cables and plugs regularly!Ensure that the lawnmower can drive out of the charging station and return without being obstructed. Place the charging station on a flat surface that is covered by the household WLAN.
There must be no obstacles within a radius of 1.5 m.
Ensure that the charging station is securely positioned on a level surface.
Secure the charging station to the lawn using the ground spikes.
Connect the mains cable to the charging station.
Ensure that the power cable is securely fastened to the floor.
Make sure that the location of the RTK antenna is covered by the household WLAN.
To ensure good signal strength, install the RTK antenna on an open lawn in the open air. Keep at least 1.5 m away from buildings and large obstacles such as trees.
Place the RTK antenna in an upright position.
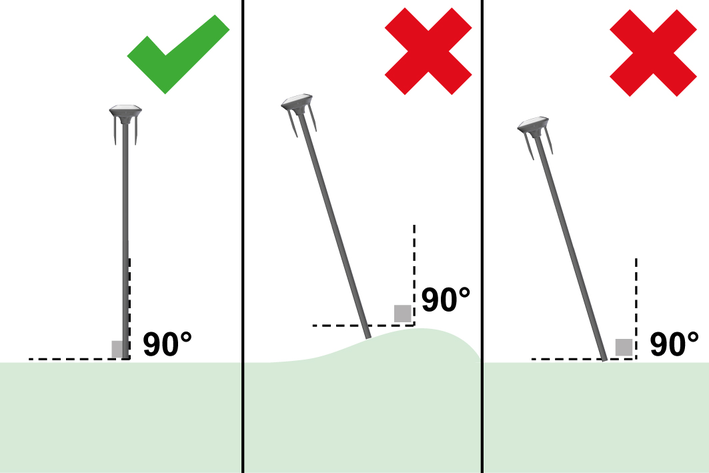
Fasten the RTK antenna to the ground using the pegs.
Connect the extension cable and charger.
Ensure that the power cable is securely fastened to the wall and floor.
Check the satellite signal:
Satellite reception indicator light | |
|---|---|
 | Lights up green: good signal strength |
Lights up orange: weak signal strength | |
Lights up red: very weak signal | |
If the location indicator light is orange, we recommend moving the RTK antenna to a more suitable location.
If the location indicator light is red, the RTK antenna must be moved to a more suitable location.
WLAN indicator light | |
|---|---|
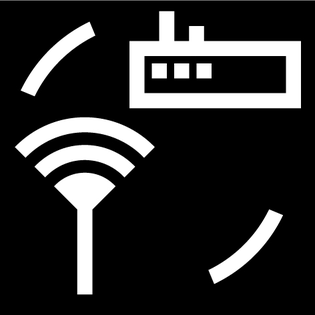 | Lights up green: WLAN connected, server access established |
Flashes green: WLAN connected or not connected to the server. | |
No green light: WLAN not connected. | |
LoRa indicator light | |
|---|---|
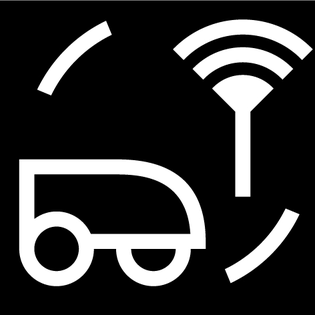 | Lights up green: normal communication between the robotic mower and RTK antenna |
Flashes green: Connection is being established. | |
No green light: Communication disorder | |
Power indicator light | |
|---|---|
 | Lights up green: Power fault |
Flashes green: Power connection established | |
No green light: no power | |
Place the lawnmower on the charging station.
Ensure that the battery contacts are connected correctly.
When the lawnmower is correctly connected and charging, the LED on the charging station flashes.
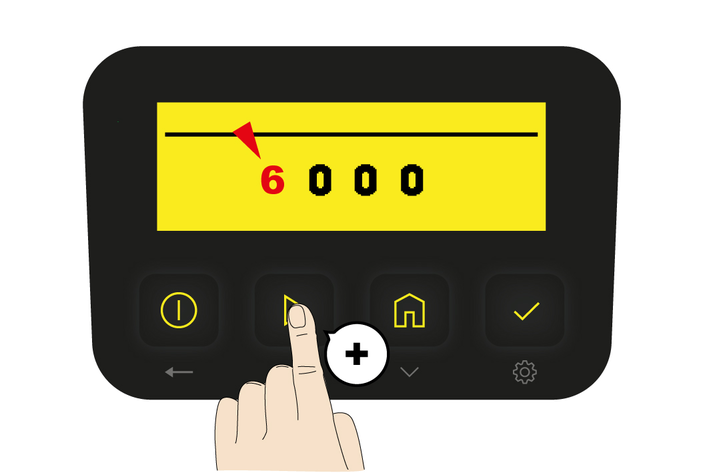
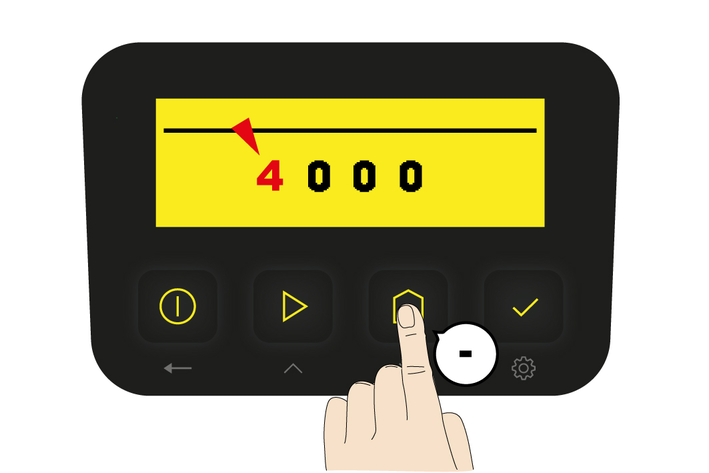
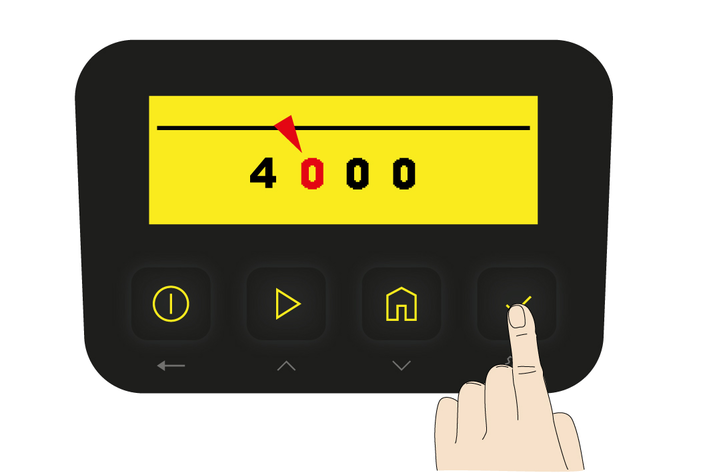
Press and hold the ON / OFF button for a few seconds.
Enter the password and confirm.
Confirm with "OK" after each digit entered.
The default password is "0000".
When entering the password, the START button can be used as a plus button (+) and the HOME button as a minus button (-).
Before you download the app, make sure you have the following:
The device is on the charging station and is charging properly.
The WLAN coverage is sufficient.
The 2.4 GHz WLAN of the router is activated.
Download the KÄRCHER Outdoor Robots app from the Apple App Store® or from the ™ store.

™ and ™ are trademarks or registered trademarks of Google Inc.
® and ® are trademarks or registered trademarks of Apple Inc.
The KÄRCHER Outdoor Robots app offers the following main functions, among others:
Connecting and activating and the lawnmower.
Map creation
Query the status and work progress of the lawnmower.
Remote control: start, stop, return to charging station
Display and change the working settings of the lawnmower (mowing plan, cutting height, map management).
Display and change the safety/function settings of the lawnmower (PIN, blade stop, etc.).
Display or update the firmware version of the device, display the network connection status.
Unlink, change or add devices.
Call up help information and customer service support.
Connect the lawnmower with the KÄRCHER Outdoor Robots app:
Download the KÄRCHER Outdoor Robots app from the Apple App Store or from the Google Play Store.
Open the KÄRCHER Outdoor Robots app.
Create an account and log in.
Switch on Bluetooth and WLAN on the smartphone.
Scan the SN code of the device to add the lawnmower.
Once the connection has been successfully completed, enter the default password 0000. The password can be changed in the app.
Follow the step-by-step instructions in the App.
Press and hold the START button and HOME button for 3 seconds.

Enter the old password.
Set digit by digit by pressing the START and HOME buttons.
START button (+):
HOME button (-):
Confirm each digit with OK.
Enter the new password and confirm with OK.
If the password was entered incorrectly, the display shows "ERR".
Press and hold the ON / OFF button for 2 seconds.
Press the START button and confirm with "OK".
Do not use the device at night. The device cannot recognise and avoid obstacles in the dark.
Ensure the lawn is free from scattered objects to maintain effective mowing.
Press and hold the ON / OFF button for 3 seconds.
"bye" is shown on the display.
The lawnmower cannot be switched off when it is in the charging station.
To restart the lawnmower, press and hold the ON/OFF button for 10 seconds.
The map for the workspace is created using the app.
Make sure that both the charging station and the RTK antenna are outside the demarcated area. There must be no obstacles within a 1.5 m radius of the RTK antenna.
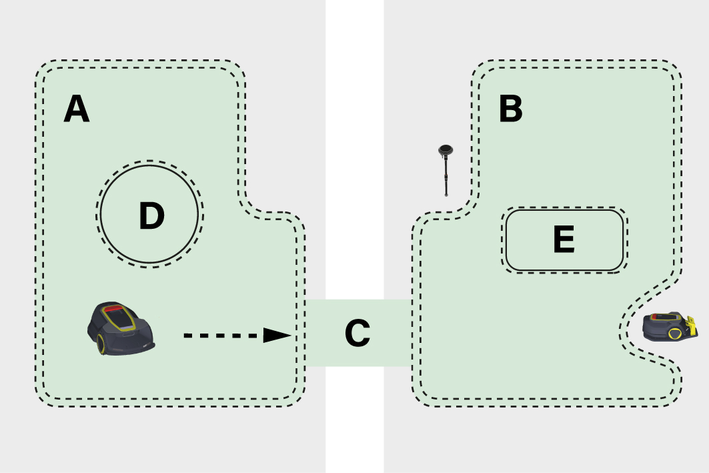
A: Work area 1
B: Work area 2
C: Transition to work area 2
D: Obstacle
E: No-Go Zone
A/B: The work area defines the zone in which the robotic mower automatically mows the grass. This area is defined by the user using virtual boundaries.
C: The transition corridor is a path defined by the user between two work areas through which the device is to travel. The device can work automatically in this path, but does not mow grass.
D: An obstacle is an immovable object and defines an area that the lawnmower cannot pass.
E: No-go zones define areas that the lawnmower is not allowed to drive over. They are defined by virtual boundaries.
Before creating a map, make sure that the remaining battery life is over 50 %.
Press the "Create map" button in the app.
Follow the step-by-step instructions.
Determining no-go zones and virtual walls
Define transitions between work areas
Delete maps
If a new firmware version is available, a notification appears in the app. It is recommended to carry out the update as soon as a new version is available.
Ensure the following points before updating:
The device is in the charging station.
The network is available.
The remaining battery life is more than 30 %.
No mowing is planned within the next hour.
Do not move the lawnmower during the update process.
Trigger the firmware update via the app.
The lawnmower light flashes blue during the update.
Once the update is complete, the lawnmower's light turns green.
Sharp blade
Incision injuries
Be careful when tipping or lifting the device.Keep all parts of your body away from the cutting blade.
Danger from sharp blades
Uncontrolled starting of the lawnmower can lead to serious injuries.
Make sure that the lawnmower is completely switched off!Clean the device (see
Pack the device in its original packaging.
Failure to observe the weight
Risk of injury and damage
Be aware of the weight of the device during storage.Always store the device in a dry place and fully charge the battery.
Sharp blade
Incision injuries
Be careful when tipping or lifting the device.Keep all parts of your body away from the cutting blade.Incorrect cleaning
Damage to the device
Clean the device with a damp cloth.Do not use solvent-based cleaning agents.Do not immerse the device in water.Do not clean the device with a hose or high-pressure water jet.Danger from sharp blades
Uncontrolled starting of the lawnmower can lead to serious injuries!
Make sure that the lawnmower is completely switched off!Clean the mowing disc, housing, wheels and rain sensor regularly using a low-pressure water hose with a wide jet
Danger from sharp blades
An uncontrolled start of the lawnmower can lead to serious injuries!
Make sure that the lawnmower is completely turned off!Sharp cutting blade
Cutting injuries
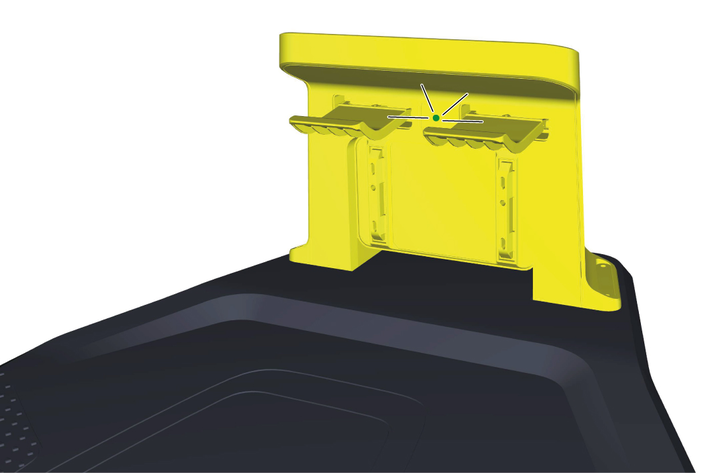
Wear protective gloves when working on the cutting blade.To ensure mowing performance and safety, it is recommended to replace the screws and blades of the lawn mower every 1 to 2 months with frequent use. For a safe mowing system, you should always replace all blades and screws.
Switch off the device.
Turn the device over and place it on a clean, soft surface.
Unscrew the screws and remove the old blades.
New blades to be fitted and tightened with new screws (1.0 Nm + 0.2 Nm).
Installation is performed in reverse sequence.
Switch off the device.
Turn the device over and place on a clean, soft surface.
Unscrew the screws.
Remove the cover.
Disconnect the electrical socket plug connection.
Remove the battery.
The battery will achieve a longer service life if it is charged at a temperature between 18 °C and 25 °C.
The battery achieves its best performance when it is operated at a temperature of 20 °C +/- 5 °C.
Malfunctions often have simple causes that you can remedy yourself using the following overview. When in doubt, or in the case of malfunctions not mentioned here, please contact your authorised Customer Service.
The device stops on the lawn during operation.
Cause:
The device is stuck in a recess in the lawn.
Remedy:
Move the device manually and remove it from the recess.
Clean the wheels if they are soiled with mud.
Cause:
The RTK signal is weak or the area is labelled as a no-go zone.
Remedy:
Check the RTK signal.
Check whether the area is labelled as a no-go zone and release if necessary.
Cause:
The return to the charging station has failed.
Remedy:
Check the work area that has already been processed and, if necessary, move the device to the charging station manually.
Cause:
The RTK antennas were not positioned correctly.
Remedy:
Check the positioning of the RTK antenna.
The device returns to the charging station.
Cause:
The battery level is low.
Remedy:
Charge the device.
Cause:
The RTK signal is weak or the area is labelled as an obstacle.
Remedy:
Check the RTK signal.
Check whether the area is labelled as an obstacle and release if necessary.
The device does not return properly to the charging station.
Cause:
The code on the charging station is not placed correctly or is dirty.
Remedy:
Position the code correctly on the charging station and remove any dirt if necessary.
Cause:
There are obstacles in front of the charging station.
Remedy:
Remove any obstacles in front of the charging station.
Cause:
The code on the charging station cannot be recognised by the device due to a light source or reflections.
Remedy:
Check the environment.
Cause:
The position of the charging station or the RTK antennas has been changed.
Remedy:
Create a new map via the app.
The device works with the rain sensor switched on even though it is not raining.
Cause:
The rain sensor is switched on.
Remedy:
Check in the app whether the rain sensor is switched on or off.
Check whether the rain sensor is dirty.
The device is not positioning itself correctly.
Cause:
The RTK signal is weak.
Remedy:
Check that all 4 lights on the RTK antenna light up green.
Cause:
The RTK antenna is not positioned correctly.
Remedy:
Check whether the RTK antenna is positioned correctly and reposition it if necessary.
Cause:
There are obstacles in front of the charging station.
Remedy:
Remove any obstacles in front of the charging station.
If the problem persists, place the device in the charging station manually and trigger the task again.
If the problem persists, restart the device.
The mowing disc is blocked.
Cause:
The mowing disc is blocked due to soiling.
Remedy:
Remove the soiling.
Cause:
The grass is longer than the permitted length.
Remedy:
Use a regular lawnmower to cut the grass to the permitted length.
Cause:
The grass is wet.
Remedy:
In the event of rain, wait at least 4 hours before starting to mow. Wet grass impairs the cutting quality and may stick to the underside of the device.
The device does not work according to the schedule.
Cause:
The time setting is not correct.
Remedy:
Check the time setting.
Cause:
The rain sensor was switched on.
Remedy:
Check in the app whether the rain sensor is switched on or off.
Cause:
The battery is empty.
Remedy:
Charge the device.
Cause:
The schedule was not saved correctly.
Remedy:
Check the schedule in the app.
Cause:
The device performs a manually triggered task.
Remedy:
Check the device.
Device performance data | |
Wireless connections | WLAN, Bluetooth, LoRa
|
WLAN and Bluetooth frequency band (s) | 2400 - 2483,5 MHz |
WLAN and Bluetooth max. output power | 20,0 dBm |
LoRa frequency band (s) | 863 - 870 MHz |
LoRa max. output power | 14,0 dBm |
Cutting width | 22 cm |
Cutting height | 20-60 mm |
Max. mowing area | 1500 m2 |
Max. working area slope | 60 (30) % (°) |
Battery capacity | 5 Ah |
Determined values in acc. with EN 50636-2-107 | |
Sound level LpA | 52 dB(A) |
Uncertainty KpA | 3 dB(A) |
Sound power level LwA | 60 dB(A) |
Uncertainty KWA | 3 dB(A) |
Dimensions and weights | |
Length x width x height | 677 x 425 x 277 mm |
Weight | 12,2 kg |
Device performance data | |
Wireless connections | WLAN, Bluetooth, LoRa |
Wi-Fi and Bluetooth frequency band(s) | 2400 - 2483.5 MHz |
Wi-Fi and Bluetooth max. Output Power | 20.0 dBm |
LoRa Frequenzband (s) | 863 - 870 MHz |
LoRa max. Output Power | 14.0 dBm |
Cutting width | 35 cm |
Cutting height | 20-100 mm |
Max. mowing area | 3000 m2 |
Max. working area slope | 70 (35) % (°) |
Battery capacity | 5 Ah |
Determined values in acc. with EN 50636-2-107 | |
Sound level LpA | 52 dB(A) |
Uncertainty KpA | 3 dB(A) |
Sound power level LwA | 60 dB(A) |
Uncertainty KWA | 3 dB(A) |
Dimensions and weights | |
Length x width x height | 735 x 510 x 270 mm |
Weight | 14.4 kg |
The warranty conditions issued by our relevant sales company apply in all countries. We shall remedy possible malfunctions on your appliance within the warranty period free of cost, provided that a material or manufacturing flaw is the cause. In a warranty case, please contact your dealer (with the purchase receipt) or the next authorised customer service site.
Further information can be found at: www.kaercher.com/dealersearch
Further warranty information (if available) can be found in the service area of your local Kärcher website under "Downloads".
We hereby declare that the product named below complies with the relevant provisions of the directives and regulations listed. This declaration is invalidated by any changes made to the product that are not approved by us.
Product: Robot lawnmower with charging station
Type: 1.269-xxx.0
Directives and Regulations2014/53/EU
2011/65/EU
2006/42/EC
2009/125/EC
(EU) 2019/1782
(EU) 2023/1542
EN 60335-1
EN 50636-2-107
EN 62311: 2008
EN 62233: 2008
EN 50563: 2011 + A1: 2013
EN 301 489-1 V2.2.3
EN 301 489-17 V3.2.4
EN IEC 55014-1: 2021
EN IEC 55014-2: 2021
EN IEC 61000-3-2: 2019 + A1: 2021
EN 61000-3-3: 2013 + A1: 2019 + A2: 2021
EN 300 220-2 V3.1.1
EN 301 489-3 V2.3.2
EN 301 489-19 V2.2.1
EN 300 328 V2.2.2
EN IEC 63000: 2018
Name and addressDocumentation supervisor:
S. Reiser
Alfred Kärcher SE & Co. KG
Alfred-Kärcher-Str. 28 - 40
71364 Winnenden (Germany)
Tel.: +49 7195 14-0
Fax: +49 7195 14-2212

Winnenden, 2024/11/01
The undersigned act on behalf of and with the authority of the Board of Directors.
Alfred Kärcher SE & Co. KG
Alfred-Kärcher-Str. 28 - 40
71364 Winnenden (Germany)
Ph.: +49 7195 14-0
Fax: +49 7195 14-2212