KIRA B-Range Software
59803240 (07/25)
59803240 (07/25)
The software described in this document is valid for all robotic devices in the KIRA B series.
The screenshots shown in the instructions may differ slightly depending on your device and mounting kits.
The screen is touch-sensitive, also known as a touch display. A quick tap with your finger is all it takes to select a function.
With the help of the touch display, the user can define basic device settings, plan routes, view cleaning reports, rectify faults and view information about the cleaning progress and device status.
Status information about the device is shown at the top edge of the touch display, e.g.the time. The menus and control elements are shown in the menu area in the centre of the display. Depending on the menu, different symbols are displayed on the right, left and bottom edge.
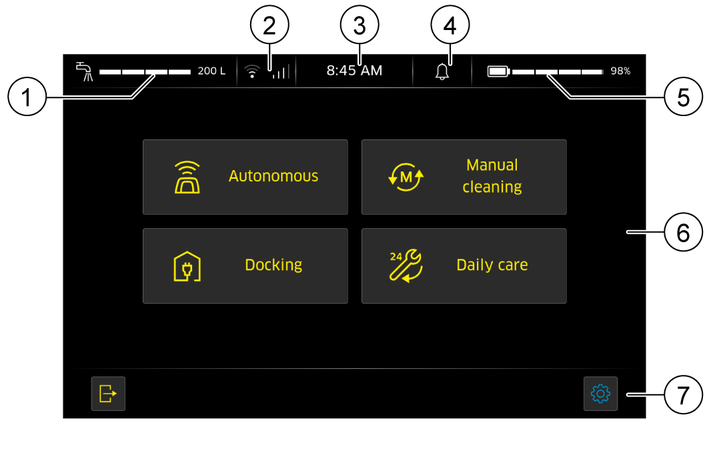
Screen layout
Some operating steps are repeated in the various menus of the software and are explained separately here.
Functions with password requirementSome functions, e.g. interrupting and resuming routes, require the user password to be entered. After tapping the required button, an input dialogue opens.
AuthorisationsAuthorisations are assigned for each user to define which functions may be executed. These authorisations must be observed for all functions. Various role proposals are preconfigured in the standard settings, which you can edit according to your requirements.
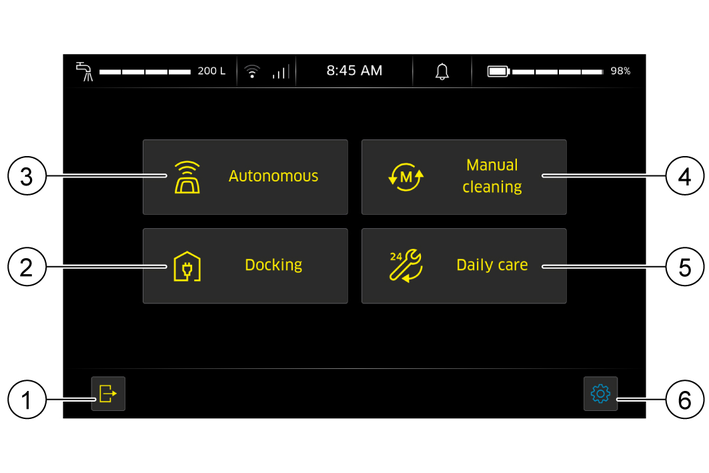
Menu navigationIn the main menus, you can navigate to the submenus by tapping the respective buttons. As a rule, you can return to the higher-level menu by tapping  . If there is no explicit button for saving changes in the menus, changed settings are applied when you jump back.
From the start screen, you can access the main menus and settings by tapping the  symbol or the relevant button.
You can log out by tapping on the  symbol.
If a Position code is recognised, a message appears in the status bar.
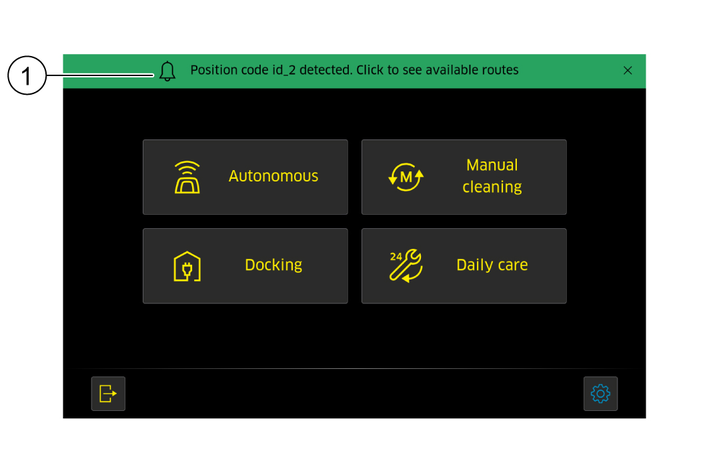
Tapping the message opens an overview of the routes available at the respective position. See chapter Autonomous.
Tap the  symbol to return to the start screen from other menus.
In autonomous operation, the device cleans one or more previously taught-in areas independently. Teaching is carried out by travelling and saving a route.
If necessary, call up the start screen.
Select the menu
An overview page with the autonomous functions opens.
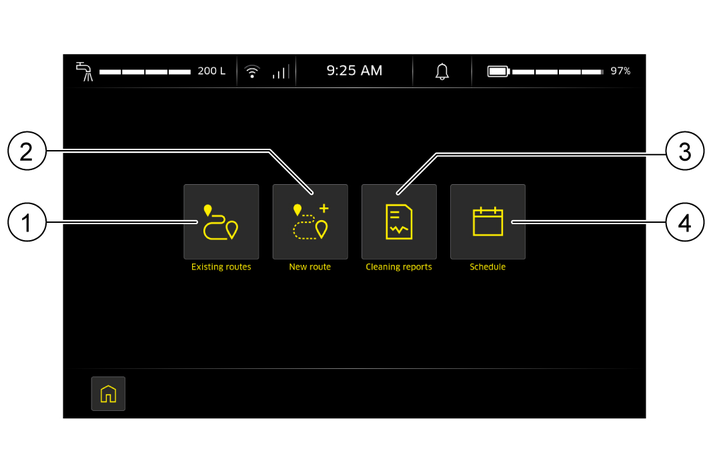
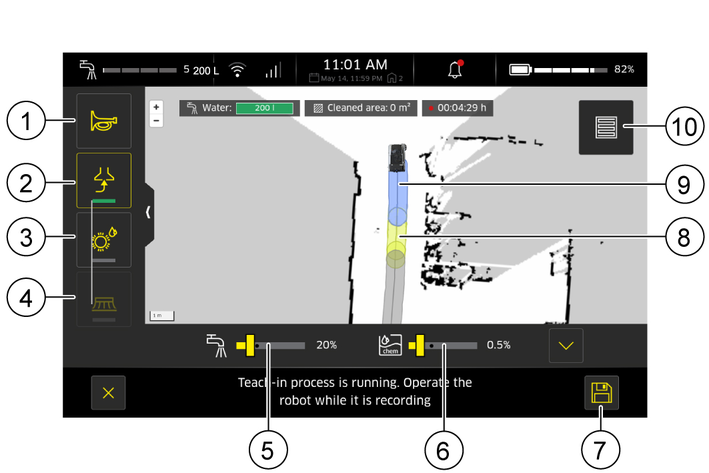
When a route is taught, a cleaning task is performed manually, recorded in the process and then saved for autonomous cleaning.
Notes on how to optimally design a route are can be found in the Set-up Guide. The rules for autonomous operation must be observed, e.g.a position code must be attached to the starting point of a route.
During teaching, the following information about the route is saved:
The travel path of the device.
The points at which cleaning function were switched on or off.
The parameter settings, e.g.for water application, detergent dosing unit, brush speed, suction performance and brush contact pressure. The available parameters depend on your device and equipment.
Honking the horn (e.g.at a crossing).
Not recorded are:
Short pauses during teaching
The travel speed during teaching
Whether a user is allowed to teach new routes depends on their role, i.e. their authorisations.
Call up the start menu and start the teaching via
Select whether cleaning should take place during teaching or whether cleaning should only be simulated. During simulated teaching, all cleaning options are recorded but not actively executed.
Prerequisites:
The battery is fully charged.
The fresh water tank is full
The waste water tank is empty.
Confirm fulfilment of the respective requirements via  or exit the menu via the
  symbol and fulfil the requirements.
Position the device in front of the position code at the starting point. To do this, align the front of the device at a distance of approx. 1 m from the position code and wait until the device has recognised the position code.
Confirm the position code.
Drive over the surface to be cleaned. Observe the prescribed distances. See the operating instructions of the device.
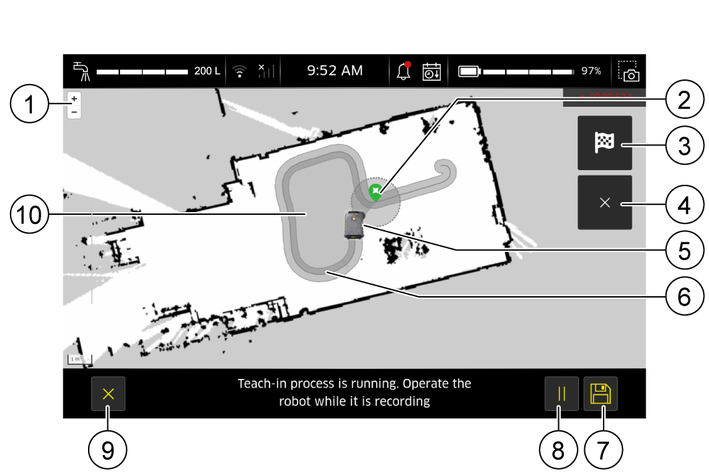
The area already worked on and the route so far are displayed on the live map. The current position is indicated by a small device.
When cleaning, first activate the suction before switching on the water. This prevents water from remaining on the route.
Finish the route.
Deactivate the side brushes (only for devices with side brushes)
Deactivate the cleaning head.
Drive a short distance (approx. 10-15 m) with active suction to suck up residual water.
Deactivate the suction.
Position the device.
If the route is to be terminated at a docking station, position the device approximately 1 metre in front of the docking station.
If the end of the route is to serve as the starting point for additional routes, the device must be positioned in front of a position code.
Save the taught route.
Tap on the symbol  .
.
If necessary, wait until the device has recognised the position code.
Tap on the button
If necessary, confirm the position code.
Type a name for the route in the input field using the keyboard.
The route is saved under the name entered.
With the
The start and end points of the route must be identical. The start point can be recognised by a circle on the touchscreen.
Several areas can be defined in a route as a Smart-Fill area. The routes before and after the Smart-Fill function are taught as usual.
Any number of Smart-Fill areas can be defined within a route.
With
Start the
Teach the route up to the starting point for the area outline.
At the starting point of the area outline, tap the button  . The function can be cancelled by tapping the symbol.
Drive around the area to be cleaned until the device is in the target circle on the live map.
Tap on the symbol  .
.
The Smart-Fill area is saved.
Continue the function
Existing, taught routes and routines can be filtered according to the position code of the starting point or searched for by name.
On the start page, tap on the function
On the page that opens, tap on the function
A window with 2 tabs opens.

Existing routes are displayed in the
Linked routes are displayed in the
Existing routes can be sorted alphabetically or by creation date and searched for by position code or name using the symbols on the left-hand side.
Tap on the tab
Search for a route by name.
Tap on the symbol  .
.
Tap the input field.
Enter the name of the route you are looking for using the keyboard.
Tap the
The found route is displayed.
Search route by position code.
Tap on the symbol  .
.
The available routes are displayed sorted by position code.
Tap on the folder with the position code you are looking for.
The found route is displayed.
Tap on the tab
The linked routes are displayed.
Tap on a route or routine to execute it or tap on the cogwheel at the top right of the respective tile to edit it.
Page Layout
Zones
You can use the zone buttons to define and edit different zones. You can use the "Select type of zone" symbol to decide which type of zone you want to edit. The following zone types can be defined:
No-Go Zone
The cleaning robot will not enter these zones, not even to avoid obstacles.No-Clean Zone
All cleaning functions are switched off in these zones, even if, for example,they are entered to avoid obstacles.Speed-Filter Zone
In these zones, the cleaning robot always travels at the speed defined in the zone.Looping-Horn Zone
While the robot is in this zone, continuous honking is active.On the start page, tap on the function
On the page that opens, tap on the function
To select a route, click on the symbol in the route preview window, see Existing routes.
Select the desired route.
The route editing window opens, see "Edit route" dialogue.
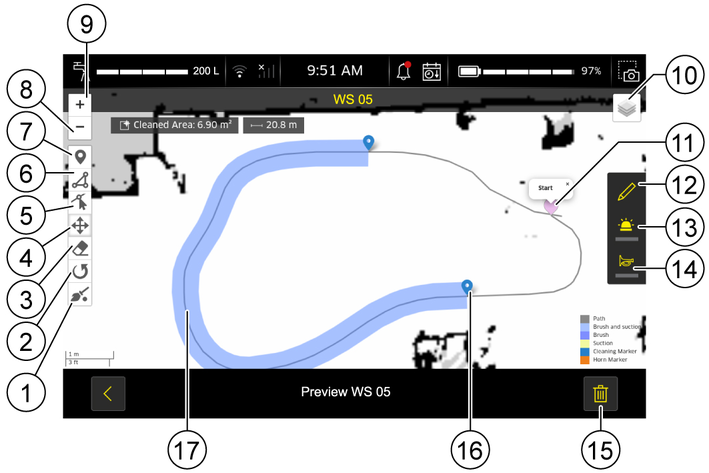
Edit the route. You have the following options for editing:
Reduce or enlarge the display.
Tap the  symbol to edit the name of the route.
Tap on the  symbol in the bar on the left to set a new event or tap on an existing symbol on the route to open the cleaning event settings. You can configure the following settings here:
 .To select the suction performance, tap the button
  .Tap the button
  .
.The side brush can only be activated when the cleaning head is switched on.
Press and hold the existing symbol on the map and move the event to the desired position on the route.
Tap on the  symbol to switch on permanent repetitive honking for this route.
Tap the symbol  to switch on the flashing beacon and, if necessary, the point jet for this route.
Tap on the  symbol to reset the Cleaning Marker to the setting used during teaching.
Tap the  symbol to select the type of zone you want to view, create or edit.
You can choose from Nogo Zone, No Clean Zone, Speed Filter, Looping-Horn zone.
Tap the  symbol to define a zone.
Tap the  symbol to move a zone.
Tap the  symbol to rotate a zone.
Tap the  symbol to delete a zone.
Tap the  symbol to move the corner points of a zone.
Set the desired amount of water using the slider.
Tap the  symbol to delete the route.
You can link several routes as a routine so that they can be cleaned autonomously one after the other. Only routes that start and end with a position code can be linked. The position code at the end of each linked route must match the position code at the start of the next route.
On the start page, tap on the function
On the page that opens, tap on the function
Switch to the tab Routines and tap on the button New routine.
Select the first route to be cleaned as part of the routine.
If necessary, select further routes to be cleaned one after the other. Only the routes whose position code at the beginning matches the position code at the end of the previous route are available for selection here.
Save the routine via the symbol and assign a name.
Alternatively, you can also select several routes in the tab Routes and save them as a routine using the  symbol at the bottom right.
The device must be positioned at an angle of + / - 30 ° and at a distance of 1 m in front of the position code of the starting point.
Position the device at the starting point.
If necessary, call up the start menu.
Select the function
The overview page with the autonomous functions opens.
Tap on the function
Select a route by tapping on it. See chapter Existing routes. If several routes are to be executed in succession, select the next route and combine them into a routine that can be executed directly or saved for later.
After selecting the first route, only the routes whose starting point matches the end point of the previous route are displayed.
The starting point of a route must be a position code, and sufficient resources must be available for the next route in the routine.
The end point must be a position code, only the last route of a routine can end without a position code.
KÄRCHER recommends using a docking station as the start and end point of a route, as this ensures that sufficient resources are loaded for the next route in the routine.
The routes are numbered in the order of selection.
A route selected by mistake can be deselected by touching it again.
After selecting the route, tap the symbol at the bottom right.
A selection opens.
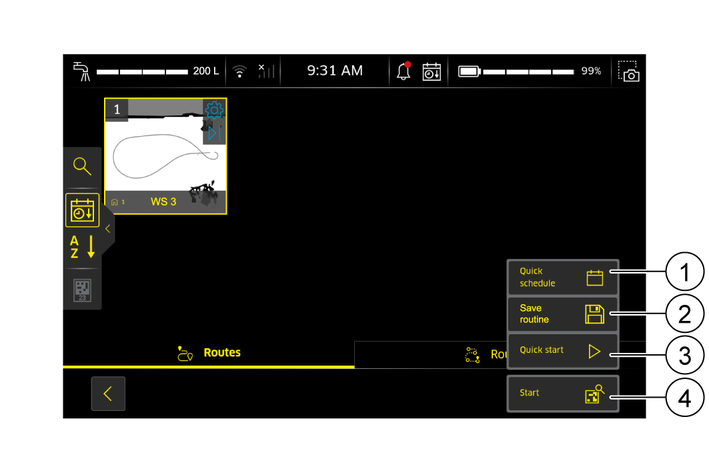
Tap the button
Push the device in front of the position code requested in the touch screen.
Wait until the device has recognised the position code.
Confirm the position code.
The route is executed.
The selected route can be started without a Position code e.g.if position codes are not to be permanently attached. To do this, the position codes are only applied when the route is being taught, and it must be ensured that the robot is started at the correct position when it is executed. A position code is always required for a docking station.
Position the device at the taught starting point of the route.
If necessary, call up the start menu.
Select the function
The overview page with the autonomous functions opens.
Tap on the function
Select a route by tapping on it. See chapter Existing routes.
After selecting the route, tap the symbol at the bottom right.
A selection opens.
Tap the
The route is executed.
The route can be started with a delay of up to one week.
Position the device at the starting point.
If necessary, call up the start menu.
Select the function
The overview page with the autonomous functions opens.
Tap on the function
Select a route by tapping on it. See Existing routes.
After selecting the route, tap the symbol at the bottom right.
A selection opens.
Tap the plan button
The schedule opens.
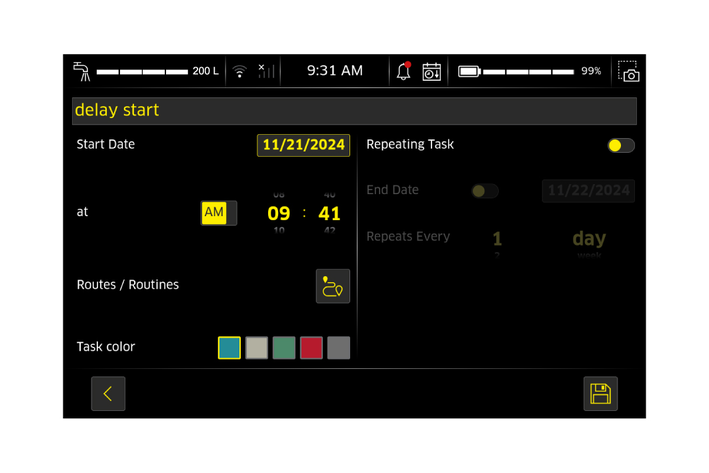
Set the start time.
Set the start date.
Set the start time
Select route/routine to be executed.
Select the colour for the task.
If necessary, set a repetition of the cleaning task.
Set an end date for the repetition.
Set an interval for the repetition.
Save the desired start time by tapping the symbol.
The route is executed at the set time.
Tap the  icon to interrupt the route during execution.
The device stops for 10 seconds. To pause the device permanently, the password must be entered.
Resuming a route:
Position the device in the area on the route that is shown in green on the map
Tap the symbol and enter the password to execute the route again.
Tap the symbol and enter the password to pause the route.
Tap on the symbol to finish the route.
The calendar function is used to carry out autonomous cleaning tasks at a specific time (time / date) without an operator being present, for example at night or on Sundays and public holidays. The task can be performed once or repeatedly.
If necessary, call up the start menu.
Select the function
The overview page with the autonomous functions opens.
Tap on the symbol  .
.
The schedule opens.
Assign a name for the cleaning task.
Set the start time.
Set the start date.
Set the start time
Select route/routine to be executed.
Select the colour for the task.
If necessary, set a repetition of the cleaning task.
Set an end date for the repetition.
Set an interval for the repetition.
Save the desired start time by tapping the symbol.
The route is executed at the set time.
The cleaning report provides information about completed cleanings.
On the start page, tap on the function
On the page that opens, tap the  symbol.
An overview of the most recently completed cleanings is displayed.
Tap on the desired cleaning report for a route or routine.
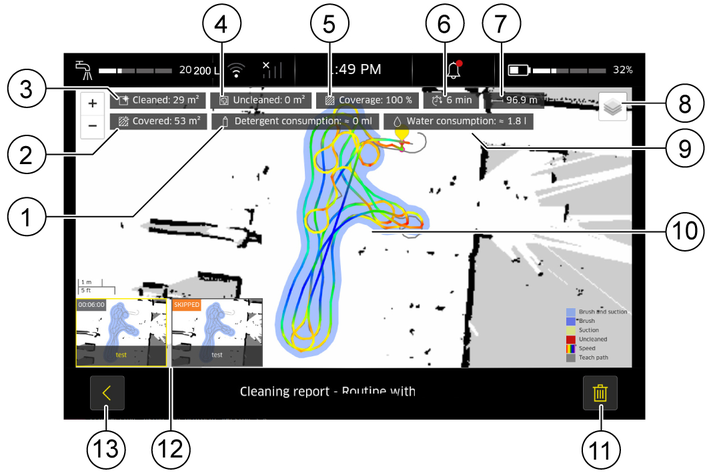
Example report of a routine with several routes
Use the  and
and  buttons to enlarge or reduce the details of the report.
Delete the selected cleaning report by tapping the button.
Tap the button to return to the start page.
In manual mode, the device is guided by the operator over the surface to be cleaned. Observe the device's operating instructions.
Requirement: The device is located at the operating location, see operating instructions for the device.
If necessary, call up the start menu.
Select the function
The overview page with the cleaning parameters opens.
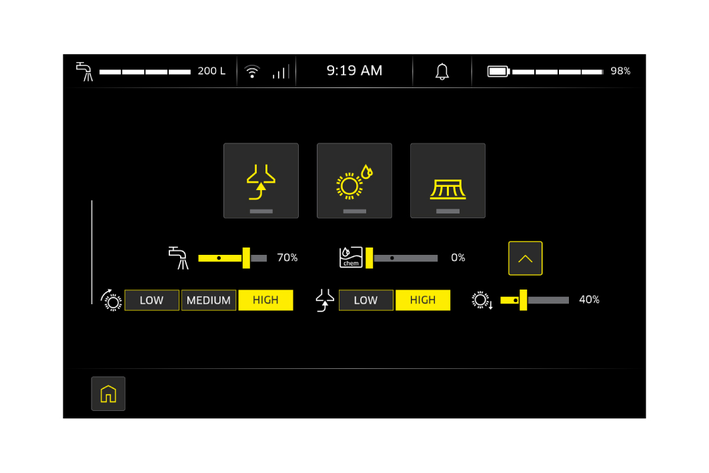
Set the desired amount of water using the slider.
Set the desired detergent dosage with the "+" and "-" buttons.
Set the suction parameters.
Activate the suction by tapping on the symbol .
To select the suction performance, tap the button
The activated function turns yellow.
Set the brush parameters.
Activate the cleaning head by tapping on the symbol .
To select the brush speed, tap the button
The activated function turns yellow.
Adjust the contact pressure of the brush using the slider (not available on all device models).
Activate the side brushes by tapping on the symbol (not available on all device models).
The side brush can only be activated when the cleaning head is switched on.
Move the device over the surface to be cleaned, see the operating instructions for the device.
Deactivate the side brushes by tapping on the symbol .
Deactivate the cleaning head by tapping on the symbol .
The deactivated functions turn grey.
Siphon off the residual water on the last few metres of the route.
Deactivate the suction by tapping on the symbol .
When charging without a docking station, the device is charged using the existing mains cable. See the operating instructions of the device. Additional actions, such as emptying the waste water tank or filling the fresh water tank, must be carried out manually.
Connect the mains power cable. See the operating instructions of the device.
When charging via the optional docking station, the device connects to the docking station. The connection must always be started via the display as described below.
Risk of damage due to manual docking
Manually docking the device to a docking station can damage the device and the station.
To dock the device, only use the docking function on the display.After successful connection, the following actions are performed:
The waste water tank is emptied.
The waste water tank is flushed.
The fresh water tank is filled.
The battery is charged.
Position the device in front of the docking station, keeping a distance of approx. 1 m from the docking station.
Call up the start menu.
Select the main menu
The device searches for the position code of the docking station.
Wait until the device has recognised the position code.
When the device has docked, information on the duration of charging and the status of the actions performed during charging appear on the screen.
The completion of an action is indicated by a green tick on the respective button.
If necessary, tap the symbol to finish the resource exchange prematurely.
If necessary, use the "Undock" function to move the robot out of the docking station again.
The device remains in the docking station until either undocking is carried out or a new cleaning task starts due to scheduling.
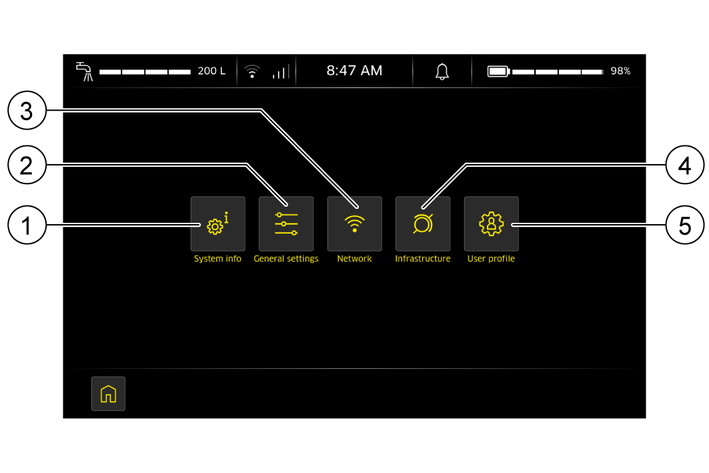
Call up the start menu.
Tap on the main menu
There are various menus to choose from:
Service functions
Here, you can control components directly.Operating manual
Here, you can view the operating instructions for the device and the software.Maintenance instructions
Here, you can see a list of the maintenance work to be carried out with instruction videos.Call up the start menu.
Tap on the main menu
Tap on the

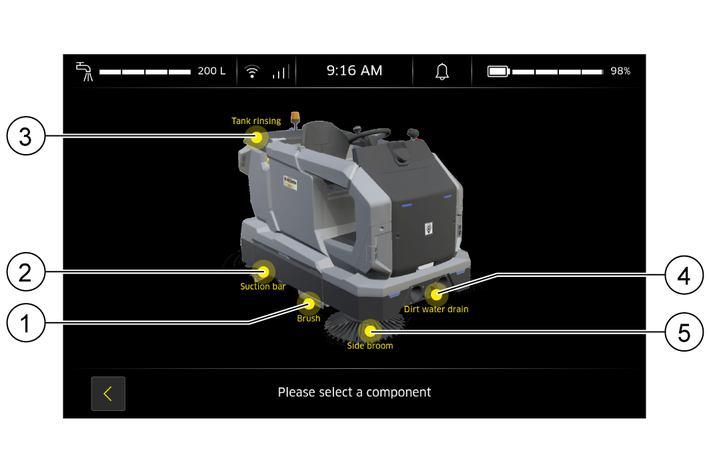
Component overview (example KIRA BR 200)
Call up the start menu.
Tap on the main menu
Tap on the Maintenance instructions menu to obtain an overview of the maintenance tasks. The exact information depends on the device
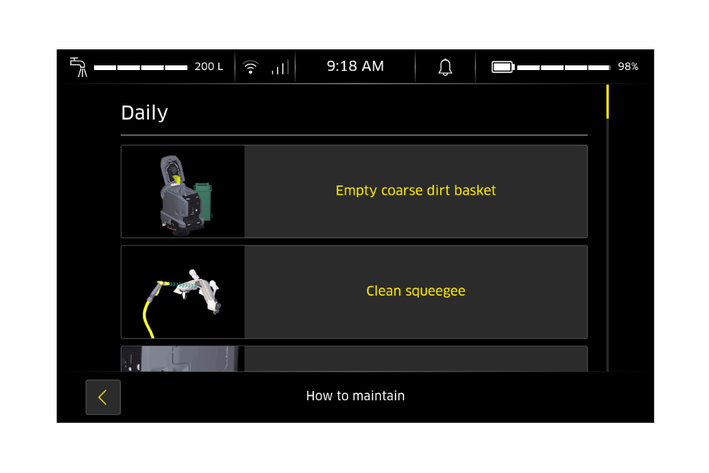
Maintenance instructions (example KIRA B 50)
Tap on a maintenance step to call up the instruction video.
In this menu, information can be checked and settings such as date, language etc. can be checked and changed.
The following information, among other things, can be displayed in this menu:
Device data such as material number, serial number, latest software function, last service date, operating hours, etc.
Change log of the software with information on software version, serial number, etc.
Information recorded:
Software version
Newly installed functions of the device that were made available with the respective software update.
How to call up the change log:
On the start page, tap the  symbol.
The change log is displayed, with the software versions starting with the last / latest and then descending. The change log can be searched by moving the scroll bar with your finger.
Changes are not possible.
The following functions are available in this menu:
Check and change general settings
Check and change system settings
Check and change basic settings:
Tap on the symbol  .
.
A window with several tabs opens.
In the "General" tab, you can check and changee.g. time zone, unit system and how much time passes before the device goes into sleep mode.
In the "System" tab, one can initialise the side brushes and perform a reset to the factory settings.
Use the scroll bar to scroll through the page.
To change the general settings, tap on the desired input field or adjust the corresponding slider.
Change the system settings.
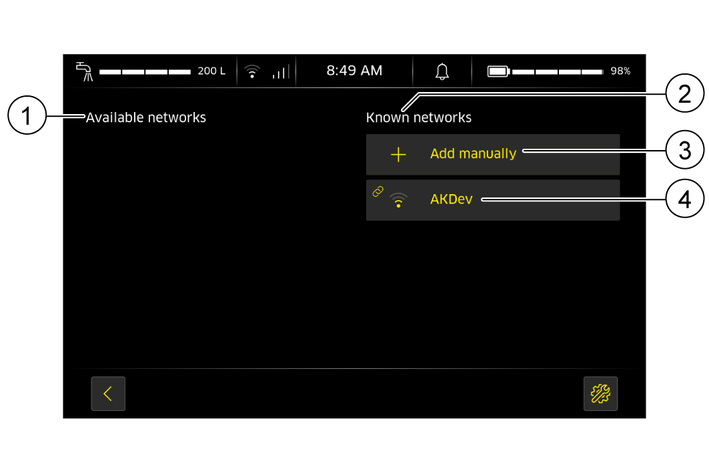
The network settings can be configured in this menu.
The device automatically connects to an available LTE mobile network with its SIM card.
If necessary,for example, if the mobile phone connection is poor, the device can be connected to a WLAN network.
The device can log into an existing, already known WLAN network.
The device can be manually logged into to a new WLAN network.
The settings of the available WLAN networks can be configured.
The user's assigned role determines which rights they have in this menu.
The device can connect to a WLAN network via a radio antenna. Kärcher recommends only connecting the device to secure and encrypted WLAN networks ("known networks").
This is how the WLAN network is configured:
Tap on the symbol  .
.
All "Visible networks" and "Known networks" at the location are displayed with the respective network strength. The currently connected network is displayed with a chain symbol in front of the name.
Select a
Tap on the button with the name of the WLAN network.
A window opens.
Enter the password for the WLAN network.
The device is logged into the selected WLAN network.
Add a new
Tap on the button
A window opens.
Enter the SSID encryption of the wireless access point/router.
Select the encryption type from the list.
Enter the password for the WLAN network.
Discard the selection by tapping the symbol.
Confirm the selection by tapping the symbol.
The WLAN network was added.
In this menu, the device can be integrated into other control software via the VDA 5050 interface and the rolling gate control can be set up via the I/O Box menu.
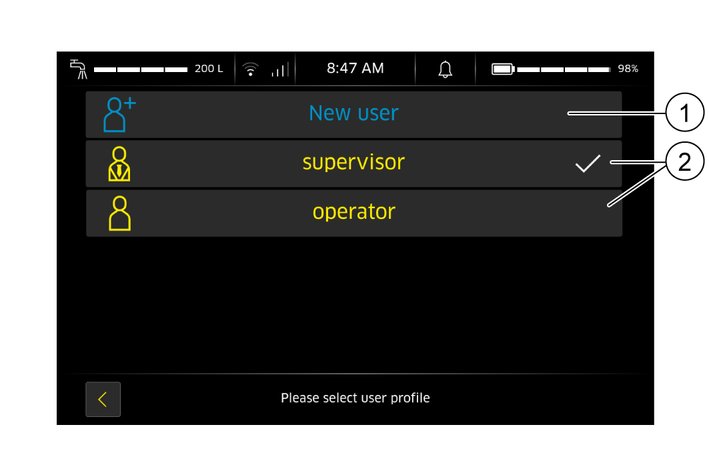
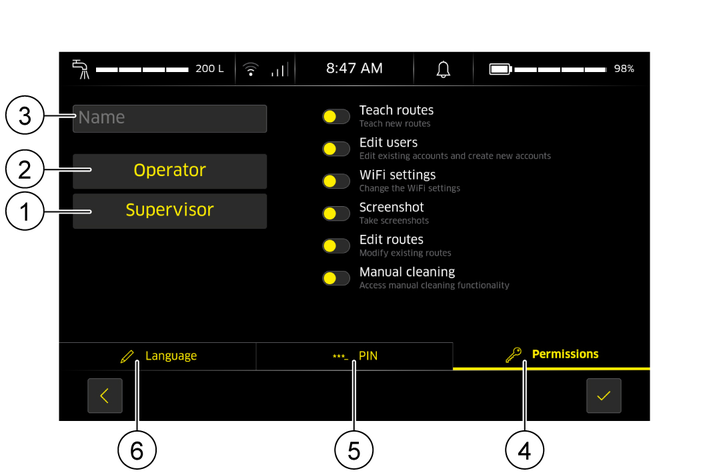
In this menu, users can be created and deleted, and user profiles can be edited.
The assigned role offers a preselection of authorisations. These authorisations can be individually adapted to the respective user.
Authorisations available for selection:
Teaching routes (teaching)
Creating users
Edit user profiles
Print screenshots
Change routes
Perform manual cleaning
Roles available for selection:
Operator
Supervisor
Developer, only with special rights
Service, only with special rights
This is how new users are created:
Tap on the symbol  .
.
The window User profile opens.
Tap on the button
A window with 3 tabs opens.
Select the tab Language.
Assign the user a language from the list.
If necessary, scroll through the list by moving the scroll bar.
Confirm the selection by tapping the symbol.
Select the tab ***_PIN.
Use the keypad to assign a PIN to the user.
Confirm the PIN by repeating it.
Confirm the selection by tapping the symbol.
Select the tab
Type in the input field and enter the user name using the keyboard.
Tap the
Tap the
Use the sliders to customise the user's preset authorisations.
Authorisations granted turn yellow.
Confirm the selection by tapping the symbol.
Tap on the symbol .
The window User profile opens.
Tap the button of the user you want to check or change.
Change and save the desired user data.
Only administrators, developers or the Service have the right to delete users.
This is how users are deleted:
Tap on the symbol .
The window User profile opens.
Log in to the corresponding profile.
Click on the symbol .
The user is deleted.
Symbol | Meaning |
|---|---|
| | Log out (Logout) |
| | Suction |
| | General settings |
| | Edit |
| | Finish /Discard |
| | User administration |
| | Confirm = OK |
| | Move corner points of zone |
| | Settings |
 | Brush settings |
| | Brush cleaning settings |
| | Horn signal settings / set horn signal |
| | Light signal settings / Set light signal |
| | Side brushes |
| | Set and move event. The type of event determines the colour of the marker:
|
| | Reset event to default settings |
| Info |
| | Calendar |
| | Delete |
 | Scroll up |
 | Scroll down |
| | WLAN network settings / WLAN network strength (the weaker the WLAN network, the fewer bars) |
| | Break |
| | Position code |
 | Continue cleaning |
| | Starting cleaning |
| | Call up cleaning report |
| | Smart-Fill function |
| | Save |
| Start- / end point |
| | Search |
 | System information |
| | Define zone |
| | Rotate zone |
| | Delete zone |
| | Move zone |
| | Zoom in / Plus |
| | Zoom out / Minus |
| | Maintenance functions |
 | Next / scroll ahead |
| Select the type of zone (when editing routes):
Select display in the cleaning report |
| | Scroll back |
 | Reset to factory settings |
| | Return to the start screen |