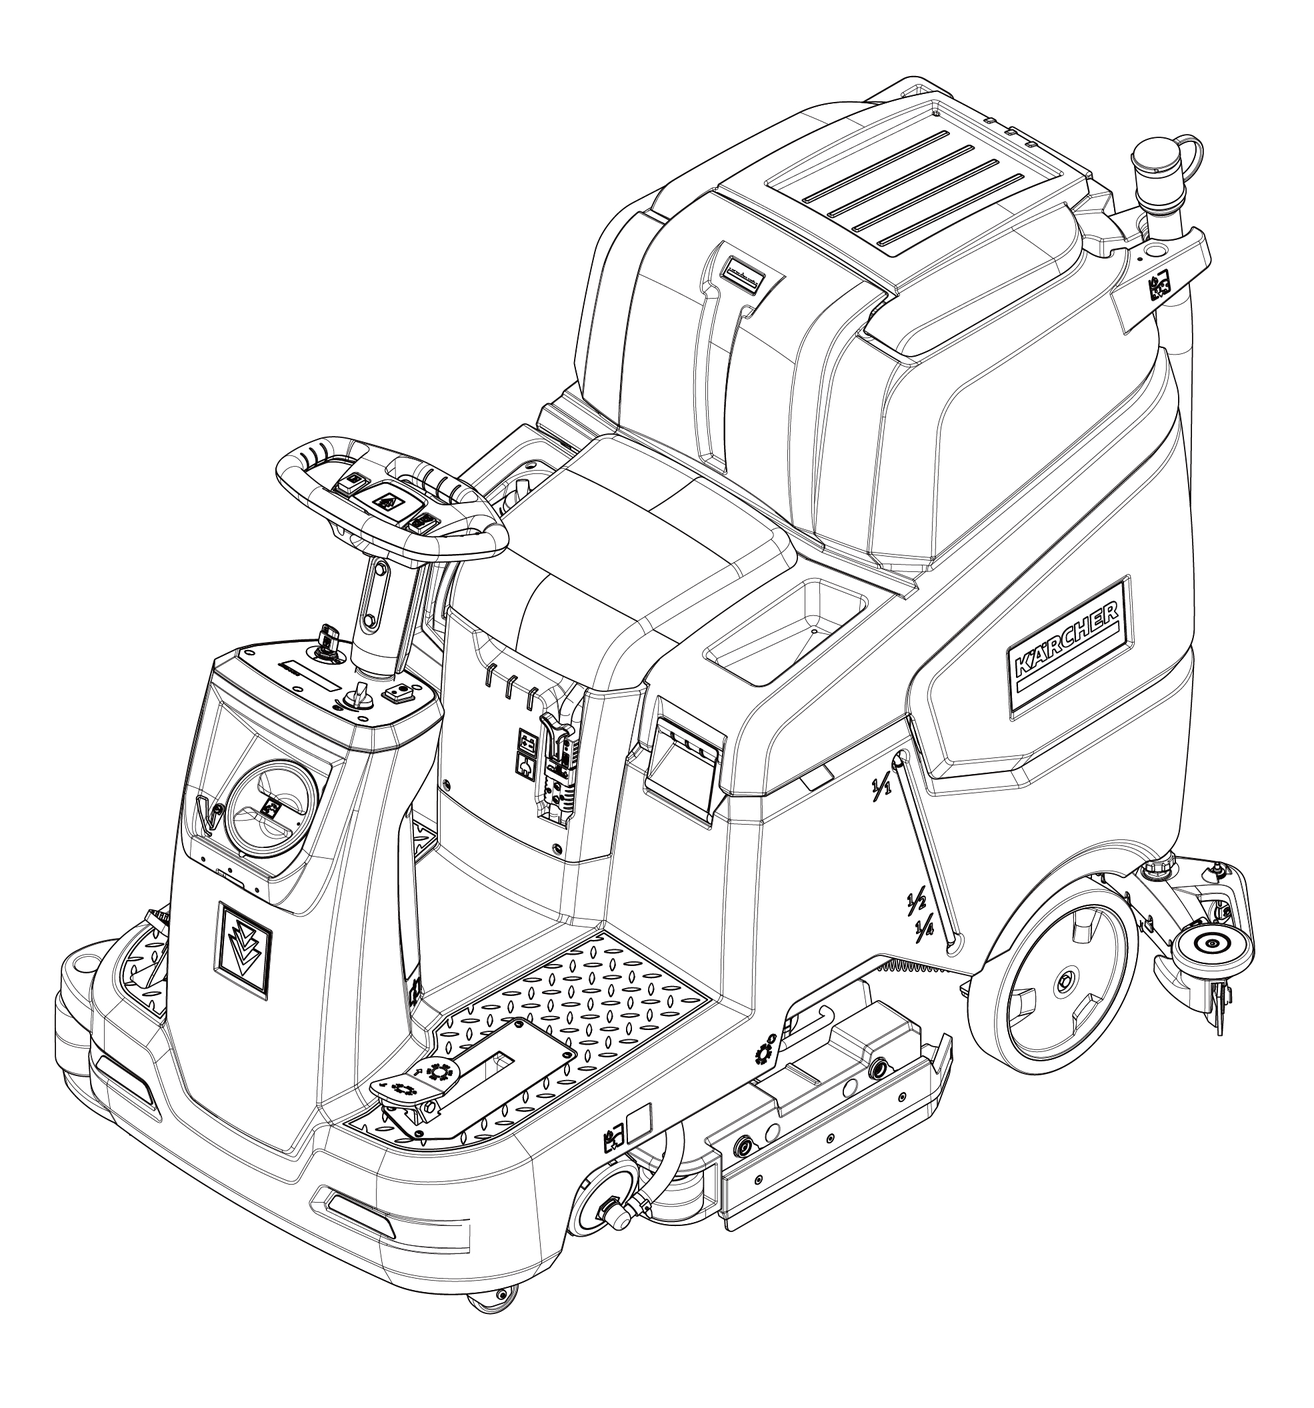
B 85 R Classic
97726920 (01/26)
97726920 (01/26)
 Read these original operating instructions and the enclosed safety instructions before using the device for the first time. Proceed accordingly.
Keep both books for future reference or for future owners.
This scrubbing and vacuum machine is used for wet cleaning or polishing of level floors.
The device can be adjusted to suit the respective cleaning task by setting the water volume and detergent volume appropriately. The detergent dosage is adjusted by adding detergent to the tank or via a dosing device ("Dose" option).
Brush irrigation is either speed-dependent or constant.
The working width and the capacity of the fresh and waste water tanks (see chapter "Technical data") enable effective cleaning with a long working time.
The device has a drive motor.
The device can be equipped with various accessories to suit the respective cleaning task. Request a copy of our catalogue or visit our Internet website at www.kaercher.com.
This device is suitable for commercial and industrial use, e.g. in hotels, schools, hospitals, factories, shops, offices, and rental companies. Use the device only in accordance with the information in these operating instructions.
The device may only be used for cleaning smooth surfaces that are insensitive to water and polishing.
The device is designed for indoor use.
The operational temperature range is between +5 °C and +40 °C.
The device is not suitable for cleaning frozen floors (e.g. in cold stores).
The device is suitable for a maximum water height of 1 cm. Do not drive into an area if there is a danger of exceeding the maximum water height.
When using chargers or batteries, only the components approved in the operating instructions may be used. A different combination must be confirmed by the responsible charger and/or battery supplier.
The device is not intended for cleaning public traffic routes.
The device must not be used on pressure-sensitive floors. Take into account the permissible load per unit area of the floor. The load per unit area caused by the device is specified in the technical data.
The device is not suitable for use in potentially explosive environments.
The device is approved for operation on surfaces with a maximum slope (see chapter "Technical Data").
 The packing materials can be recycled. Please dispose of packaging in accordance with the environmental regulations.
 Electrical and electronic devices contain valuable, recyclable materials and often components such as batteries, rechargeable batteries or oil, which - if handled or disposed of incorrectly - can pose a potential danger to human health and the environment. However, these components are required for the correct operation of the device. Devices marked by this symbol are not allowed to be disposed of together with the household rubbish.
Current information on content materials can be found at: www.kaercher.de/REACH
Only use original accessories and original spare parts. They ensure that the appliance will run fault-free and safely.
Information on accessories and spare parts can be found at www.kaercher.com.
Check the contents for completeness when unpacking. If any accessories are missing or in the event of any shipping damage, please notify your dealer.
Before using the device for the first time, read and observe these operating instructions and the accompanying brochure: Safety instructions for brush cleaning devices, No. 5.956-251.0.
The device is approved for operation on surfaces with a specified limited slope (see chapter "Technical Data").
The device can tip over
Risk of injury
Only operate the device on surfaces that do not exceed the permitted slope (see chapter "Technical Data").Risk of accident due to incorrect operation
People can be injured.
Operators must be properly trained on how to use this machine.The device may only be operated when the hood and all covers are closed.
Danger of injury!
Serious injuries due to missing, modified or ineffective safety devices.
Do not bypass or remove the safety devices and do not render them ineffective. Safety devices are provided for your own protection.For immediate shutdown of all functions: Set the safety switch to "0".
The device brakes hard when the safety switch is switched off.
The safety switch acts directly on all device functions
If the operator leaves the seat during work or while driving, the seat switch switches off the engine after a short delay.

Risk of damage
Water will damage the suction turbine.
Do not fill or splash water into this opening.
Danger of burns
Components marked with this notice become hot during operation.
Do not touch components marked in this way. Let these components cool down before working on the device.
Danger of accident
On slopes, there is an increased risk of tipping over at high speed.
Drive slowly downhill.Do not turn on a slope.When driving fast, avoid jerky steering with a large steering angle.Observe the following warnings when handling the batteries:
 | Observe notes in the instructions for the battery, on the battery and in these operating instructions. |
 | Wear eye protection. |
 | Keep acids and batteries away from children. |
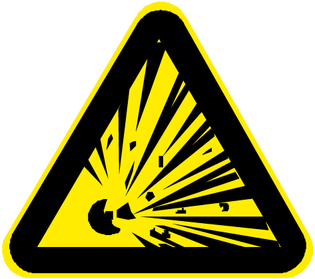 | Risk of explosion |
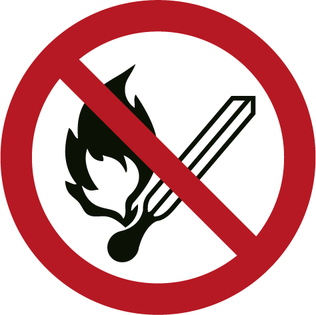 | Fire, sparks, open flames and smoking are prohibited. |
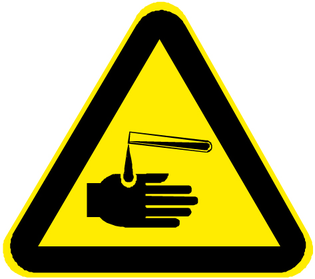 | Risk of acid burns |
 | First aid. |
 | Warning |
| Disposal |
| Do not throw batteries in the bin. |
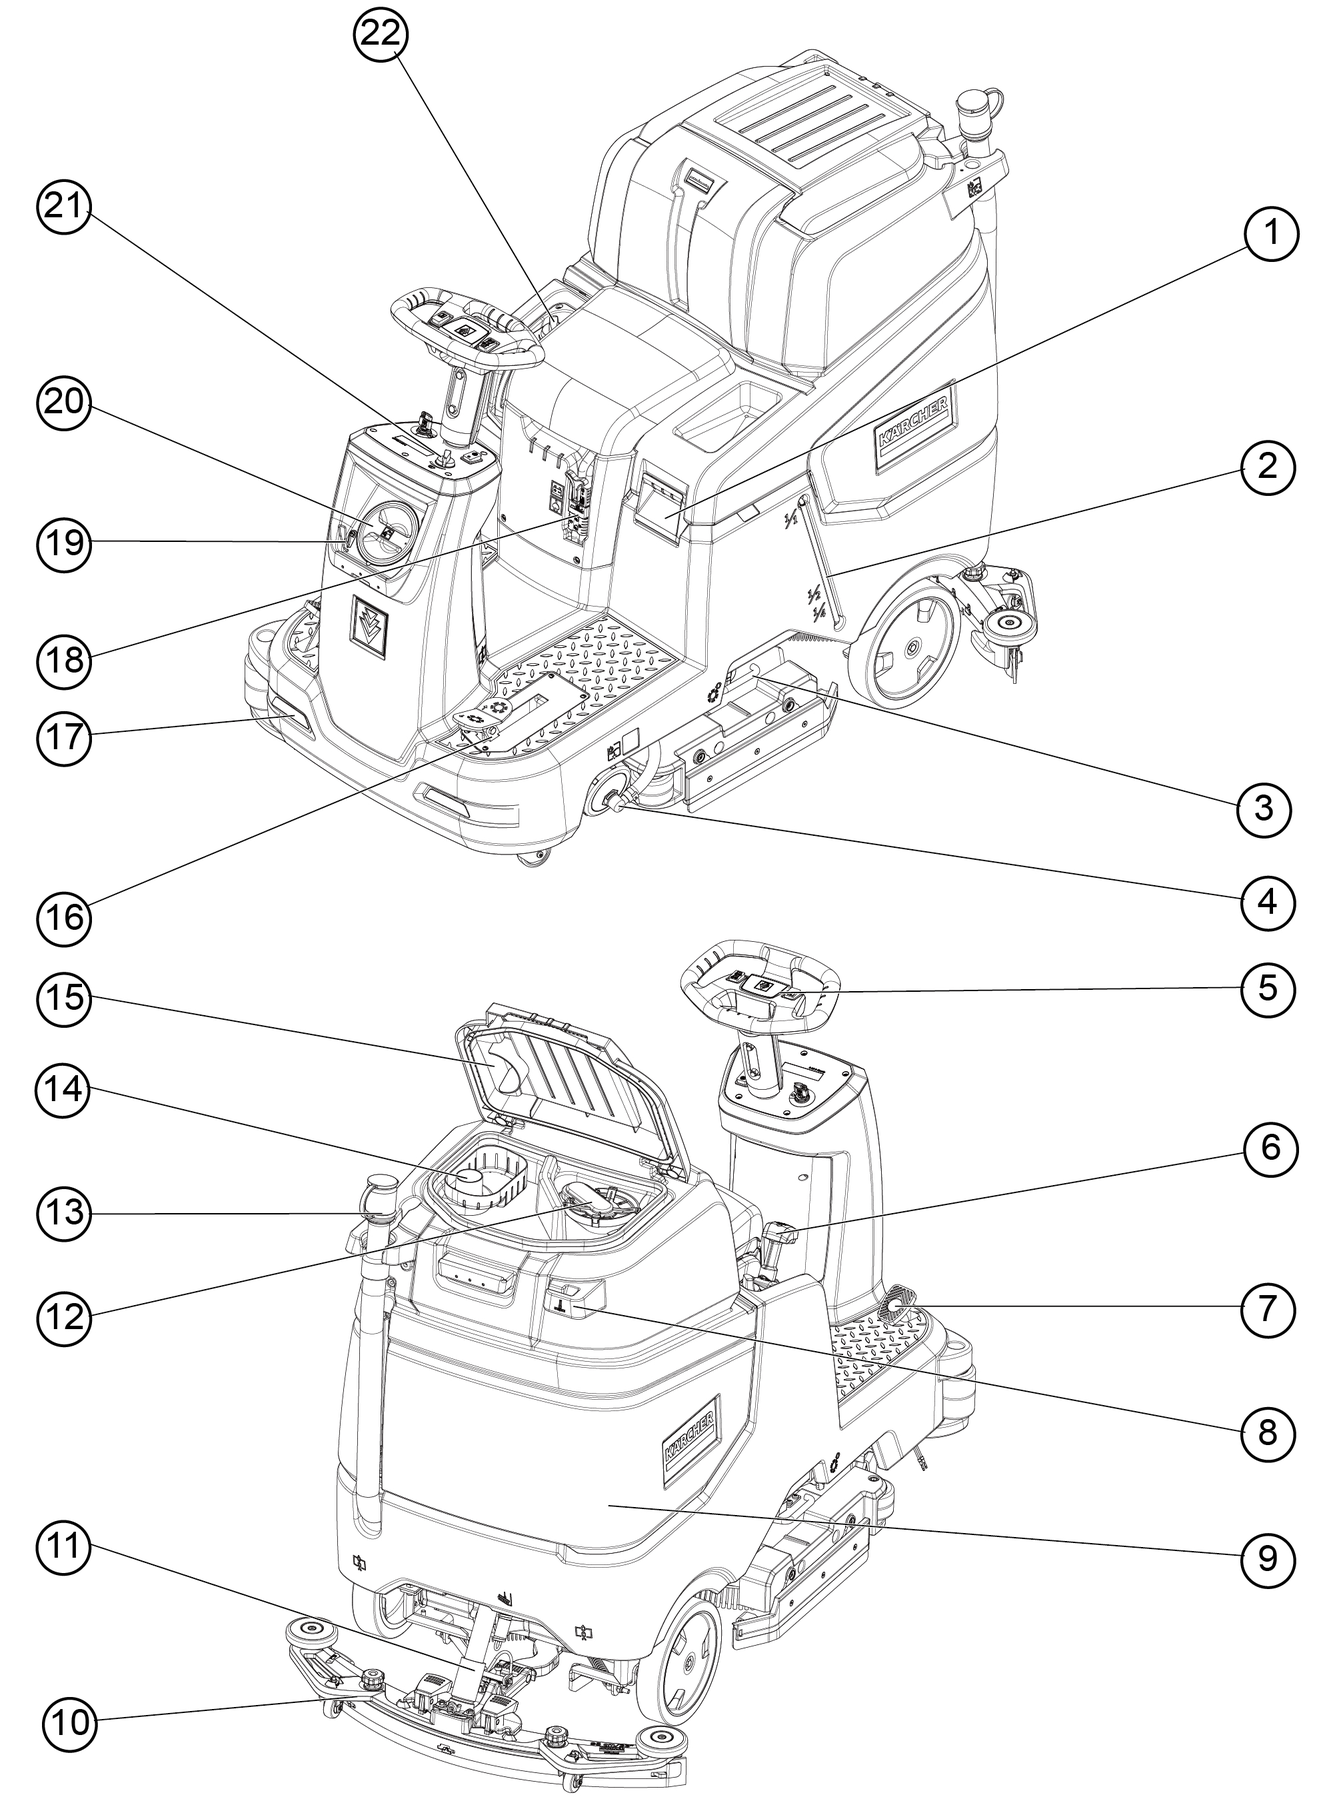
* optional
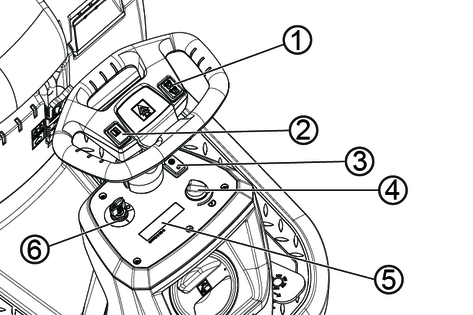
Control elements for the cleaning process are yellow.
Control elements for maintenance and servicing are light grey.
When driving through narrow spaces, the suction bar can be removed and hung in one of the openings on the lid of the waste water tank.
The suction bar can be hung in the recess on the waste water tank for storage.
 | Fresh water tank drain opening |
 | Waste water tank drain opening |
 | Fresh water tank filling level (100%) |
 | Fresh water tank filling level (50%) |
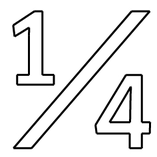 | Fresh water tank filling level (25%) |
 | Lashing point |
 | * Mop holder |
| Fresh water filling |
 | Brush replacement |
 | Charging plug |
 | Suction bar holder |
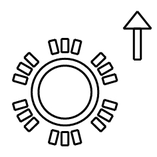 | Brush head raising |
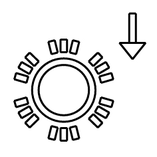 | Brush head lowering |
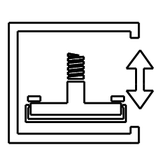 | Suction bar raising/lowering |
* optional
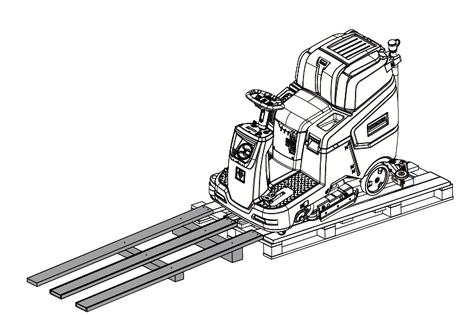
Remove the packaging film.
Remove the strap.
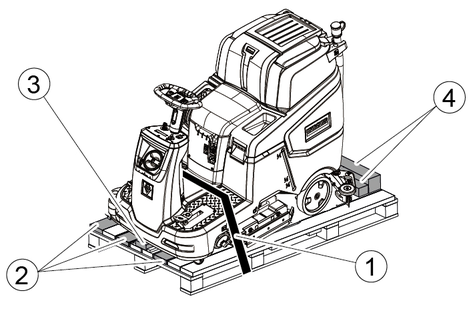
Unscrew the block, squared timber and boards. The components to be unscrewed are marked in gray in the illustration.
Place a ramp in front of the pallet using the unscrewed boards and squared timber and fasten with chipboard screws.
Install the batteries if the device was delivered without batteries (see chapter "Before initial startup/batteries").
Drive the device forward and off the pallet (see chapter "Operation / Driving").
The installation of the brushes is described in the chapter "Maintenance work".
Pivot both clamping levers upwards.
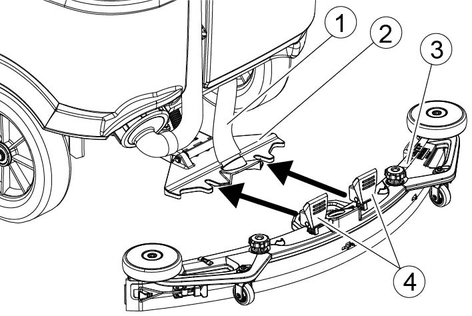
Insert the suction bar in the suction bar mount.
Pivot both clamping levers downwards.
Risk of damage
Batteries may only be replaced with batteries of the same technology.Lead batteries must not be replaced by Li-Ion batteriesLi-ion batteries must not be replaced by lead batteries.Lead batteries:
Description | Order no. |
|---|---|
| 162Ah - Maintenance-free, AGM | 9.772-745.0 |
* Minimum volume of battery charging room
** Minimum air flow between battery charging room and environment
The device requires 2 batteries.
Li-ion batteries:
Description | Order no. |
|---|---|
90 Ah, 25.6 V | 6.654-558.0 |
In the case of the device variant with Li-Ion battery, the battery is already installed and connected.
Removing and installing the batteries
Unstable machine position
Ensure that the machine is positioned stably when removing and installing the batteries.Incorrect connection polarity
Destruction of the control electronics
Take care to ensure the correct polarity when connecting the batteries.Deep discharge
Risk of damage
Charge the batteries before starting the device.Drain the waste water.
Unlock the waste water tank and pivot it to the rear.
Place the battery in the device.
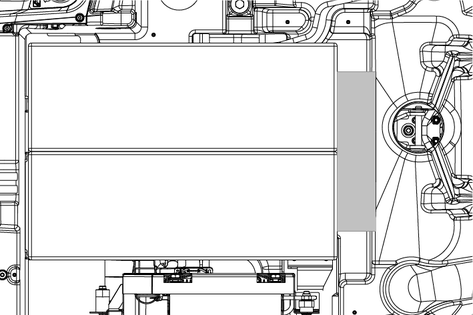
170 Ah, 4.039-352.7
Insert the spacers at the locations shown in the picture between the battery and the device.
Connect the battery terminals using the connecting cables.
Clamp the connecting cable on the (+) and (‑) battery terminals that are still free.
For the 170 Ah 4.039-352.7 battery set, attach the connection cable to the negative pole with the insulated pole screw.
Connect the device-side battery connector to the battery-side battery connector.
Pivot the waste water tank forwards and close it.
Li-Ion batteries are delivered in transport mode and must be activated before initial startup of the device.
Charge the battery (see "Initial startup/Charging the battery"), this will end the transport mode.
Removing and installing the batteries
Unstable machine position
Ensure that the machine is positioned stably when removing and installing the batteries.Risk of injury due to the device tipping over!
Device may tip over when removing and installing batteries.
Ensure that the device is positioned stably when removing and installing the batteries.Turn the key-operated switch to "0" and remove the key.
Disconnect the battery connector.
Drain the waste water.
Pivot the waste water tank upwards.
Disconnect the device-end cable from the negative terminal at the battery.
Disconnect the remaining cables from the battery.
Remove the battery.
Dispose of the used batteries in accordance with statutory provisions.
Inappropriate use of the charger
Flammable gases are generated when the battery is charged
Electric shock
Risk of explosion
Adhere to the mains voltage and fuse values specified on the device type plate.Only use the charger in dry rooms with sufficient ventilation.Only charge the battery in a suitable room. The room must have a minimum volume depending on the battery type and an adequate air exchange rate with a minimum air flow (see "Recommended batteries").Accumulation of dangerous gases under the tank during the charging process
Risk of explosion
Pivot the waste water tank upwards before charging low-maintenance batteries.The average charging time is approx. 10-15 hours.
The device cannot be used during the charging process.
The device has deep discharge protection, i.e. the brush motor and turbine are switched off automatically when the permitted minimum capacity level is reached.
Drive the device directly to the charger and do not drive on slopes.
Before the initial startup, after a service reset or when changing to a different battery type, it is essential to set the charging characteristic.
Danger due to the device inadvertently starting up
Risk of injury
Disconnect the spark plug connector or disconnect the battery before performing any work on the device.Risk of damage to the battery
The service life and charging capacity of the battery can be affected by an incorrect charging characteristic.
Make sure that the battery characteristic curve that matches the battery is selected in the machine.The currently selected battery characteristic curve can be seen on the display or via the app in the "Device status" area during charging.The charging characteristic can only be adjusted by Kärcher Service.
Battery characteristics are available for the following batteries:
EXIDE GF12105V
HOPPECKE TB115
EXIDE GF12076V
EXIDE FF12080W
TROJAN 27TMX
HOPPECKE TB80
ZENITH L120185
To enable the use of other batteries as well, a custom battery characteristic curve can be created by the Kärcher service department.
Risk of damage due to unsuitable charger!
Do not connect the charger to the device-side battery connector.
Use only a charger suitable for the type of battery installed.Battery | Capacity | Charger |
|---|---|---|
6.654-242.0 | 170 Ah AGM battery | 6.654-496.0 |
6.654-558.0 | 90Ah Li-ion battery | 6.654-496.0 |
Unlock the waste water tank and pivot it up.
Pull out the device-side battery connector.
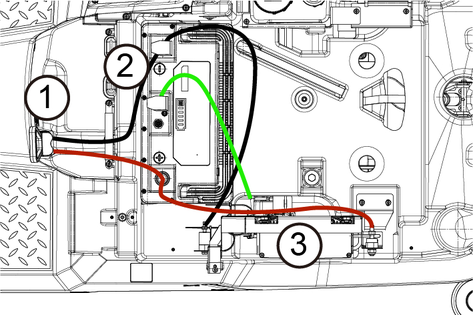
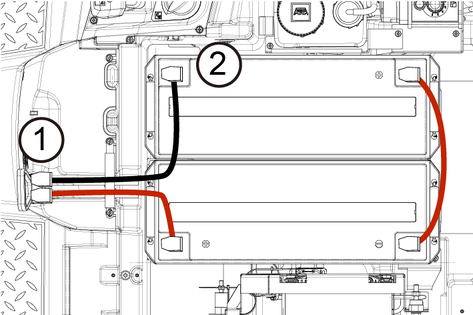
Connect the battery-side battery connector to the charger.
Plug the mains plug of the charger into the socket.
Carry out the charging process in accordance with the operating instructions for the charger.
Connect the device-side battery connector to the battery-side battery connector.
Pivot the waste water tank forwards and then close it.
Unlock the waste water tank and pivot it up.
Plug the mains plug of the internal charger into the mains socket.
The charging state of the battery is shown on the control panel display.
Unplug the charger mains plug from the mains socket after charging.
Pivot the waste water tank forwards.
Falling objects
Risk of injury
Do not drive the device into areas where there is a possibility of the operating personnel being hit by falling objects.Risks during operation
Risk of injury
In the event of danger, set the safety switch to "0".Sit in the driver's seat.
Insert the Key.
Set the key switch to "1".
Turn the direction switch to the desired direction.
The daytime running light is in operation when the device is switched on.
Defective parking brake
Danger of accident
Before each operation, check the function of the parking brake on level ground.Switch the device on.
Set the travel direction switch to "Forward".
Press the accelerator pedal lightly.
The brake must audibly unlock. The appliance must roll easily on a plane surface.
Release the accelerator pedal.
The brake must be audibly engage.
If this is not the case, take the device out of operation and call Customer Service.
Lack of braking
Danger of accident
Before using the device, it is essential to check the function of the parking brake. Never use the device if the parking brake does not work.Careless driving
Danger of tipping over
Only drive on gradients up to a maximum of 10% in the direction of travel and across the direction of travel.Do not turn up or down gradients.Drive slowly in corners and on wet ground.Only drive the device on stable ground.The travel direction can be changed while driving. This means that very dull spots can be polished by moving back and forth several times.
Assume a seated position.
Insert the Key.
Turn the safety switch to "1".
Set the direction of travel using the drive direction button on the steering wheel.
Specify the travel speed by using speed adjustment on control panel.
Release the accelerator pedal.
The device stops.
The driving motor is switched off in the event of an overload. A fault message appears on the display. If the controller overheats, the affected power unit is switched off.
Allow the device to cool down for at least 15 minutes.
Set the key switch to “0”, wait briefly and set to the key switch to "1".
Open the fresh water tank cap.
Fill fresh water (max. 50 °C) to the lower edge of the filling nozzle.
Note: The fresh water hose can be clamped with the hose holder during filling.
Close the fresh water tank lock.
Unsuitable detergents
Health risk, damage to the device
Use only recommended detergents. The operator carries all increased risks relating to operational safety and increased risk of accidents if using other detergents.Use only detergents free of chlorine, solvents, salt and hydrofluoric acid.Adhere to the safety instructions stated on the detergent packaging.Do not use heavily foaming detergent.
Fill the detergent into the fresh water tank.
Note: The lid for the filling hole of the fresh water tank can be used to measure the detergent. It has a measuring scale marked on the inner side.
Detergent is added to the fresh water on the way to the cleaning head with the help of a dosaging device.
Unlock the waste water tank and pivot it up.
Open the bottle lid and add detergent into the bottle.
Close the bottle lid.
Turn on the dosing system using on\off switch.
Adjust detergent dosing percentage using the knob.
Pivot the waste water tank forwards and close it.
The dosing unit can be used to add 3% detergent at maximum. With higher dosagethe detergent must be put into the fresh water tank.
Risk of clogging due to dried detergent when the detergent is added to the freshwater tank of the Dose version. The flowmeter of the dosing equipment can agglutinate on account of drying detergent and hamper the functioning of the dosing equipment. Subsequently rinse the fresh water tank and the appliance with clear water. For rinsing, select cleaning programme with application of water at the programme selector switch. Set the water quantity to the highest value, set the detergent dosage to0%.
The appliance is equipped with a fresh water indicator in the display. If the fresh water tank is empty, the function of adding detergent gets deactivated. The cleaning head continues to work without liquid supply.
The height adjustment affects the bending of the suction lips on contact with the floor.
Push the device a small distance forwards.
Compare the bending of the suction lips with the figure below.
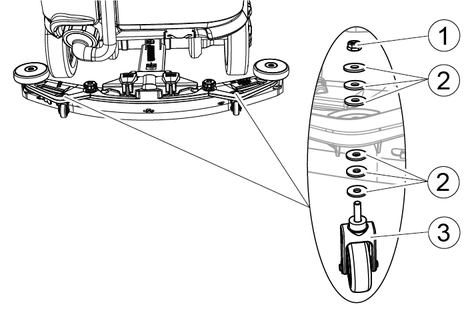
Unscrew the screw.
Insert a sufficient number of washers between the suction bar and spacer roller to create the correct bending of the suction lip.
Fit the remaining unused washers above the spacer roller.
Screw in and tighten the screw.
Repeat the entire procedure at the second spacer roller.
Push the device a small distance forwards.
Check the bending of the suction lips over the entire length.
Repeat the adjustment procedure if necessary.
The inclination must be adjusted so that the suction lips of the suction bar make even contact with the floor over the entire length of the suction bar.
Park the device on a surface without a slope.
Turn the program switch to the "Vacuum" position.
Drive the device a small distance forwards.
Read the spirit level.
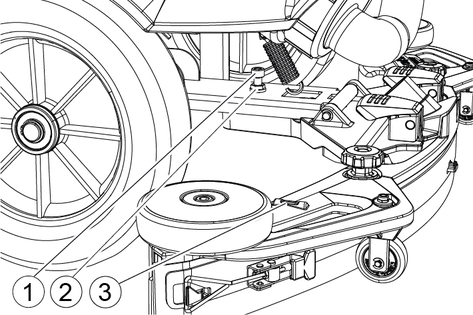
Unscrew the nut.
Adjust the screw so that the spirit level indicator is between the two lines.
Tighten the nut.
To check the new setting, move the device forward again a short distance. Repeat the adjustment process if necessary.
Turn the key switch to "0".
Set the water quantity at the regulationknob according to the dirt level and thetype of flooring.
Lower
Press down the rear surface of the pedal to raise/lower the cleaning head, release and let the pedal move upwards. The brush drive will start as soon as the cleaning head is lowered.
Press down the front surface of the pedal to raise/lower the cleaning head and lock it.
Lower
Pull the lever up to raise/lower the vacuum bar, press toward the outside andlower.
Pull the lever to raise and lower the vacuum bar up and lock.
Push the pedal for the cleaning head down until it locks into place.
Drive the machine a little further to vacuum up the remaining water.
Pull the vacuum bar lever upwards until it locks into place.
The suction turbine is switched off after a after-running time of 10 seconds.
Turn key switch to “0”.
Raise the brush head.
Continue moving a short distance.
The residual water is vacuumed up.
Raise the suction bar.
Turn the key-operated switch to "0".
Remove the Key.
Charge the battery if necessary.
Improper disposal of waste water
Environmental pollution
Observe the local waste water treatment regulations.When the waste water tank is full, the suction flow is interrupted by a float to prevent the waste water tank from overflowing. In this case, drain the waste water.
Remove the waste water drain hose from the support and open the drain hose cover.
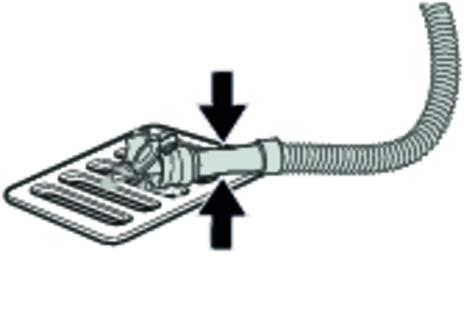
Squeeze the end of the hose and lower it over the disposal facility.
Adjust the strength of the waste water jet by squeezing the end of the hose.
Rinse the waste water tank with clear water.
Close the drain hose cover.
Press the waste water hose into the support on the device.
Lift the coarse dirt container and pull it out.
Empty the coarse dirt container.
Reinstall the coarse dirt container.
Open the fresh water tank cap.
Drain the fresh water.
Clean the filter.
Fit the fresh water tank cap.
Turn the key-operated switch to "0".
Secure the device against rolling away.
Open the waste water tank cover.
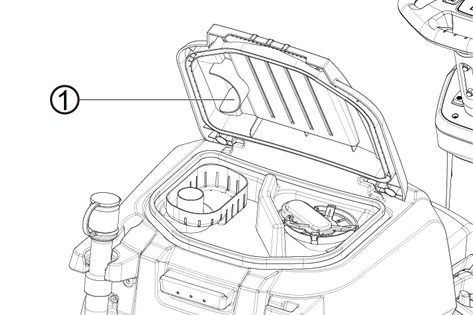
Charge the battery if necessary.
Failure to observe the weight
Risk of injury and damage
Be aware of the weight of the device during transport and storage.Uncontrolled startup
Remove the battery from the device before transport.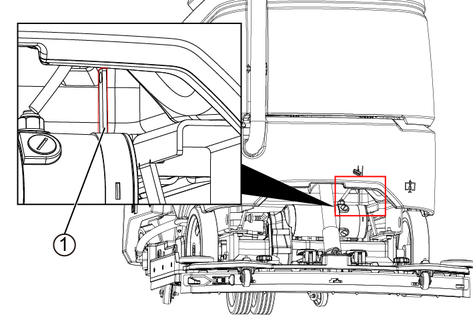
When transporting in vehicles, secure the device against slipping and tipping over according to the applicable guidelines.
Unlocking lever.
Press the unlocking lever upwards and push the appliance.
Danger of accident due to lacking brake function.
You must press the unlocking lever down again after pushing the appliance.
Risk of injury or damage due to non-observance of the weight
Be aware of the weight of the device during storage.Risk of damage due to frost!
Material damage
Empty fresh and waste water completely from the device. Water that is not completely drained can damage the device during freezing.Always protect the device from frost: during operation, transport, and storage.This device may only be stored indoors.
Fully charge the batteries before storing them for a long period.
Fully charge the batteries at least every month during storage.
Inadvertently starting up device
Risk of injury, electric shock
Turn the program switch to the “OFF” position.Remove the Intelligent Key prior to all work on the device.Pull out the charger mains plug.Unplug the battery connector.Drain and dispose of the waste water and fresh water.
Improper cleaning
Risk of damage.
Do not spray the device with water.Do not use aggressive cleaning agents.A detailed description of the individual maintenance work is provided in the chapter "Maintenance Work".
Drain the waste water.
Rinse the waste water tank with clear water.
Clean the coarse dirt sieve.
Only with R cleaning head: Remove the coarse dirt container and empty it.
Clean the exterior of the device using a damp cloth, wetted with a mild washing lye.
Check the suction lips, check for wear and tear and replace if necessary.
Clean the squeegee blades, check for wear and tear and replace if necessary.
Clean the brushes, check for wear and tear and replace if necessary.
Charge the battery.
Lead-acid & AGM battery:
Please use suitable charger to charge the battery.
Please recharge after use immediately.
Charge before the battery is fully empty; timely charging extends battery life.
Li-Ion battery:
Recharge as necessary.
When used regularly, charge the battery fully and without interruption at least once a week.
A detailed description of the individual maintenance work is provided in the chapter "Maintenance Work".
If the device is temporarily shut down: Perform equalization charging of the battery.
Check battery poles for oxidation, brush off if necessary. Make sure the connection cables are firmly in place.
Clean the seals between the waste water tank and the cover, check for leaks and replace if necessary.
Drain the fresh water tank and flush out deposits.
Clean the fresh water filter.
Check the acid density of the cells if the batteries are not maintenance-free.
Only with R cleaning head: Clean the brush tunnel.
Only with R cleaning head: Clean the water distribution strip on the cleaning head.
For longer periods of disuse, shut down the device when the battery is fully charged. Fully charge the battery at least once a month.
Have the prescribed inspection performed by Customer Service.
You can agree on regular safety inspections or close a maintenance contract with your dealer. Please seek advice on this.
The suction lips must be turned over or replaced when worn out.
The suction lips can be turned 3 times until all 4 edges are worn.
Remove the suction bar.
Unscrew the star handles.
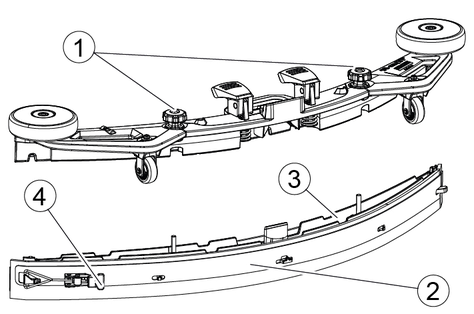
Pull out the inner part of the suction bar.
Open the tension lock.
Remove the strap.
Release the suction lips from the inner part.
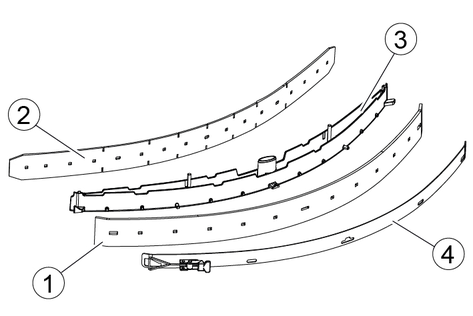
Press the turned or new suction lips onto the knobs of the inner part of the suction bar.
Attach the strap.
Push the inner part of the suction bar into the upper part.
Screw in and tighten the star handles.
Open the waste water tank cover.
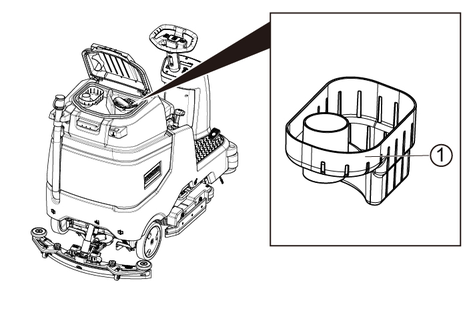
Pull the coarse dirt filter upwards and off.
Rinse off the coarse dirt filter under running water.
Reinsert the coarse dirt filter into the waste water tank.
Open the waste water tank cover.
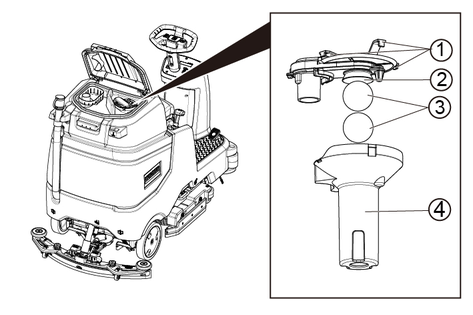
Release the latching hooks.
Pull the float housing downwards and off.
Remove the float from the float housing and clean it.
Clean the fluff filter.
Assemble all parts in the reverse order.
Bristles have a yellow wear indicator which shows the 10mm.Replace the roller brushes when the bristle length has reached 10 mm.
Raise the cleaning head.
Pull out the brush replacement handle.
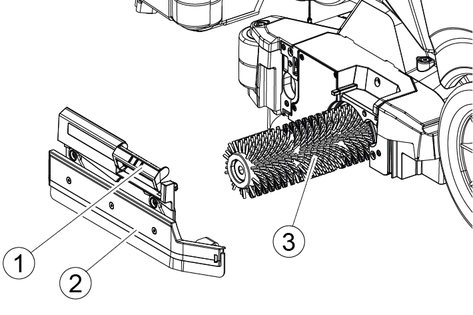
Remove the bearing cover including the side skirt blade.
Pull out the roller brush.
Fit the new roller brush and centre it on the driver.
Install the bearing cover with the side skirt blade.
Make sure the roller brush sits on the mounting mandrel and not underneath.
Pivot the brush replacement handle upwards and latch it into place.
Repeat the entire procedure at the other side.
Drain the fresh water (see chapter "Draining fresh water").
Unscrew the fresh water tank cap.
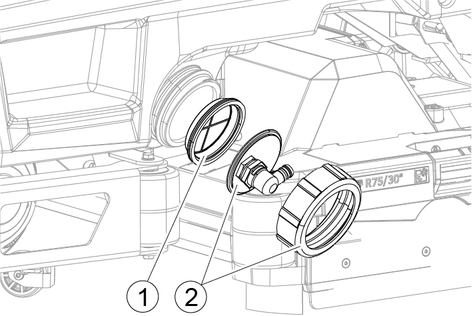
Pull out the fresh water filter and rinse with clean water.
Insert the fresh water filter.
Fit the fresh water tank lock.
Note: Take care to ensure that the hose connection in the fresh water tank cap is positioned at the lowest point in the tank after screwing the cap in place.
Press the latch in the direction of the arrow and hold it there.
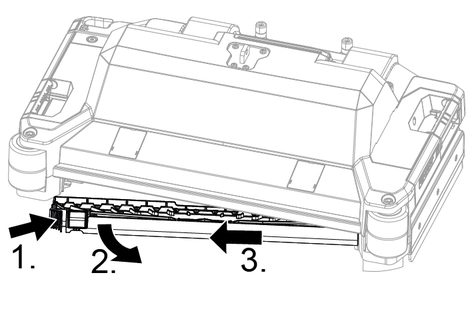
Pivot the water distribution strip forward.
Pull out the water distribution strip lengthways.
Clean the water distribution strip.
Fit the water distribution strip back into the cleaning head and snap the lock into place.
Wear safety goggles, protective clothing and protective gloves.
Keep the battery cell plugs closed.
Remove the batteries.
Only clean the plastic parts of the batteries and the battery compartment with water or water-soaked cleaning cloths without additives.
Dry the surfaces after cleaning.
Reinstall the batteries.
If maintenance work shown in the display has been carried out, the corresponding maintenance counter must then be reset.
Resetting the maintenance counters is described in the chapter "Grey Intelligent Key".
The device can start unintentionally
People working on the device can be injured.
Remove the Intelligent Key prior to all work on the device.Before carrying out any work, pull the mains plug of the internal charger out of the socket.Disconnect the battery connector before performing any work.Drain the waste water.
Drain the remaining fresh water.
If the malfunction cannot be remedied with the following instructions, contact Customer Service.
If the displayed malfunction is not in the following list, do the following:
Turn the key-operated switch to "OFF".
Wait 10 seconds.
If the malfunction recurs, call Customer Service.
The warranty conditions issued by our relevant sales company apply in all countries. We shall remedy possible malfunctions on your appliance within the warranty period free of cost, provided that a material or manufacturing flaw is the cause. In a warranty case, please contact your dealer (with the purchase receipt) or the next authorised customer service site.
Further information can be found at: www.kaercher.com/dealersearch
Further warranty information (if available) can be found in the service area of your local Kärcher website under "Downloads".
A: Packaging unit, B: Quantity required by the device
Description | Part no. | Description |
|---|---|---|
Brush roller red R 65 (standard) | 4.035-604.0 | For general cleaning (will be delivered with the machine*), for all surfaces. |
Brush roller white R 65 | 6.907-770.0 | For cleaning sensitive floor coverings. |
Brush roller orange R 65 | 6.907-726.0 | With high-low structure for particularly effective cleaning of textured floor coverings. |
Brush roller green R 65 | 6.907-727.0 | For removing stubborn dirt and deep cleaning. |
Brush roller black R 65 | 6.907-728.0 | For cleaning heavily soiled floors and for deep cleaning. |
Pad roller shaft R 65 | 4.762-626.0 | Aluminum pad roller shaft suitable for holding roller pads or microfiber rollers. |
Microfibre roller R 65 | 4.114-054.0 | Ideal for fine stoneware tiles. Microfiber roller for the reliable and gentle removal of grey haze. |
Roller pad red | 6.369-456.0 | Standard pad for cleaning on unstructured floors. |
Roller pad green | 6.369-455.0 | Abrasive pad for deep cleaning and hard-sticking dirt on unstructured floors. |
A: Packaging unit, B: Quantity required by the device
Description | Part no. | Description |
|---|---|---|
Disc brush, red (medium, standard) | 4.905-010.0 | For general cleaning (will be delivered with the machine*), for all surfaces. |
Disc brush black, hard | 4.905-013.0 | For stubborn dirt and deep cleaning. Only for hard-wearing surfaces. |
Disc brush nature, soft | 4.905-012.0 | Made of natural fibers, for cleaning and polishing. |
Disc brush white | 4.905-011.0 | Very soft brushes for sensitive floors or polishing. |
Pad drive board STRONG | 4.762-590.0 | For cleaning with pads. With quick-change coupling and Centerlock. |
Pad green, medium-hard | 6.369-002.0 | For removing stubborn dirt and deep cleaning. |
Pad red, medium-soft | 6.369-003.0 | For cleaning all types of floors. |
Pad black, hard | 6.371-001.0 | For cleaning heavily soiled floors and for deep cleaning. |
General | |
Driving / cleaning speed | 6 km/h |
Transport speed | 6 km/h |
Travel speed, backwards | 4 km/h |
Theoretical surface performance | 3900 m2/h |
Theoretical area performance with side scrub deck | - m2/h |
Practical area performance | 2730 m2/h |
Fresh water tank capacity | 85 l |
Waste water tank capacity | 85 l |
Water dosing | 0-5 l/min |
Surface load (with driver and full fresh water tank) | |
Surface pressure | 1.06 N/mm2 |
Load per unit area (weight / parking area) | 1082 kg/m2 |
Dimensions | |
Length | 1490 mm |
Width | 740 mm |
Width suction bar | 850 mm |
Amount | 1390 mm |
Working Width | 650 mm |
Packaging dimensions lxwxh | 1715x1140x1625 mm |
turning circle | 1950 mm |
Dimensions battery compartment lxbxh | 540x350x290 mm |
Tyres | |
Front wheel, width | 43 mm |
Front wheel, diameter | 200 mm |
Rear wheel, width | 48 mm |
Rear wheel, diameter | 250 mm |
Weight | |
Approved total weight | 440 kg |
Net weight (transport weight) | 282 kg |
Typical operating weight | 445 kg |
Brush pressure, max. | 395 (40) N (kg) |
Brush contact pressure, max. | 16400 (167) N / m2 (g / cm2) |
Device performance data | |
Rated voltage | 24 V |
Battery capacity | 162 Ah (5 h) |
Mean power input | 2160 W |
Rated power | 2200 W |
Driving motor power | 600 W |
Suction Turbine Power | 600 W |
Brush Drive Power | 2 x 300 W |
Protection type | IPX3 |
Suction | |
Suction Power, Airflow | ~25 l/s |
Negative Pressure (max.) | ~17 (~170) kPa (mbar) |
Negative Pressure (in Operation) | ~5 (~50) kPa (mbar) |
Cleaning Brushes | |
Brush Diameter | 100 mm |
Brush rotation speed | 1200 1/min |
Environmental conditions | |
Permissible temperature range | 5...40 °C |
Water temperature max. | 50 °C |
Relative humidity | 20...90 % |
Incline | |
Max. working area slope | 10 % |
Incline short distance (max. 10 m) Transport, loading | 17.6 % |
Determined values according to EN 60335-2-72 | |
Hand-arm vibration value | <2.5 m/s2 |
Seat Vibration value | <2.5 m/s2 |
Uncertainty K | 0.2 dB(A) |
Sound pressure level LpA Eco mode | 59.2 dB(A) |
Sound pressure level LpA Normal operation | 63.6 dB(A) |
Uncertainty KpA | 1.6 dB(A) |
Sound power level LWA + Uncertainty KWA Eco mode | 74.1 dB(A) |
Sound power level LWA + Uncertainty KWA Normal operation | 78.7 dB(A) |
General | |
Driving / cleaning speed | 6 km/h |
Transport speed | 6 km/h |
Travel speed, backwards | 4 km/h |
Theoretical surface performance | 4200 ( 6 km/h x 700mm) m2/h |
Theoretical area performance with side scrub deck | - m2/h |
Practical area performance | 2940 m2/h |
Fresh water tank capacity | 85 l |
Waste water tank capacity | 85 l |
Water dosing | 0-5 l/min |
Surface load (with driver and full fresh water tank) | |
Surface pressure | 1.06 N/mm2 |
Load per unit area (weight / parking area) | 1082 kg/m2 |
Dimensions | |
Length | 1490 mm |
Width | 740 mm |
Width suction bar | 850 mm |
Amount | 1390 mm |
Working Width | 700 mm |
Packaging dimensions lxwxh | 1715x1140x1625 mm |
turning circle | 1950 mm |
Dimensions battery compartment lxbxh | 540 x 350 x 290 mm |
Tyres | |
Front wheel, width | 43 mm |
Front wheel, diameter | 200 mm |
Rear wheel, width | 48 mm |
Rear wheel, diameter | 250 mm |
Weight | |
Approved total weight | 440 kg |
Net weight (transport weight) | 282 kg |
Typical operating weight | 445 kg |
Brush pressure, max. | 375 (38) N (kg) |
Brush contact pressure, max. | 2550 (26) N / m2 (g / cm2) |
Device performance data | |
Rated voltage | 24 V |
Battery capacity | 162 Ah (5 h) |
Mean power input | 2160 W |
Rated power | 2200 W |
Driving motor power | 600 W |
Suction Turbine Power | 600 W |
Brush Drive Power | 2 x 300 W |
Protection type | IPX3 |
Suction | |
Suction Power, Airflow | ~25 l/s |
Negative Pressure (max.) | ~17 (~170) kPa (mbar) |
Negative Pressure (in Operation) | ~5 (~50) kPa (mbar) |
Cleaning Brushes | |
Brush Diameter | 355 mm |
Brush rotation speed | 140 1/min |
Environmental conditions | |
Permissible temperature range | 5...40 °C |
Water temperature max. | 50 °C |
Relative humidity | 20...90 % |
Incline | |
Max. working area slope | 10 % |
Incline short distance (max. 10 m) Transport, loading | 17.6 % |
Determined values according to EN 60335-2-72 | |
Hand-arm vibration value | <2.5 m/s2 |
Seat Vibration value | <2.5 m/s2 |
Uncertainty K | 0.2 dB(A) |
Sound pressure level LpA Eco mode | 59.2 dB(A) |
Sound pressure level LpA Normal operation | 63.6 dB(A) |
Uncertainty KpA | 1.6 dB(A) |
Sound power level LWA + Uncertainty KWA Eco mode | 74.1 dB(A) |
Sound power level LWA + Uncertainty KWA Normal operation | 78.7 dB(A) |
We hereby declare that the machine described below complies with the relevant basic safety and health requirements in the EU Directives, both in its basic design and construction as well as in the version placed in circulation by us. This declaration is invalidated by any changes made to the machine that are not approved by us.
Product: Floor cleaner
Type: 1.161-xxx
Currently applicable EU Directives2006/42/EC (+2009/127/EC)
2014/30/EU
2014/53/EU (TCU)
Harmonised standards usedEN 60335-1
EN 60335-2-29
EN 60335-2-72
EN 62233: 2008
EN 55012: 2007 + A1: 2009
EN 61000-3-2: 2014
EN 61000-3-3: 2013
EN 61000-6-2: 2005
EN 61000-6-3: 2007 + A1:2011
TCUEN 301 511 V12.5.1
EN 300 440 V2.1.1
EN 300 328 V2.2.2
EN 300 330 V2.1.1
National standards used-
The signatories act on behalf of and with the authority of the company management.

Documentation supervisor:
S. Reiser
Alfred Kärcher SE & Co. KG
Alfred-Kärcher-Str. 28 - 40
71364 Winnenden (Germany)
Ph.: +49 7195 14-0
Fax: +49 7195 14-2212
Winnenden, 2021/09/01