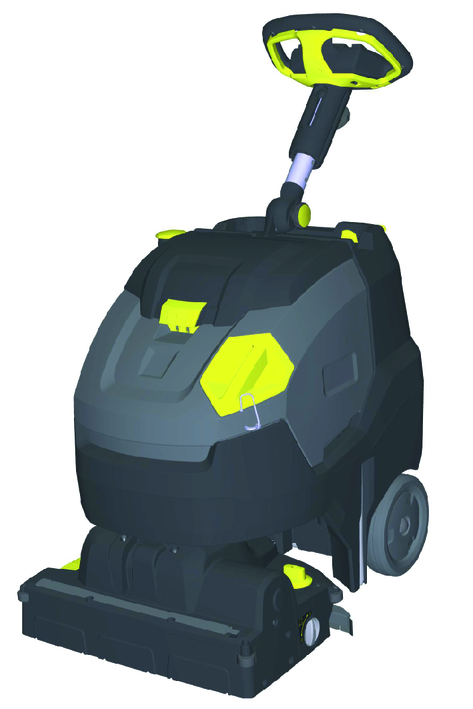
BR 45/22 C
59804190 (06/25)
59804190 (06/25)
Read these original operating instructions and the enclosed safety instructions before using the device for the first time. Proceed accordingly.
Keep both books for future reference or for future owners.
Before using the device for the first time, read and observe these operating instructions and the accompanying brochure: Safety instructions for brush cleaning devices, No. 5.956-251.0.
The device can tip over
Danger of injury
Do not operate the device on sloping surfaces.Risk of accident due to incorrect operation
People can be injured.
Operators must be properly trained on how to use this machine.The device may only be operated when the hood and all covers are closed.
Indication of an imminent threat of danger that will lead to severe injuries or even death.
Indication of a potentially dangerous situation that may lead to severe injuries or even death.
Indication of a potentially dangerous situation that may lead to minor injuries.
Indication of a potentially dangerous situation that may lead to damage to property.
A lithium-ion battery is installed in this device, which is subject to special requirements. Removal, installation and testing of defective batteries may only be carried out by Kärcher Customer Service or qualified staff.
Storage and transport instructions can be obtained from Kärcher Customer Service.
Modifications and alterations to the device are not permitted.
You must not open the battery, there is a danger of a short circuit. Irritating vapours or corrosive liquids can also escape.
Do not expose the battery to strong sunlight, heat or fire. There is a danger of explosion.
Do not operate the charger in an explosion-hazard environment.
Do not use a dirty or wet charger.
Ensure sufficient ventilation during the charging process.
Danger of explosion. Keep naked flames away from the battery or the battery charging room, and do not generate sparks or smoke in the vicinity of a battery of a battery charging room.
Danger of explosion. Do not place any tools or objects on the battery, i.e. on the end poles and cell connectors.
Check the device and the mains cable for damage before each use. Do not use damaged devices and have damaged parts repaired by qualified personnel only.
Keep children away from batteries and charger.
Do not charge damaged batteries. Have damaged batteries replaced by Kärcher customer service.
Do not throw a defective battery in the household rubbish. Inform Kärcher Customer Service.
Avoid contact with fluid leaking from defective batteries. In case of accidental contact, rinse the liquid with water. In case of contact with the eyes, consult a doctor as well.
Be sure to observe these operating instructions. Adhere to the recommendations of the legislature regarding the handling of batteries.
The mains voltage must match the voltage indicated on the type plate of the device.
Operate the battery only with this device. It is forbidden and dangerous to use it for other purposes.
The brush drive switches off when the safety switch is released.
Use the device only in accordance with the information in these operating instructions.
This device is suitable for commercial use, e.g. in hotels, schools, hospitals, factories, shops, offices, and rental companies.
Only use the device for cleaning hard surfaces that are not sensitive to moisture and polishing.
Do not use the device for cleaning frozen floors (e.g. in cold stores).
Only equip the device with original accessories and spare parts.
Only use the device for cleaning indoor floors.
 The packing materials can be recycled. Please dispose of packaging in accordance with the environmental regulations.
 Electrical and electronic devices contain valuable, recyclable materials and often components such as batteries, rechargeable batteries or oil, which - if handled or disposed of incorrectly - can pose a potential danger to human health and the environment. However, these components are required for the correct operation of the device. Devices marked by this symbol are not allowed to be disposed of together with the household rubbish.
Current information on content materials can be found at: www.kaercher.de/REACH
The warranty conditions issued by our relevant sales company apply in all countries. We shall remedy possible malfunctions on your appliance within the warranty period free of cost, provided that a material or manufacturing flaw is the cause. In a warranty case, please contact your dealer (with the purchase receipt) or the next authorised customer service site.
Further information can be found at: www.kaercher.com/dealersearch
Further warranty information (if available) can be found in the service area of your local Kärcher website under "Downloads".
The scope of delivery for the appliance is shown on the packaging. Check the contents for completeness when unpacking. If any accessories are missing or in the event of any shipping damage, please notify your dealer.
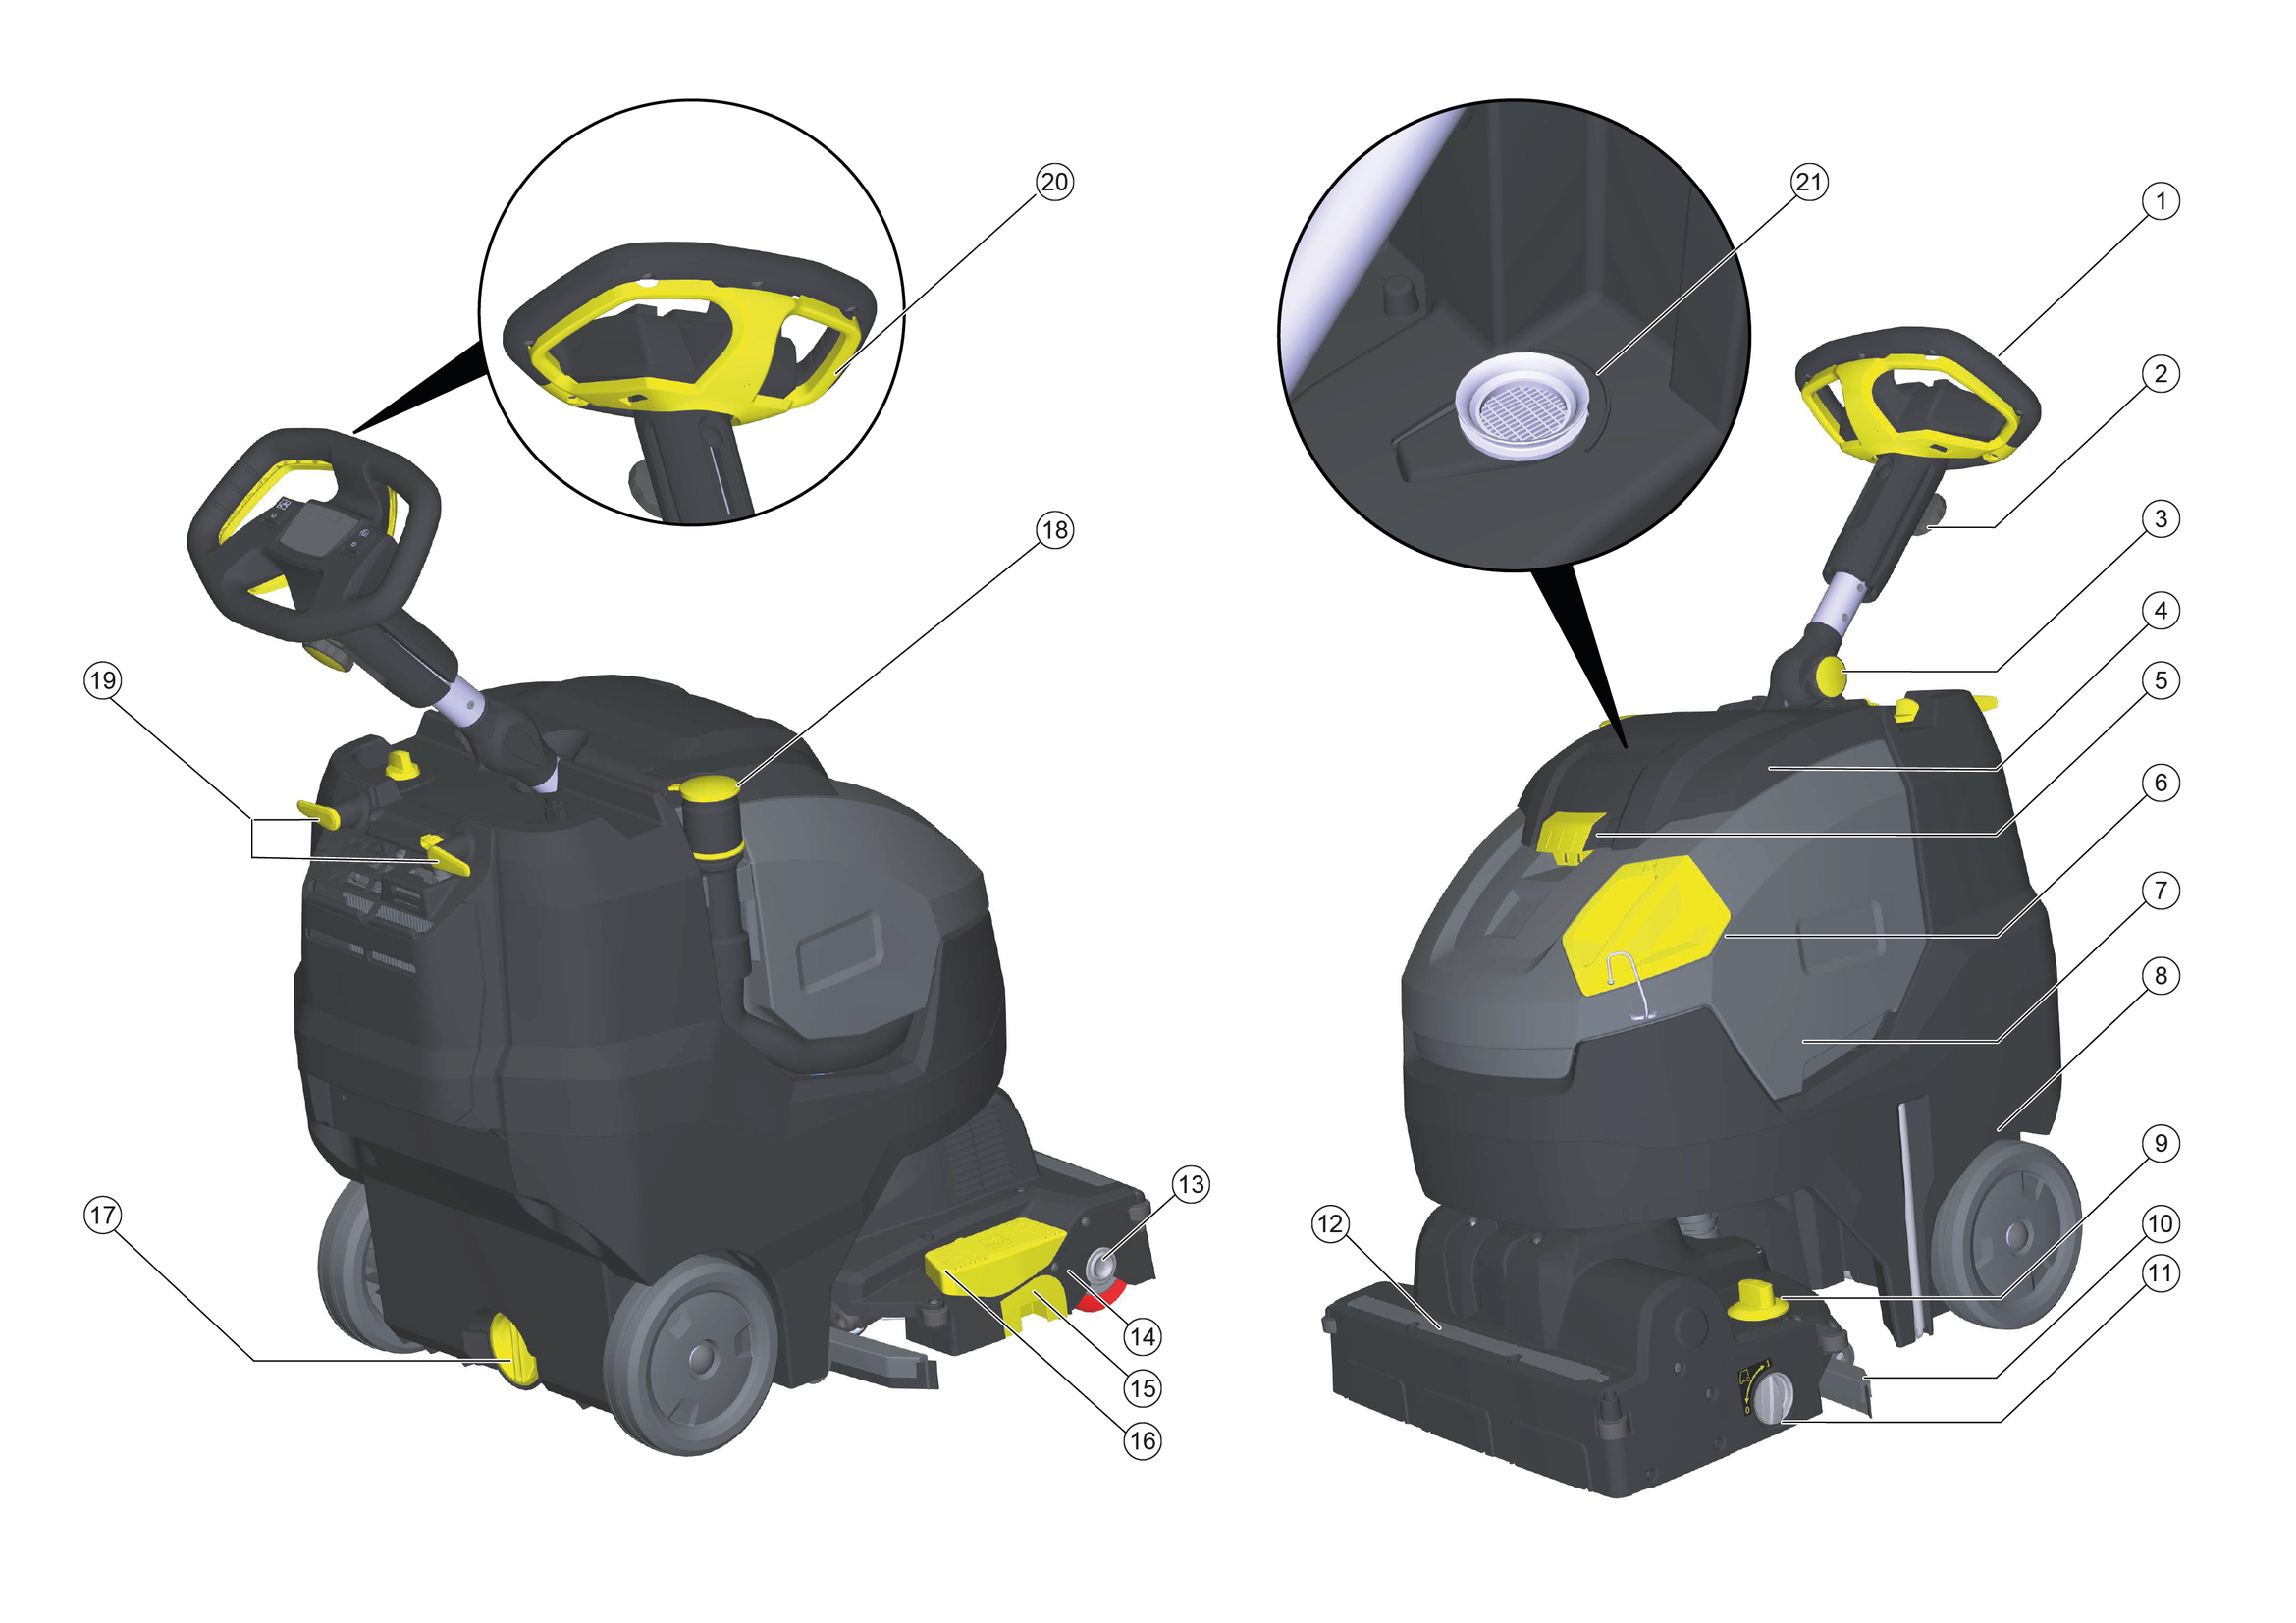
 | Fresh water filling opening |
 | Suction bar pedal |
 | Transport chassis rotary knob |
 | Guide for tie down strap during transport in vehicles |
 | Contact pressure of the roller brush |
The device has deep discharge protection, i.e. the device is switched off automatically when the permitted minimum capacity level is reached.
The charger ends the charging process automatically.
The charging time takes approx. 3.5 hours.
If necessary, the device can also be used again before the battery has been fully charged.
Plug the mains plug into a mains socket.
Release the star-knob for the transport position.
Align the steering column straight.
Tighten the star-knob.
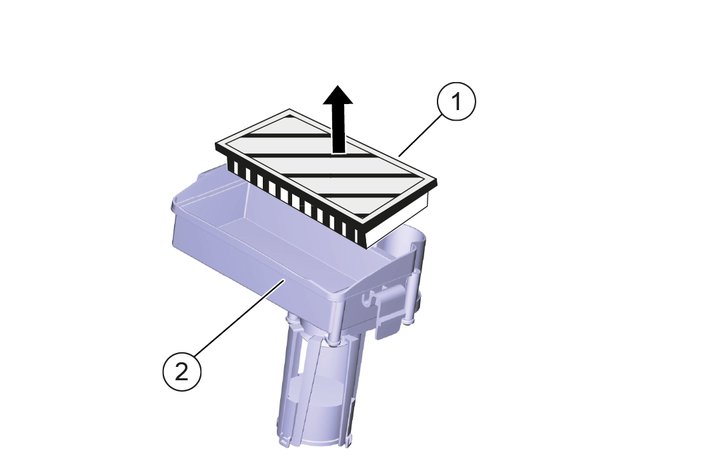
Open the waste water tank cover.
Push in both locking mechanisms and remove the filter casing.
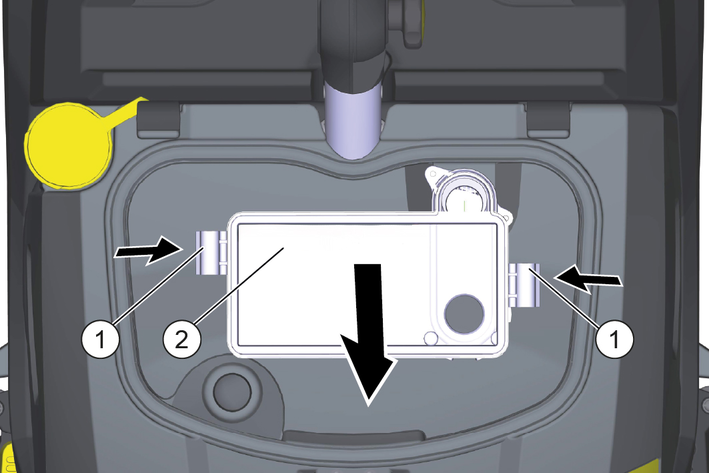
Insert the EPA filter in the filter casing.
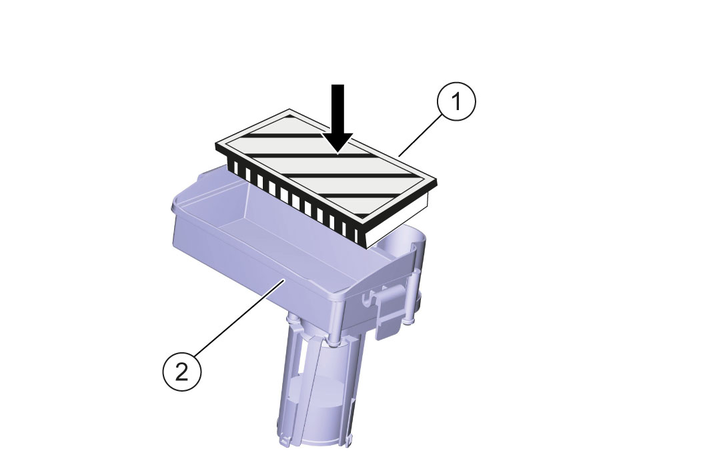
Attach the filter casing on the cover of the waste water tank and engage the locking mechanism.
Close the cover of the waste water tank.
Risk of damage
Use only recommended detergents. With other detergents, you are liable for the increased risk in terms of operational safety, risk of accident and reduced service life of the device. Use only detergents free of solvents, salt and hydrofluoric acid. Adhere to the safety instructions stated on the detergent packaging.Do not use strong foaming detergents.
Observe dosing instructions.
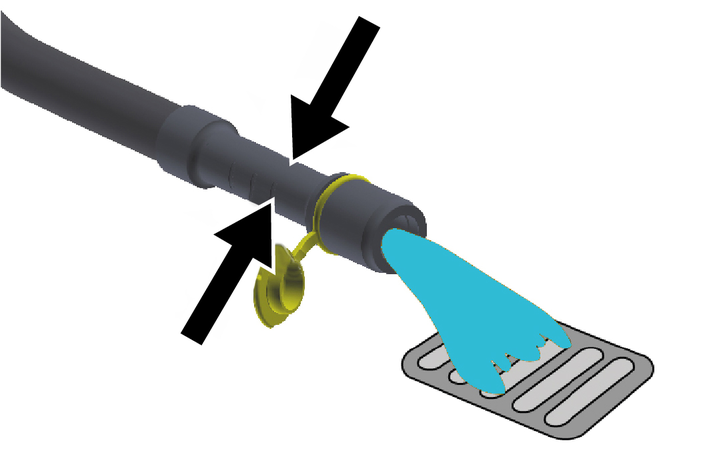
Remove dosing cap of the fresh water tank.
Fill with fresh water (max. 50 °C) and use the filler hose (accessory) if necessary.
Add detergent using the dosing cap. One capful corresponds to a 1% application.
Application | Detergent |
|---|---|
Maintenance cleaning of tiles in sanitary areas | RM 751 |
Maintenance cleaning and basic cleaning of industrial floors | RM 69 ASF |
Coating removal on all alkaline-resistant floors (e.g. PVC) | RM 752 |
Coating removal on linoleum floors | RM 754 |
Intermediate cleaning of carpets | RM 768 iCapsol |
Crystallization agent for floors containing calcium | RM 749 |
Detergents are available from specialist shops.
Close the dosing cap of the fresh water tank.
Loosen the star knob for height adjustment of the steering wheel.
Set the steering wheel to the desired height.
Tighten the star-knob.
Adjust the dosage of the cleaning solution according to the contamination and type of floor covering.
Set the twist grip for the brush contact pressure to the desired value.
Only set the brush contact pressure when the cleaning head is raised.
If the device pulls forwards too much during operation, reduce the contact pressure.
Move the Eco mode switch to the desired position.
Normal operation: The device operates at maximum brush speed and maximum suction performance.
Eco: The device works with reduced brush speed and suction performance. This also reduces energy consumption. The possible working time increases with one charging cycle.
Press the steering wheel downward so that the device lifts up towards the front.
The parking support swivels downwards.Release the steering wheel.
The device is standing on the parking support.The roller brush is unloaded and is protected from deforming.Push the device forwards.
The parking support swivels upwards.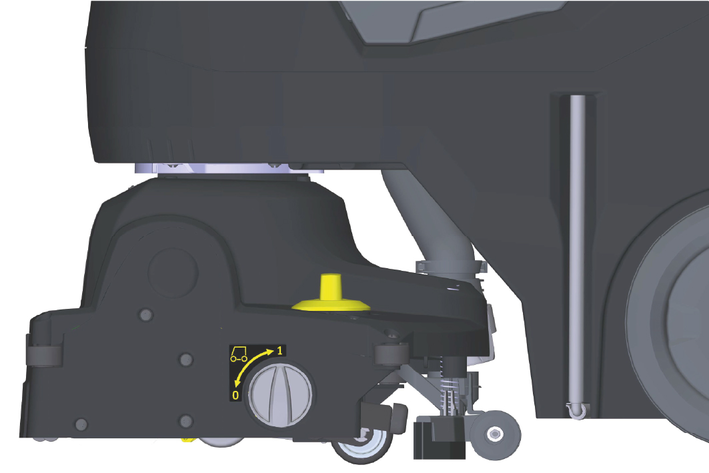
0 Transport chassis retracted
1 Transport chassis extended
Lower the parking support.
Turn the rotary knob to position 1 (transport chassis extended).
Lower the parking support.
Turn the rotary knob to position 0 (transport chassis retracted).
Risk of damage to the floor covering. Do not operate the device continuously at the same point.
Risk of damage. Lift the suction bar before pulling the device backwards for a longer distance.If the steering wheel is turned 180°, the device also reverses.
Standby mode goes off if the device is not used for 15 minutes with the power switch on.
Restoring standby mode:
Set the power switch to “0”.
Wait for a short time.
Set the power switch to the "I" position.
Let go of the safety button.
Move the device 1-2 metres forwards to suck out the residual water.
Press the suction bar lift pedal downward to raise the front suction bar.
The suction lips and brush can become permanently deformed.
Always set the device down with the parking support folded out.Set the power switch to “0”.
Press the steering wheel downward so that the device lifts up towards the front.
The parking support swivels downwards.
Environmental pollution!
Environmental pollution due to improper disposal in waste water.
Observe the local waste water treatment regulations.Retract the transport chassis.
Lift the parking support.
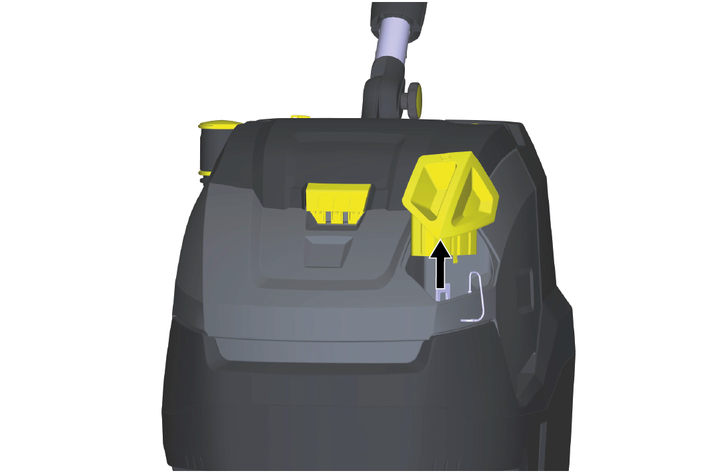
Remove the drain hose from the support and lower it over a suitable collecting device.
Press the dosing device together or kink the hose.
Open the dosing device cover.
Drain off the waste water - regulate the water quantity by pressing or bending.
Rinse the wastewater container with clear water.
Environmental pollution!
Environmental pollution due to improper disposal in waste water.
Observe the local waste water treatment regulations.Unscrew the cover from the drain opening of the fresh water tank and let the cleaning solution drain.
Danger of frost
Incompletely emptied devices can be destroyed by frost.
Completely empty the device and accessories.Protect the device from frost.Empty the fresh and dirt water tanks.
Park the device in a frost-protected room.
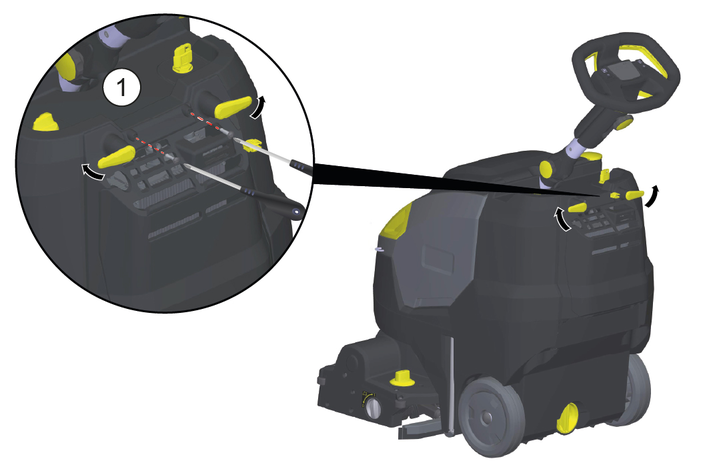
The steering column can be folded down to reduce the space required for transport and storage.
Release the star-knob for the transport position.
Pivot the steering wheel all the way forward.
Tighten the star-knob.
Risk of injury or damage due to the weight of the device!
Injury and damage.
Be aware of the weight of the device during transport and storage.Remove the brush to avoid damage to the brushes.
Lift the device using the transport handles.
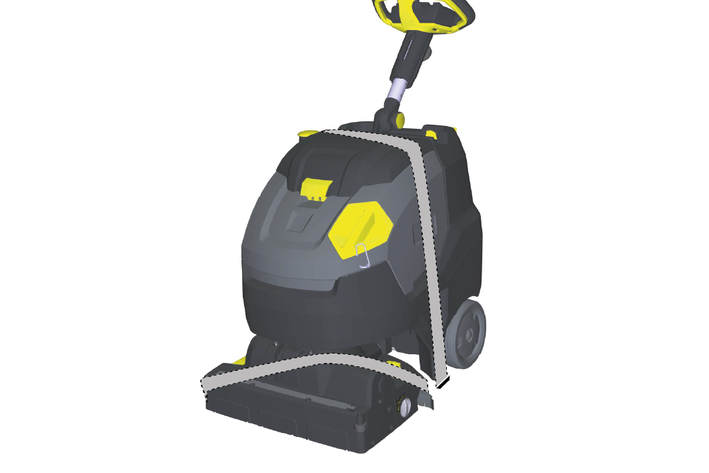
When transporting in vehicles, secure the device against slipping and tipping over according to the applicable guidelines.
Completely charge the battery prior to longer operational breaks extending over several weeks.
Set the power switch to "0".
Risk of damage to the battery
Always switch the trigger to “0” during operation breaks.Risk of injury or damage due to the weight of the device!
Injury and damage.
Be aware of the weight of the device during transport and storage.Inadvertently starting up device
Risk of injury, electric shock
Set the power switch to "0" prior to all work on the device.Pull out the charger mains plug.Risk of damage to the device due to leaking water.
Empty the waste water tank and the fresh water tank before working on the device.Park the device on a level surface.
Risk of damage.
Do not spray the device with water and do not use aggressive detergent.Drain the waste water.
Open the waste water tank cover.
Remove the EPA filter (optional) and allow it to dry outside of the device.
Rinse the inside of the cover and the float with water.
Rinse the waste water tank with clear water.
Clean the suction bar.
Remove and empty the coarse dirt receptacle.
Clean the outside of the device with a damp cloth which has been soaked in mild washing lye.
Clean the vacuum lips, check for wear and replace if required.
Clean the brush.
Check the brush for wear and tear, replace if required (see "Maintenance work").
Charge the battery if required.
Pull the water distribution strip off the cleaning head and clean the water channel.
Clean the fluff filter.
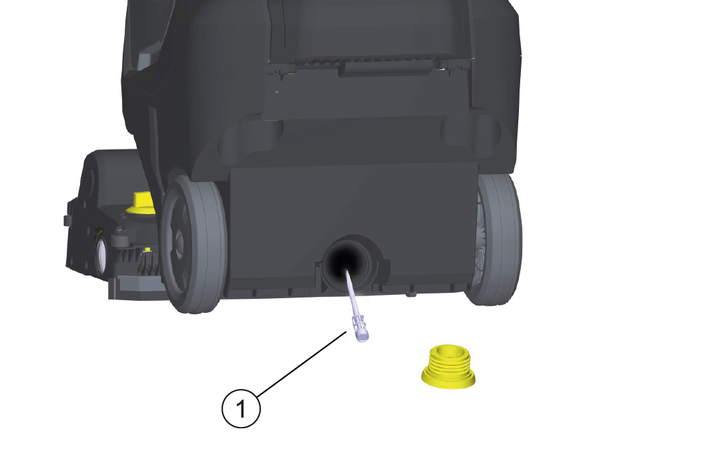
Unscrew the cover from the drain opening of the fresh water tank.
Take out the fresh water filter and rinse with clean water.
Check the condition of the seals between the waste water tank and cover, replace if required.
Have the prescribed inspection carried out by the customer service.
Press the fastening elements together and pull the suction lips downwards out of the suction bar.
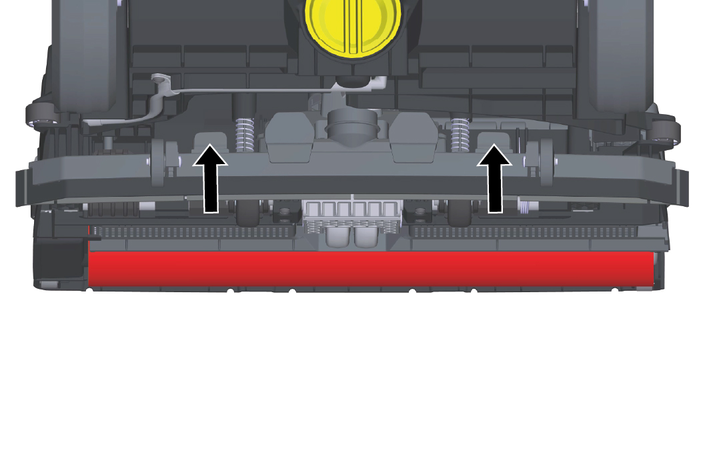

Remove the suction lips from the holder.
The suction lips cannot be confused due to the hole pattern. They cannot be turned over and reinserted.
Replace the suction lips.
Insert the holder with suction lips into the suction bar and snap into place.
Risk of crushing due to the parking support folding in during brush replacement.
Turn the steering wheel 45° to the left before commencing brush replacement.Press the roller brush unlocking button, swivel the roller brush downwards and pull it off the driver.
Fit the new roller brush onto the driver and engage on the opposite side.
To ensure a reliable operation of the device, maintenance contracts can be concluded with the competent Kärcher sales outlet.
Removing the battery
Electric shock
The removal of the battery may only be performed by Kärcher Customer Service or qualified staff. Classification as whether the battery is damaged is done by an authorised Customer Service technicianPlease refer to the chapter on handling rechargeable batteries at Battery.Unscrew the 2 screws.

Swing the cover downwards.
Release and disconnect the battery plug connector.
Remove the battery.
Dispose of the used batteries in accordance with statutory provisions.
Inadvertently starting up device
Risk of injury, electric shock
Set the power switch to "0" prior to all work on the device.Pull out the charger mains plug.Risk of damage to the device due to leaking water.
Empty the waste water tank and the fresh water tank before working on the device.Contact Customer Service in the case of malfunctions that cannot be corrected using this table.
Indicator | Malfunction | Rectification |
|---|---|---|
The brush drive indicator light flashes orange | Control is overheated | Switch off the power switch, wait a few minutes, switch on the power switch again. |
Blocked brush | Check if the roller brush is blocked by foreign bodies and remove the foreign bodies if necessary. | |
The suction indicator light flashes orange | Control is overheated | Switch off the power switch, wait a few minutes, switch on the power switch again. |
The battery status indicator flashes red | Malfunction during charging process | Unplug the mains plug of the charger. Wait 10 seconds. Reinsert the mains plug. If the malfunction is displayed again: contact customer service. |
During the charging process, the charger flashes alternately between Charging and Error. | Temperature too high during charging. | Keep the mains plug of the charger plugged in. The charging process starts automatically as soon as the temperature has dropped. |
Eco mode indicator light flashing blue | Battery capacity nearly exhausted, device working at reduced power. | Charge the battery. |
Malfunction | Rectification |
|---|---|
Device does not start | Turn on the device switch, wait 3 seconds, check the battery charging state. |
Low water quantity | Check fresh water level, top up tank if necessary. |
Turn on the cleaning solution switch. | |
Clean the fresh water filter. | |
Pull the water distribution strip off the cleaning head and clean the water channel. | |
Poor suction performance | Lower the suction bar. |
Empty the waste water tank. | |
Clean the seals between the waste water tank and cover and check for tightness, replace if required. | |
Clean the vacuum lips on the suction bar, turn or replace if required. | |
Check the suction hose and suction bar for clogging and remove any clogging if necessary. | |
Check the suction hose for leaks; clean if necessary. | |
EPA filter (optional) soiled, replace. | |
Unsatisfactory cleaning result | Retract the transport chassis. |
Check/set the brush contact pressure. | |
Check the suitability of the brush type and detergent used. | |
Check the brushes for wear and tear, replace if required. | |
Brush does not rotate | Pull the safety button towards the steering wheel. |
Check if the roller brush is blocked by foreign bodies and remove the foreign bodies if necessary. Turn off the brush drive switch, wait briefly, turn on the switch again. |
Only use original accessories and original spare parts. They ensure that the appliance will run fault-free and safely.
Information on accessories and spare parts can be found at www.kaercher.com.
Description | Part no. | Description |
|---|---|---|
Roller brush, white (soft) | 4.762-405.0 | For polishing floors |
Roller brush, red (medium, standard) | 4.762-392.0 | For cleaning lightly soiled or sensitive floors. |
Roller brush, green (hard) | 4.762-407.0 | For cleaning heavily soiled floors. |
Roller brush, orange (high / low) | 4.762-406.0 | For scrubbing structural floors (safety tiles, etc.) |
Microfiber roller | 4.037-093.0 | Especially for fine stone tiles, microfibre cleaning brush with particularly high cleaning performance |
Pad roller shaft | 4.762-413.0 | For holding roller pads |
Roller pad, red (medium) | 6.367-107.0 | For cleaning lightly soiled floors. |
Roller pad, green (hard) | 6.367-106.0 | For cleaning normal to heavily soiled floors. |
Roller pad, yellow (soft) | 6.367-105.0 | For polishing floors |
Filler hose | 6.680-124.0 | For filling the fresh water tank |
Suction lip set | 4.037-094.0 | As a replacement |
EPA filter | 6.414-631.0 |
Device performance data | |
Rated voltage | 25,2 V |
Battery capacity | 30 Ah (5 h) |
Battery type | Li-ion |
Mean power input (Power/Eco) | 650/350 |
Suction Turbine Power | 280 W |
Brush Drive Power | 185 W |
Protection type | IPX3 |
Protection class | 1 |
Theoretical surface performance | 1800 m2/h |
Fresh water tank capacity | 22 l |
Waste water tank capacity | 22 l |
Water temperature max. | 50 °C |
Suction | |
Suction performance, air quantity Power/Eco | 20/15 l/s |
Suction performance, vacuum Power/Eco | 8/5 kPa |
Cleaning Brushes | |
Working Width | 450 mm |
Brush Diameter | 96 mm |
Brush speed Power/Eco | 1050/750 1/min |
Charger | |
Mains voltage | 220...240 V |
Frequency | 50-60 Hz |
Power input | 300 W |
Environmental conditions | |
Permissible temperature range | 2...40 °C |
Dimensions and weights | |
Length x width x height (transport) | 866x530x1061 mm |
Approved total weight | 65 kg |
Net weight (transport weight) | 43 lbs (kg) |
Determined values according to EN 60335-2-72 | |
Hand-arm vibration value (position 1) | 0,5 m/s2 |
Hand-arm vibration value (position 2) | 0,5 m/s2 |
Uncertainty K | 0,2 m/s2 |
Sound level LpA | 63 dB(A) |
Uncertainty KpA | 2 dB(A) |
Sound power level LWA + Uncertainty KWA | 85 dB(A) |
We hereby declare that the machine described below complies with the relevant basic safety and health requirements in the EU Directives, both in its basic design and construction as well as in the version placed in circulation by us. This declaration is invalidated by any changes made to the machine that are not approved by us.
Product: Scouring and vacuum machine
Type: 1.783-xxx
Currently applicable EU Directives2006/42/EC (+2009/127/EC)
2014/30/EU
2011/65/EU
2014/53/EU (TCU)
Harmonised standards usedEN 60335-1
EN 60335-2-72
EN 60335-2-29
EN 55012: 2007 + A1: 2009
EN 55014-1: 2006+A1: 2009+A2: 2011
EN 55014-2: 1997+A1: 2001+A2: 2008
EN 61000-3-2: 2014
EN 61000-3-3: 2013
EN 61000-6-2: 2005
EN 62233: 2008
EN IEC 63000: 2018
National standards usedTCUEN 301 511 V12.5.1
EN 300 440 V2.1.1
EN 300 328 V2.2.2
EN 300 330 V2.1.1
The signatories act on behalf of and with the authority of the company management.

Documentation supervisor:
S. Reiser
Alfred Kärcher SE & Co. KG
Alfred-Kärcher-Str. 28 - 40
71364 Winnenden (Germany)
Ph.: +49 7195 14-0
Fax: +49 7195 14-2212
Winnenden, 2021/02/01
2-2-SC-A4-GS-AW19869